Google Workspace Backup
下記に該当する質問がない場合は、サポートフォームよりお問い合わせください。折り返しご連絡いたします。
一般
- IDrive® 360 Google Workspace Backupとは何ですか?
- なぜGoogle Workspaceのバックアップが必要ですか?
- IDrive® 360 Google Workspace Backupとリストアで対応しているGoogle Workspaceアプリケーションはどれですか?
- IDrive® 360 Google Workspace Backupに制限はありますか?
- IDrive® 360 Google Workspace BackupでShared Drivesはバックアップされますか?
- IDrive® 360 Google Workspace Backupの利用開始方法は?
- IDrive® 360で個人のGoogleアカウントをバックアップできますか?
- IDrive® 360個人Googleアカウントバックアップの制限はありますか?
- IDrive® 360 Google Workspaceで新しいドメインを追加・管理する方法は?
- IDrive® 360 Google Workspace Backupでドメイン名を変更できますか?
- バックアップしたGoogle Workspaceデータにどこからでもアクセスできますか?
- バックアップ保存先のリージョンはいくつありますか?
- IDrive® 360 Google Workspace Backupはどのようにデータを保護しますか?
- IDrive® 360 Google Workspace BackupはHIPAA準拠要件をどのように満たしていますか?
- データのエクスポートやリストア時にIPアドレスの信頼を求められる理由は?
- Google Drive上のファイルサイズよりバックアップファイルサイズが大きい理由は?
- Google Workspace Business/Enterprise - Archive User Licenceのユーザーをバックアップできますか?
- 「Error:"unauthorized_client", Description:"Client is unauthorized to retrieve access tokens using this method, or client not authorized for any of the scopes requested.", Uri:"".. .」というエラーが出た場合の対処方法は?
バックアップ
- IDrive® 360 Google Workspace Backupはどのようにバックアップを実行しますか?
- IDrive® 360 Google Workspace Backupのバックアップスケジュールはどのようになっていますか?
- バックアップ済みファイルの変更はIDrive® 360 Google Workspace Backupに増分転送されますか?
- IDrive® 360 Google Workspace Backupアカウントで特定ユーザーのDrive、Gmail、カレンダー、連絡先データをバックアップする方法は?
- IDrive® 360 Google Workspace Backupアカウントで特定ユーザーのShared Drivesデータをバックアップする方法は?
- IDrive® 360 Google Workspace Backupのスナップショットとバージョン管理の仕組みは?
- ダッシュボードのOverviewタブでどんな情報が確認できますか?
シート管理
- シートとは何ですか?
- シート管理で利用できるユーザー管理ツールは何ですか?
- ユーザーのシートステータスを変更する方法は?
- IDrive® 360 Google Workspace Backupセットにユーザーを追加する方法は?
- IDrive® 360 Google Workspace Backupセットにユーザーを再追加する方法は?
- ユーザーやShared Drivesのバックアップ状況を確認する方法は?
- Google OU単位でシート管理は可能ですか?
リカバリー
- IDrive® 360 Google Workspace Backupアカウントで特定ユーザーのDriveやShared Drivesデータをリストアする方法は?
- IDrive® 360 Google Workspace Backupアカウントで特定ユーザーのGmailデータをリストアする方法は?
- IDrive® 360 Google Workspace Backupアカウントで特定ユーザーのカレンダーイベントをリストアする方法は?
- IDrive® 360 Google Workspace Backupアカウントで特定ユーザーの連絡先をリストアする方法は?
- IDrive® 360 Google Workspace Backupアカウントで特定アイテムを検索できますか?
- IDrive® 360 Google Workspace Backupで特定のファイルやフォルダーを検索する方法は?
- IDrive® 360 Google Workspaceアカウントで進行中のリストアをキャンセルする方法は?
- IDrive® 360 Google Workspace Backupアカウントからバックアップ済みGoogle Workspaceデータをエクスポートする方法は?
- IDrive® 360 Google Workspace Backupアカウントでエクスポートやリストア時に利用できる検索語句は?
- バックアップ済みメールの内容をプレビューできますか?
- IDrive® 360 Google Workspaceバックアップから破損したファイルやフォルダーをリストアできますか?
アクティビティログ
- IDrive® 360 Google Workspace Backupアカウントのアクティビティログはどこで確認できますか?
- IDrive® 360 Google Workspace Backupのシステムアクティビティログレポートを確認する方法は?
- IDrive® 360 Google Workspace Backupの管理者アクティビティログレポートを確認する方法は?
- IDrive® 360 Google Workspace Backupの全イベントアクティビティログレポートを確認する方法は?
IDrive® 360 Google Workspace Backupとは何ですか?
IDrive® 360 Google Workspace Backupは、Google Workspaceデータの包括的なバックアップ、エクスポート、リストアを提供するクラウドバックアップ・リカバリーサービスです。IDrive® 360 Google Workspace Backupは、誤ってデータを削除した場合やサイバー攻撃、ランサムウェアによる暗号化などからデータを守るための追加のセキュリティ層を提供します。
なぜGoogle Workspaceのバックアップが必要ですか?
Google Workspaceの共有責任モデルによると、Googleはプラットフォームの大部分のセキュリティとサービス稼働時間のみを担当しています。データの損失から守る責任はユーザー自身にあります。
また、Google VaultやGoogle Adminなどの標準ツールはデータのアーカイブや部分的なリカバリーしか提供していません。バックアップやバージョン管理、ポイントインタイムでのデータ復元の機能がないため、人的ミスやマルウェア、ハードウェア障害によるデータ損失のリスクがあります。信頼できる第三者バックアップ・リカバリーソリューションでGoogle Workspaceデータを保護することが重要です。
IDrive® 360 Google Workspace Backupとリストアで対応しているGoogle Workspaceアプリケーションはどれですか?
IDrive® 360 Google Workspace Backupは、Gmail、Google Drive、Google Shared Drives、Google Contacts、Google Calendarのバックアップに対応しています。
アプリケーションでバックアップ・リストアできるデータの概要は以下の通りです。
Gmail
- ユーザー名やメールアドレスでデータ検索
- 特定データ、ラベル、個別メッセージのバックアップ・リカバリー
- ラベル全体やメールボックス全体のバックアップ・リストア
Google Drive
- My Driveのデータのバックアップ、検索、エクスポート、リカバリー
- Shared Drivesに含まれるアイテムのバックアップ
- IDrive® 360 Google Workspace Backupは現在、Googleドキュメント、Googleスプレッドシート、Googleスライド、Google図形描画に対応しています。
Google Contacts
全連絡先や個別の連絡先カードのバックアップ、エクスポート、リストアが可能です。
Google Calendar
カレンダー全体や個別のカレンダーイベントのバックアップ、エクスポート、リストアが可能です。
IDrive® 360 Google Workspace Backupに制限はありますか?
IDrive® 360 Google Workspace Backupは、現バージョンでバックアップできるデータ種別に以下の制限があります。
Google Contacts
- 外部連絡先プロファイル(ディレクトリプロファイル、Googleプロファイル)はバックアップ対象外です。
- その他の連絡先フォルダーとディレクトリフォルダーはバックアップ対象外です。
- 2025年6月9日以降に追加された連絡先のプロフィール写真のみGoogle Contactsでバックアップされます。
Google Calendar
- タスク、リマインダー、予約枠、イベント会議フィールド、イベントに添付されたフォルダーはバックアップ対象外です。
- 自動承認された招待はバックアップ対象外です。
Google Photos
- Google Photosに保存された写真や動画はバックアップできません。
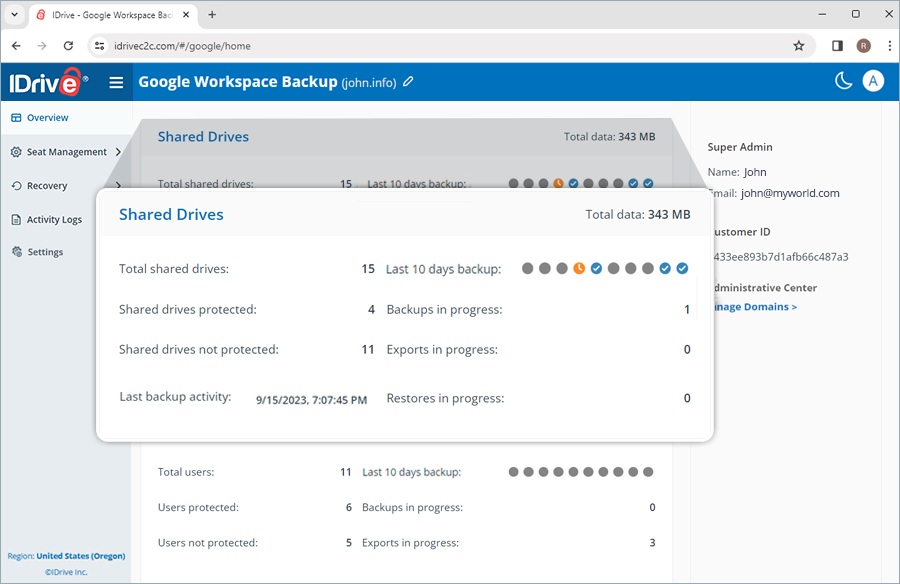
IDrive® 360 Google Workspace BackupでShared Drivesはバックアップされますか?
はい。IDrive 360® Google Workspace Backupは、Google Workspaceアカウント内のすべてのGoogle Shared Drivesを自動的に検出し、バックアップします。これは、スーパー管理者がアクセスできるShared Drivesだけでなく、アクセスできないShared Drivesも含まれます。
IDrive® 360 Google Workspace Backupの利用開始方法は?
利用開始手順は以下の通りです。
- IDrive® 360アカウントにログインします。
- Google Workspaceをクリックします。
- Google Workspaceバックアップを有効化したい会社を選択します。
- 有効化をクリックします。
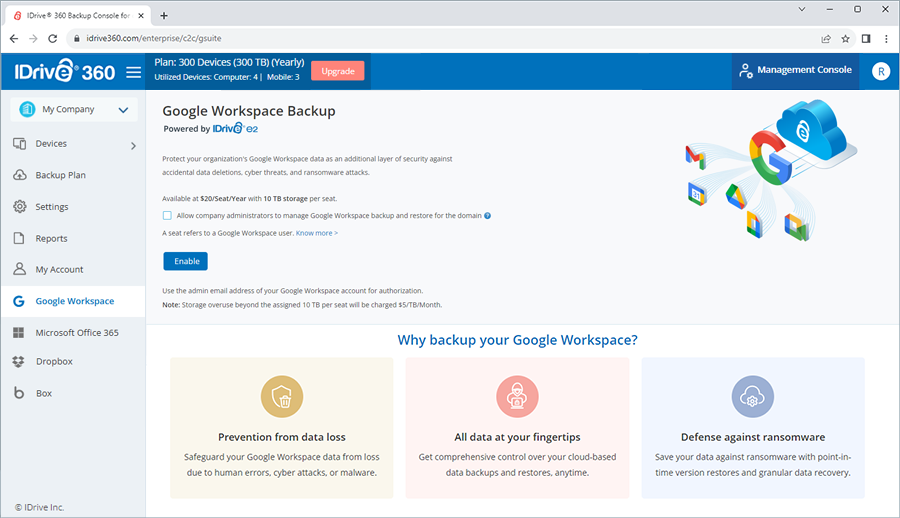
- Google Workspaceバックアップの保存先リージョンをドロップダウンリストから選択します。
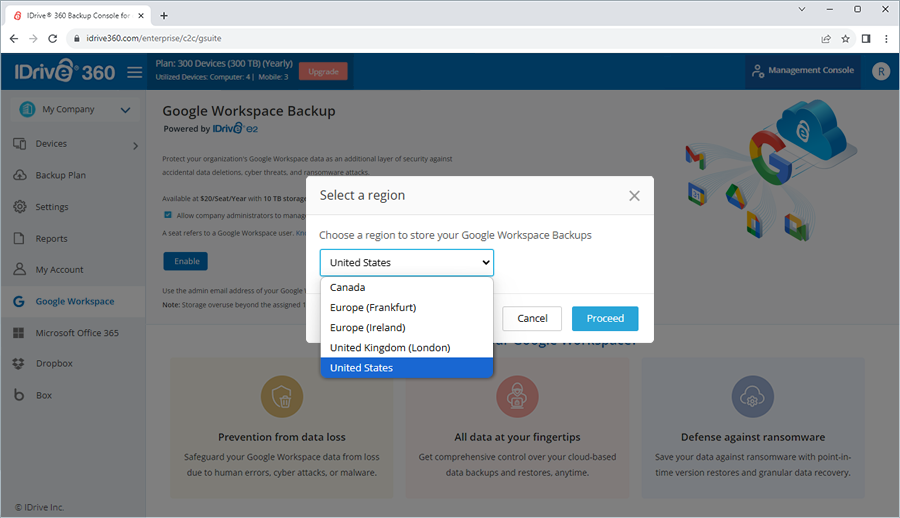
- 進むをクリックします。
- Googleアカウント接続ページでGoogle Workspace Backupに進みます。
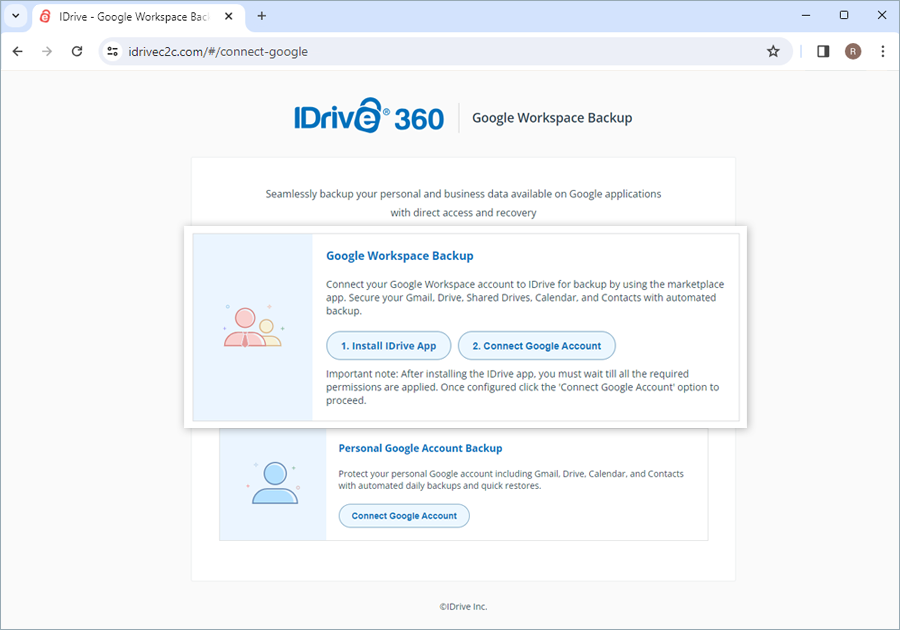
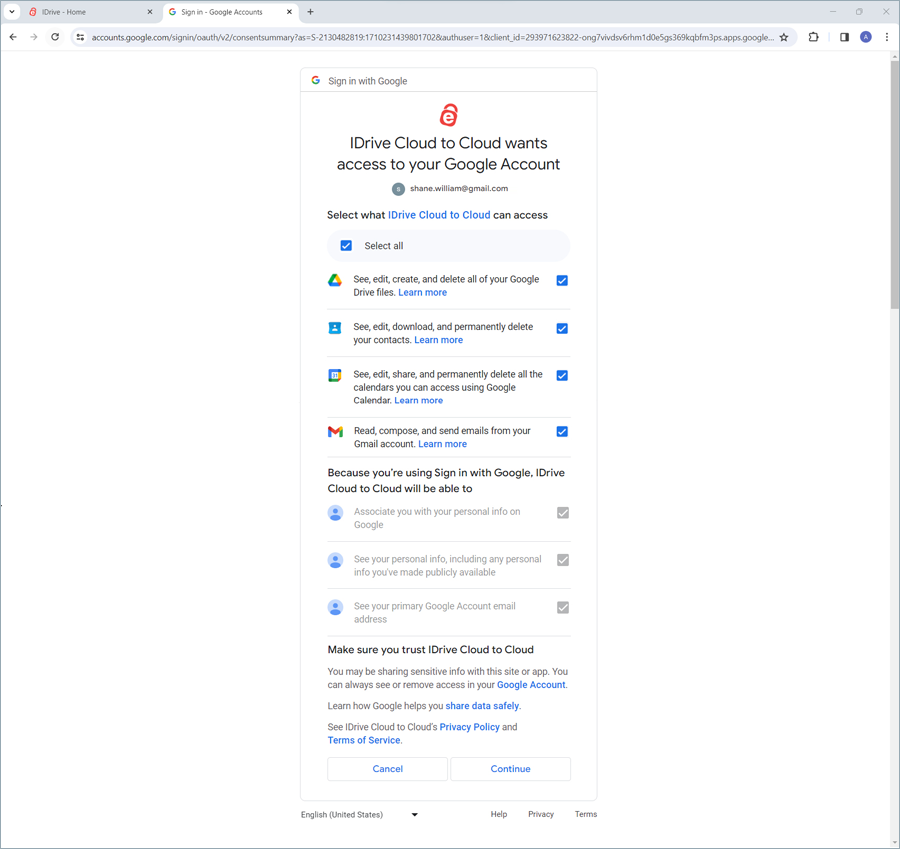
- Google Workspaceアカウントを接続するには、Google Workspaceアカウントのスーパー管理者が次の2つの手順を行う必要があります。
- a. IDriveアプリをインストールをクリックし、Google Workspace Marketplaceからアプリをインストールします。
インストール完了後、すべての権限が適用されるまで待ちます。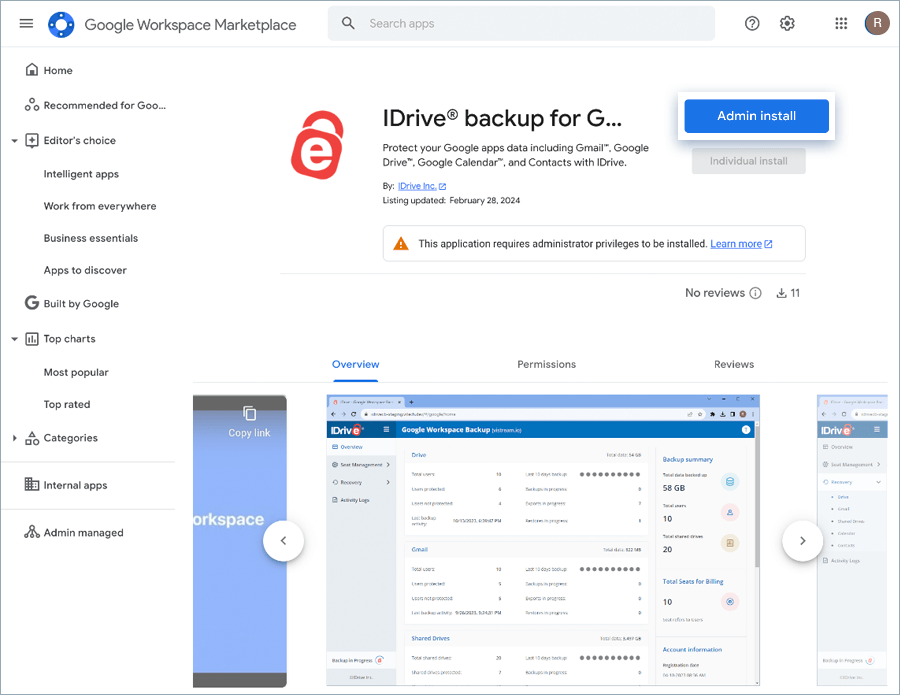
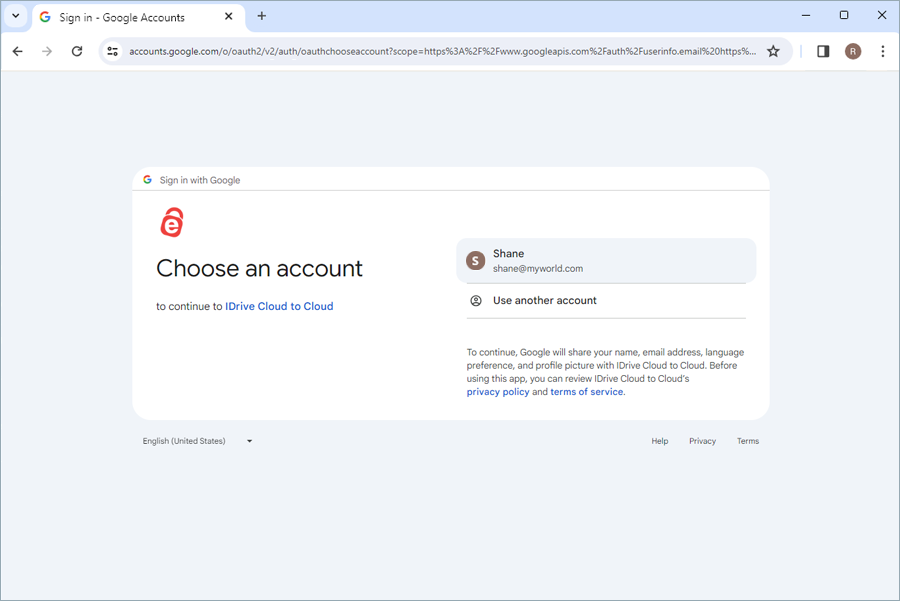
- b. 設定が完了したら、アカウント接続ページに戻り、Googleアカウントを接続をクリックします。
- a. IDriveアプリをインストールをクリックし、Google Workspace Marketplaceからアプリをインストールします。
- 接続したいアカウントをクリックすると、Google Workspace Backupアカウントのダッシュボードにリダイレクトされます。
Google Workspaceアカウントは自動的にIDriveと同期され、ユーザーデータが画面に表示されます。ウェブコンソールから、Google Workspaceアカウント内の全ユーザーやドライブのバックアップ、エクスポート、リストア管理が可能です。
注: Company Administrator Accessのチェックボックスを選択すると、その会社の管理者はドメインの設定やログインはできますが、管理はできません。
IDrive® 360で個人のGoogleアカウントをバックアップできますか?
はい、IDrive® 360は個人のGoogleアカウントのバックアップに対応しており、Gmail、ドライブ、カレンダー、連絡先を保護できます。
- IDrive® 360アカウントにログインします。
- Google Workspaceをクリックします。
- 有効化をクリックします。
- Googleアカウント接続ページで、個人用Googleアカウントバックアップの下にあるGoogleアカウントを接続をクリックします。
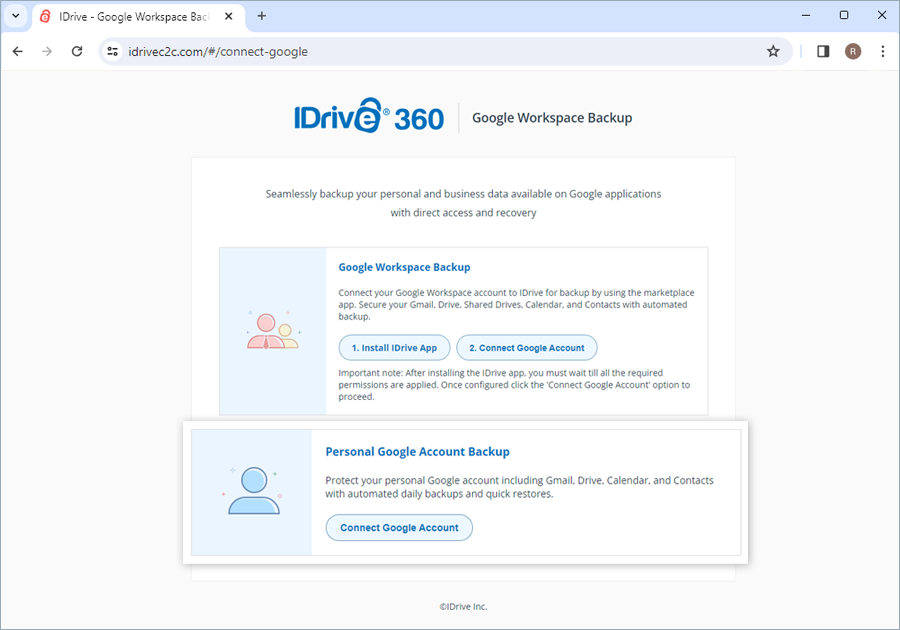
- 接続したいGoogleアカウントを選択し、すべて選択をクリックしてアクセス許可を付与します。これはバックアップを正常に実行するために必要です。
個人のGoogleアカウントは自動的にIDrive® 360と同期され、バックアップが実行されます。
IDrive® 360個人Googleアカウントバックアップの制限はありますか?
IDrive® 360個人Googleバックアップは、現バージョンでバックアップできるデータ種別に以下の制限があります。
Google Drive:読み取り専用権限の「自分と共有」データはバックアップから除外されます。
Google Photos:Google Photosに保存された写真や動画はバックアップできません。
Google Calendar:以下の項目はバックアップから除外されます:
- タスク
- リマインダー
- 予約枠
- イベント会議フィールド
- イベントに添付されたフォルダー
- 自動承認された招待
Google Contacts:以下の項目はバックアップから除外されます:
- 外部連絡先プロファイル(ディレクトリプロファイル、Googleプロファイルなど)
- その他の連絡先フォルダー
- ディレクトリフォルダー
- 2025年6月9日より前に追加された連絡先のプロフィール写真
これらの除外項目は、個人Googleバックアップの設定や管理を行う際に注意すべき重要な点です。
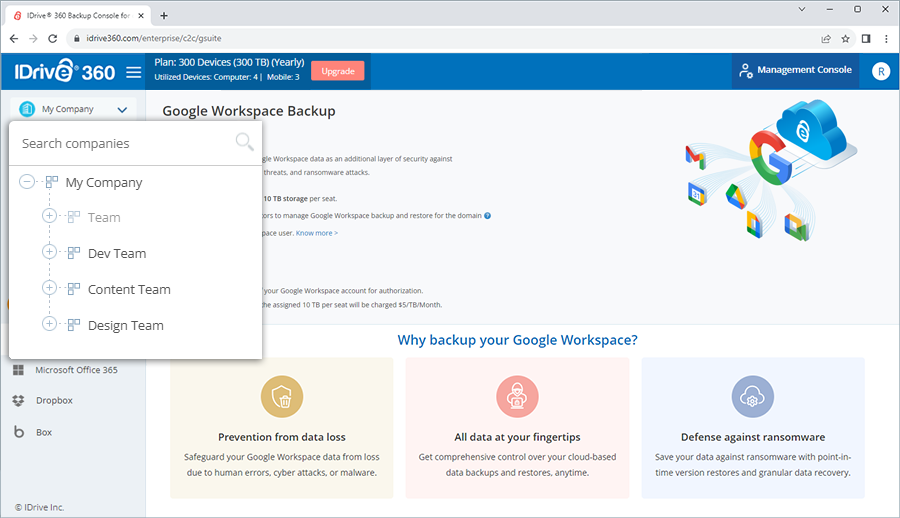
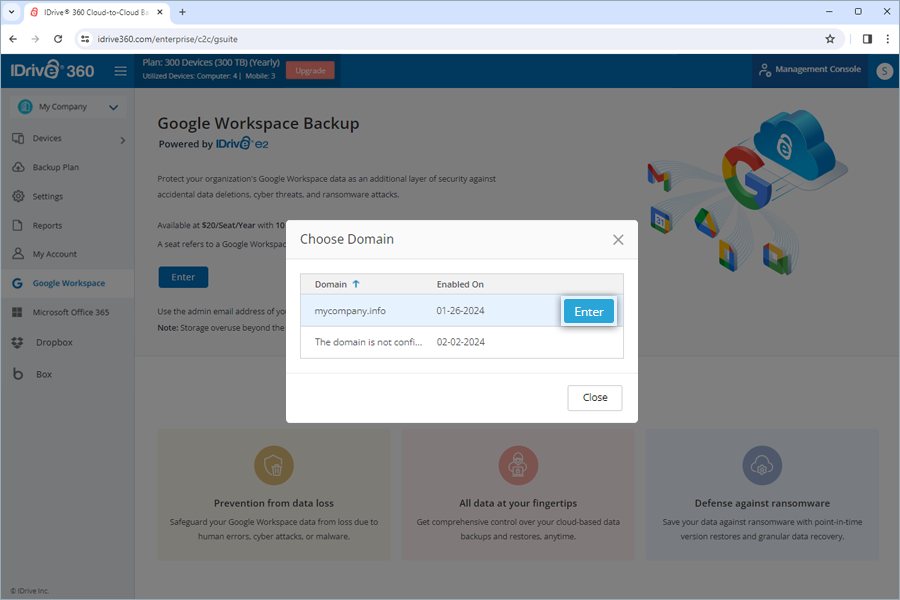
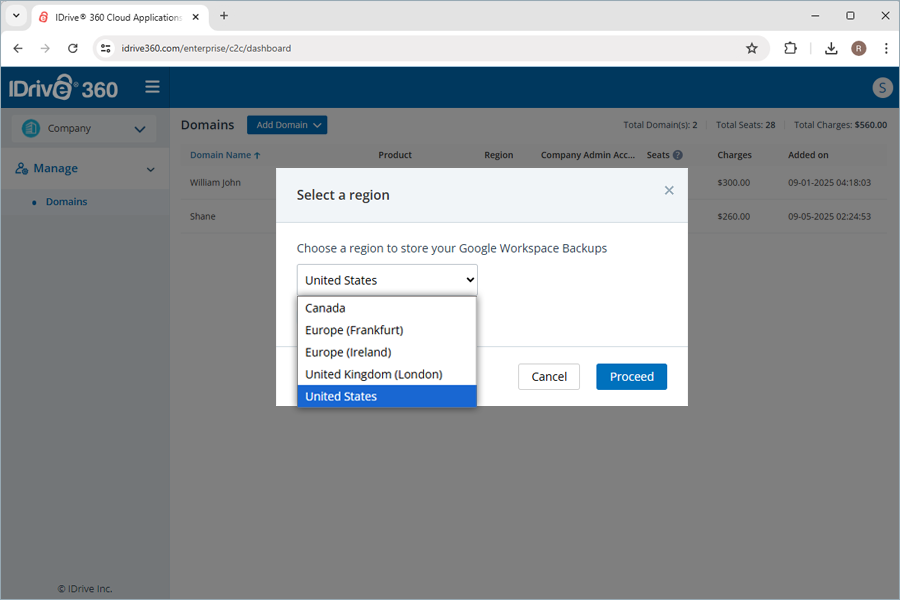
IDrive® 360 Google Workspaceで新しいドメインを追加・管理する方法は?
新しいドメインを追加するには、まずIDrive® 360 Google Workspace Backupを有効化している必要があります。
- Google Workspace BackupでEnterをクリックします。
- Choose Domainポップアップで、リスト上にマウスを置いてドメインを選択します。
- a. Configureをクリックします。
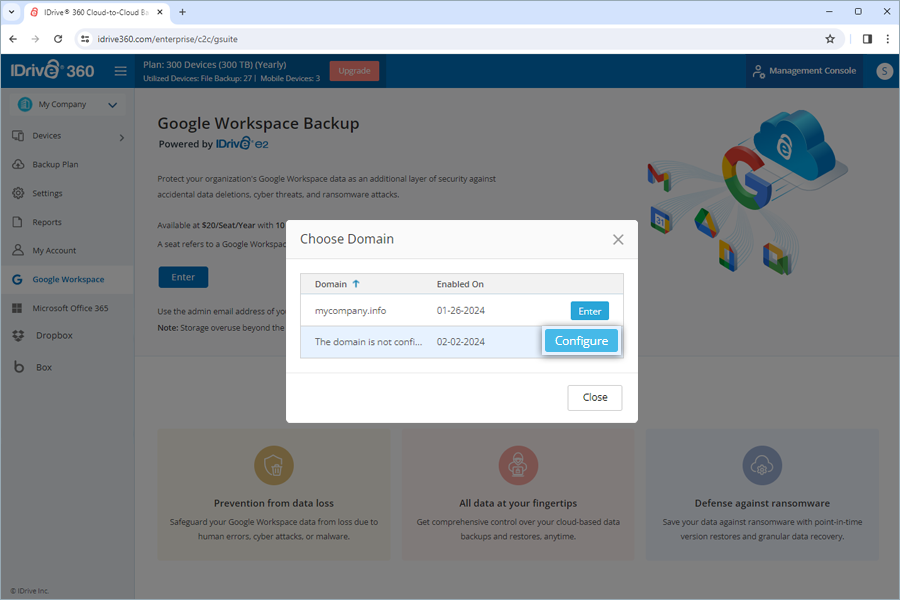
- b. Googleアカウント接続ページでGoogle Workspace Backupを選択します。
- c. Google WorkspaceアカウントのスーパーAdministratorが、Google MarketplaceからIDriveアプリをインストールする必要があります。インストール完了後、すべての権限が適用されるまで待ちます。
- d. 設定完了後、IDriveに戻りConnect Google Accountをクリックします。
- e. 接続したいアカウントをクリックします。IDrive Google Workspace Backupアカウントのダッシュボードにリダイレクトされます。
- a. Choose DomainポップアップでEnterをクリックします。Google Workspace Backupダッシュボードにリダイレクトされます。
- Overviewタブで、Administrative Center > Manage Domainsに進みます。
- DomainsページのManageでAdd Domainをクリックします。
- Google Workspace Backupを選択します。
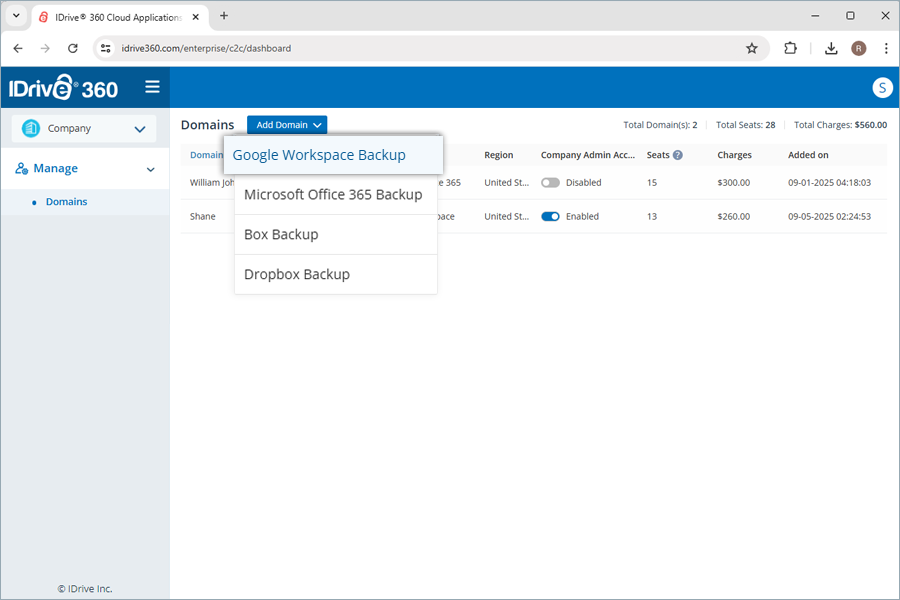
- Google Workspaceバックアップを保存するドロップダウンリストからRegionを選択します。
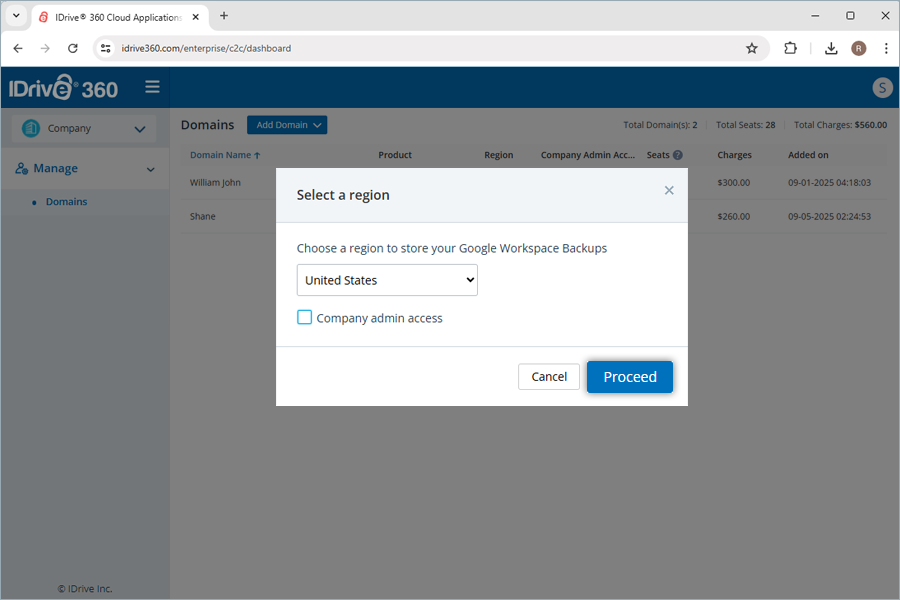
- Proceedをクリックし、上記の手順に従って有効化・設定を行います。
有効化されているが設定されていないドメインの場合:
有効化され設定済みのドメインの場合:
ドメインに入るまたは削除するには、対象ドメインにマウスを置いてEnterまたはRemoveをクリックします。
注:
- 以前に有効化したドメインを設定する前に、より多くのドメインを入力することはできません。
- 各ドメインはシートとして課金されます。
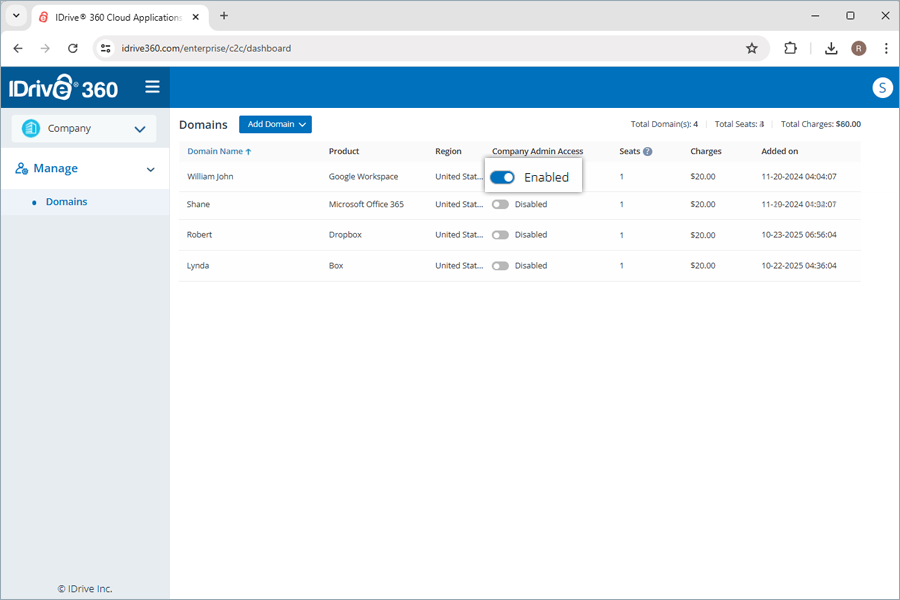
- アカウント所有者の場合、設定済みの各ドメインには、Company Administratorアクセスを許可または取り消すためのトグルボタンが付きます。有効にすると、Company Administratorはそのドメインを設定してログインできますが、管理権限は持ちません。
IDrive® 360 Google Workspace Backupでドメイン名を変更できますか?
はい、IDrive® 360 Google Workspace Backupでドメイン名を変更できます。
名前を変更するには、
- IDrive® 360 Google Workspace Backupドメイン名の隣にある
 をクリックします。
 - Edit Detailsポップアップが開きます。
- 名前を編集し、Saveをクリックします。
または、Account Information > ProviderでEdit domainをクリックしてドメイン名を変更することもできます。
バックアップしたGoogle Workspaceデータにどこからでもアクセスできますか?
はい。Drive、Gmail、Shared Drives、カレンダー、連絡先のバックアップデータは、ウェブコンソールからどこからでもアクセスできます。同様に、バックアップやリストア操作もウェブ経由でどこからでも管理できます。
- 概要: ユーザーアカウントや、Drive、Gmail、Shared Drives、連絡先、カレンダー全体のバックアップ・エクスポート・リストアの概要を確認できます。
- シート管理: Google Workspace全体のユーザーアカウントやShared Drivesの追加・表示・管理ができます。

- リカバリー: アカウント全体のアクティビティログを表示できます。
- アクティビティログ: アカウント全体のアクティビティログを表示できます。
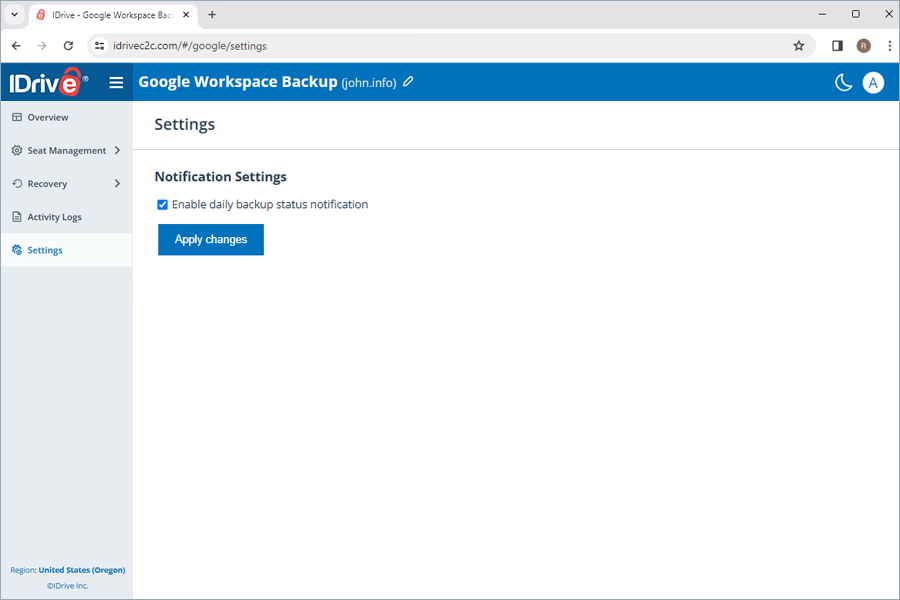
- 設定: バックアップ完了・失敗・進行中の通知メールを受信するためのステータス通知を有効化できます。
ウェブコンソールには以下のセクションがあります:
現在、データ保存先として選択できるリージョンは、オレゴン(米国)、アイルランド(EU)、フランクフルト(EU)、ロンドン(英国)、カナダです。Google Workspaceバックアップの有効化時にリージョンを選択できます。
IDrive® 360 Google Workspace Backupはどのようにデータを保護しますか?
IDrive® 360 Google Workspaceは、以下の方法でデータセキュリティを重視しています。
自動バックアップ
データは1日3回自動的にバックアップされ、重要なビジネスデータを定期的かつ確実に保護します。
- IDrive® 360 Google Workspace Backupは、最高水準のデータセンターでデータを保管し、転送・保存の両方で業界標準の256ビットAES暗号化を適用しています。
- Google Workspaceからの認証済みデータ送信やユーザー操作は、TLS 1.2暗号化接続で処理されます。
- IDrive® 360は、パスワード不要の0Auth認証でGoogle Workspaceユーザーアカウントを検証します。
多層的なデータセキュリティ
ビジネスコンプライアンス
IDrive® 360は、運用・ソフトウェア・インフラ全体でデータ管理対策を実施し、HIPAA、SOX、GLBA、SEC/FINRA、PCI DSSなど各種規制基準への対応を支援します。
IDrive® 360 Google Workspace BackupはHIPAA準拠要件をどのように満たしていますか?
IDrive® 360 Google Workspace BackupはIDrive® e2テクノロジーを使用しています。IDrive® e2は以下を実現し、ユーザーのHIPAA準拠を支援します。
- データセンターの物理的なセキュリティ
- クラウド、ストレージ、ネットワークインフラの強力な認証・認可管理
- 保存時・転送時の暗号化による機密患者情報の保護
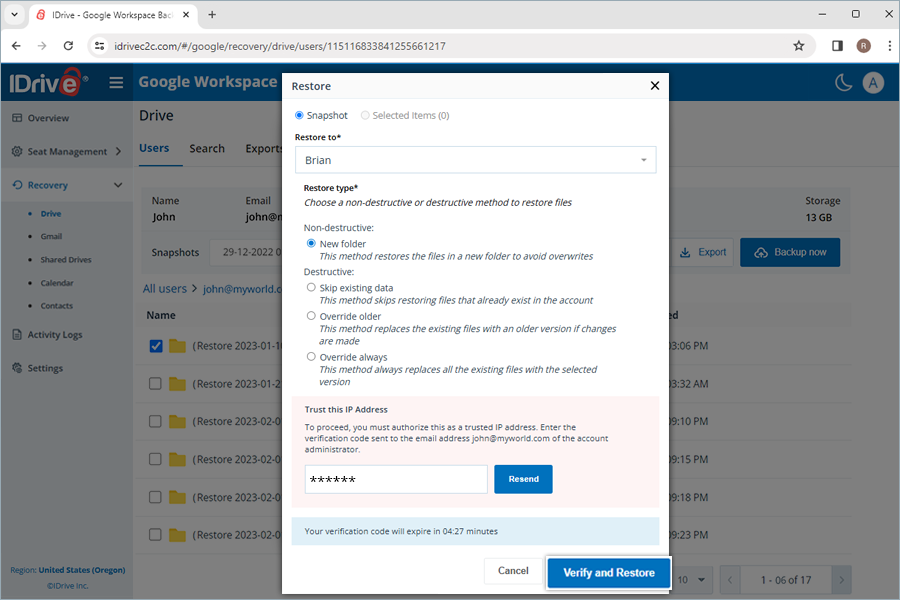
データのエクスポートやリストア時にIPアドレスの信頼を求められる理由は?
新しいIPアドレスでデータのエクスポートやリストアを行う場合、アカウント管理者のメールアドレスに送信される認証コードを入力してIPアドレスを認証する必要があります。これにより、データのセキュリティがさらに強化されます。
Google Drive上のファイルサイズよりバックアップファイルサイズが大きい理由は?
Google Workspaceファイル(ドキュメント、スプレッドシートなど)をクラウドにバックアップする際、元のGoogle Drive形式ではダウンロードできません。標準フォーマットに変換されるため、通常ファイルサイズが大きくなります。また、過去のバージョンや削除済みファイルもサイズ計算に含まれるため、全体のサイズが増加します。
Google Workspace Business/Enterprise - Archive User Licenceのユーザーをバックアップできますか?
Google Workspace Business/Enterprise - Archive User Licenceのユーザーのバックアップには対応していません。ただし、IDrive® 360でGoogle Workspaceアカウントをバックアップした後は、アカウントがGoogle管理コンソールで停止・アーカイブ・削除されていても、データのリストアやエクスポートが可能です。
IDrive® 360を利用すれば、積極的にバックアップされていないユーザーアカウントのデータも手頃な価格で保持・保存できます。
バックアップを行うには、Google管理コンソールでアーカイブ済みアカウントを再アクティブ化する必要があります。バックアップ完了後は、再度アーカイブやドメインからの削除を行っても、データ損失や高額なアーカイブユーザーライセンス価格設定を心配する必要はありません。
「Error:"unauthorized_client", Description:"Client is unauthorized to retrieve access tokens using this method, or client not authorized for any of the scopes requested.", Uri:"".. .」というエラーが出た場合の対処方法は?
この問題を解決するには、以下の手順に従ってください。
- Google Workspaceドメイン管理者アカウントでGoogle Workspace管理コンソールにログインします。
- Google Workspace Marketplaceアプリに移動し、アプリ一覧に進みます。
IDrive® backup for Google Workspace™アプリが一覧にない場合
- アプリをインストールをクリックします。
- IDrive® backup for Google Workspace™アプリを検索します。
- 管理者インストールを実行します(組織全体を選択)。
IDrive® backup for Google Workspace™アプリが一覧にある場合
- IDrive® backup for Google Workspace™アプリを選択します。
- アクセスを許可をクリックします。
- ステータスが付与済みになっていることを確認します。
IDrive® 360 Google Workspace Backupはどのようにバックアップを実行しますか?
Google Workspaceとの連携設定後、IDrive® 360 Google Workspace Backupは全ユーザーのGmail、Google Drive、Google Shared Drives、Google Contacts、Google Calendarの完全自動バックアップを実行します。
IDrive® 360 Google Workspace Backupは自動データ同期を有効にしており、初回のフルバックアップ後は、以降のすべての変更が増分バックアップとして保存されます。
IDrive® 360 Google Workspace Backupのバックアップはどのようにスケジュールされていますか?
IDrive® 360 Google Workspace Backupは、組織内の全ユーザーに対して1日最大3回の自動バックアップを実行します。これらのシステムバックアップは、組織全体の事前定義されたスケジュールで実行されます。
バックアップ済みファイルの以後の変更はIDrive® 360 Google Workspace Backupに増分転送されますか?
はい、IDrive® 360 Google Workspace Backupは自動データ同期を有効にします。初回のフルバックアップ後は、以後のすべての変更が増分バックアップされます。
IDrive® 360 Google Workspace Backupアカウントで特定ユーザーのDrive、Gmail、カレンダー、連絡先データをバックアップする方法は?
特定ユーザーのバックアップを実行するには、
- IDrive® 360 Google Workspace Backupダッシュボードのリカバリータブに移動します。
- ユーザーのデータをバックアップしたいアプリケーションを選択します:
- Drive - ユーザーのドライブデータをバックアップします。
- Gmail - ユーザーのメールおよびフォルダデータをバックアップします。
- Calendar - ユーザーのカレンダーのスケジュールおよびイベントをバックアップします。
- Contacts - ユーザーの連絡先カードをバックアップします。
- データをバックアップしたいユーザーアカウントをクリックします。
- 今すぐバックアップをクリックします。
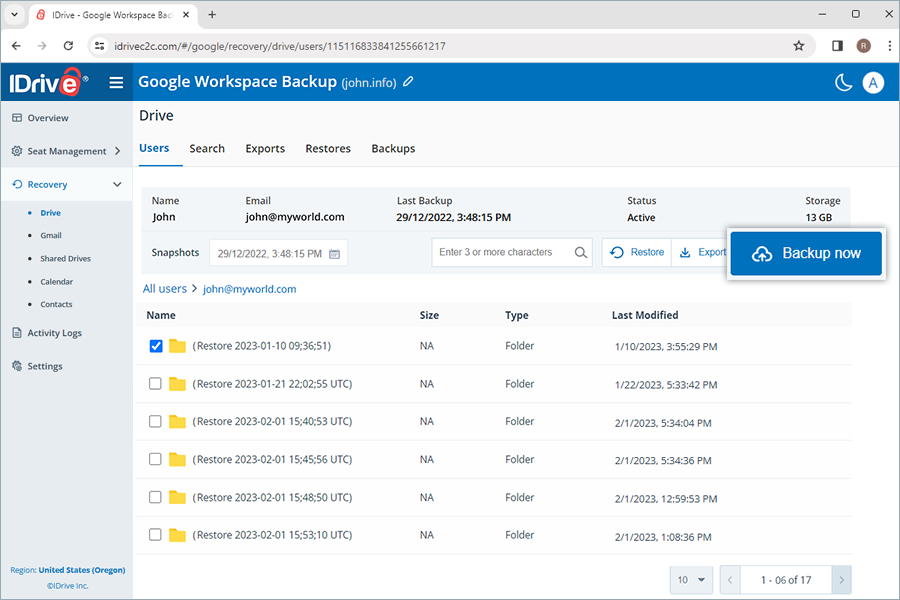
バックアップの進行状況はリアルタイムで表示されます。バックアップの詳細はBackupsで確認できます。
注意:
- 初回バックアップ時は、
 をクリックして現在のバックアップサイズを確認できます。
 - 手動バックアップの実行は自動スケジュールバックアップに影響しません。
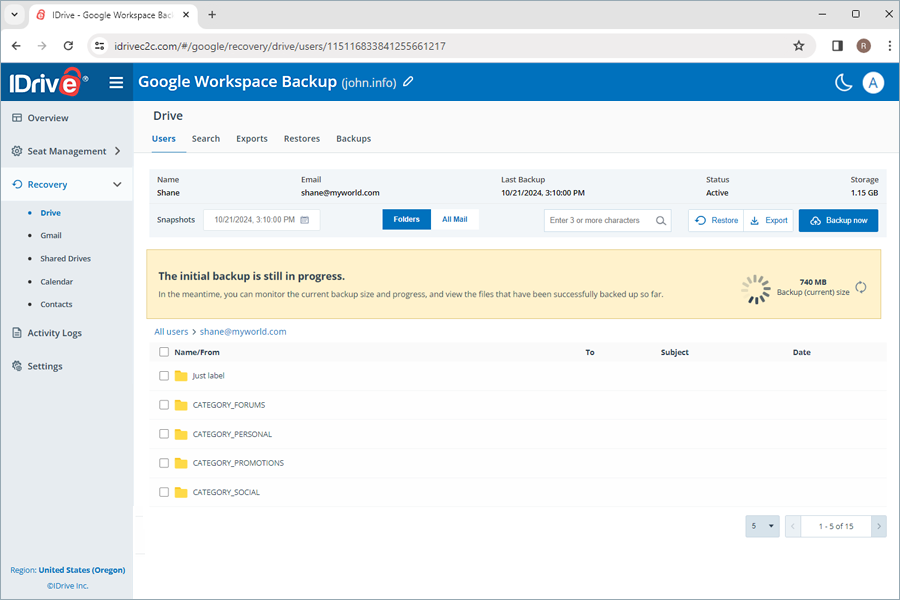
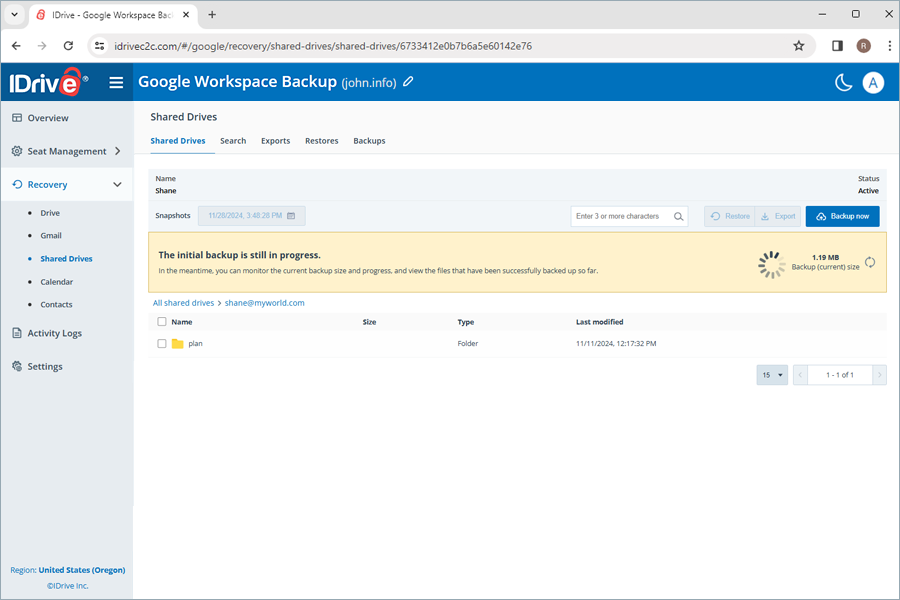
IDrive® 360 Google Workspace Backupアカウントから特定ユーザーのShared Drivesデータをバックアップする方法は?
特定ユーザーのShared Drivesバックアップを実行するには、
- IDrive® 360 Google Workspace Backupダッシュボードのリカバリータブに移動します。
- Shared Drivesを選択します。
- バックアップしたい共有ドライブをクリックします。
- 今すぐバックアップをクリックします。
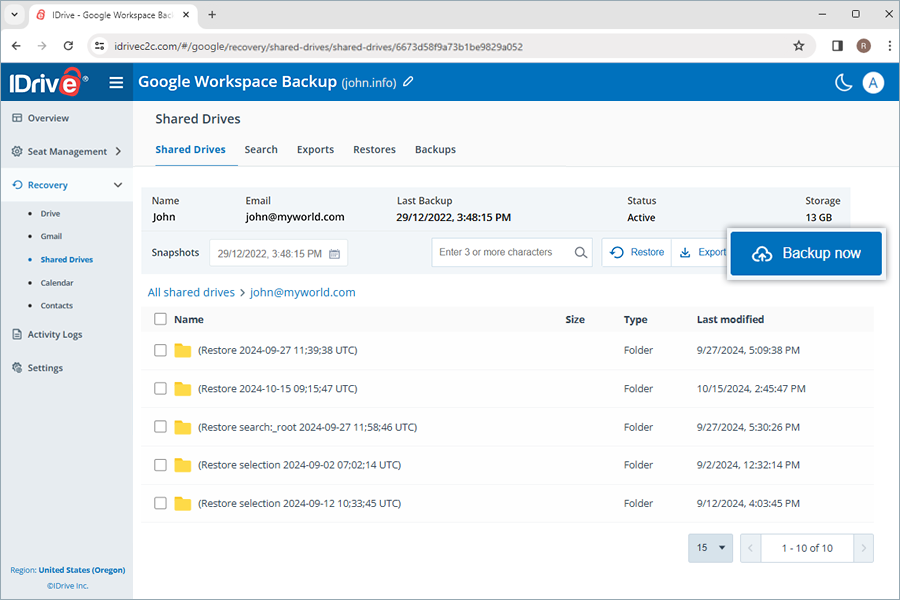
バックアップの進行状況はリアルタイムで表示されます。バックアップの詳細はBackupsで確認できます。
注意:
- 初回バックアップ時は、をクリックして現在のバックアップサイズを確認できます。
- 手動バックアップの実行は自動スケジュールバックアップに影響しません。
IDrive® 360 Google Workspace Backupのスナップショットとバージョン管理の仕組みは?
IDrive® 360 Google Workspace Backupは、バックアップされたデータの以前のバージョンをポイントインタイムのスナップショットとして保持し、バックアップ時の正確な状態にデータをポイントインタイムでリストアできるようにします。
スナップショットは以下のように保持・統合されます:
- IDrive® 360は1日で3回の自動バックアップを実行し、30日間保持します
- 30日後、IDrive® 360はユーザーごとに3回の日次バックアップのうち1回を保存します
- 90日後、IDrive® 360はユーザーごとに週次バックアップを1回保存します
- 365日後、IDrive® 360はユーザーごとに月次バックアップを1回保存します
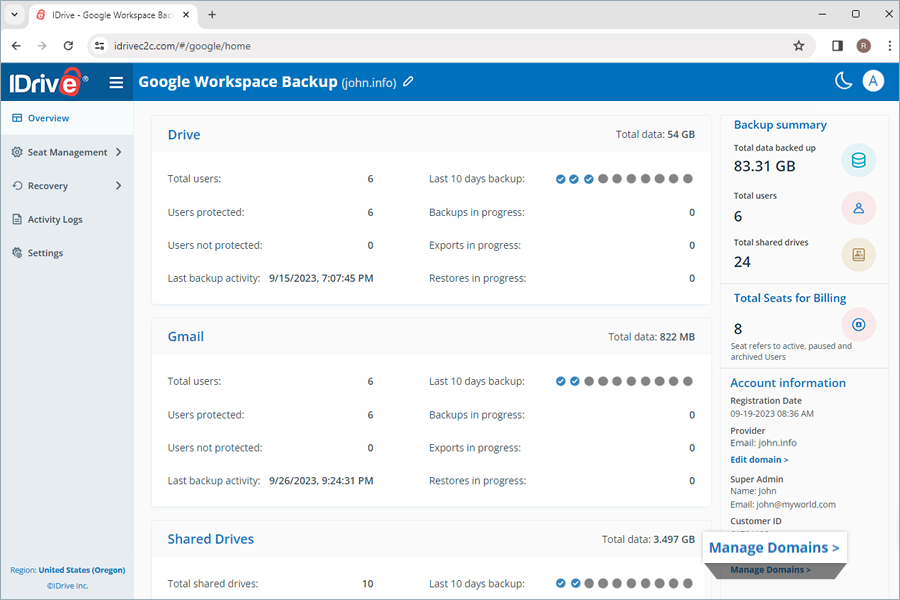
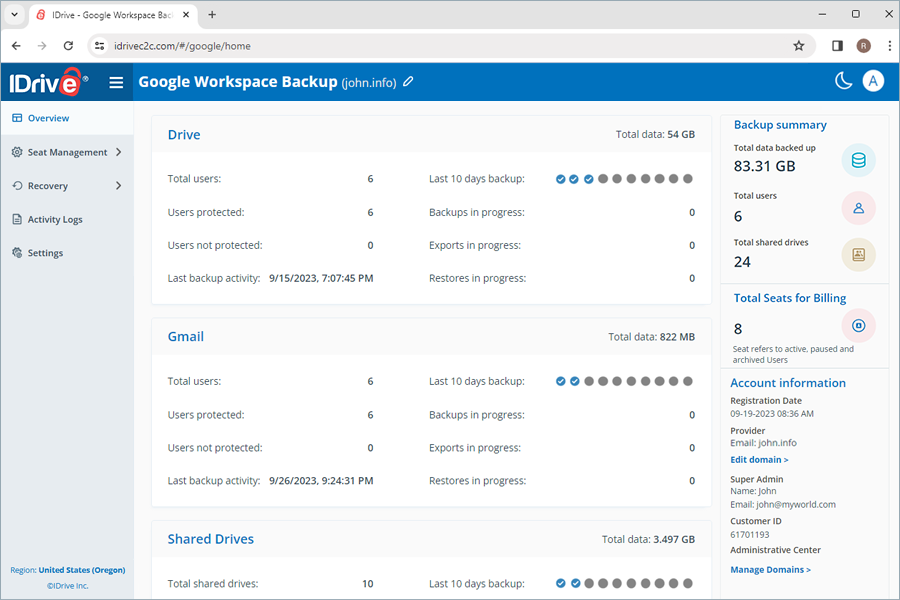
ダッシュボードのOverviewタブでどんな情報が確認できますか?
Overviewタブでは、ユーザーのリストア、エクスポート、バックアップと合わせてユーザーを一目で確認できます。
Drive、Gmail、Shared Drives、Calendar、Contacts全体で以下の情報の概要を確認できます:
- 総ユーザー数:Workspace全体のアクティブユーザーの総数。
- バックアップ済みユーザー:バックアップリストに追加されかつ過去24時間以内にバックアップを完了したアクティブWorkspaceユーザーの数。
- 未バックアップユーザー:バックアップリストに含まれていないアクティブWorkspaceユーザーの数。
- 最終バックアップアクティビティ:アプリケーションのすべてのモジュールが24時間以内にバックアップを正常に完了した最終日付を表示します。
- 過去10日間のバックアップ:過去10日間のステータスを以下のアイコンで表示します:
 - バックアップ失敗
 - バックアップ100%成功
 - バックアップ未開始
 - バックアップ部分成功
- 進行中のバックアップ:実行中のバックアップ操作の総数。
- 進行中のエクスポート:実行中のエクスポート操作の総数。
- 進行中のリストア:実行中のリストア操作の総数。
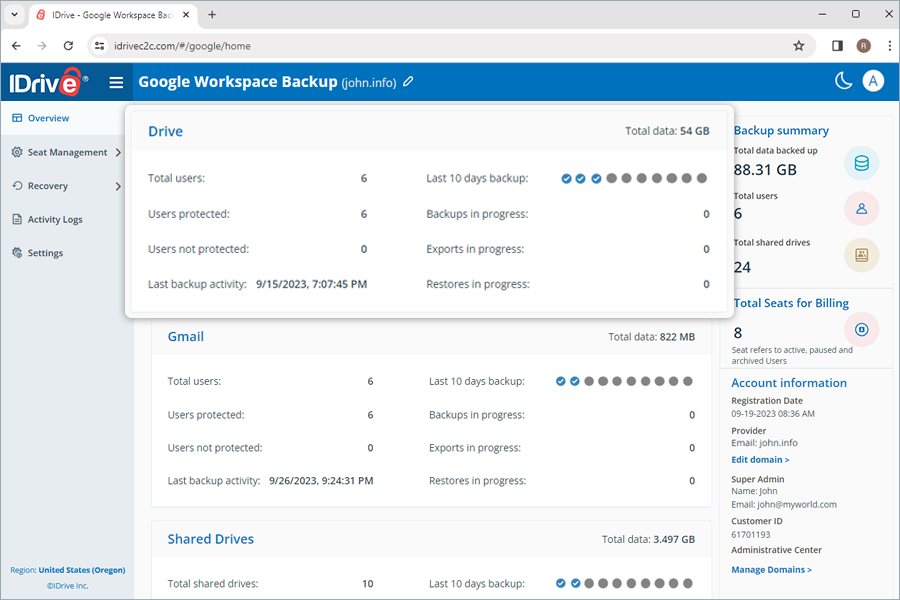
さらに、バックアップされた総データ量、ユーザー数、アカウント登録詳細の概要も確認できます。
アカウントに共有ドライブが追加されている場合は、それらに関連する同様の情報も確認できます。
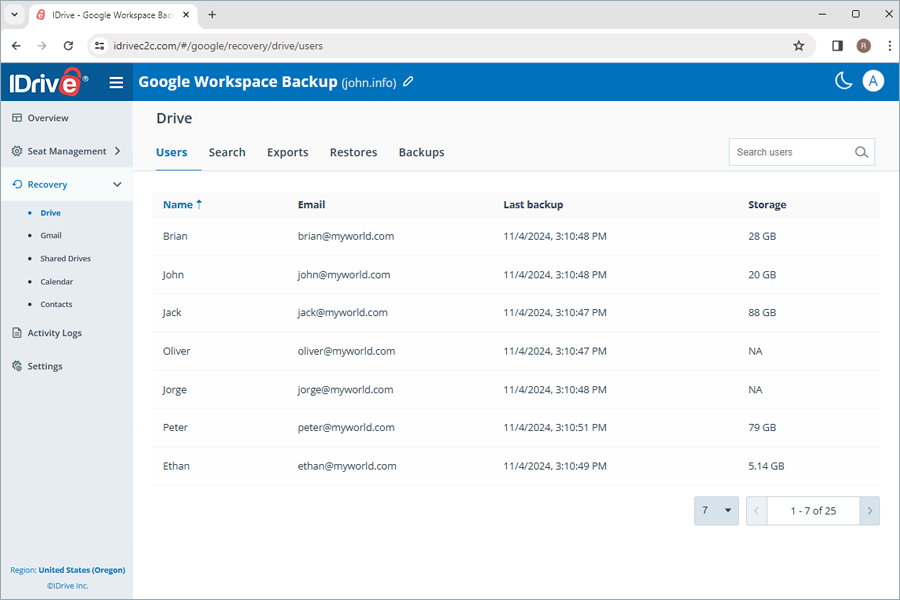
IDrive 360 Google Workspace Backupのウェブコンソールのシート管理タブで、バックアップ状況に関係なく、すべてのユーザーの記録にアクセスできます。
シート管理の下にあるユーザーまたは共有ドライブタブに移動すると、以下の管理ツールにアクセスできます:
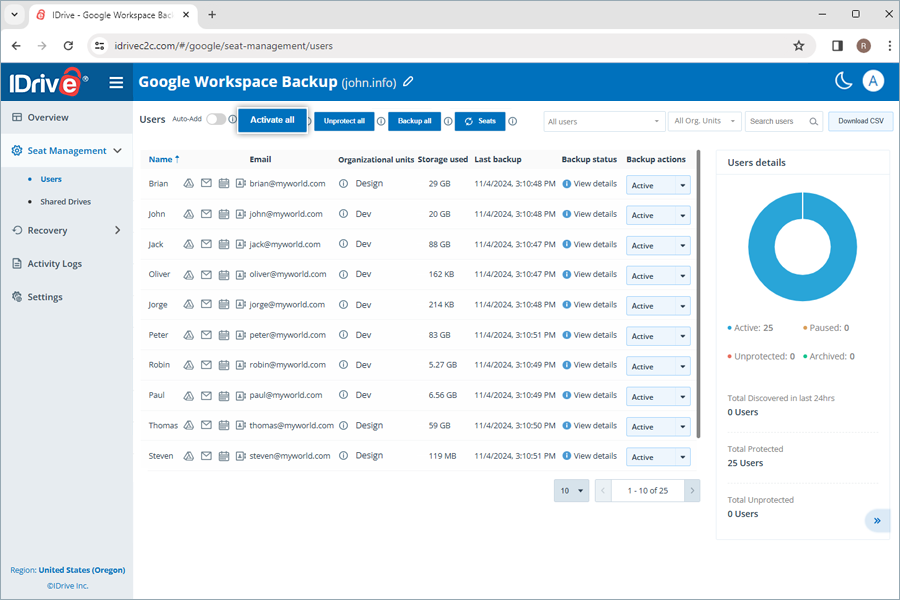
- 自動追加:Google Workspaceアカウントに追加されたすべての新しいユーザー/共有ドライブを自動的に同期します。
- すべてのユーザーを有効化/すべてを有効化:保護されていない/一時停止中のすべてのユーザーと共有ドライブのバックアップを有効にします。
- ユーザー/共有ドライブをフィルタリング:バックアップ状況(アクティブ、一時停止、保護されていない)に応じてユーザーまたは共有ドライブの記録をフィルタリングします。
- ユーザー/共有ドライブを検索:記録の中から特定のユーザーと共有ドライブを検索します。
- CSVダウンロード:選択されたすべてのユーザーと共有ドライブのリストをCSV形式でダウンロードします。
- ドライブ、Gmail、連絡先、カレンダーデータの管理:それぞれのアイコンをクリックして、ユーザーの特定のドライブ、メール、連絡先、カレンダーデータを管理します -
 または
または  または
または  または
または 
- バックアップ状況:詳細を表示にカーソルを合わせるとバックアップ状況の概要が表示され、ボタンをクリックすると詳細なバックアップ状況の要約が表示されます。
- バックアップアクション:バックアップセットからユーザーと共有ドライブを一時停止、追加、削除します。詳細については、ユーザーのシートステータスを変更するにはどうすればよいですか?を参照してください。
- シートの更新:このボタンをクリックしてシートを更新できます。自動追加の状況に応じて、新しいシートが対応するバックアップ状況で追加されます。自動追加が有効な場合、新しく発見されたシートは自動的に保護され、そうでない場合は、ユーザーが手動で変更するまで保護されません。
- すべての保護を解除:このオプションを使用して、すべてのシートの保護を解除できます。保護されていないシートは日次バックアップから除外され、リカバリモジュールでアクセスできません。
- すべてバックアップ:この機能により、すべてのアクティブなシートのバックアップを一度に開始できます。

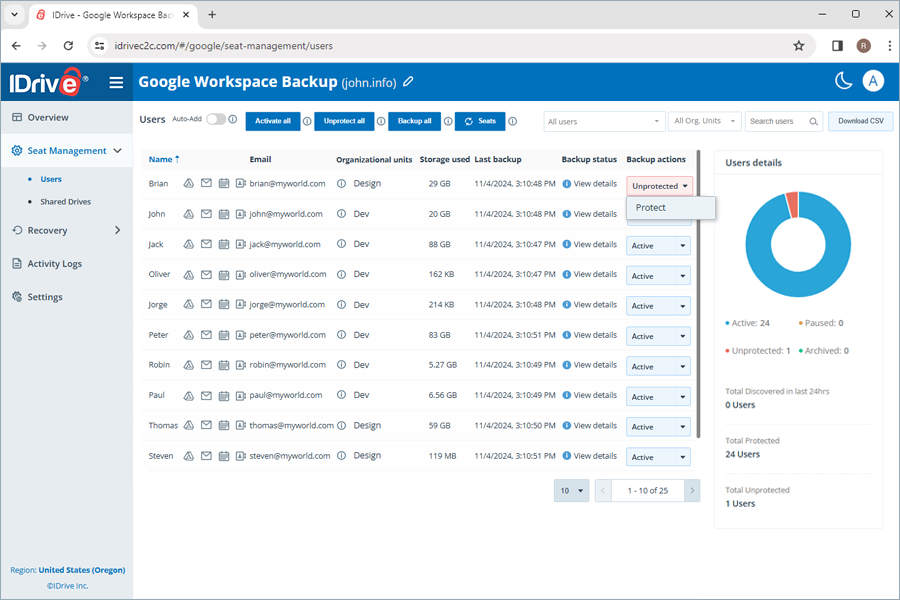
ユーザーのシートステータスを変更するにはどうすればよいですか?
シートステータスを変更することで、バックアップセットからユーザーを追加・削除したり、バックアップを一時停止したりできます。
ユーザーのシートステータスを変更するには、
- IDrive® 360 Google Workspace Backupダッシュボードのシート管理タブに移動します。
- ユーザータブに移動します。
- ユーザーに対応するバックアップアクション列で、必要に応じてシートステータスを設定します:
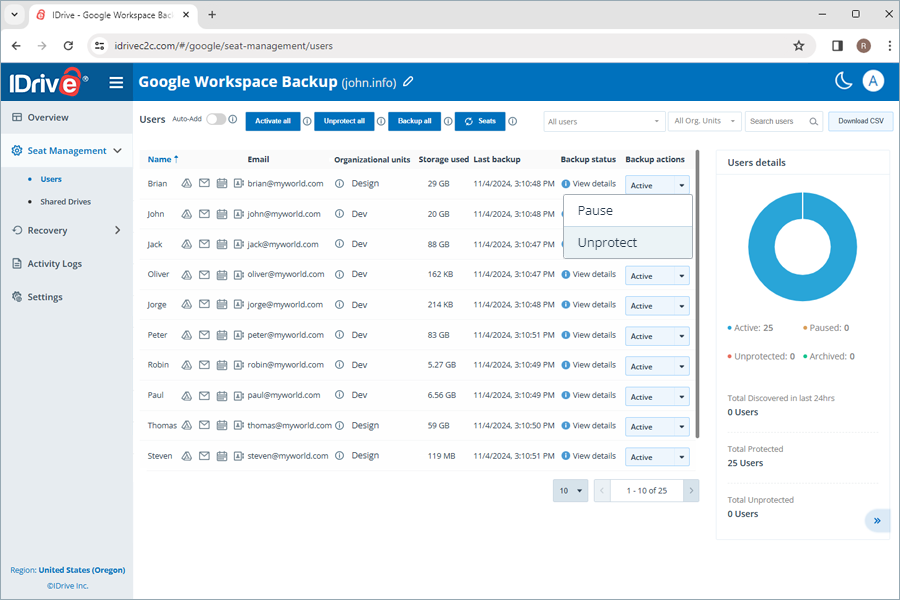
- 一時停止:ユーザーまたは共有ドライブのバックアップを一時停止します
- 保護解除:IDrive® 360 Workspaceバックアップセットからユーザーを削除します
- 保護:保護されていない/一時停止中のユーザーのバックアップを再開/開始します
バックアップセットに追加されたユーザーのステータスはアクティブとして表示されます。
注意:ユーザーのシートステータスを保護解除に変更すると、そのユーザーまたはドライブに関連するすべてのバックアップが削除されます。
IDrive® 360 Google Workspace Backupセットにユーザーを追加するにはどうすればよいですか?
Google WorkspaceのユーザーはGoogleアカウントをIDrive® 360で設定すると、自動的に検出されバックアップセットに追加されます。自動追加はデフォルトで有効になり、Google Workspaceの新しいユーザーを保護します。
自動追加の状況に応じて、新しいシートが対応するバックアップ状況で追加されます。自動追加が有効な場合、新しく発見されたシートは自動的に保護され、そうでない場合は、ユーザーが手動で変更するまで保護されません。
新しいシートを手動で追加するには、 をクリックしてデータを更新できます。
自動追加を有効にするには、
- IDrive® 360 Google Workspace Backupダッシュボードのシート管理タブに移動します。
- ユーザータブに移動します。
- 自動追加の横にあるトグルスイッチを有効にします。

IDrive® 360 Google Workspace Backupセットにユーザーを再追加するにはどうすればよいですか?
シートステータスを保護に変更することで、ユーザーをアクティブなバックアップセットに再追加できます。
バックアップセットに含まれていないユーザーのバックアップを有効にするには、
- IDrive® 360 Google Workspace Backupダッシュボードのシート管理タブに移動します。
- ユーザータブに移動します。
- 一時停止/保護されていないユーザーの横にあるバックアップアクション列で、ドロップダウンメニューから保護を選択します。
保護されていないすべてのユーザーを有効にするには、すべてを有効化をクリックします。
ユーザー/共有ドライブのバックアップ状況はどのように確認できますか?
各ユーザーまたは共有ドライブの横にあるバックアップ状況は、過去24時間以内の各モジュールのバックアップ結果の概要を示します。詳細を表示をクリックすると、各モジュールの以下のバックアップ状況パラメータを確認できます。
- バックアップ状況:過去24時間のバックアップの成功/失敗状況(完了 / 失敗で表示)
- 使用ストレージ:バックアップで占有されている合計容量
- 最終バックアップ:最後にバックアップが行われた日時
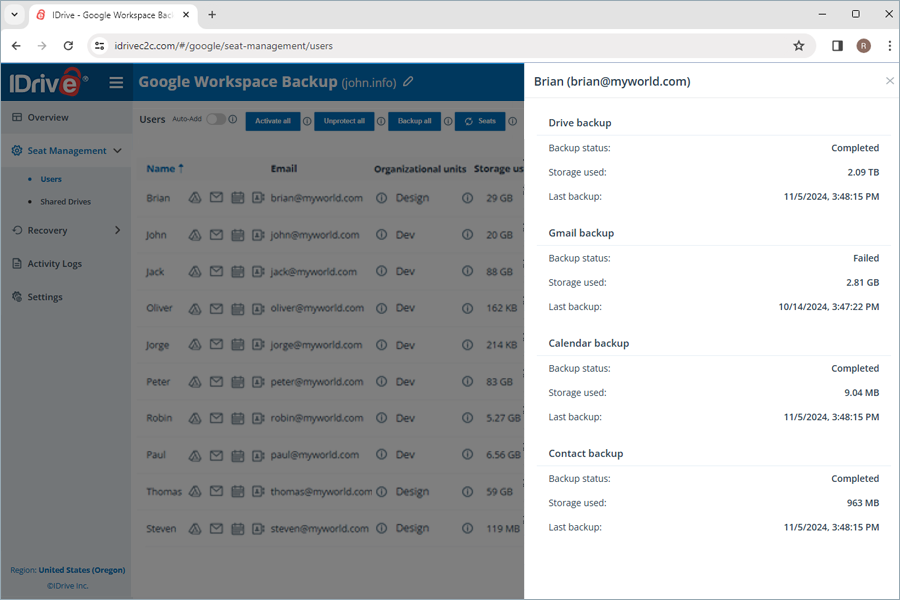
各モジュールのバックアップ状況の概要を表示するには、詳細を表示にカーソルを合わせてください。
GoogleのOU(組織単位)ごとにシートを管理できますか?
はい、IDrive 360 Google Workspace Backupでは、各OUごとにシートの表示と管理が可能です。
OUごとにシートを管理するには、
- シート管理タブに移動します。
- ユーザータブに移動します。
- 組織単位列に各シートが属するOUが表示されます。
- ドロップダウンから特定のOUを選択すると、そのOUに属するすべてのシートが表示されます。
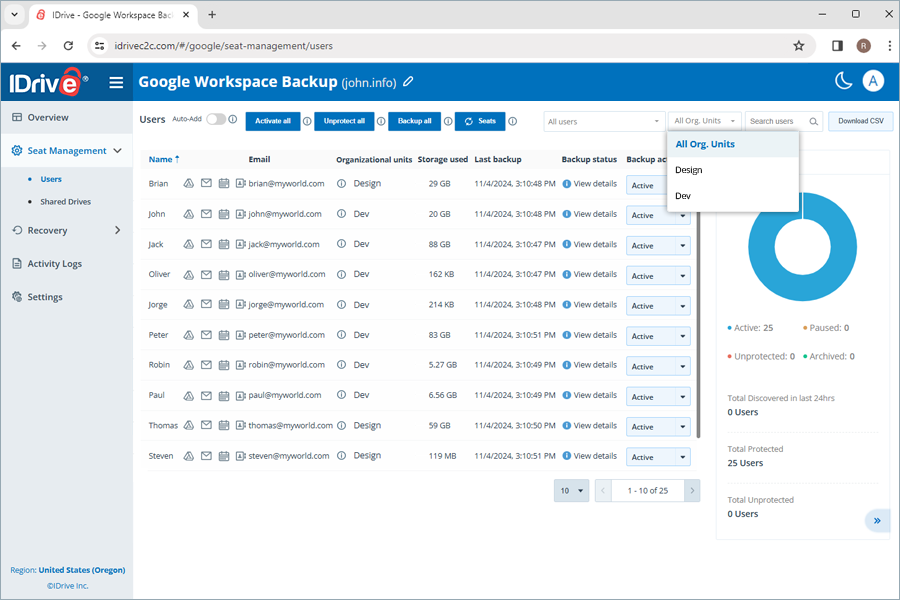
- 各ユーザーの
 にカーソルを合わせると、完全なOUパスが表示されます。
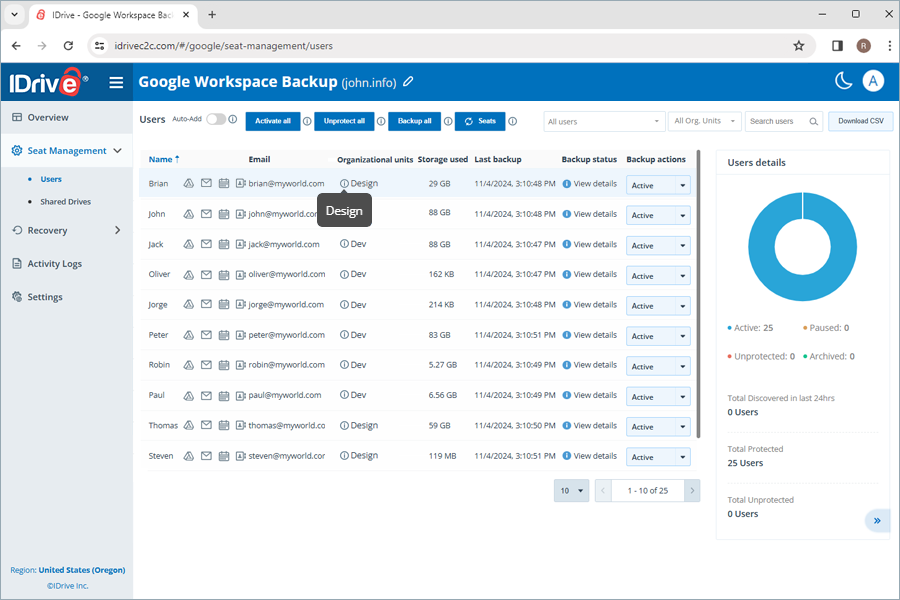
- 選択したOU内のすべてのユーザーに対して、すべてを有効化またはすべての保護を解除を選択できます。
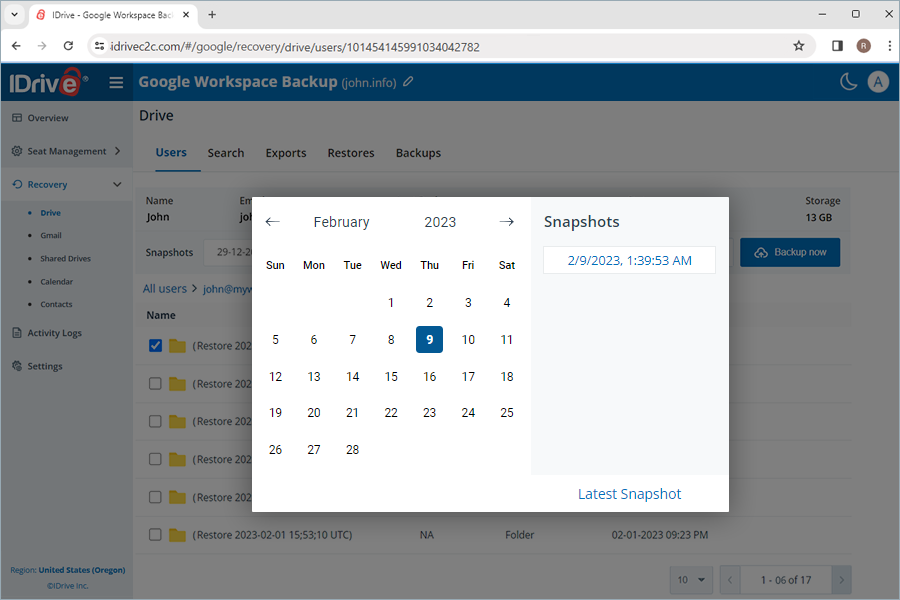
IDrive® 360 Google Workspace Backupアカウントから特定のユーザーのバックアップされたドライブと共有ドライブのデータを復元するにはどうすればよいですか?
バックアップされたドライブと共有ドライブのデータを復元するには、
- IDrive® 360 Google Workspace Backupダッシュボードのリカバリタブに移動します。
- ドライブまたは共有ドライブをクリックします。
- データを復元したいユーザーアカウントまたは共有ドライブをクリックします。
- ポイントインタイム復元を実行する場合は、スナップショットで適切な復旧ポイントを選択します。特定のファイルまたはフォルダを復元する場合は、バックアップされたアイテムのリストからアイテムを選択します。特定のファイルまたはフォルダを検索することもできます。
- 復元をクリックします。ポップアップウィンドウが表示されます。

- 必要に応じてスナップショットまたは選択されたアイテムを選択します。
注意:選択されたアイテムオプションは、復元用のアイテムを選択した場合のみ有効になります。何も選択されていない場合は、デフォルトでスナップショットが選択されます。
- 復元先ドロップダウンメニューから、スナップショットまたは選択したアイテムを復元したいユーザーアカウントを選択します。同じユーザーアカウントまたは異なるユーザーアカウントにデータを復元できます。
- 既存ファイルを管理するために、非破壊的または破壊的な復元方法を選択します:
- 新しいフォルダ(非破壊的):この方法は、上書きを避けるためにファイルを新しいフォルダに復元します。
- 既存データをスキップ(破壊的):この方法は、アカウントにすでに存在するファイルの復元をスキップします。
- 古いバージョンで上書き(破壊的):この方法は、変更が行われた場合、既存のファイルを古いバージョンで置き換えます。
- 常に上書き(破壊的):この方法は、常にすべての既存ファイルを選択したバージョンで置き換えます。
- 復元をクリックします。
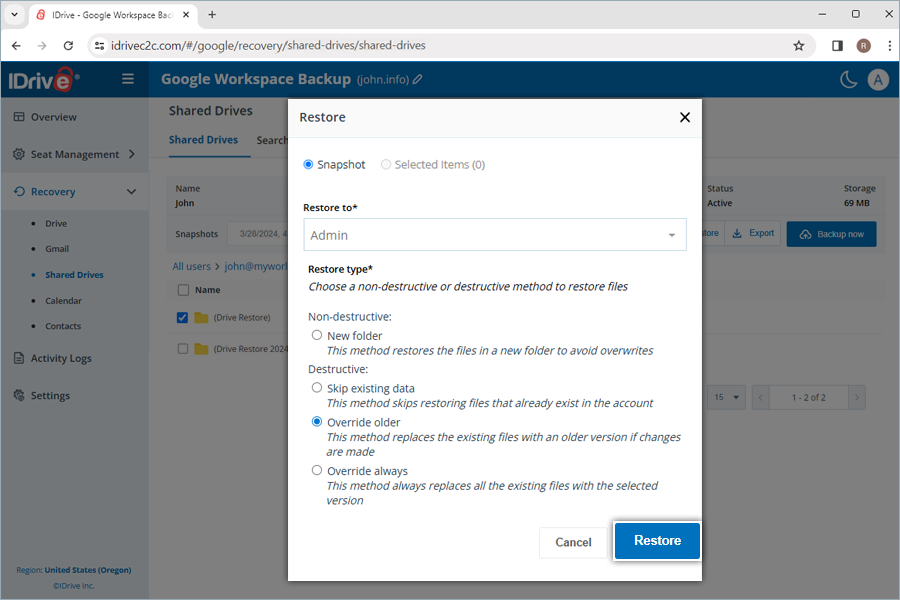
- 古いバージョンで上書きまたは常に上書きを選択した場合は、確認ポップアップで続行をクリックします。
非破壊的な復元方法で新しいフォルダを作成することを選択すると、復元先に復元モードと日付の名前が付いたフォルダが自動的に作成されます。選択されたアイテムを復元するときは、フォルダ(IDrive Restore selection <TimeStamp in UTC>)が作成されます。同様に、スナップショット復元の場合はフォルダ(IDrive Restore <TimeStamp in UTC>)が作成され、検索ベースの復元の場合はフォルダ(IDrive Restore search:Search_Term <TimeStamp in UTC>)が作成されます。
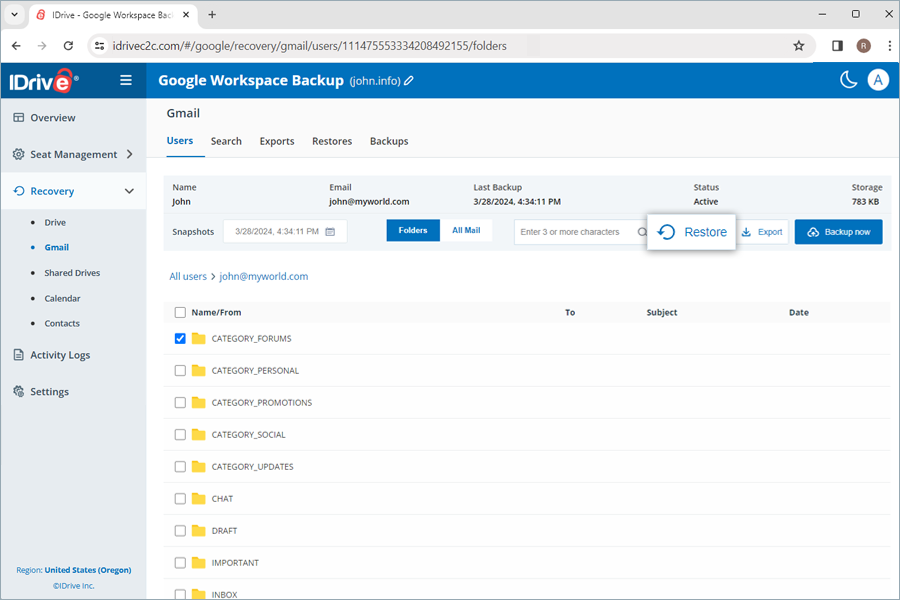
IDrive® 360 Google Workspace Backupアカウントから特定のユーザーのバックアップされたGmailデータを復元するにはどうすればよいですか?
バックアップされたメールデータを復元するには、
- IDrive® 360 Google Workspace Backupダッシュボードのリカバリタブに移動します。
- Gmailをクリックします。
- Gmailデータを復元したいユーザーアカウントをクリックします。
- メールの添付ファイルを復元するにはフォルダを選択します。
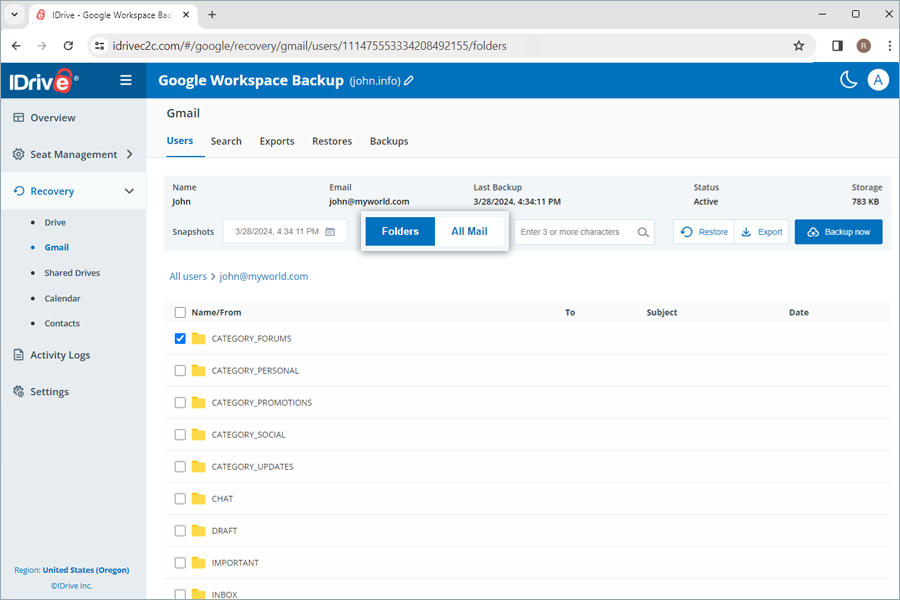
- ポイントインタイム復元を実行する場合は、スナップショットで適切な復旧ポイントを選択します。特定のメールまたはフォルダを復元する場合は、バックアップされたアイテムのリストからアイテムを選択します。特定のメールまたはラベルを検索することもできます。
- 復元をクリックします。ポップアップウィンドウが表示されます。
- 必要に応じてスナップショットまたは選択されたアイテムを選択します。
注意:選択されたアイテムオプションは、復元用のアイテムを選択した場合のみ有効になります。何も選択されていない場合は、デフォルトでスナップショットが選択されます。
- 復元先ドロップダウンメニューから、スナップショットまたは選択したアイテムを復元したいユーザーアカウントを選択します。同じユーザーアカウントまたは異なるユーザーアカウントにデータを復元できます。
- 既存ファイルを管理するために、非破壊的または破壊的な復元方法を選択します:
- 新しいフォルダ(非破壊的):この方法は、上書きを避けるためにメールを新しいフォルダに復元します。
- 元のパスに復元(破壊的):この方法は、アカウントにすでに存在するメールの復元をスキップします。
- 復元をクリックします。
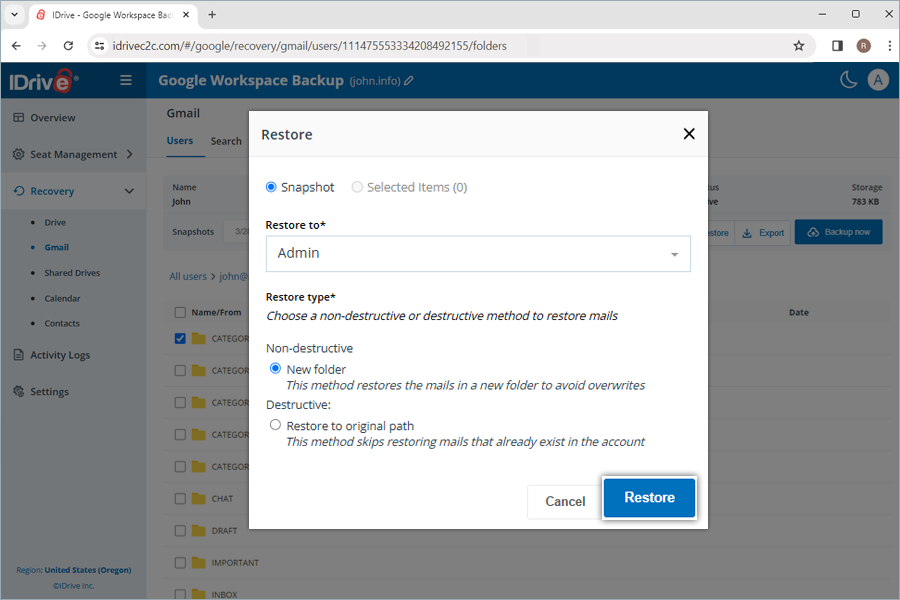
非破壊的な復元方法で新しいフォルダを作成することを選択すると、復元先に復元モードと日付の名前が付いたラベルが自動的に作成されます。選択されたアイテムを復元するときは、ラベル(IDrive Restore selection <TimeStamp in UTC>)が作成されます。同様に、スナップショット復元の場合はラベル(IDrive Restore <TimeStamp in UTC>)が作成され、検索ベースの復元の場合はフォルダ(IDrive Restore search:Search_Term <TimeStamp in UTC>)が作成されます。
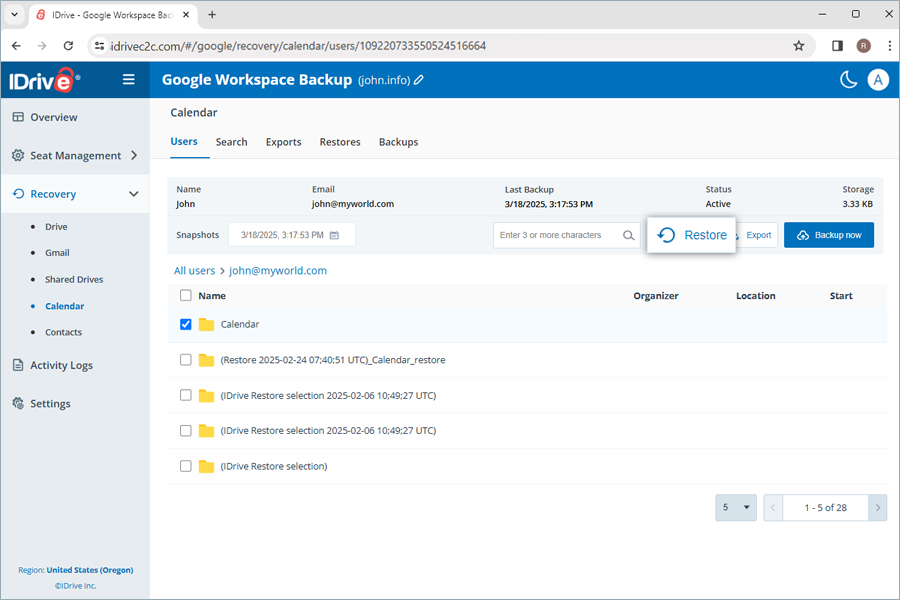
IDrive® 360 Google Workspace Backupアカウントから特定のユーザーのバックアップされたカレンダーイベントを復元するにはどうすればよいですか?
バックアップされたカレンダーイベントを復元するには、
- IDrive® 360 Google Workspace Backupダッシュボードのリカバリタブに移動します。
- カレンダーをクリックします。
- カレンダーイベントを復元したいユーザーアカウントをクリックします。
- ポイントインタイム復元を実行する場合は、スナップショットで適切な復旧ポイントを選択します。特定のイベントまたはフォルダを復元する場合は、バックアップされたアイテムのリストからアイテムを選択します。特定のイベントまたはカレンダーを検索することもできます。
- 復元をクリックします。ポップアップウィンドウが表示されます。
- 必要に応じてスナップショットまたは選択されたアイテムを選択します。
注意:選択されたアイテムオプションは、復元用のアイテムを選択した場合のみ有効になります。何も選択されていない場合は、デフォルトでスナップショットが選択されます。
- 復元先ドロップダウンメニューから、スナップショットまたは選択したアイテムを復元したいユーザーアカウントを選択します。同じユーザーアカウントまたは異なるユーザーアカウントにデータを復元できます。
- 既存ファイルを管理するために、非破壊的または破壊的な復元方法を選択します:
- 新しいフォルダ(非破壊的):この方法は、上書きを避けるためにイベントを新しいフォルダに復元します。
- 既存データをスキップ(破壊的):この方法は、アカウントにすでに存在するイベントの復元をスキップします。
- 古いバージョンで上書き(破壊的):この方法は、変更が行われた場合、既存のイベントを古いバージョンで置き換えます。
- 常に上書き(破壊的):この方法は、常にすべての既存イベントを選択したバージョンで置き換えます。
- 復元をクリックします。
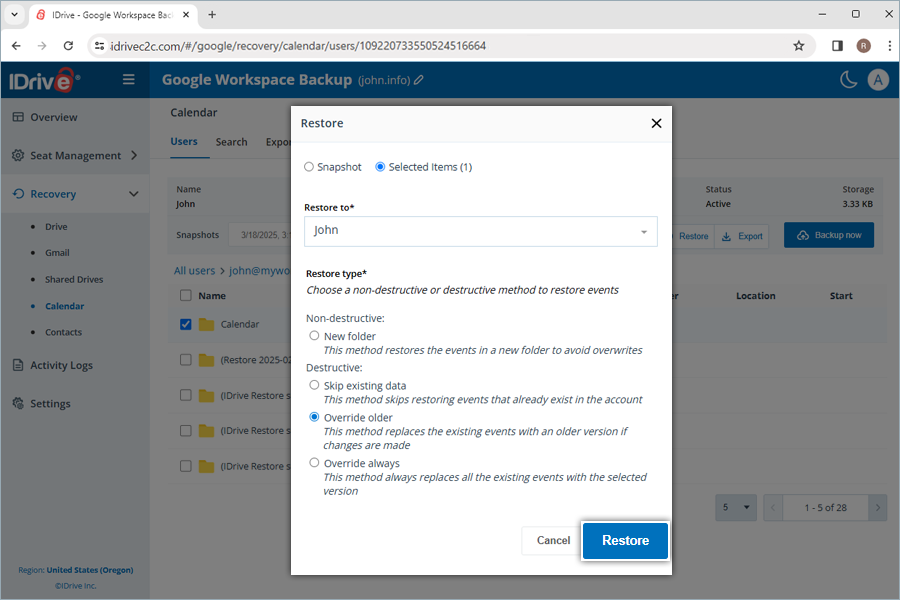
- 古いバージョンで上書きまたは常に上書きを選択した場合は、確認ポップアップで続行をクリックします。
非破壊的な復元方法で新しいフォルダを作成することを選択すると、復元先に復元モードと日付の名前が付いたカレンダーが自動的に作成されます。選択されたアイテムを復元するときは、カレンダー(IDrive Restore selection <TimeStamp in UTC>)が作成されます。同様に、スナップショット復元の場合はカレンダー(IDrive Restore <TimeStamp in UTC>)が作成され、検索ベースの復元の場合はフォルダ(IDrive Restore search:Search_Term <TimeStamp in UTC>)が作成されます。
注意:パブリックカレンダーは復元時にスキップされます。
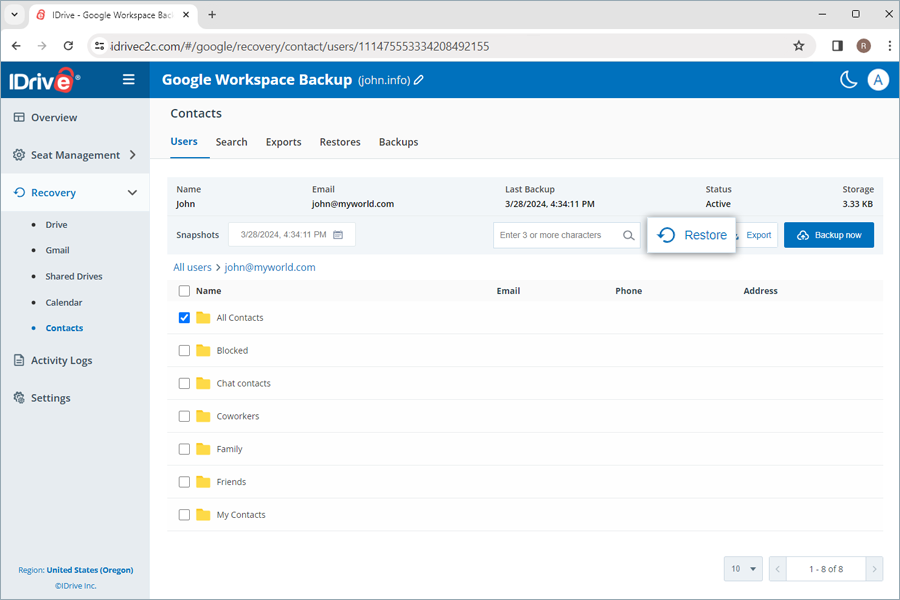
IDrive® 360 Google Workspace Backupアカウントから特定のユーザーのバックアップされた連絡先を復元するにはどうすればよいですか?
バックアップされた連絡先を復元するには、
- IDrive® 360 Google Workspace Backupダッシュボードのリカバリタブに移動します。
- 連絡先をクリックします。
- 連絡先を復元したいユーザーアカウントをクリックします。
- ポイントインタイム復元を実行する場合は、スナップショットで適切な復旧ポイントを選択します。特定の連絡先またはフォルダを復元する場合は、バックアップされたアイテムのリストからアイテムを選択します。特定の連絡先またはラベルを検索することもできます。
- 復元をクリックします。ポップアップウィンドウが表示されます。
- 必要に応じてスナップショットまたは選択されたアイテムを選択します。
注意:選択されたアイテムオプションは、復元用のアイテムを選択した場合のみ有効になります。何も選択されていない場合は、デフォルトでスナップショットが選択されます。
- 復元先ドロップダウンメニューから、スナップショットまたは選択したアイテムを復元したいユーザーアカウントを選択します。同じユーザーアカウントまたは異なるユーザーアカウントにデータを復元できます。
- 既存ファイルを管理するために、非破壊的または破壊的な復元方法を選択します:
- 新しいフォルダ(非破壊的):この方法は、上書きを避けるために連絡先を新しいフォルダに復元します。
- 既存データをスキップ(破壊的):この方法は、アカウントにすでに存在する連絡先の復元をスキップします。
- 古いバージョンで上書き(破壊的):この方法は、変更が行われた場合、既存の連絡先を古いバージョンで置き換えます。
- 常に上書き(破壊的):この方法は、常にすべての既存連絡先を選択したバージョンで置き換えます。
- 復元をクリックします。
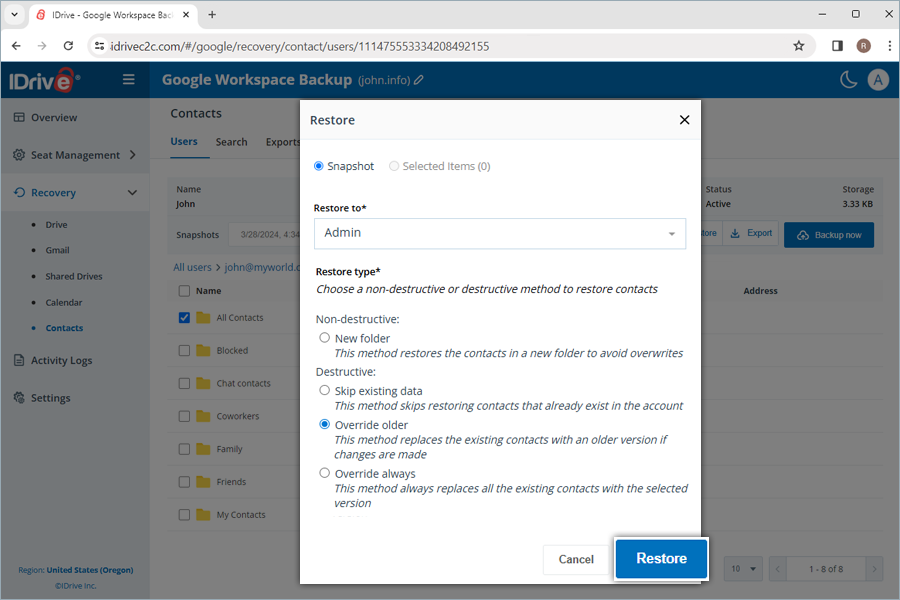
- 古いバージョンで上書きまたは常に上書きを選択した場合は、確認ポップアップで続行をクリックします。
非破壊的な復元方法で新しいフォルダを作成することを選択すると、復元先に復元モードと日付の名前が付いたラベルが自動的に作成されます。選択されたアイテムを復元するときは、ラベル(IDrive Restore selection <TimeStamp in UTC>)が作成されます。同様に、スナップショット復元の場合はラベル(IDrive Restore <TimeStamp in UTC>)が作成され、検索ベースの復元の場合はフォルダ(IDrive Restore search:Search_Term <TimeStamp in UTC>)が作成されます。
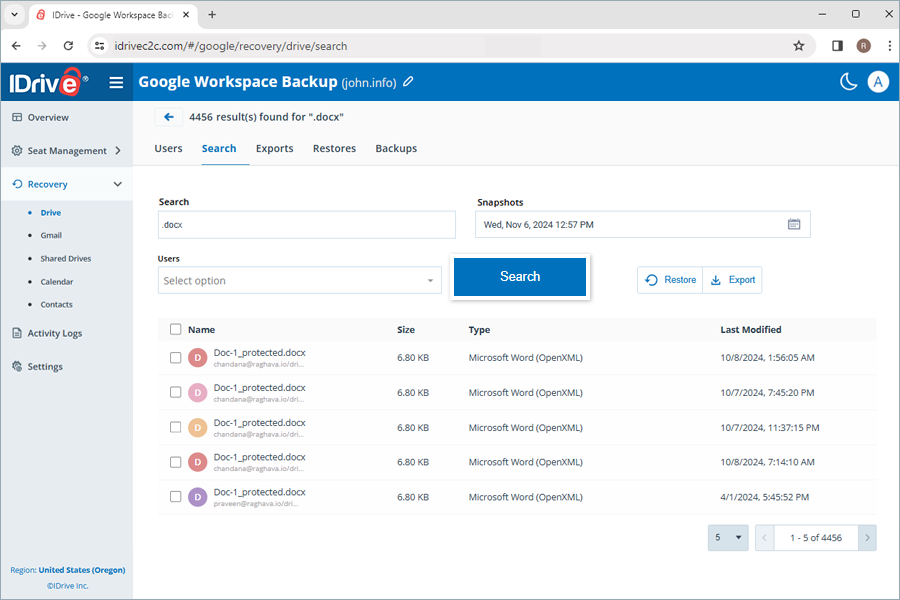
IDrive® 360 Google Workspace Backupアカウントから特定のアイテムを検索できますか?
はい、IDrive® 360 Google Workspace Backupでは、特定のファイル、フォルダ全体、画像、動画、メール、さらに連絡先やカレンダーを粒度レベルで検索および復旧することができます。
注意:グローバル検索は新しいフォルダ復元のみをサポートします。
IDrive® 360 Google Workspace Backupで特定のファイルまたはフォルダを検索するにはどうすればよいですか?
特定のアイテムの粒度復元を実行するために、複数の検索パラメータでポイントインタイム検索とファイルレベル検索の両方を実行できます。
ユーザーアカウントまたは共有ドライブからバックアップされたデータの特定バージョンを復元するためのポイントインタイム検索を実行するには、
- IDrive® 360 Google Workspace Backupダッシュボードのリカバリタブに移動します。
- データを復元したい必要なアプリケーションを選択します。
- 検索を実行したいユーザーアカウントまたは共有ドライブをクリックします。
- 特定のデータのすべてのスナップショットを検索するには、カレンダーで日付を選択します。すべての最新スナップショットのリストが画面に表示されます。必要なスナップショットを選択します。最新のスナップショットを見つけるには最新スナップショットをクリックします。
ファイルレベル検索では、ユーザーアカウントまたは共有ドライブから特定のバックアップされたファイルとフォルダを特定できます。
ファイルレベル復元を実行するには、
- IDrive® 360 Google Workspace Backupダッシュボードのリカバリタブに移動します。
- データを復元したい必要なアプリケーションを選択します。
- 検索タブに移動します。
- 有効な検索キーワードを入力し、スナップショットの必要な日付と時刻を設定し、ドロップダウンメニューから単一または複数のユーザー/共有ドライブを選択します。検索キーワードについてはこのFAQを参照してください。
注意:選択したタイムスタンプに最も近いスナップショットが表示されます。
- 検索をクリックします。
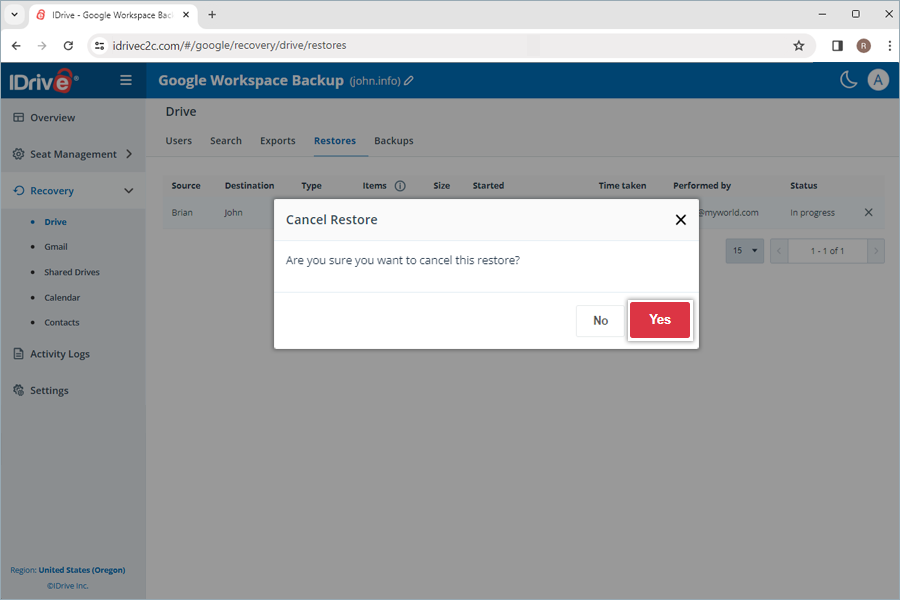
IDrive® 360 Google Workspaceアカウントで進行中の復元をキャンセルするにはどうすればよいですか?
進行中のデータ復元をキャンセルするには、
- リカバリに移動し、ドロップダウンリストから必要なモジュールを選択します。
- 復元を選択します。
 をクリックして進行中の復元操作を停止します。
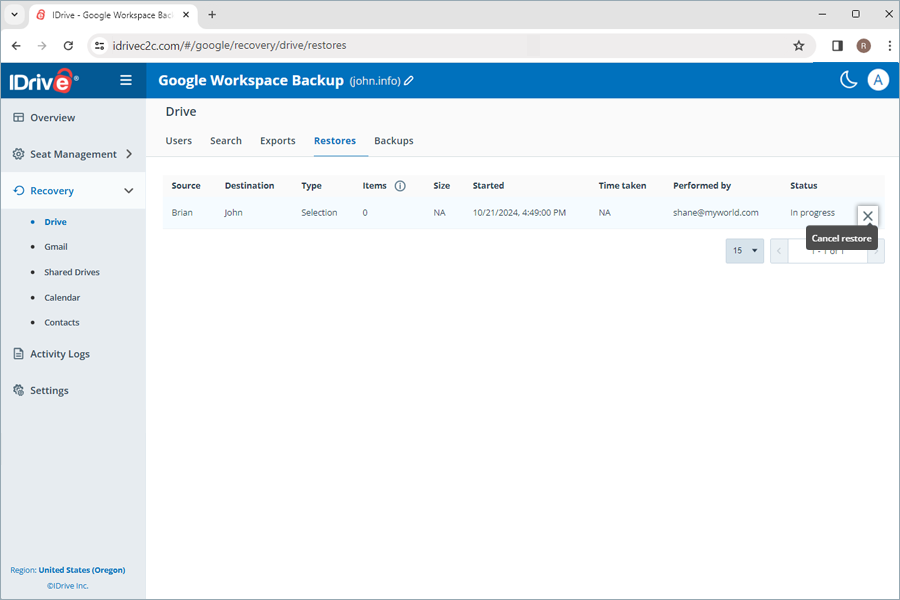
- 確認ポップアップではいをクリックします。
IDrive® 360 Google Workspace BackupアカウントからバックアップされたGoogle Workspaceデータをエクスポートするにはどうすればよいですか?
バックアップされたデータをエクスポートするには、
- IDrive® 360 Google Workspace Backupダッシュボードのリカバリタブに移動します。
- データをエクスポートしたい必要なアプリケーションを選択します。
- ポイントインタイムエクスポートを実行する場合は、スナップショットで適切なスナップショットを選択します。特定のファイルまたはフォルダをエクスポートする場合は、バックアップされたアイテムのリストからアイテムを選択します。特定のファイルまたはフォルダを検索することもできます。
- エクスポートをクリックします。ポップアップウィンドウが表示されます。
- 必要に応じてスナップショットまたは選択されたアイテムを選択します。
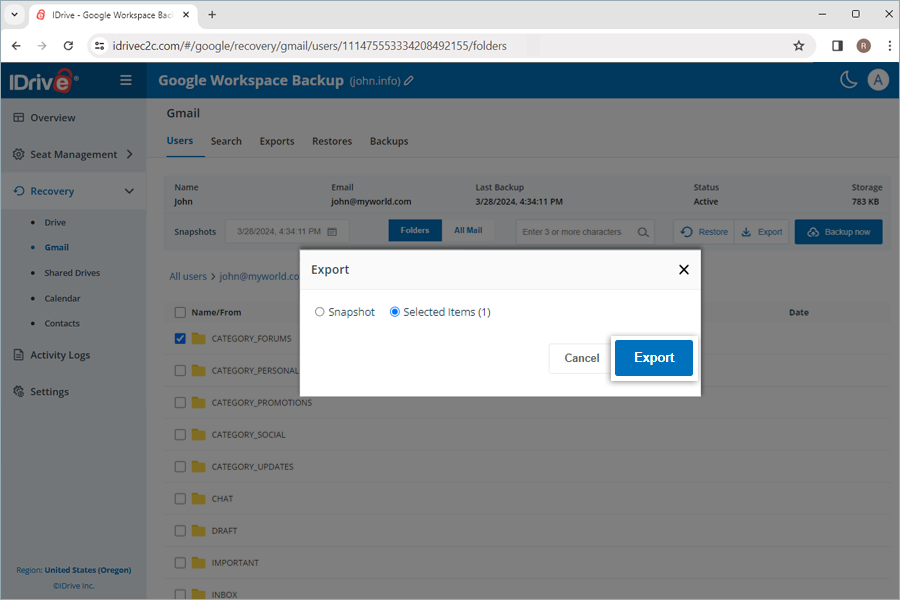
- エクスポートをクリックします。
成功したエクスポートの横にある![]() をクリックして、エクスポートタブで生成されたエクスポートファイルをダウンロードできます。または、
をクリックして、エクスポートタブで生成されたエクスポートファイルをダウンロードできます。または、![]() をクリックしてエクスポートされたデータを削除できます。
をクリックしてエクスポートされたデータを削除できます。
注意:エクスポートされたデータはジップファイルとしてダウンロードされます。
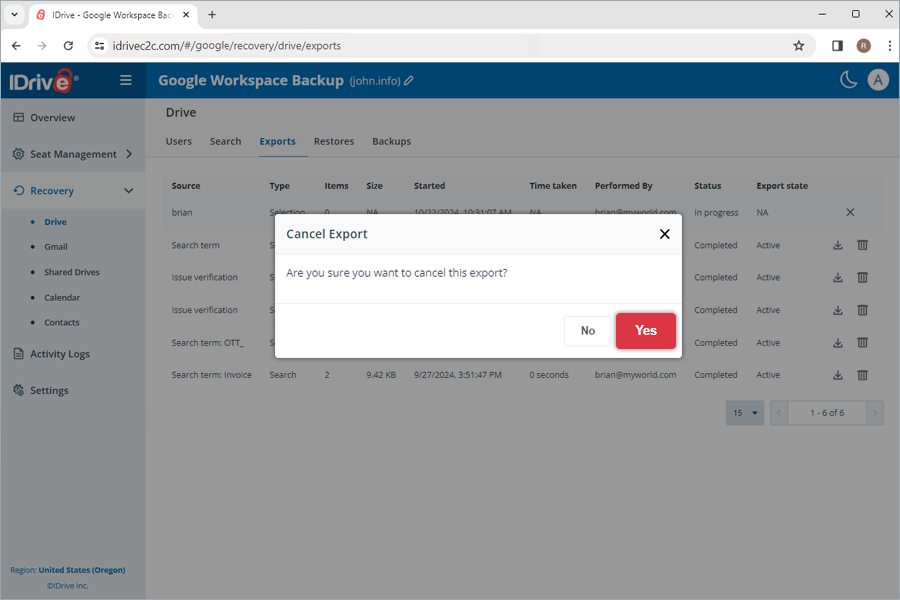
進行中のデータエクスポートをキャンセルするには、![]() をクリックし、確認ポップアップではいをクリックします。
をクリックし、確認ポップアップではいをクリックします。
IDrive® 360 Google Workspace Backupアカウントでエクスポートと復元にサポートされている検索キーワードは何ですか?
IDrive 360 Google Workspace Backupは、以下にリストされているように、各モジュールの特定の検索キーワードをサポートしています:
| モジュール | 検索キーワード |
|---|---|
| ドライブ | フォルダ名/ファイル名 |
| Gmail | フォルダ名/名前/送信者/件名 |
| 共有ドライブ | フォルダ名/ファイル名 |
| カレンダー | フォルダ名/イベント名 |
| 連絡先 | フォルダ名/連絡先名/メール |
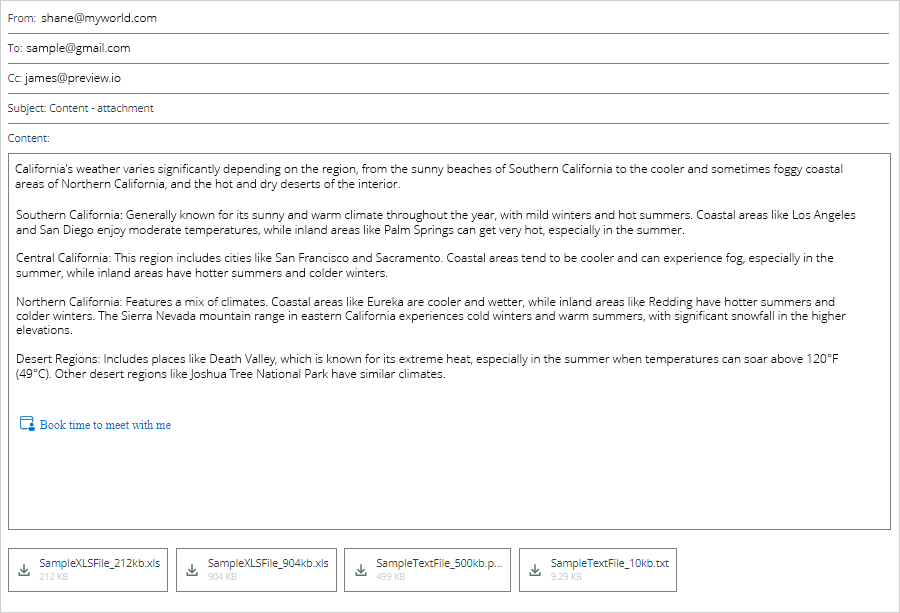
Can I preview the content of a backed up email?
Yes, you can preview the content of any backed up email. Go to Recovery > Gmail and click on the required email. The content of the email will be displayed in a preview pane. You can download any attachments to your computer.
IDrive® 360 Google Workspaceバックアップから破損したファイルやフォルダを復元できますか?
はい、削除されたや破損したファイルやフォルダをユーザーアカウントや共有ドライブに直接復元できます。正確なフォルダ構造を維持したまま、デバイスにダウンロードすることもできます。
IDrive® 360 Google Workspace Backupアカウントのアクティビティログはどこで確認できますか?
アクティビティログタブから、スケジュール済みシステムイベントのアクティビティログレポートを生成したり、IDrive® 360 Google Workspace Backup全体でバックアップ、復元、検索、ウェブ操作などの管理者操作を実行できます。
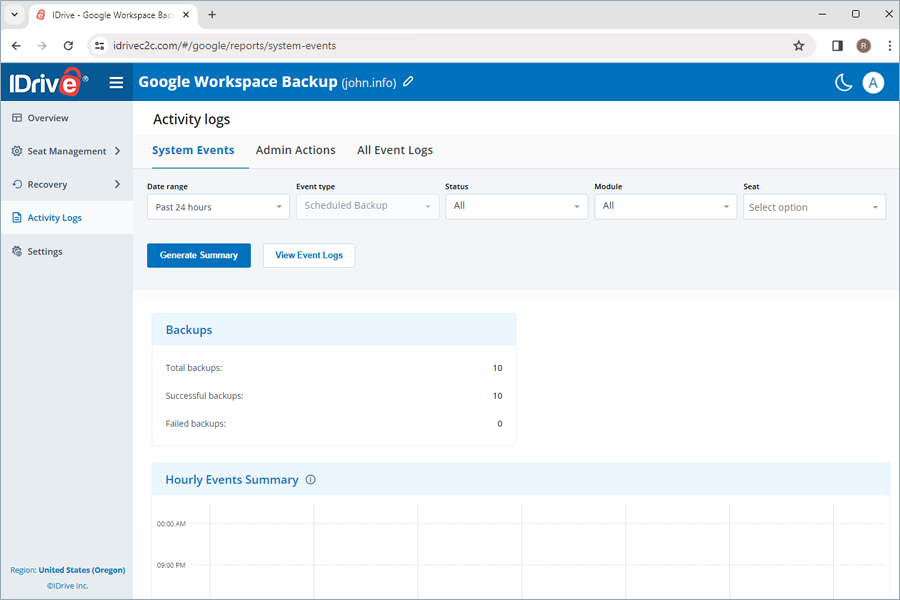
IDrive® 360 Google Workspace Backupのシステムアクティビティログレポートを確認する方法は?
システムが生成した自動バックアップのアクティビティログレポートを表示するには、
- IDrive® 360 Google Workspace Backupダッシュボードのアクティビティログタブに移動します。
- システムイベントをクリックします。
- 日付範囲を選択します。カスタムの開始日と終了日を設定するには、カスタム範囲を選択します。
- 次に、以下のパラメータを指定します:
- イベントタイプ:デフォルトではスケジュール済みに設定されます。
- モジュール:バックアップ済みサービスを選択(すべて、Gmail、Google Drive、Shared Drives、Contacts、Calendar)。
- ステータス:すべてのアクティビティまたは完了、保留、進行中、失敗イベントのログを生成。
- シート:特定のユーザー/共有ドライブまたはすべてのユーザー/共有ドライブのログを生成。
- イベントログを表示をクリックします。

スケジュールされたすべてのバックアップアクティビティ(タイムスタンプ、シート、モジュール、バックアップステータス、イベント(バックアップ)、復元先、実行者を含む)のリストが画面に表示されます。時間別および日別イベント(バックアップ)のサマリーも確認できます。
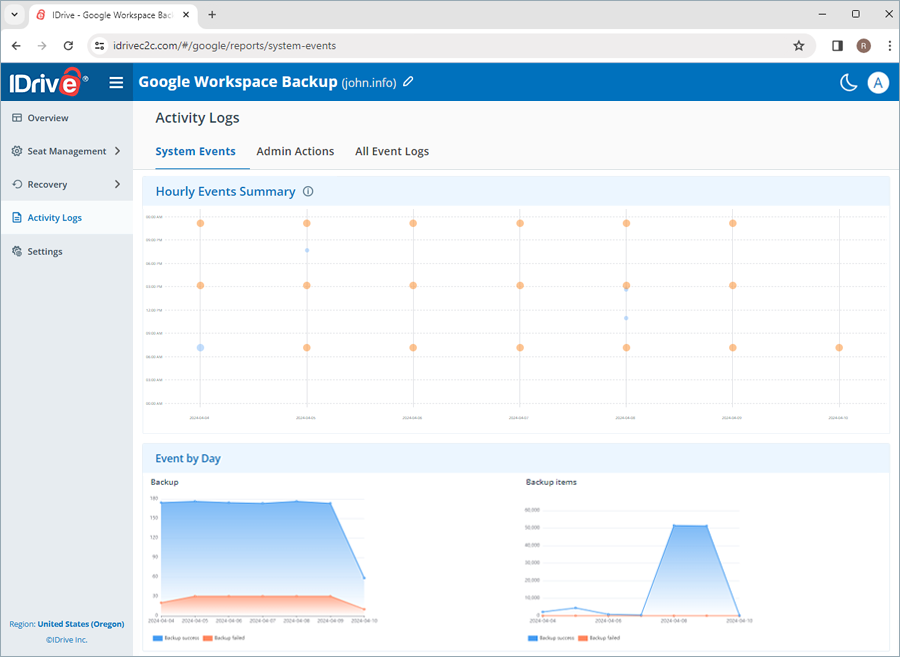
アクティビティの詳細サマリーレポートを生成するには、サマリー生成をクリックします。
CSVダウンロードをクリックして、アクティビティログレポートをCSV形式でシステムにダウンロードすることも可能です。
IDrive® 360 Google Workspace Backupの管理者アクティビティログレポートを確認する方法は?
管理者が開始したアクションのアクティビティログレポートを表示するには、
- IDrive® 360 Google Workspace Backupダッシュボードのアクティビティログタブに移動します。
- 管理者操作をクリックします。
- 日付範囲を選択します。カスタムの開始日と終了日を設定するには、カスタム範囲を選択します。
- 次に、以下のパラメータを指定します:
- イベントタイプ:操作のタイプを選択(すべて、バックアップ、エクスポート、復元、検索)
- ステータス:すべてのアクティビティまたは完了、保留、進行中、失敗イベントのログを生成。
- モジュール:バックアップ済みサービスを選択(すべて、Gmail、Google Drive、Shared Drives、Contacts、Calendar)。
- シート:特定のユーザー/共有ドライブまたはすべてのユーザー/共有ドライブのログを生成。
- イベントログを表示をクリックします。
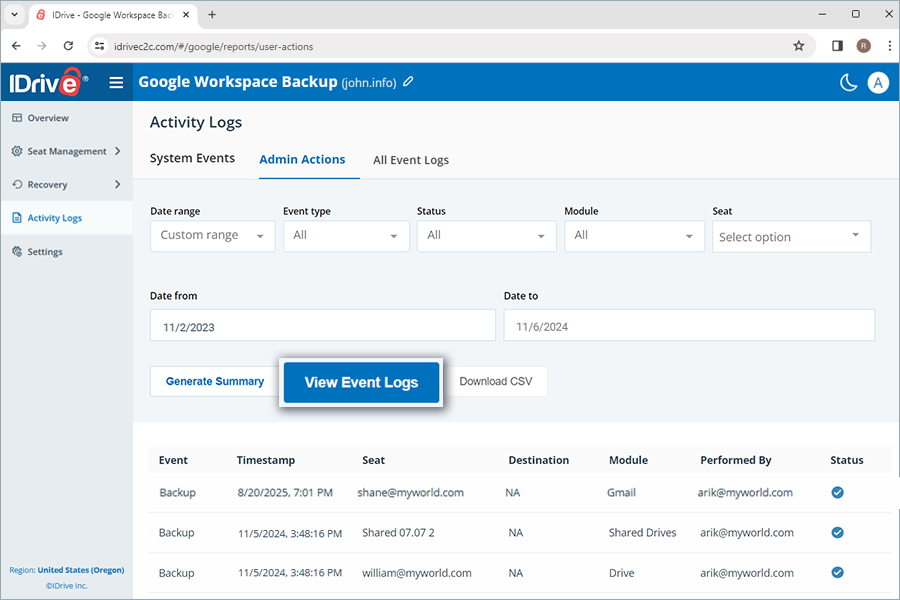
手動バックアップアクティビティのすべてのリスト(タイムスタンプ、シート、モジュール、バックアップステータス、イベント(バックアップ)、復元先、実行者を含む)が画面に表示されます。
アクティビティの詳細サマリーレポートを生成するには、サマリー生成をクリックします。CSVダウンロードをクリックして、アクティビティログレポートをCSV形式でシステムにダウンロードすることも可能です。
IDrive® 360 Google Workspace Backupのすべてのイベントアクティビティログレポートを確認する方法は?
すべてのイベントのアクティビティログレポートを表示するには、
- IDrive® 360 Google Workspace Backupダッシュボードのアクティビティログタブに移動します。
- すべてのイベントログをクリックします。
- 日付範囲を選択します。カスタムの開始日と終了日を設定するには、カスタム範囲を選択します。
- 次に、以下のパラメータを指定します:
- イベントタイプ:操作のタイプを選択(すべて、バックアップ、エクスポート、復元、検索)
- ステータス:すべてのアクティビティまたは完了、保留、進行中、失敗イベントのログを生成。
- モジュール:バックアップ済みサービスを選択(すべて、Gmail、Google Drive、Shared Drives、Contacts、Calendar)。
- シート:特定のユーザー/共有ドライブまたはすべてのユーザー/共有ドライブのログを生成。
- イベントログを表示をクリックします。
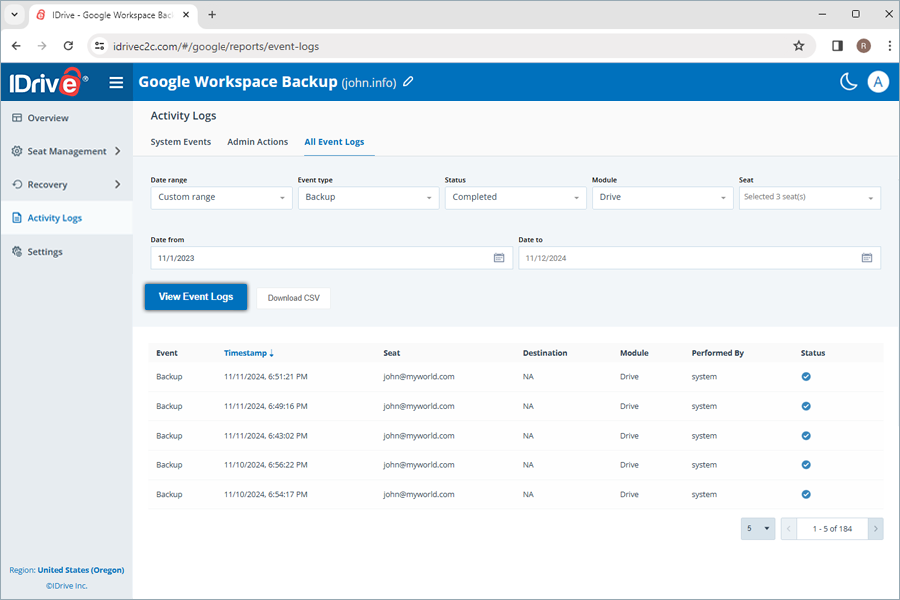
スケジュールと手動の両方のシステムおよび管理者バックアップアクティビティのすべてのリスト(タイムスタンプ、シート、モジュール、バックアップステータス、イベント(バックアップ)、復元先、実行者を含む)が画面に表示されます。
アクティビティの詳細サマリーレポートを生成するには、サマリー生成をクリックします。CSVダウンロードをクリックして、アクティビティログレポートをCSV形式でシステムにダウンロードすることも可能です。