How can I perform differential backup of my MS SQL Server?
To perform differential backup,
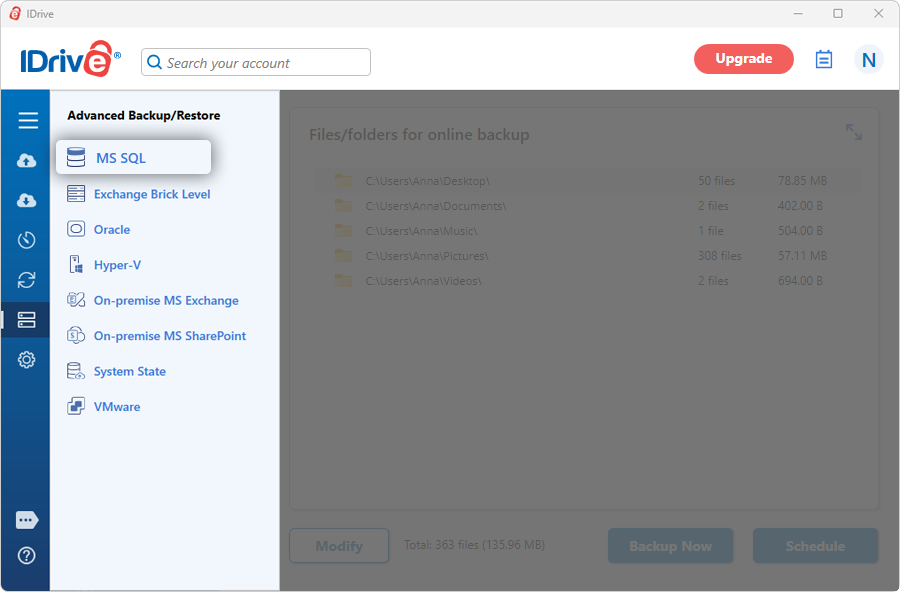
Sign in to the IDrive application and click 'Server Backup' tab. A slider menu will appear.
Click 'MS SQL'. The MS SQL connection screen appears. By default, 'MS SQL backup' is selected.
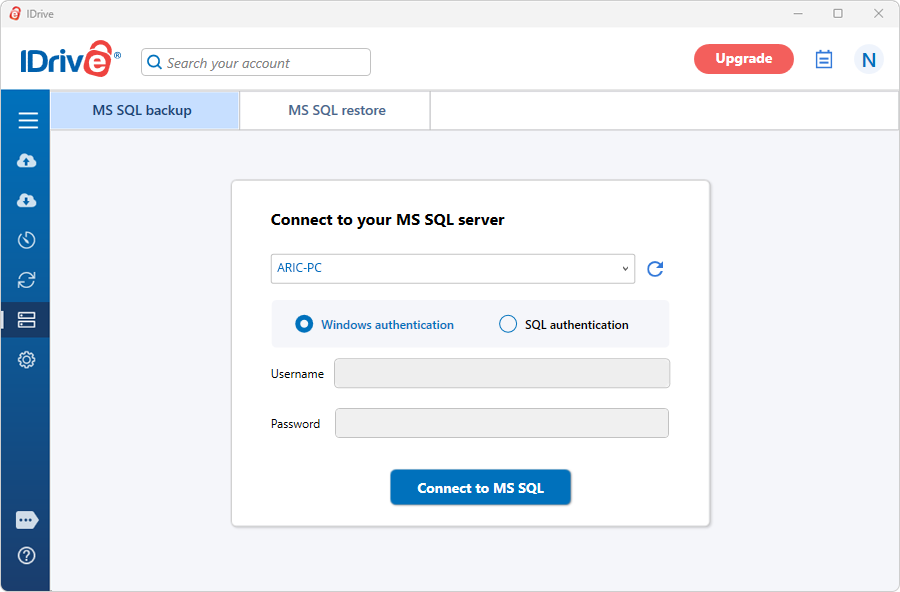
Provide the relevant authentication information when prompted. IDrive provides two modes of MS SQL server authentication. Click 'Connect to MS SQL'.
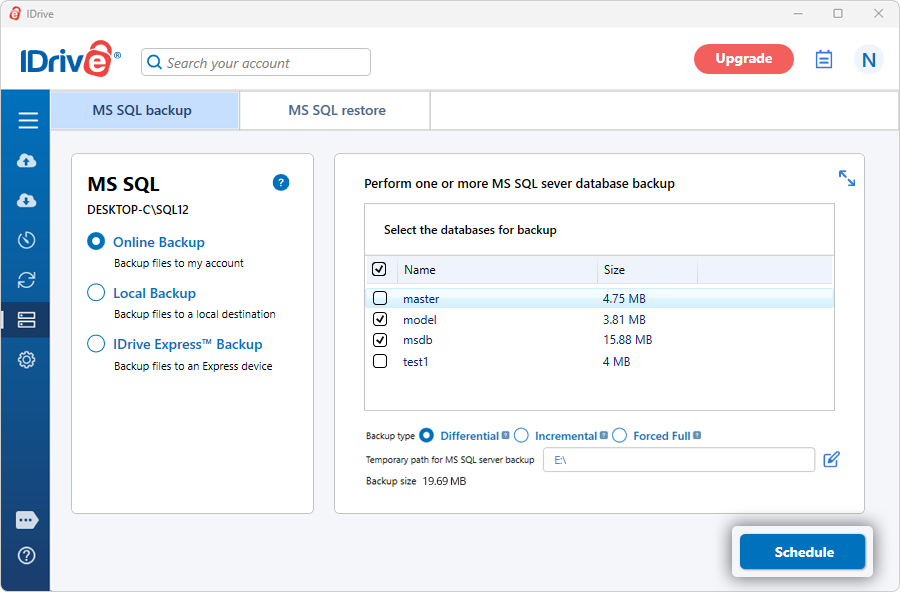
Select 'Online Backup', or 'Local Backup', or 'IDrive Express™ Backup'.
Note: On selecting 'Online Backup', the data will be stored on the IDrive cloud whereas on selecting 'Local Backup' or 'IDrive Express™ Backup' the data will be stored in the local drive.
Select the database(s) from the list which appears and specify MS SQL backup temporary path for local backup.
Note: Once the local backup is initiated, '.ServerBackup' folder is auto-created.
Click 'Schedule Now'.
The 'Scheduler’ appears, from where you can schedule the backup for any future day and time or perform an immediate backup of the selected databases. Click 'Save Changes'.
Note: IDrive for Windows allows you to schedule the MS SQL server backup for different instances. For easy identification of the SQL server backup set, the name of the backup set will be 'IDSQLServerBkset' followed by the instance name scheduled for backup. Example: If the instance name is 'MJOHN\INSTMJOHN' then the name of the backup job is 'IDSQLServerBkset (MJOHN##INSTMJOHN)'
How can I perform incremental backup of my MS SQL server?
To perform incremental backup,
Sign in to the IDrive application and click 'Server Backup'. A slider menu will appear.
Click 'MS SQL'. The MS SQL connection screen appears. By default, 'MS SQL backup' is selected.
Provide the relevant authentication information when prompted. IDrive provides two modes of MS SQL server authentication. Click 'Connect to MS SQL'.
Select 'Online Backup', or 'Local Backup', or 'IDrive Express™ Backup'.
Note: On selecting 'Online Backup', the data will be stored on the IDrive cloud whereas on selecting 'Local Backup' or 'IDrive Express™ Backup' the data will be stored in the local drive.
Select the database(s) from the list which appears and select the 'Incremental' option.
Specify the local backup location and click 'Schedule Now'.
In the 'Scheduler’ that appears, schedule the backup for any future day and time or perform an immediate backup of the selected databases. Click 'Save Changes'.
How can I perform forced full backup of my MS SQL server?
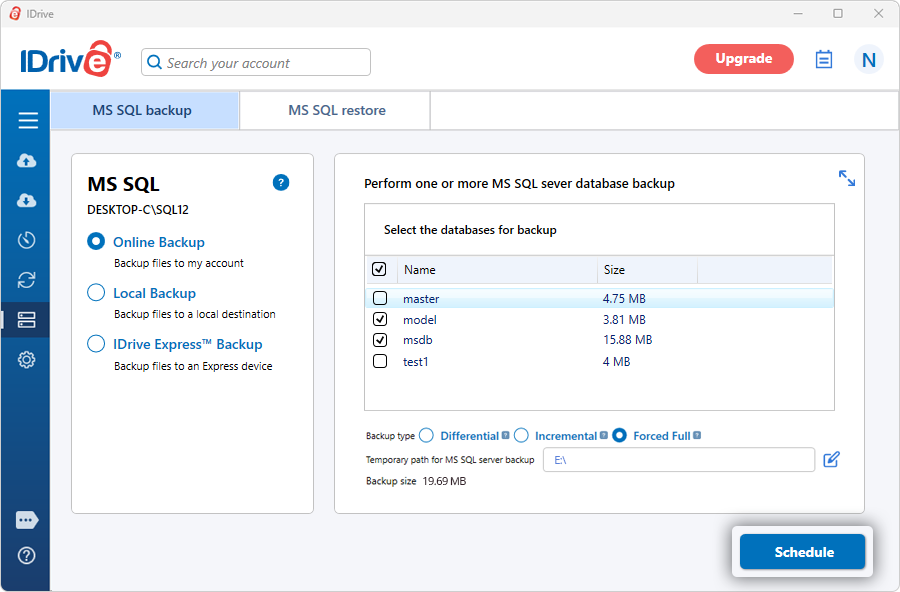
The Forceful Full backup option performs a complete backup of your MS SQL Server every time, ensuring all data is fully protected.
To perform forced full backup,
Sign in to the IDrive application and click 'Server Backup'. A slider menu will appear.
Click 'MS SQL'. The MS SQL connection screen appears. By default, 'MS SQL backup' is selected.
Provide the relevant authentication information when prompted. IDrive provides two modes of MS SQL server authentication. Click 'Connect to MS SQL'.
Select 'Online Backup', or 'Local Backup', or 'IDrive Express™ Backup'.
Note: On selecting 'Online Backup', the data will be stored on the IDrive cloud whereas on selecting 'Local Backup' or 'IDrive Express™ Backup' the data will be stored in the local drive.
Select the database(s) from the list which appears and select the 'Forced Full' option.
Specify the local backup location and click 'Schedule Now'.
In the 'Scheduler’ that appears, schedule the backup for any future day and time or perform an immediate backup of the selected databases. Click 'Save Changes'.
Can I backup databases from multiple instances of MS SQL server?
Yes. You can backup databases from multiple instances of the MS SQL server running on your local computer. However, you may be unable to backup databases from multiple instances of MS SQL server hosted at multiple locations on your network.
I am unable to view the databases in the instance of MS SQL server that I am logged into. Why?
You may be unable to view all the databases under the instance, due to lack of proper access permissions/privileges for the username that you are logged in with. We recommend you to contact your database administrator to obtain the privileges to access the databases.
Yes. IDrive can backup the entire MS SQL server database along with the corresponding database log file, containing the entire structure and components of the database, to your online account.
You can also backup multiple databases wherein each database has its own corresponding '[<database name>].dmp' file.
Can I restore my database file to a different MS SQL server database?
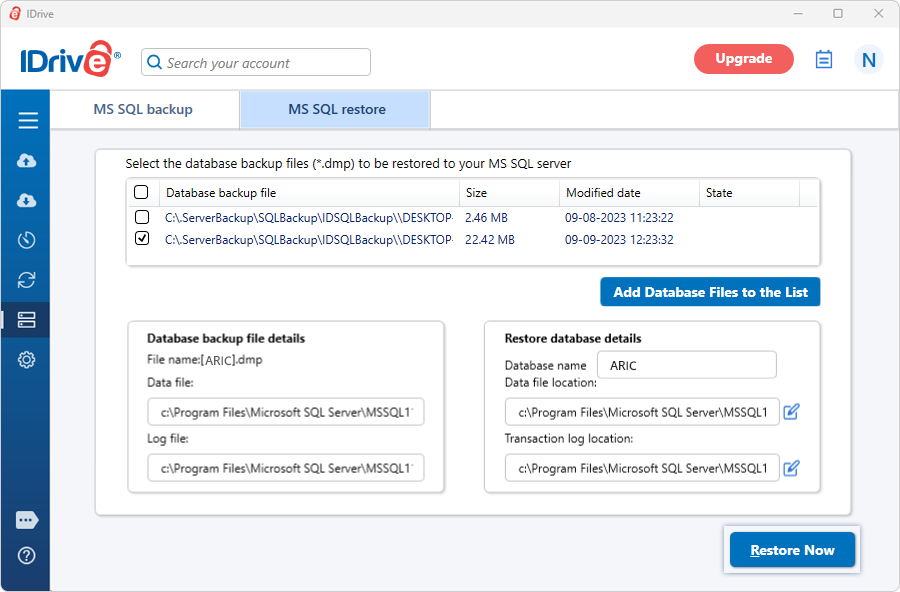
Yes. You can restore your database backup file (.dmp) to a different database by providing a new database name. Further, it is possible to change the data and transaction log file location as desired.
Under what circumstance should I restore the MS SQL server 'master' database?
You need to restore the master database if you are:
Rebuilding all your databases from scratch.
Changing any server-wide or database configuration options.
Adding logins or other login security-related operations.
Creating or removing logical backup devices.
Configuring the server for distributed queries and remote procedure calls such as adding linked servers or remote logins.
Note: If you just want to restore a user database, there is no need to restore your master database. For details on the Microsoft SQL server master database, visit http://www.microsoft.com/sql/.
When should I restore the 'model', 'msdb' and 'distribution' databases?
You should restore the 'model' database, if you have changed the database template of your MS SQL server.
Restore the 'msdb' database, if you have changed the scheduling information or want to restore the backup and restore history of your databases.
If you are running the replication components of MS SQL server, then restore your 'distribution' database.
Note: You need not restore these databases, if you just want to restore a user database. For more information on Microsoft SQL server model, msdb and distribution database, visit http://www.microsoft.com/sql/.
My MS SQL restore operation failed. How do I proceed?
The Microsoft ODBC error: Use the WITH REPLACE or WITH STOPAT Clause of the Restore statement, Restore Database is terminating abnormally.
If the MS SQL restore operation fails and you see the above error message, use the WITH REPLACE or WITH STOPAT Clause. We recommend changing the data file location, log file location and database name and then performing the restore.
I am receiving an error message stating "VDS::Create Fails: 0x80770005" during MS SQL server backup. Why?
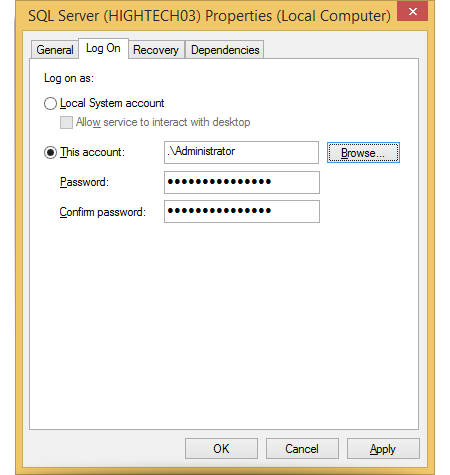
The error message implies that your MS SQL server service on your computer is running under a start up account with the format .\UserName.
To resolve this issue, contact your system administrator to configure the startup account of the MS SQL server service to use the LocalSystem account. Alternately, use a start-up account that has the full name of the domain account instead of a period (.) to start the service. For example, use the startup account DomainName\UserName to start the service.
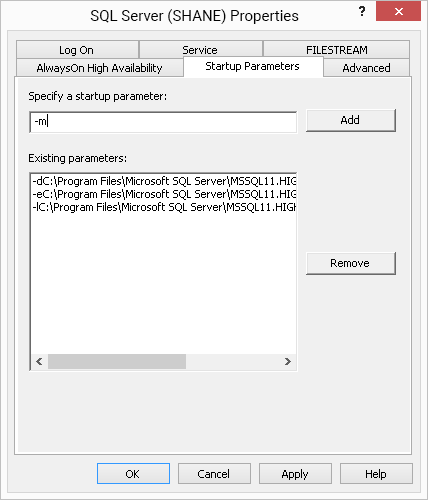
I am receiving an error message stating 'Check registration of SQLVDI.DLL and value of IID' during MS SQL server backup. Why
This message appears when the application tries to use a sqlvdi.dll file that has not been registered.
To resolve this problem, register the sqlvdi.dll file again using the following steps:
Stop the SQL server.
Click Start, click Run, type Regsvr32
\SQLVDI.DLL in the Open box and click 'OK'. The default path of the Sqlvdi.dll file is 'C:\Program Files\Microsoft SQL Server\80\COM.'
How do I set 'sysadmin' role to the "NT AUTHORITY\SYSTEM" or the "BUILTIN\Administrators group" in my MS SQL server?
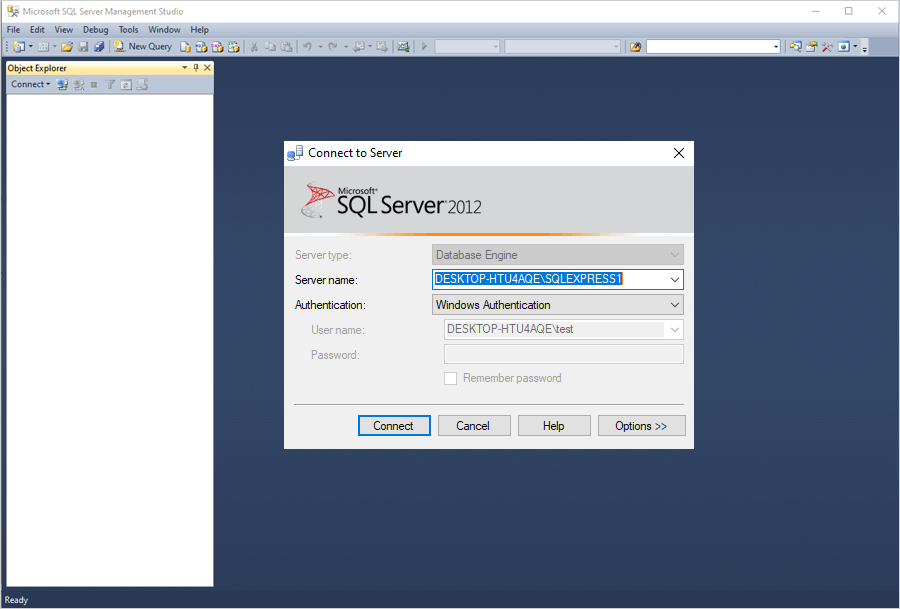
For MS SQL server 2008 and earlier, the 'sysadmin' role is automatically applied to the NT AUTHORITY\SYSTEM and BUILTIN\Administrators groups. However, for MS SQL server 2012 and higher versions, you must first apply the 'sysadmin' role manually to the NT AUTHORITY\SYSTEM or the BUILTIN\Administrators group.
You can set the 'sysadmin' role using the following techniques.
SQL Server Management Studio:
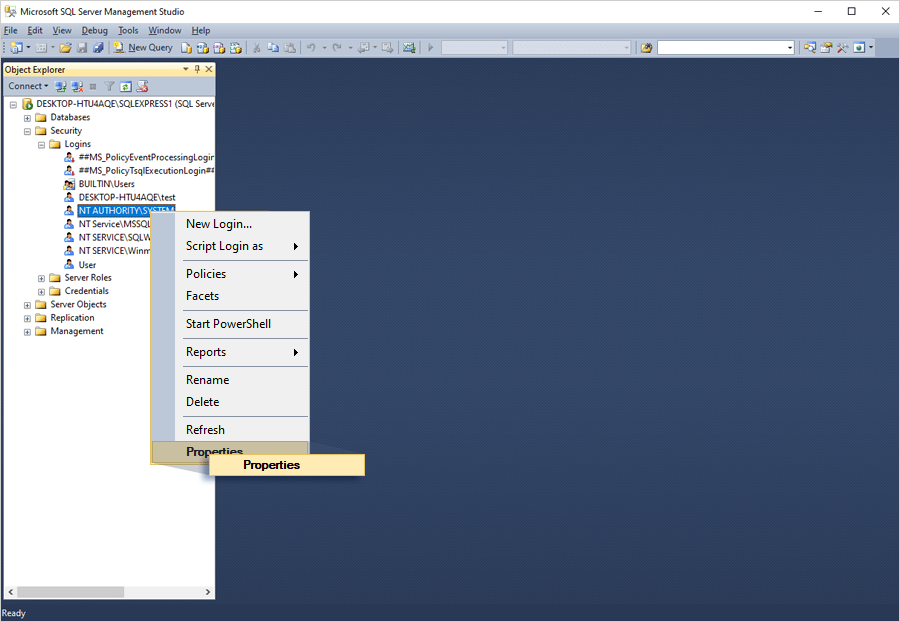
Launch 'Microsoft SQL Management Studio'.
Navigate to 'Security' > 'Logins' > 'NT AUTHORITY\SYSTEM'.
Right-click 'NT AUTHORITY\SYSTEM' and select 'Properties'.
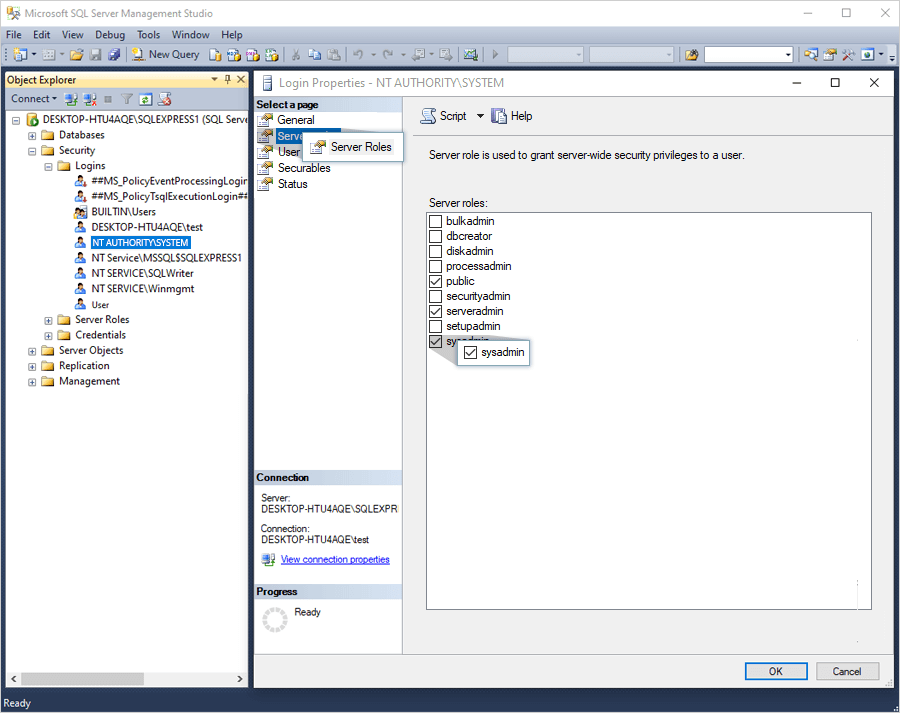
In the 'Login Properties- NT AUTHORITY\SYSTEM' window, click 'Server Roles'.
Select the 'sysadmin' check box, and click 'OK'.
SQL Server Command Line Utility:
Open the Command Prompt with an administrator privilege.
Use the following command to connect to a named instance by using Windows Authentication and provide a sysadmin role.
sqlcmd -S <ComputerName>\<InstanceName> or sqlcmd -S <ComputerName> (For default instance)
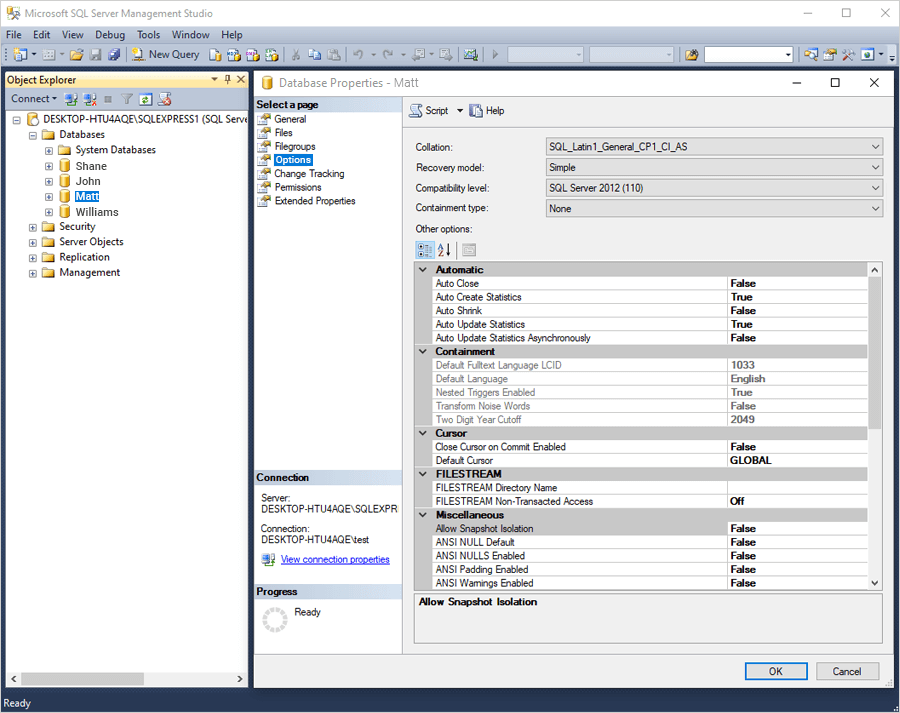
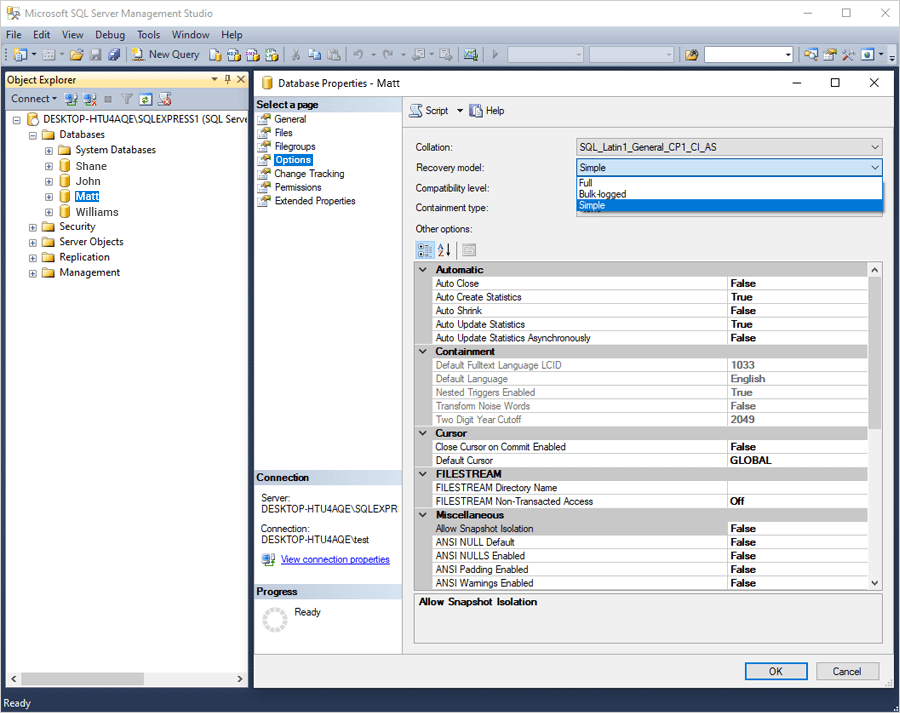
What are the recovery models that IDrive supports for MS SQL server database backup and restore?
A recovery model is a database property that handles how all MS SQL transactions are logged. Furthermore, it decides whether a transaction log requires (and allows) backing up and the different types of restore operations that are available.
MS SQL server database backup, restore, and recovery operations are based on these recovery models:
Simple Recovery Model
Supports full and differential backups
The simplest among all recovery models
Doesn't support transaction log backups
Full Recovery Model
All transactions are fully recorded in the transaction log file
Supports full backup, differential backup, and incremental (log) backups
Incremental (log) backups are the transactions that have changed since the last backup
Bulk-Logged Recovery Model
A unique purpose database configuration option that works similar to the full recovery model, except that certain bulk operations can be minimally logged
Supports full backup, differential backup, and incremental (log) backups
Incremental (log) backups are the transactions that have changed since the last backup
How can I backup MS SQL server database backup from a NAS / mapped drive?
In order to perform MS SQL server database backup to a network mapped drive / NAS drive, you have to map your network location to your system.
To backup,
Click 'Server Backup'. A slider menu will appear.
Click 'MS SQL'. The MS SQL connection screen appears. By default, 'MS SQL backup' is selected.
Provide the relevant MS SQL server authentication information when prompted. IDrive provides two modes of MS SQL server authentication. Click 'Connect to MS SQL'.
Select 'Online Backup', or 'Local Backup' or 'IDrive Express™ Backup'.
Select the database that you want to backup to your account.
Select backup type as 'Differential' or 'Incremental' or 'Forced Full'.
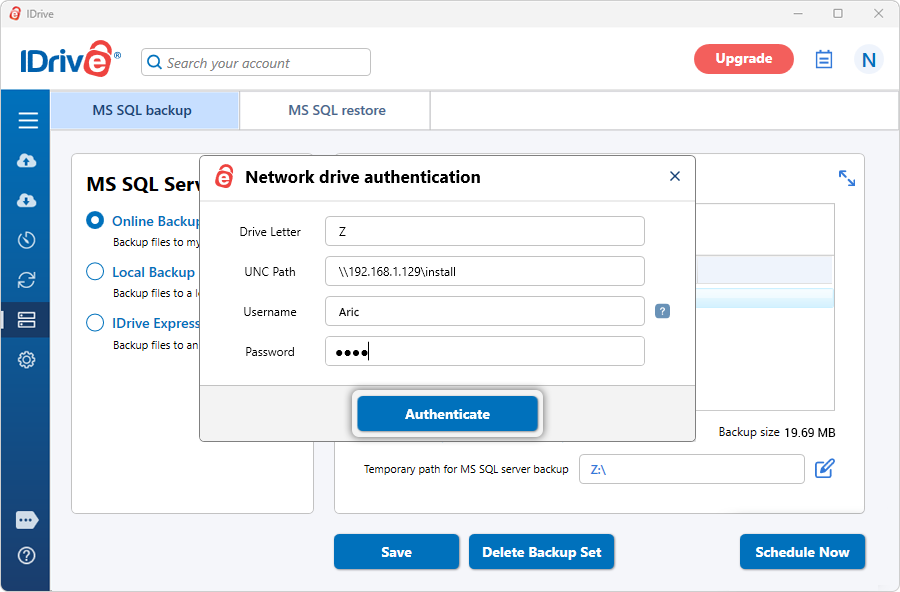
Select the network mapped drive / NAS drive as the location for creating the MS SQL database backup. Click 'OK' and then click 'Schedule Now'.
Enter your username and password to authenticate network mapped drive / NAS drive. Click 'Authenticate'.
The 'Scheduler' appears from where you can schedule MS SQL database backup to perform the backup operation to a network mapped drive / NAS drive. Click 'Save Changes'.
How can I restore MS SQL server database backup from a NAS / mapped drive?
To perform the MS SQL server database restore from a NAS / mapped drive, you have to map your network location to your system.
To restore,
Click 'Server Backup'. A slider menu will appear.
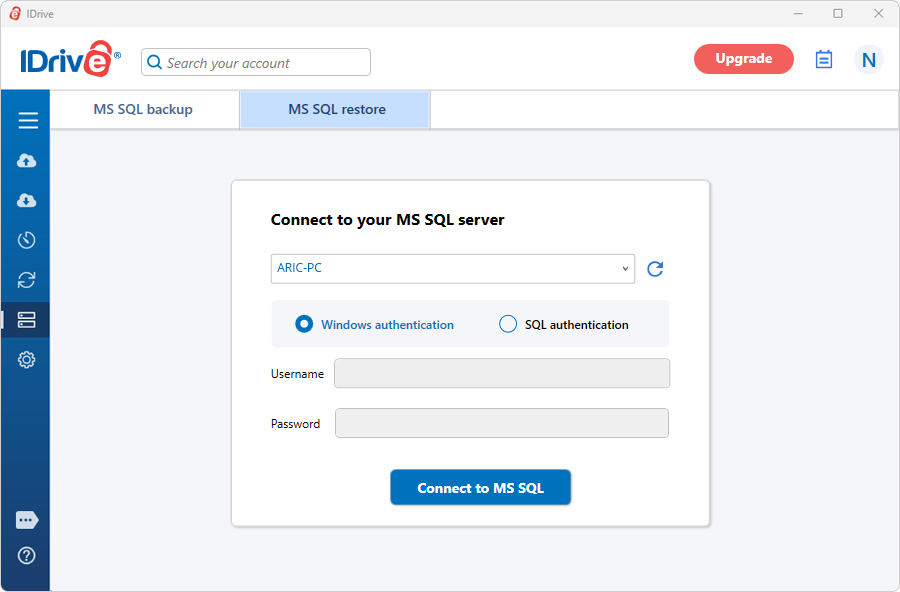
Click 'MS SQL'. The MS SQL connection screen appears.
Click 'MS SQL restore'.
Provide the relevant authentication information when prompted. IDrive provides two modes of MS SQL server authentication. Click 'Connect to MS SQL'.
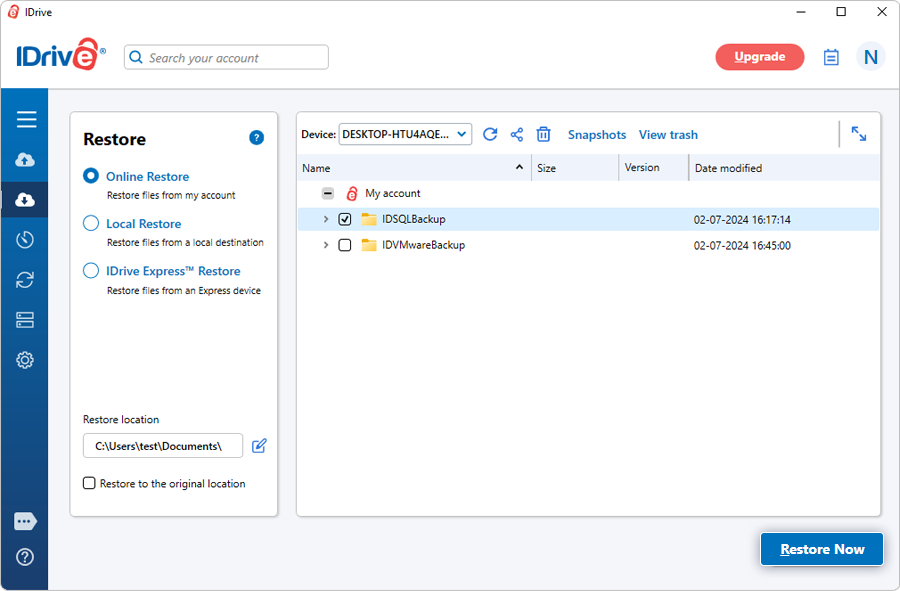
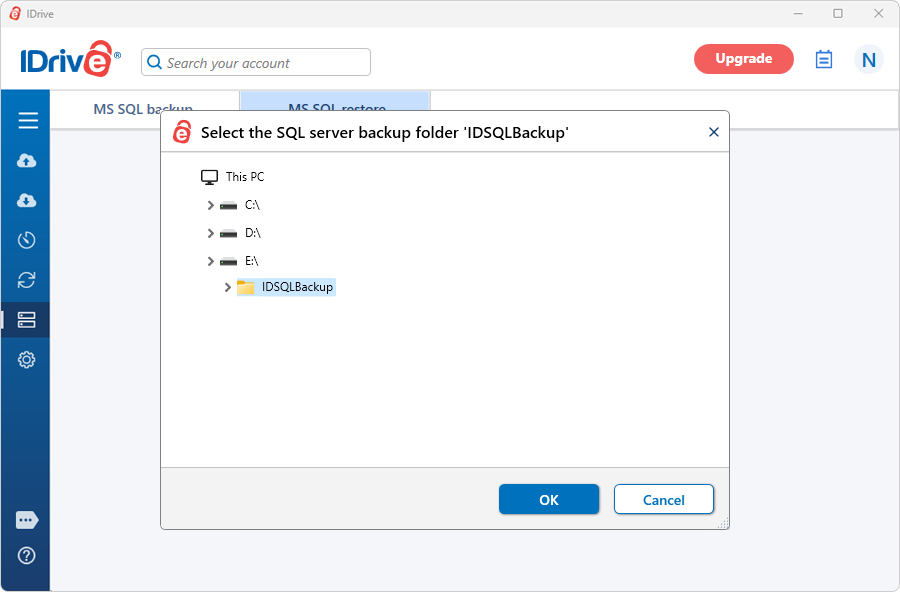
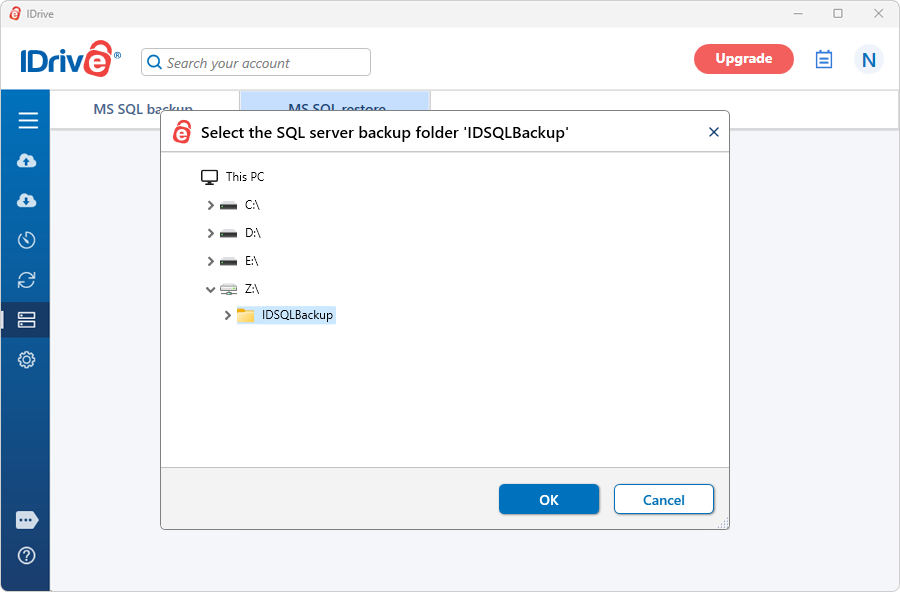
Browse the ‘IDSQLBackup’ backup folder from the NAS / mapped drive to locate the MS SQL database backup file. Download the ‘IDSQLBackup’ folder from your IDrive account or local drive to a NAS / mapped drive. Click ‘OK’ to proceed.
Select the database(s) you want to restore to your MS SQL server.
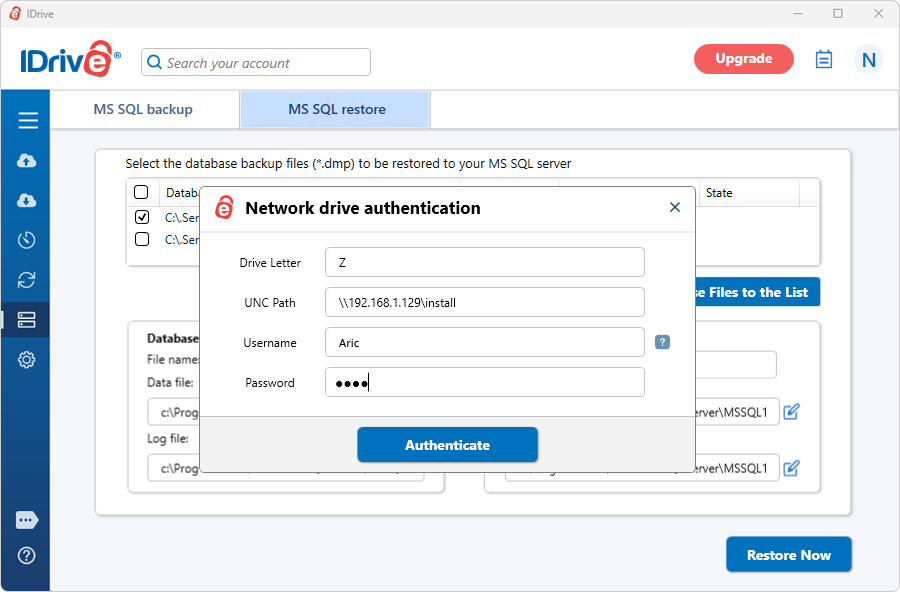
Click 'Restore Now'.
Network authentication window will appear. Enter your username and password for network drive authentication. Click 'Authenticate' to proceed.
Note: It is recommended to run SQL server instance service from the administrator / local account to restore the database backup from NAS or mapped drive.
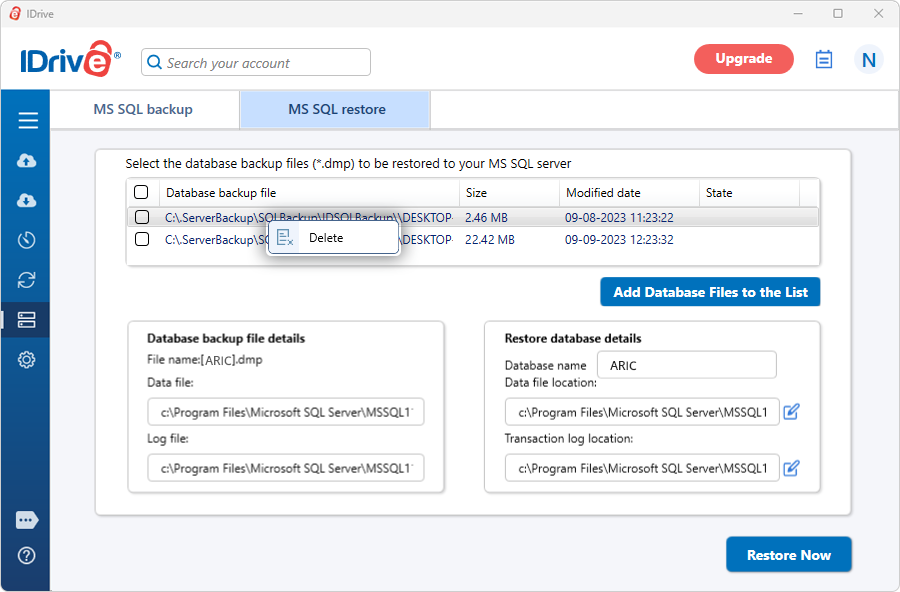
How do I remove the MS SQL server databases that are not required for restore?
To remove the databases,
Sign in to the IDrive application and click 'Server Backup'. A slider menu will appear.
Click 'MS SQL'. The MS SQL connection screen appears.
Click 'MS SQL restore'.
Provide the relevant MS SQL server authentication information when prompted. IDrive provides two modes of MS SQL server authentication. Click 'Connect to MS SQL'.
Browse and choose the database backup (IDSQLBackup) file (restored earlier from your IDrive account or local drive).
After loading IDSQLBackup file the 'SQL Server backup/restore wizard' appears.
Right-click on the database you wish to remove and click 'Delete'.