IDrive Basic Client is a simplified version of the full client.
You can quickly set up backup for your entire computer including operating system, applications, and settings or just select individual files/folders for backup. Backups allow you to recover your entire computer when a complete hard disk crashes or critical files or folders are deleted accidentally.
Your data will be stored in the IDrive cloud and can be retrieved at any time even when the computer is crashed or lost.
How do I backup my data?
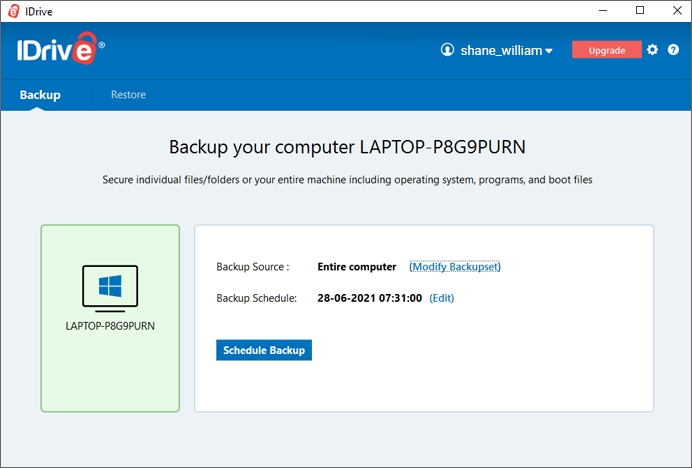
IDrive Basic Client lets you backup your full computer including the operating system, system files, programs, and boot files. By default, your entire computer will be selected for backup.
To backup your entire computer,
Sign in to the IDrive Basic Client with your 'Username/Email' and 'Password'.
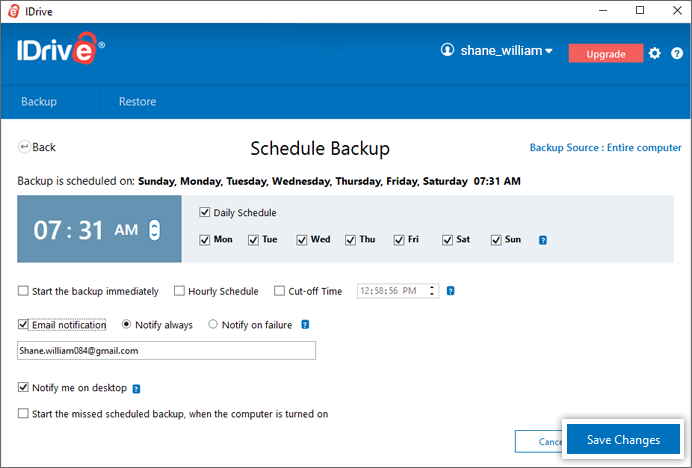
Click 'Schedule Backup'.
Select days and time for backup. Alternatively, you can create an hourly schedule and set a cut-off time.
Select 'Notify always' or 'Notify on failure' to receive email alerts on the registered email address.
Select 'Notify me on desktop' to receive alerts on desktop.
Choose 'Start the missed schedule backup, when the computer is turned on', to resume any scheduled backup once the computer is online.
Click 'Save Changes'.
Backups will occur according to the saved schedule.
To perform immediate backup, you can select the 'Start the backup immediately' checkbox in the 'Schedule Backup' window and click 'Save Changes'. Alternatively, you can click 'Start Immediate Backup' in the 'Backup' window after creating a scheduled backup job.
Is it possible to backup individual files and folders?
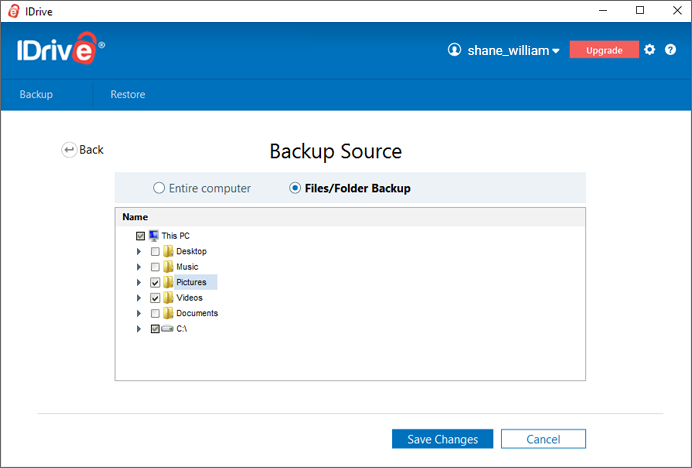
Yes, you can backup individual files and folders by modifying the backup source.
To backup,
Sign in to the IDrive Basic Client with your 'Username/Email' and 'Password'.
In the 'Backup Source' field, click 'Modify Backupset'.
Select 'File/folder backup'.
Choose and select the desired files/folders that you want to backup.
Click 'Save Changes'.
How to enable Continuous Data Protection and set the frequency of backups?
To enable Continuous Data Protection,
Sign in to the IDrive Basic Client with your 'Username/Email' and 'Password'.
Click on the top right corner in the Dashboard.
Select 'Continuous Data Protection'.
Click 'Save Changes'.
To set the CDP frequency, choose any duration as preferred (Real-time, 10 minutes, 30 minutes, or 60 minutes) from the drop-down list.
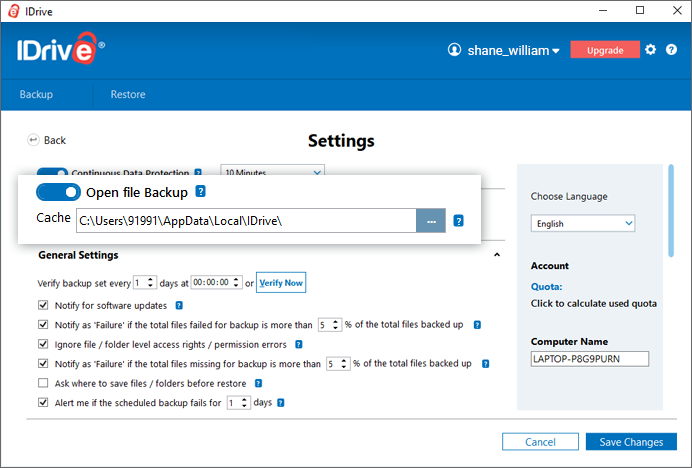
Can I backup my open files in the IDrive Basic Client?
Yes, you can backup open files like Outlook files (.pst), QuickBooks, Quicken, ACT, MS Word, MS Excel, MS Money, MS Access, and MS FoxPro.
To backup open files,
Sign in to the IDrive Basic Client with your 'Username/Email' and 'Password'.
Click on the top right corner in the Dashboard.
Select 'Open File Backup'.
Click and choose a temporary location on your local computer to store the open files during backup. Note: Also ensure that the selected location has sufficient free space to store the open files.
Click 'Save Changes'.
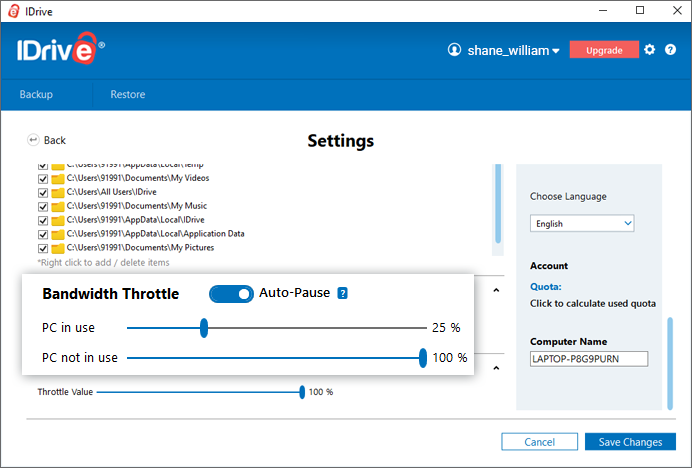
What is Bandwidth Throttle and Auto-Pause?
The Bandwidth Throttle lets you set the Internet bandwidth to be used by the IDrive Basic Client for backups. By default, the bandwidth throttle value is set at 100%.
You can set Auto-Pause, which makes intelligent guesses on bandwidth throttle during backup operation to enable optimum desktop experience with the following options:
PC in use: This option lets you set the bandwidth to be used by IDrive Basic Client for backups, when it is in use. By default, it is set to 25%. This allows other applications to run without hindrance.
PC not in use: This option lets you set the bandwidth to be used by IDrive Basic Client for backups when it is not in use. By default, it is set to 100%.
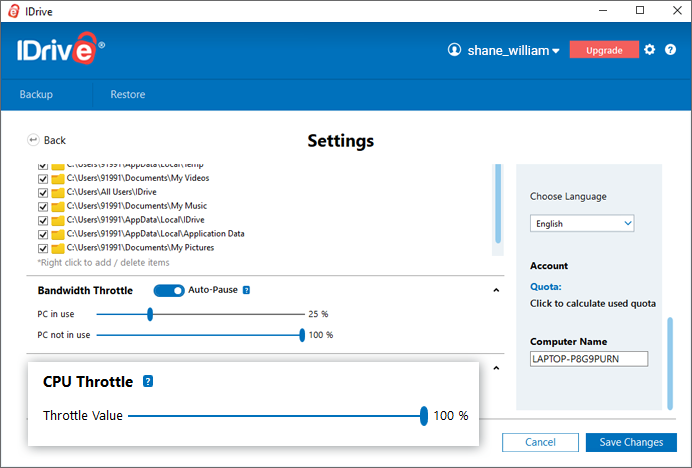
What is CPU Throttle?
CPU throttle allows you to set the CPU usage for backups. You can modify the CPU utilization rate to suit the workload of your computer. By default, the CPU throttle value is set at 100%.
To change the CPU throttle settings,
Sign in to the IDrive Basic Client with your 'Username/Email' and 'Password'.
Click on the top right corner in the Dashboard.
Navigate to 'CPU Throttle'.
Use the slider to set the CPU throttle value to be used, and click 'Save Changes''.
Note: CPU Throttle setting will be available only for operating systems Windows 8 and above.
How can I exclude certain files/folders from being backed up?
There are multiple ways by which you can exclude files/folders from being backed up.
Exclude files/folder from your backup operations in the following ways:
Based on full path names
Sign in to the IDrive Basic Client with your 'Username/Email' and 'Password'.
Click on the top right corner in the Dashboard.
Navigate to 'Exclude files / folders from backup'.
Select 'Files / folders with full path names'.
Right-click anywhere on the list box, and select 'Insert Files / Folders'.
Browse and select a file, and click 'Save Changes'.
Based on partial names
Sign in to the IDrive Basic Client with your 'Username/Email' and 'Password'.
Click on the top right corner in the Dashboard.
Navigate to 'Exclude files / folders from backup'.
Select 'Files / folders with partial names'.
Right-click anywhere on the list box, and select 'Insert partial file name' or 'Insert partial folder name'.
Enter the partial file / folder name you want to exclude from backup and click 'Save Changes'.
To delete a file from the exclude list, right-click a file and click 'Delete'.
How do I restore my backed up data in case my system crashes (or to a new computer)?
To restore your entire backed up computer to the local computer,
Sign in to the IDrive Basic Client with your 'Username/Email' and 'Password'.
From the 'Restore' tab, select your device.
Click 'Restore Now'.
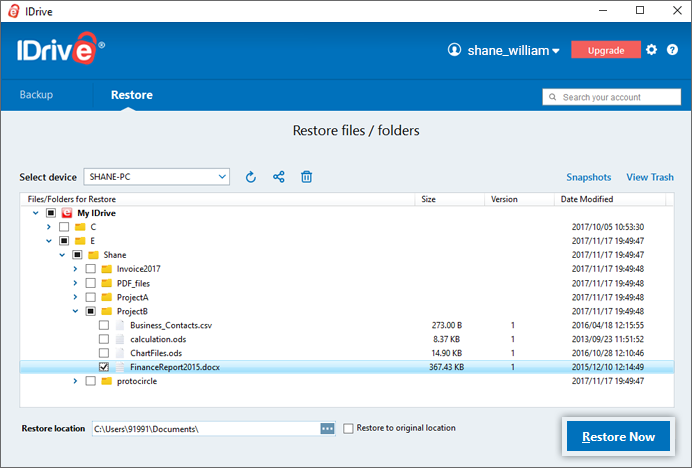
To restore individual files and folders,
Click on the required device to expand the file(s)/folder(s) list. The file(s)/folder(s) backed up from the computer will be displayed.
Select the file(s)/folder(s) that you want to restore.
Choose the desired 'Restore location'.
Click 'Restore Now'.
For more details on how to rebuild the machine from the downloaded data click here.
How do I restore data backed up from multiple computers?
To restore data backed up from multiple computers:
Sign in to the IDrive Basic Client with your 'Username/Email' and 'Password'.
From the 'Restore' tab, select the computer(s) name that you wish to restore. A list of file(s)/folder(s) backed up from the computer is displayed.
Select the file(s)/folder(s) which you wish to restore.
Choose your desired destination on the local computer and click 'Restore Now'.
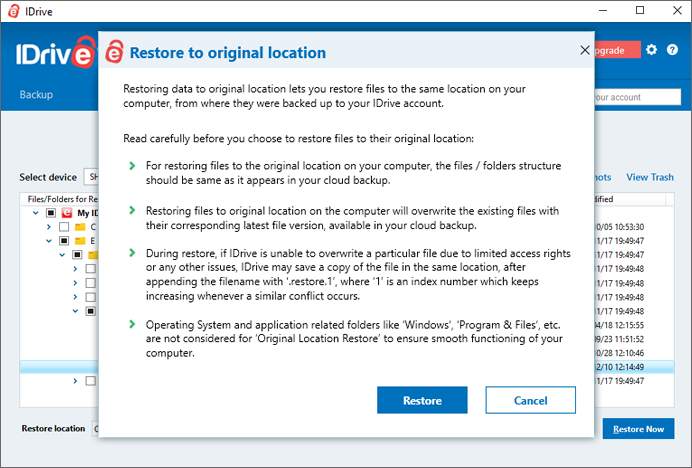
How is 'Restore to original location' different from usual file restore?
The usual file restore lets you download files to a location, selected by you; whereas restoring files to the original location downloads the selected files, keeping their folder structure intact. This means each file is restored to a similar location on your computer, as it appears in your cloud backup.
For example: if you choose to restore the file '/John-PC/D/Examples/ABC.txt' to its original location, the 'ABC.txt' file will be downloaded to a folder called 'Examples' in the 'D' drive of your computer.
Note: Data backed up from mapped drives and external drives cannot be restored using the 'Restore to original location' option.
To restore files to their original location, go to the 'Restore' tab, select the 'Restore to original location' checkbox and on the pop-up that appears, click 'Restore'. Subsequently, to revert file restore to a location selected by you, clear the checkbox, set your preferred 'Restore location', and click 'Restore Now'.
Note: Restoring to original location overwrites the existing files with the latest file version available in your cloud backup
What is Versioning? Does it impact the available quota (storage space in my account)?
IDrive retains up to 30 previous versions of all files backed up to your account (for accounts created prior to 11-07-2018, you can restore up to 10 versions). The additional storage for the previous versions has no impact on your account's quota, as your storage is calculated only for the most current version.
How do I view the versions of a file stored in my account?
To view the versions of a file stored in your IDrive account, go to 'Restore' tab, right-click the required file and select the 'Get Previous Versions' option from the list. You can also search for your desired file version.
How do I restore the latest version of a file?
To restore the latest version, in the 'Restore' tab select the desired file(s) / folder (s), the destination to which you want to restore your data and click 'Restore Now'. You can also search your desired file(s)/folder(s) and restore them back to your local system.
How can I perform point-in-time recovery?
Snapshots are a historical view of your data, stored in your IDrive account, which allow you to perform point-in-time recovery. They are useful in case your files are corrupted by malware and you want to restore a previous version of the files.
To perform snapshot based restore,
Sign in to the IDrive Basic Client with your Username/Email and Password.
Go to the 'Restore' tab and click 'Snapshots'.
Select the date and time and click 'Submit'. A list of all the data backed up on or before the selected date appears.
Select the required files/folders.
Choose your desired destination on the local computer and click 'Restore Now'.
Can I share file(s)/folder(s) directly from my IDrive account?
Yes, you can share file(s)/folder(s) stored on your IDrive account with friends and associates.
To share file(s)/folder(s),
Sign in to the IDrive Basic Client with your Username/Email and Password.
From the 'Restore' tab, select the file(s)/folder(s) and click .
You will be redirected to your web account, from where you can set the share parameters.
Click 'Advanced Settings' to define the following parameters:
Set a password - You can set a password for accessing the link.
No. of Downloads - You can specify a limit for the number of downloads. The maximum limit is 25.
No. of Days - You can specify the duration for which the link remains active. The maximum duration is 30 days.
Click 'Create share link'.
Click 'Copy link' to copy the link to clipboard. Share the link with the intended recipients.
A share link will be created and you can access it from the 'Shared' tab.
Note: Share feature is limited to IDrive accounts with default encryption key.
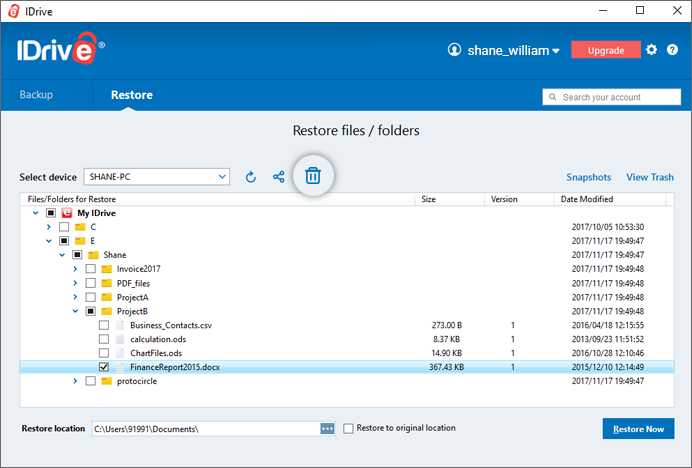
How do I delete data from my account?
To delete data from your account,
Sign in to the IDrive Basic Client with your Username/Email and Password.
Go to the 'Restore' tab.
Select the desired computer or file(s)/folder(s) that you want to delete.
Click .
In the confirmation popup that appears, click 'Ok'.
How do I uninstall the IDrive Basic Client from my computer?
To uninstall the app,
Go to 'Start' > 'Control Panel'.
In 'Control Panel', depending on the version of Windows you are using, select either 'Add/Remove Programs' or 'Programs and Features'
From the list of programs, right-click on 'IDrive Basic Client' and select 'Uninstall/Change'.
Select the 'Remove the logs and configuration settings' checkbox, if you wish to delete the log files and configuration settings from your computer. Click 'Uninstall'.
To delete the IDrive Basic Client folder,
Right-click the IDrive Basic Client shortcut item and select 'Open folder location'.
Right-click the IDrive Basic Client folder and select 'Delete'.
 .
.