The IDrive BMR device supports hosting and backup of NAS and iSCSI shares via the feature Network shares. Creating a NAS or an iSCSI share within the IDrive BMR device is easy and does not require any additional setup or software installation.
You can create a NAS share and enable data access over file-based sharing protocols, including SMB for Windows, NFS for Unix-like operating systems, and AFP for Mac. Also, you have SFTP for ssh-based file sharing. You can create an iSCSI share when you need the storage targets to appear as virtual hard disks on virtual machines.
How do I create a NAS share on the IDrive BMR device?
To create a NAS share with IDrive BMR,
Connect to the IDrive BMR device interface.
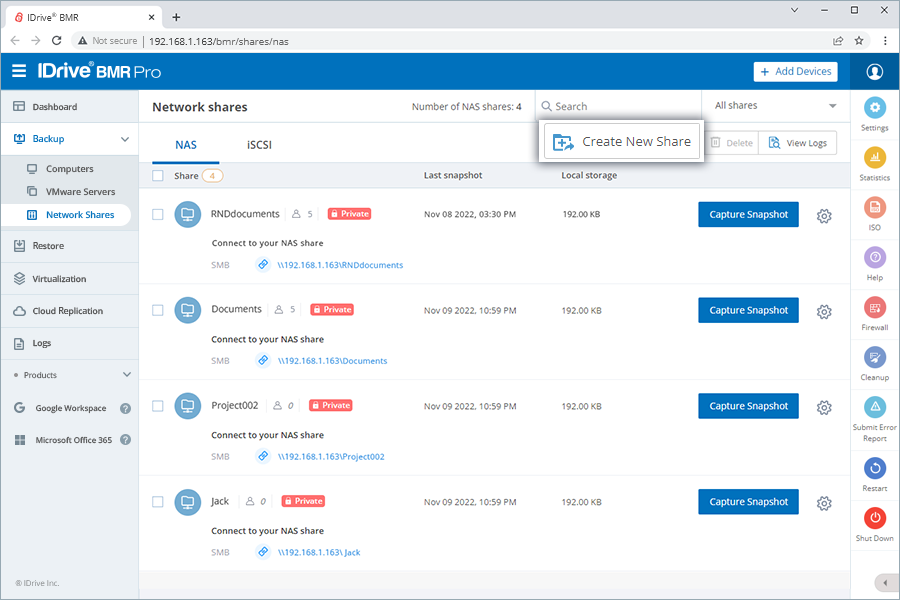
Go to Backup > Network Shares > Create New Share. The Create new share wizard appears.
Under Share type, select NAS share and click Next.
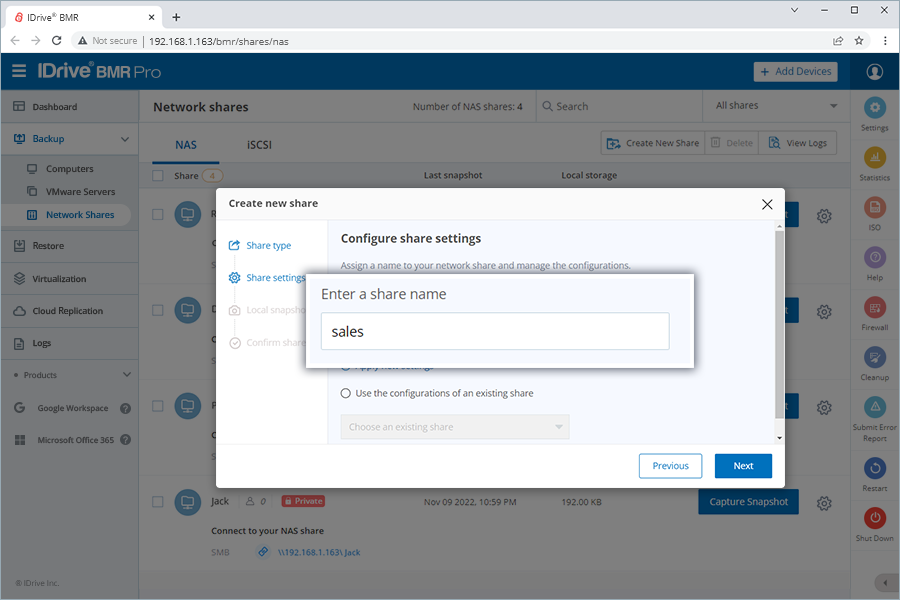
Under Share settings, assign a name for your network share.
Select Apply new settings to configure the settings of your share.
Alternatively, select Use the configurations of an existing share and select an existing share from the dropdown to replicate its configurations.
Click Next.
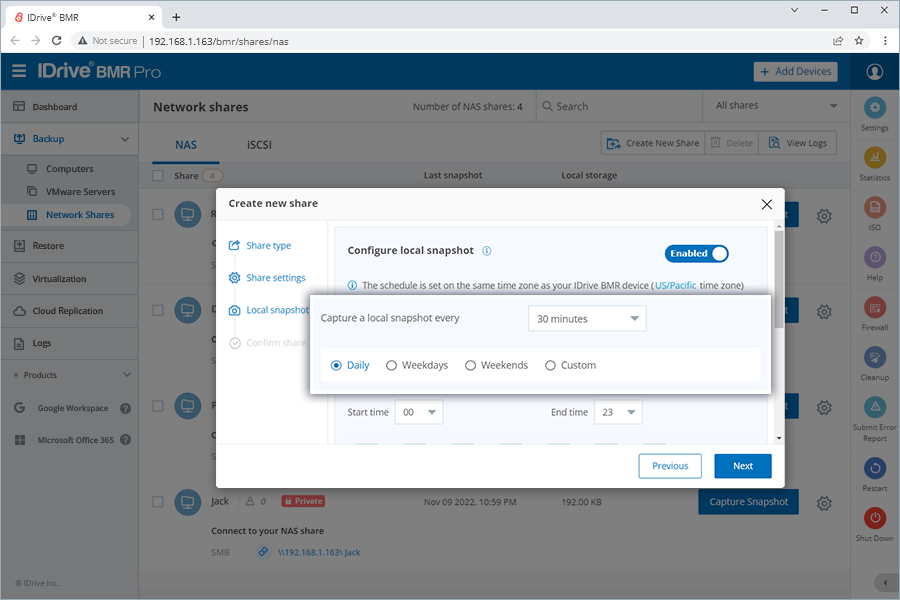
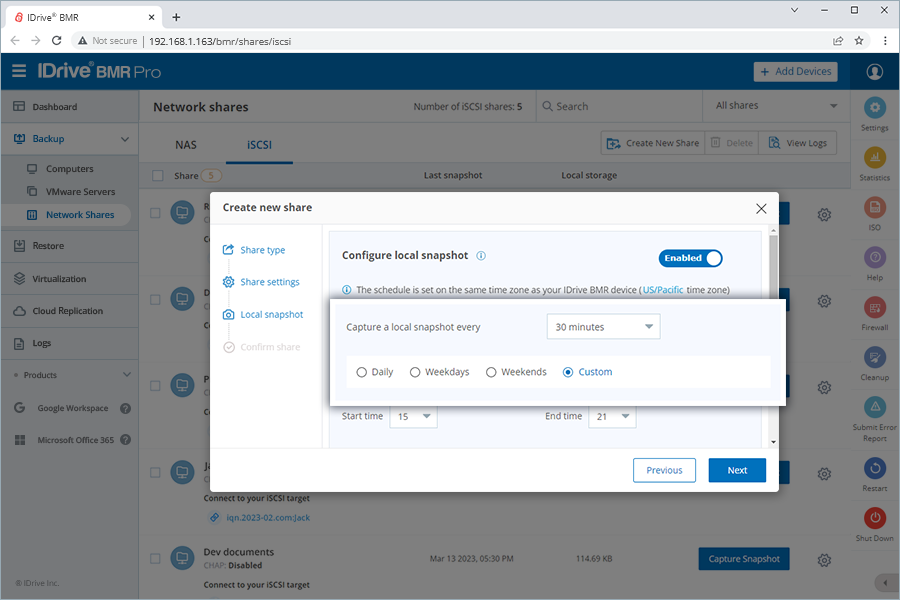
Under Local snapshot, set the snapshot frequency using the dropdown against Capture a local snapshot every.
Select the days for local backup as Daily, Weekdays, Weekend, or select Custom and choose the days.
Set the start and end time for backup.
Note: Here, Start time and End time are soft cut-offs. The actual start time is dependent on the backup pipeline and the actual end time is dependent on the ongoing tasks that are in progress.
In the Snapshot retention settings section, use the slider to set the limit for retaining local snapshots. You can retain up to 100 local snapshots of a network share. Click Next.
Under Confirm share, review the local snapshot summary and click Create. The new share will be added to IDrive BMR’s Network Shares > NAS.
How do I create an iSCSI share on the IDrive BMR device?
To create an iSCSI share with IDrive BMR,
Connect to the IDrive BMR device interface.
Go to Backup > Network Shares > Create New Share.
Under Share type, select iSCSI share and click Next.
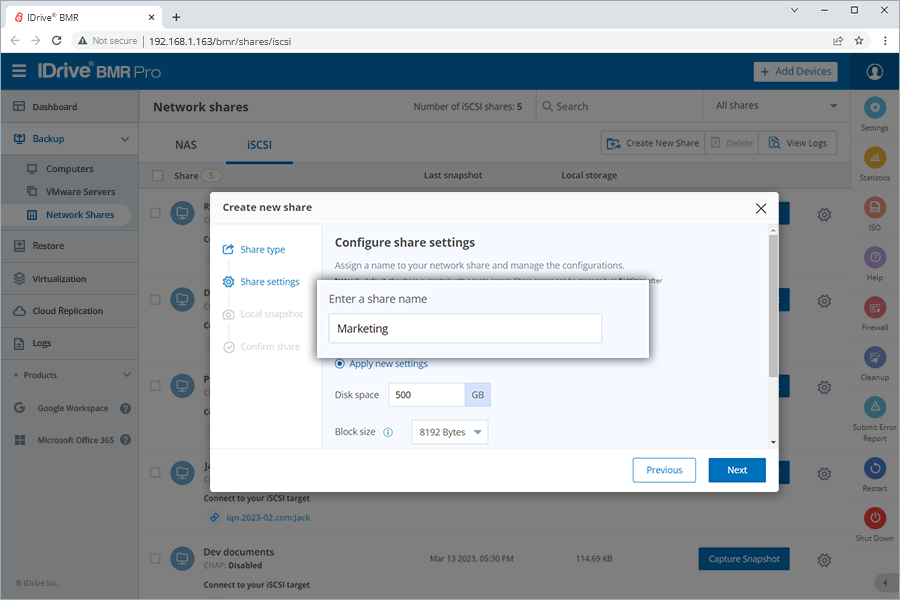
Under Share settings, assign a name for your iSCSI share.
Select Apply new settings to assign default settings to your share. Alternatively, select Use the configurations of an existing share and select an existing share from the dropdown to replicate its configurations.
Assign Disk space for the iSCSI target, configure Block size, and click Next.
Note: Sector sizes 8128 Bytes or 64 KB are supported for IDrive BMR device firmware version 8.6.0 and above. For older firmware, select 512 Bytes or 4 KB.
Under Local snapshot, set the snapshot frequency using the dropdown against Capture a local snapshot every.
Select the days for local backup as Daily, Weekdays, Weekend, or select Custom and choose the days.
Set the start and end time for backup.
Note: Here, Start time and End time are soft cut-offs. The actual start time is dependent on the backup pipeline and the actual end time is dependent on the ongoing tasks that are in progress.
In the Snapshot retention settings section, use the slider to set the limit for retaining local snapshots. You can retain up to 100 local snapshots of a network share. Click Next.
Under Confirm Share, review the local snapshot summary and click Create. The new share will be added under IDrive BMR’s Network Shares > iSCSI.
What is the difference between NAS and iSCSI shares?
The primary difference between the two network shares is their data storage architecture and accessibility:
NAS shares follow object-level storage which is suitable for sharing files and folders. They are accessible as mapped drives on the computers.
iSCSI shares follow block-level storage and the storage architecture is on the network, rather than the computer. In the case of Windows OS, the iSCSI initiator can display the shares on the IDrive BMR device as local drives on the computers on the same LAN.
How do I configure my NAS share?
To configure your NAS share,
Connect to the IDrive BMR device interface.
Go to Backup > Network Shares > NAS. All the network shares are displayed here.
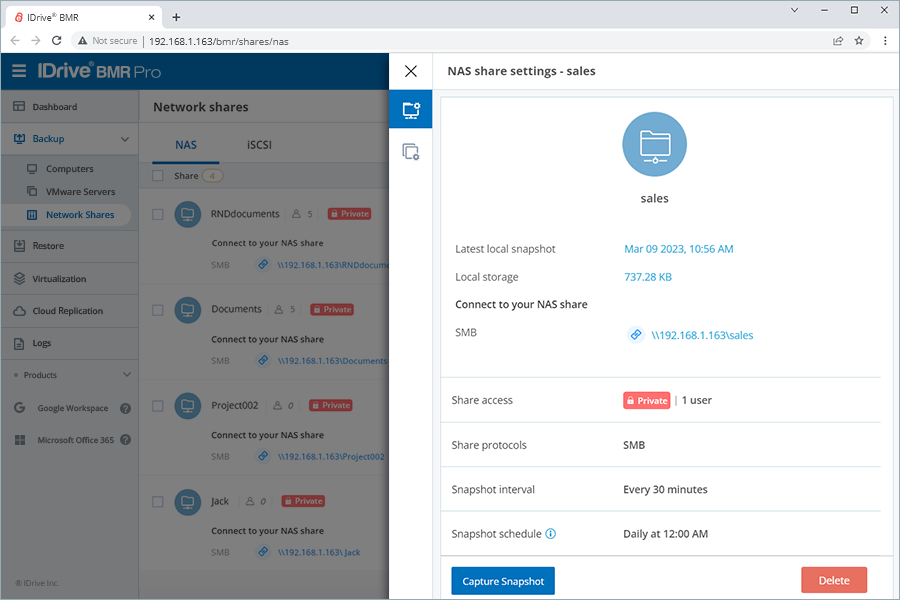
Click corresponding to the required network share. The NAS share settings screen appears.
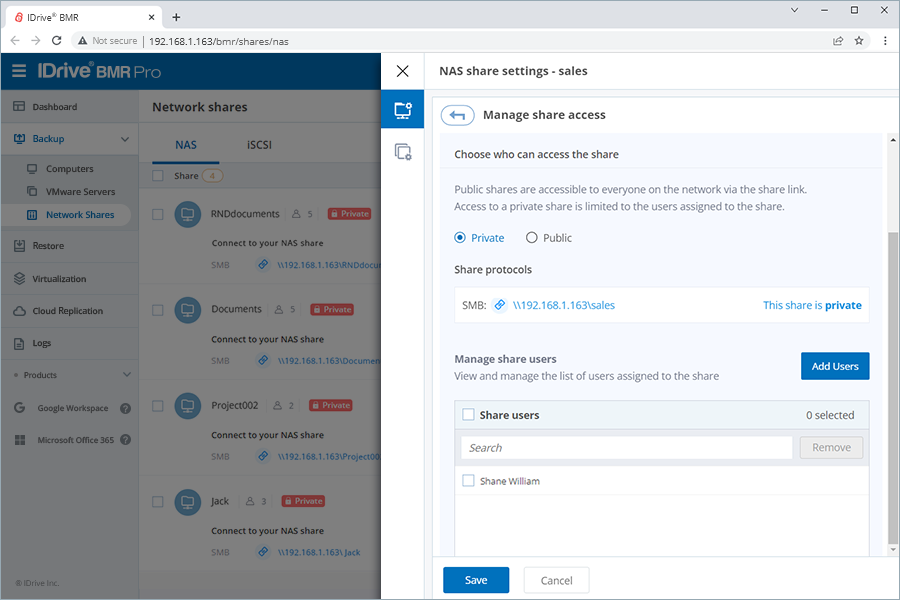
Click corresponding to the Share access field and set the access permission as public or private. In the case of private access, assign users to the share in the Manage share users section.
Click corresponding to the Share protocols field and select the network protocols that will be used for accessing the shares.
Note: SMB protocol access is configured by default.
Enable write access for all users, if required.
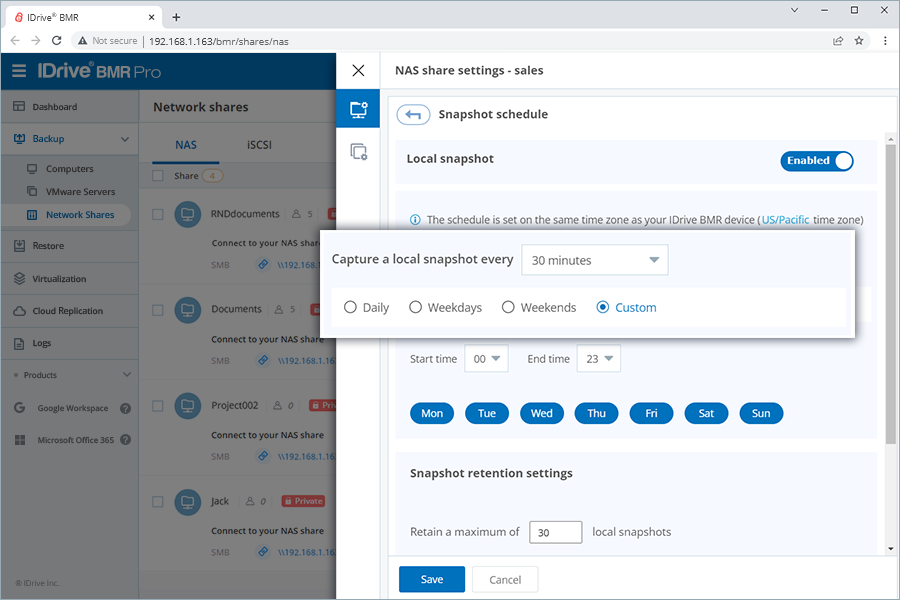
Click corresponding to the Snapshot interval field, set the frequency for capturing the local snapshots, and schedule the backups as Daily, Weekdays, Weekend, or select Custom and choose the days.
Edit the start and end time for backup.
Note: Here, Start time and End time are soft cut-offs. The actual start time is dependent on the backup pipeline and the actual end time is dependent on the ongoing tasks that are in progress.
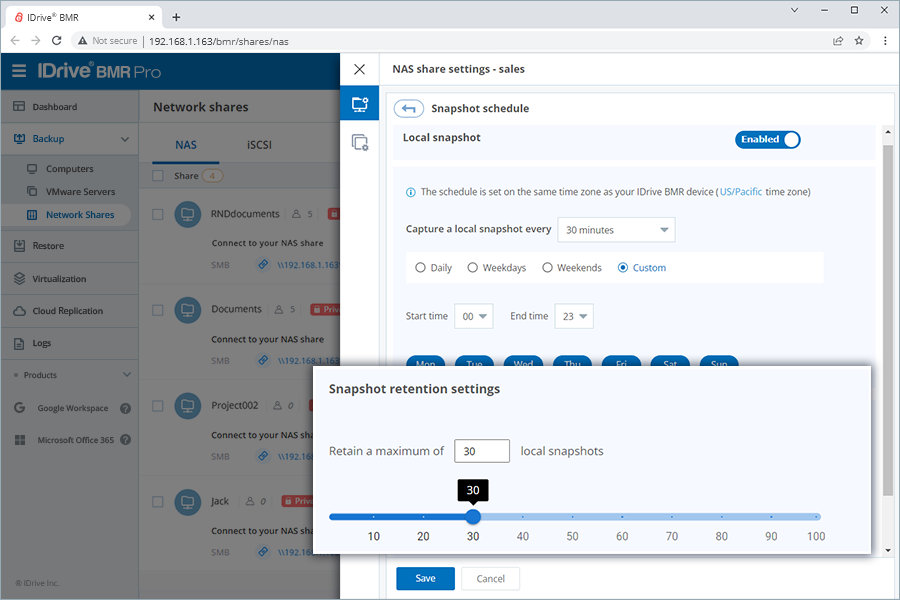
In the Snapshot retention settings section, use the slider to set the limit for retaining local snapshots. You can retain up to 100 local snapshots of a NAS share.
Click Save to save the local snapshot settings.
How do I configure my iSCSI share?
To configure your iSCSI share,
Connect to the IDrive BMR device interface.
Go to Backup > Network Shares > iSCSI. All the network shares are displayed here.
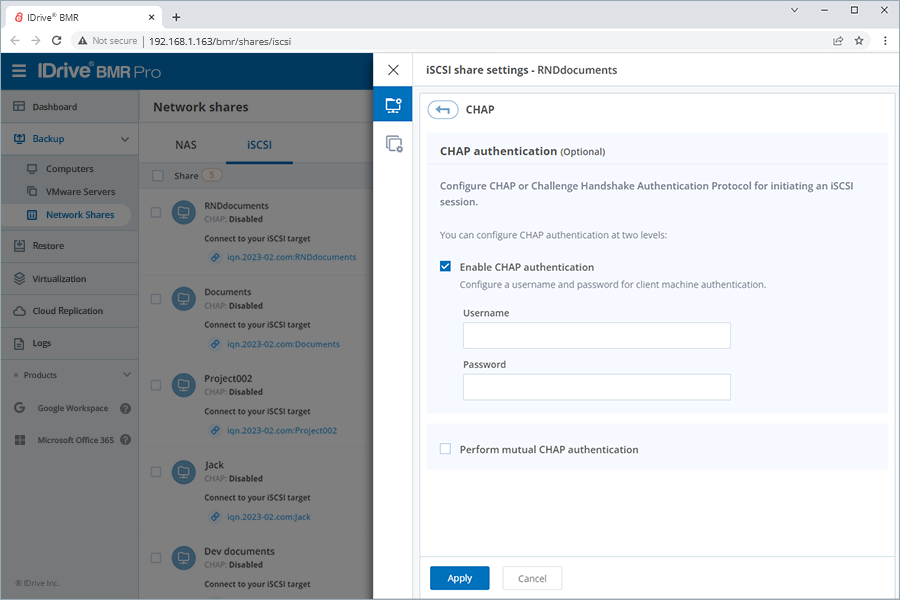
Click corresponding to the required network share. The iSCSI share settings screen appears.
Click corresponding to CHAP and configure CHAP authentication for initiating an iSCSI session.
Note:
CHAP authentication is recommended for the identity verification of the remote client(s).
CHAP authentication can be negotiated in both directions for mutual authentication between the client and the iSCSI target, via Mutual CHAP Authentication.
CHAP authentication needs to be enabled for configuring Mutual CHAP Authentication.
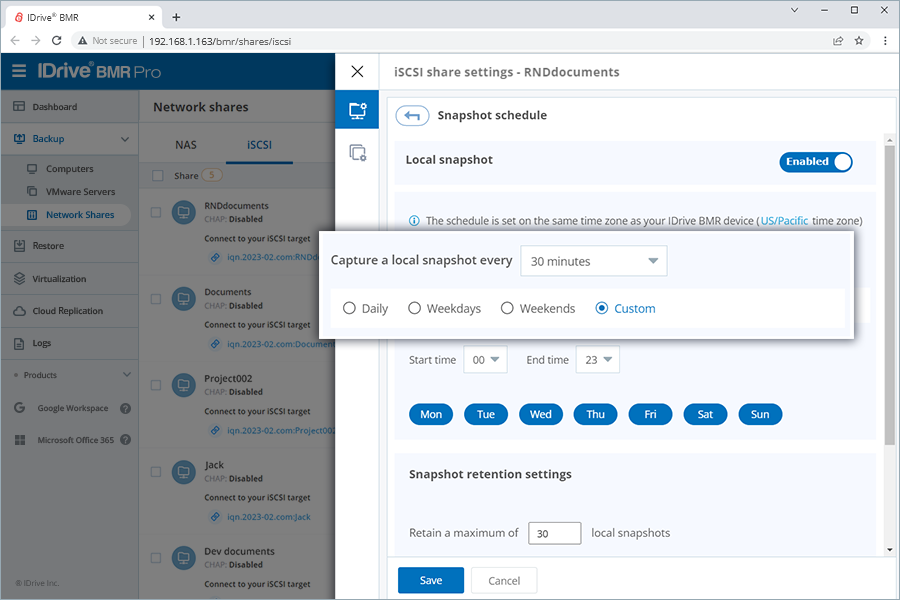
Click corresponding to the Snapshot interval field, set the frequency for capturing the local snapshots, and schedule the backups as Daily, Weekdays, Weekend, or select Custom and choose the days.
Edit the start and end time for backup.
Note: Here, Start time and End time are soft cut-offs. The actual start time is dependent on the backup pipeline and the actual end time is dependent on the ongoing tasks that are in progress.
In the Snapshot retention settings section, use the slider to set the limit for retaining local snapshots. You can retain up to 100 local snapshots of an iSCI share.
Click Save to save the local snapshot settings.
How do I manage the access permission of my NAS share?
To manage the access permission of your network share,
Connect to the IDrive BMR device interface.
Go to Backup > Network Shares. All the network shares are displayed here.
Click corresponding to the required network share.
Click corresponding to Share access.
Configure the network share access as public or private. In case of private access, manage users assigned to the share in the Manage share users section.
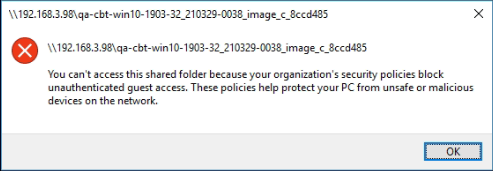
I am unable to access the File Restore/Network shares in my IDrive BMR device. How do I resolve this issue?
Some of the operating systems like Windows 10, Windows Server 2016, and Windows Server 2019, disable guest account access to the SMB shares on a remote server by default. In this case, your connection to an SMB share may fail.
To resolve this issue, you can configure the Group Policy settings of the concerned machines.
To configure a machine,
Open Local Group Policy Editor (gpedit.msc).
In the console tree, select Computer Configuration > Administrative Templates > Network > Lanman Workstation.
For the settings, right-click Enable insecure guest logons and select Edit.
Can I access my NAS share across multiple protocols?
Yes, IDrive BMR supports access and collaboration of NAS shares across SMB, AFP, NFS, and SFTP protocol. You can configure access to these network protocols in the Share protocols field while configuring the share.
How do I access an iSCSI share on my Windows system?
To access an iSCSI share on your Windows system,
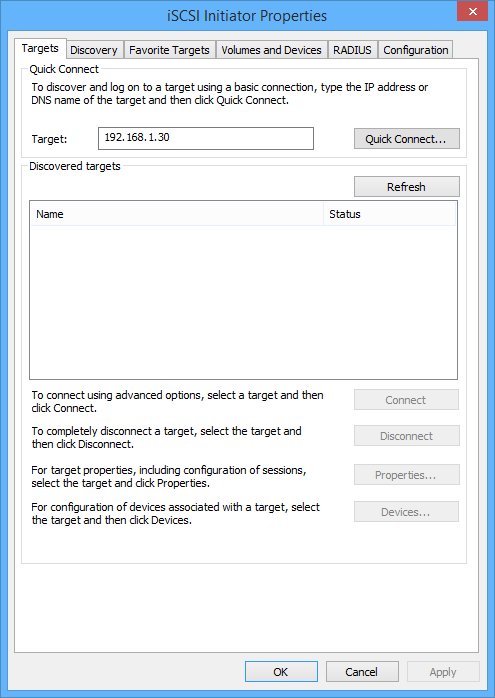
Launch iSCSI Initiator on your Windows machine.
Note: Microsoft iSCSI Initiator is installed natively on Windows Vista, Windows Server 2008, Windows 7, Windows Server 2008 R2, and Windows Server 2012. For other operating systems, it needs to be installed manually.
Enter the IP of your IDrive BMR device in the Target field and click Quick Connect...
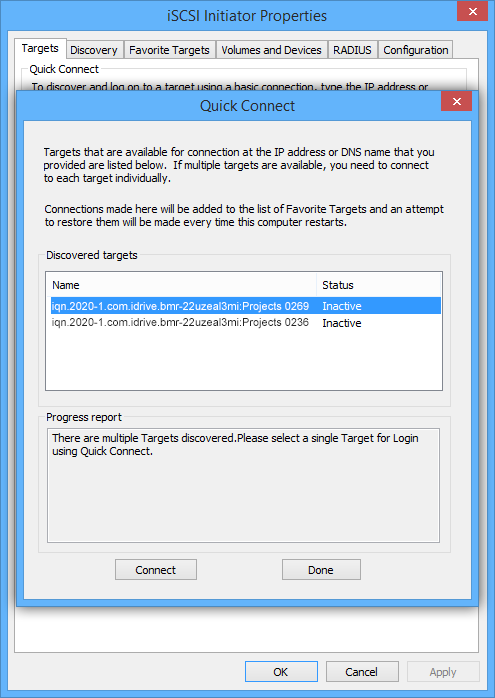
In the list of discovered targets, select the required iSCSI target and click Connect to access the iSCSI volume.
In case CHAP Authentication is enabled, an authentication failure message will be displayed.
To authenticate,
Go to Connect > Advanced.
Enter the pre-defined CHAP username and password and click OK.
Click OK in the Advanced Settings window to access the iSCSI target.
What sector sizes are supported for iSCSI in IDrive BMR NAS?
IDrive BMR NAS allows you to create storage block targets of 8128 Bytes or 64 KB with IDrive BMR device firmware version 8.6.0 and 512 Bytes or 4 KB with older firmware version. You will be able to choose your preferred sector size when configuring the iSCSI NAS share.
Note: While you may be able to change the sector size of the iSCSI target from the initiator side, it is, however, not recommended. During negotiation between the target and the initiator, a difference in the block size may cause issues with the iSCSI operations.
Is there a limit with respect to the share size or the number of network shares I can have on the IDrive BMR device?
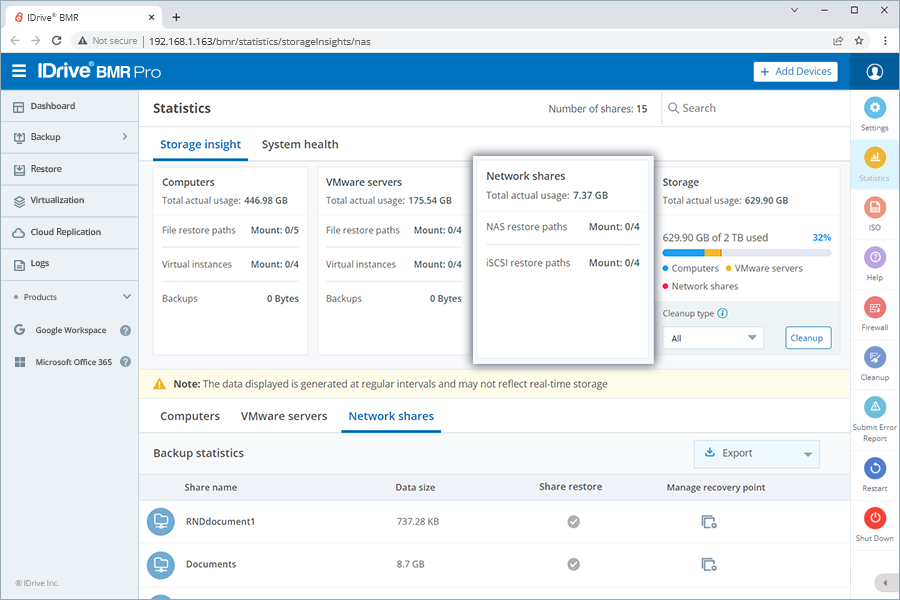
No, there is no limit to the share size or the number of network shares you can have on the IDrive BMR device. The network shares are created within your BMR local storage, therefore, you may need to monitor your local storage utilization to ensure seamless performance.
Go to Statistics > Storage insight > Network shares for details of storage utilization of your NAS and iSCSI shares on the IDrive BMR device.
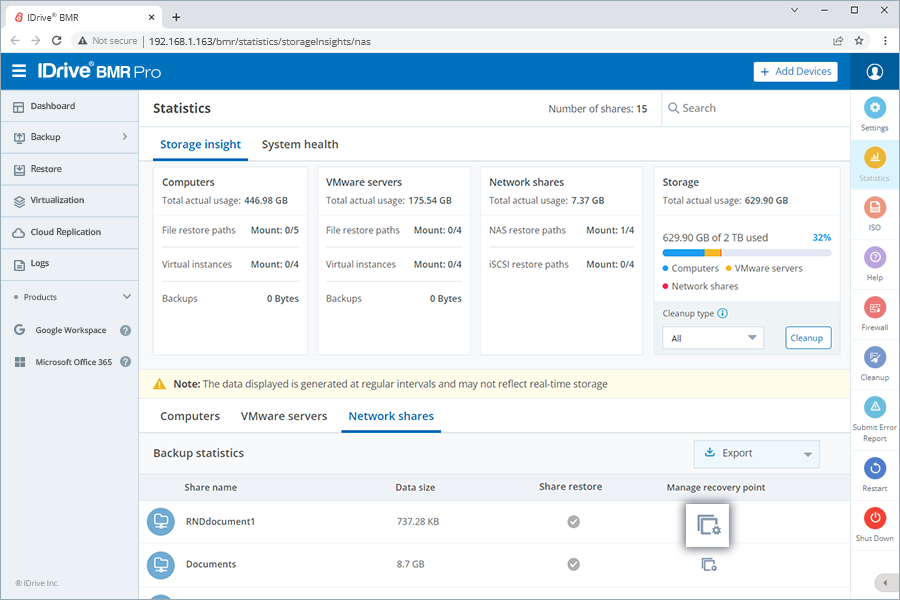
Scroll down to view and export the backup statistics of your NAS and iSCSI shares under Network shares. You can also view the size of individual recovery points of any share by clicking under the Manage recovery point column.
Can I access an IDrive BMR NAS/iSCSI share via an external network?
You can manage your IDrive BMR NAS and iSCSI shares from any external network via the Cloud Manage feature. However, you need to be on the IDrive BMR network in order to access the share.
How do I use IDrive BMR NAS to ensure data safety and security?
You can achieve data protection by maintaining a local backup of your data on the IDrive BMR device via local snapshots. Your IDrive BMR NAS data is encrypted at rest using AES 256 CCM/AES 256 GCM.
How does IDrive BMR NAS secure my data against ransomware?
IDrive BMR NAS secures your data against ransomware via scheduled local snapshots. In case of a malware attack, you can restore data from a point in time before the attack.
What is SSD-HDD Hybrid storage?
The storage of the IDrive BMR device is designed to strike a balance between offering better performance and higher storage capacity. This is done by ensuring that the critical components (operating system, virtual memory, core backup application, etc.) of the device are running on high-performing SSD storage, while the actual data is stored on high-storage-capacity-enabled HDD drives. The hybrid storage environment provides both performance and capacity at a competitive price.
Does IDrive BMR offer hardware support?
Yes, IDrive BMR offers hardware support. In the case of hardware issues or failure, contact support for assistance.
Can I backup my NAS/iSCSI share locally?
Yes, you can backup your NAS and iSCSI shares locally via local snapshots.
To schedule local snapshots for a network share on the IDrive BMR device,
Connect to the IDrive BMR device interface.
Go to Backup > Network Shares > NAS/iSCSI. All the network shares are displayed here.
Click corresponding to the required network share. The NAS share settings/iSCSI share settings screen appears.
Click corresponding to the Snapshot schedule field, set the frequency for capturing the local snapshots, and schedule the backup.
Click Save.
Is the size of my backed-up iSCSI share equal to the actual size of the physical data stored?
The space used to backup your iSCSI shares can be lesser or greater than the actual amount of data physically stored. This is because, data compression and de-duplication mechanism is used in the backend for efficient utilization of the storage space for storing your backups.
Other components such as metadata and references, data fragmentation, and padding space wasted during data alignment between iSCSI blocks and disk blocks also consume a portion of your actual data storage.
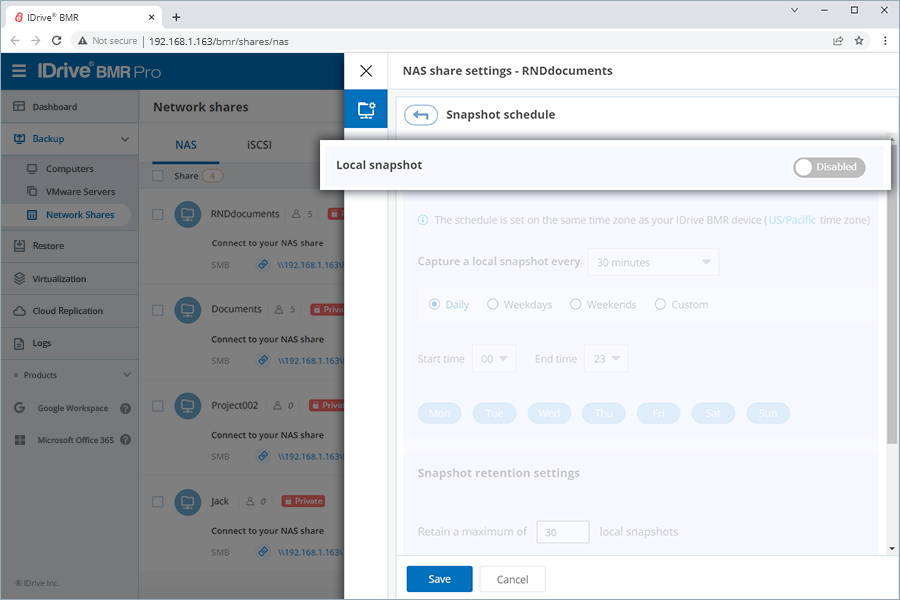
Can I pause the backup of my NAS/iSCSI share?
Yes, you can pause the backup of your NAS and iSCSI shares.
To pause the local backup of a network share on the IDrive BMR device,
Connect to the IDrive BMR device interface.
Go to Backup > Network Shares > NAS/iSCSI. All the network shares are displayed here.
Click corresponding to the required network share. The NAS share settings/iSCSI share settings screen appears.
Click corresponding to the Snapshot schedule field.
Move the slide toggle to read Disabled.
How do I restore my NAS share data from the local snapshots?
To restore your NAS share data from the local snapshots,
Connect to the IDrive BMR device interface.
Go to Restore > Network share restore.
Choose NAS as the share type.
Select the required share and recovery point.
By default, user authentication is disabled and the restore path of the share will be accessible to everyone on the network. To create a secure restore path,
Select Yes and enable user authentication.
Select the username from the Mount username dropdown.
Enter the mount password.
Click Create. The new network share will be accessible over the SMB protocol. Based on the OS you are using, you can use the SMB client native to the OS, or install a dedicated application specific to your OS platform to access the data.
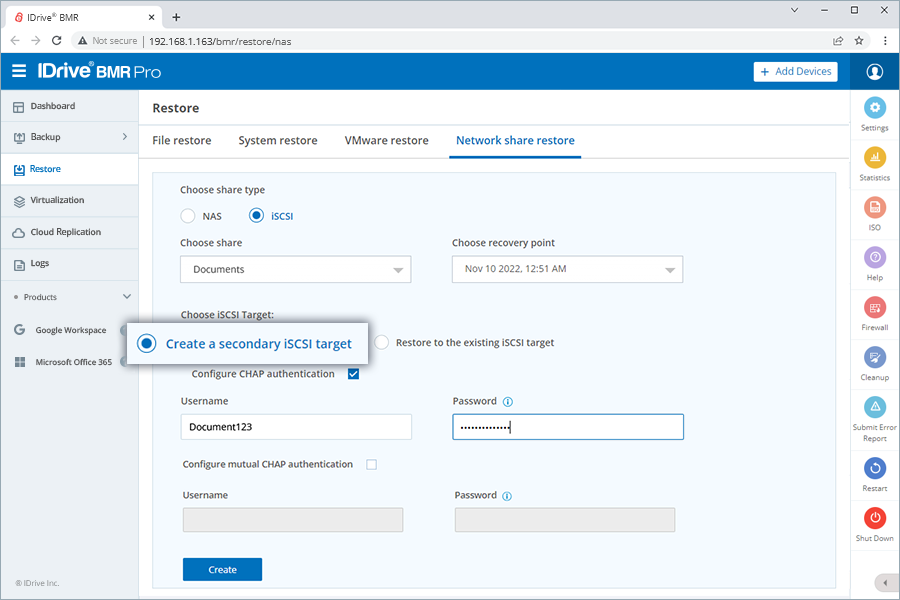
How do I restore my iSCSI share data from the local snapshots?
To restore your iSCSI share data as a secondary iSCSI target,
Connect to the IDrive BMR device interface.
Go to Restore > Network share restore.
Choose iSCSI as the share type.
Select the required share and recovery point.
Select Create a secondary iSCSI target.
Configure CHAP and Mutual CHAP authentication, if required.
Note: CHAP authentication needs to be enabled for configuring Mutual CHAP Authentication.
Click Create.
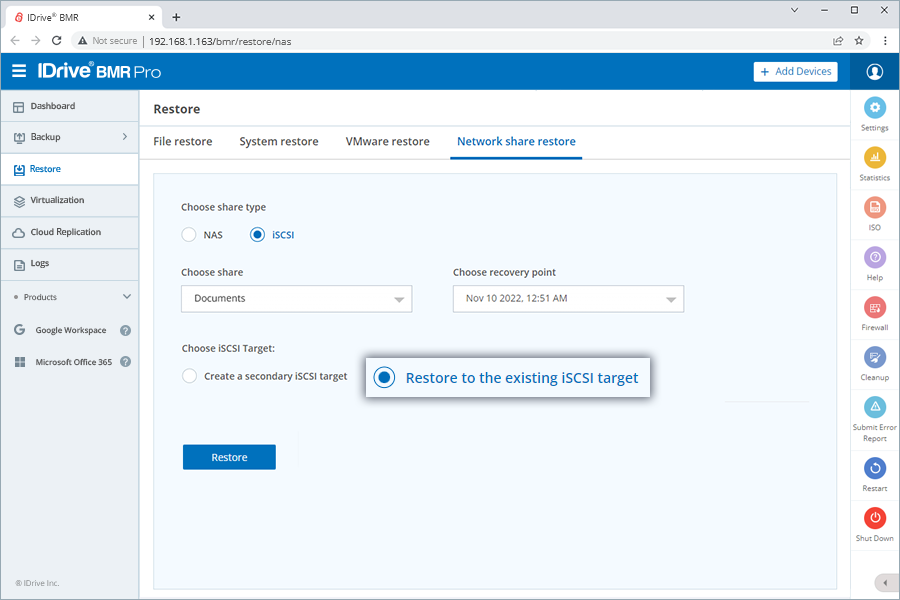
To restore your iSCSI share data to the existing iSCSI target,
Connect to the IDrive BMR device interface.
Go to Restore > Network share restore.
Choose iSCSI as the share type.
Select the required share and recovery point.
Select Restore to the existing iSCSI target.
Click Create.
Note:
Restoring your network share will effectuate the following changes:
Data created after the selected recovery point will be permanently lost.
Restore paths of the time range beyond the recovery point will be automatically deleted.
All active iSCSI connections will be terminated.
Click Confirm to continue with the restore.
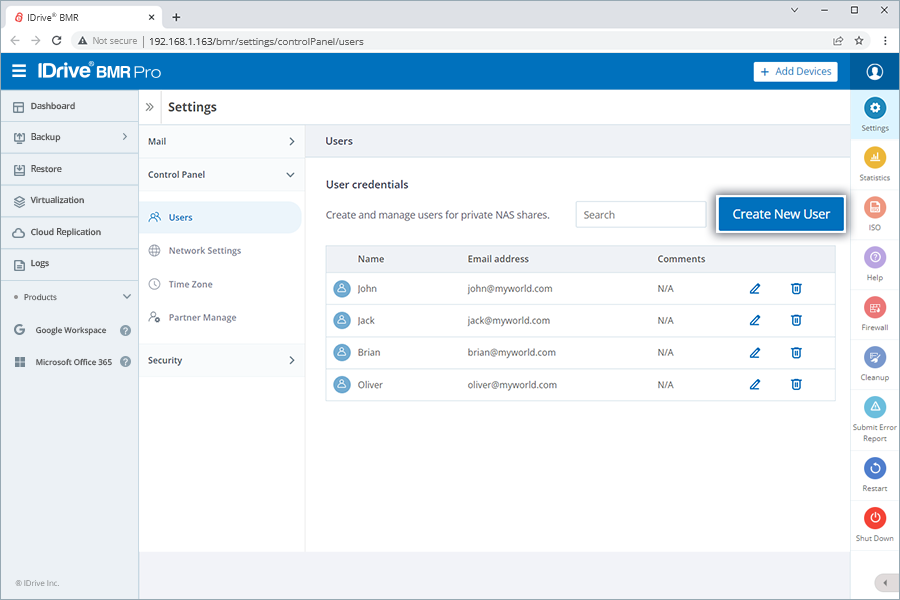
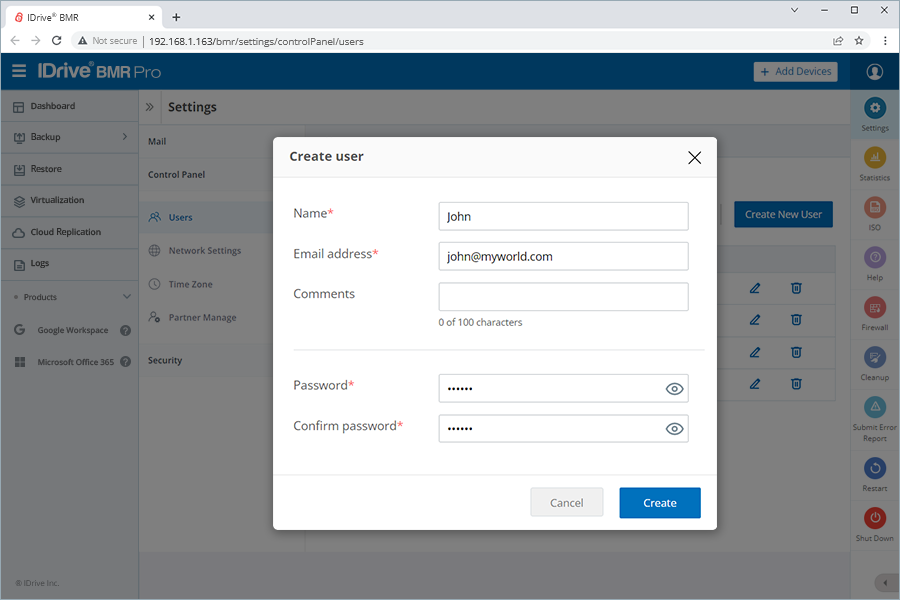
How do I add users for IDrive BMR NAS shares?
To add users to IDrive BMR for NAS shares,
Connect to the IDrive BMR device interface.
Go to Settings > Control Panel > Users.
Click Create New User.
Enter the name, email, and the required details and configure a password.
Click Create. The new user is created and listed under Users.
To delete a user, click corresponding to the user.