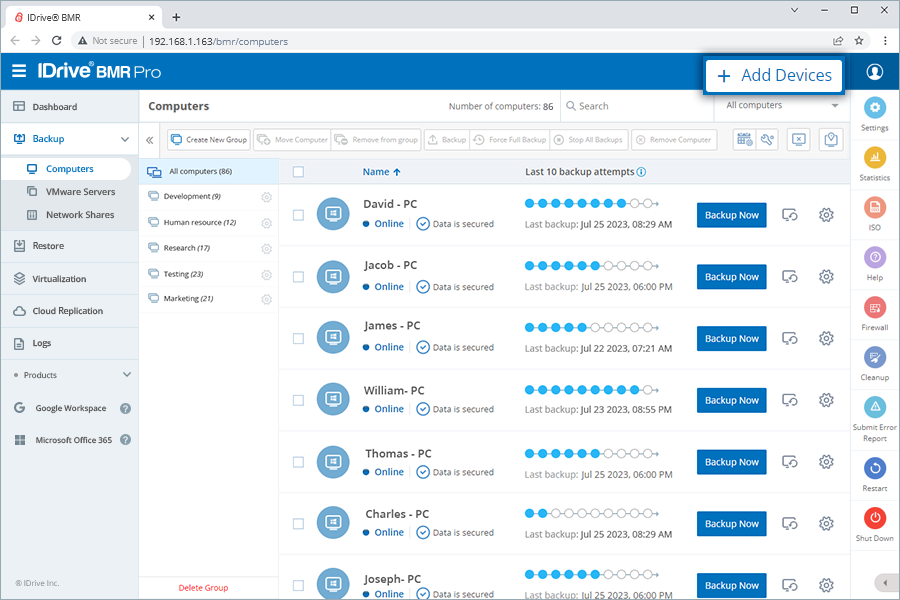
How do I backup my computer to the IDrive BMR device?
To backup a computer to your IDrive BMR device, you need to install the backup agent on your computer. The IDrive BMR device detects the agent installed on the computer and auto-starts the scheduled backup.
Note: Auto-update functionality is supported for backup agent version 4.2.0 (BMR device firmware version 8.3.0 and above) and above. You can disable the auto-update via your system's IDrive BMR tray icon.
To add a computer to the IDrive BMR device for backup,
Connect to the IDrive BMR device interface.
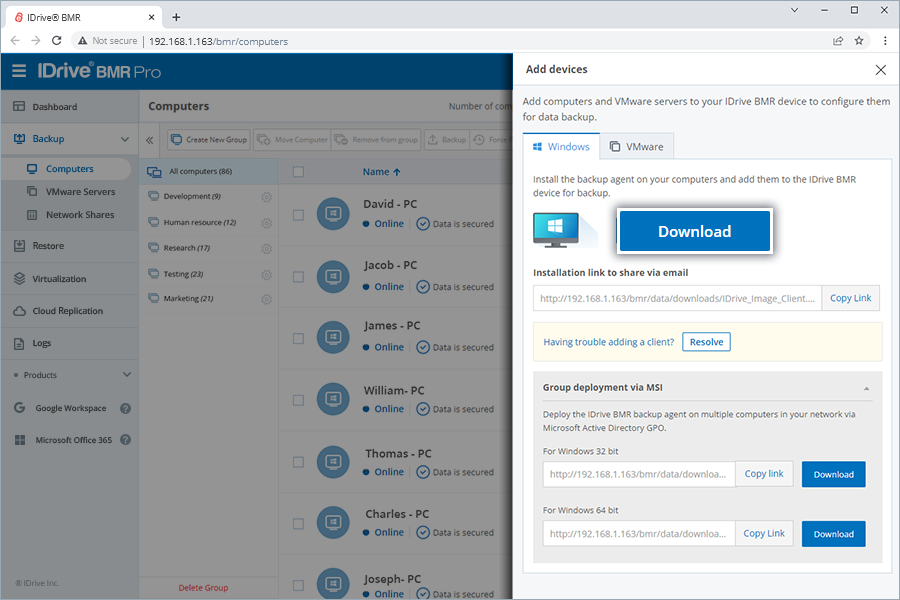
Click Add Devices. The Add Devices slider appears.
Under Windows, download the backup agent.
Install the backup agent.
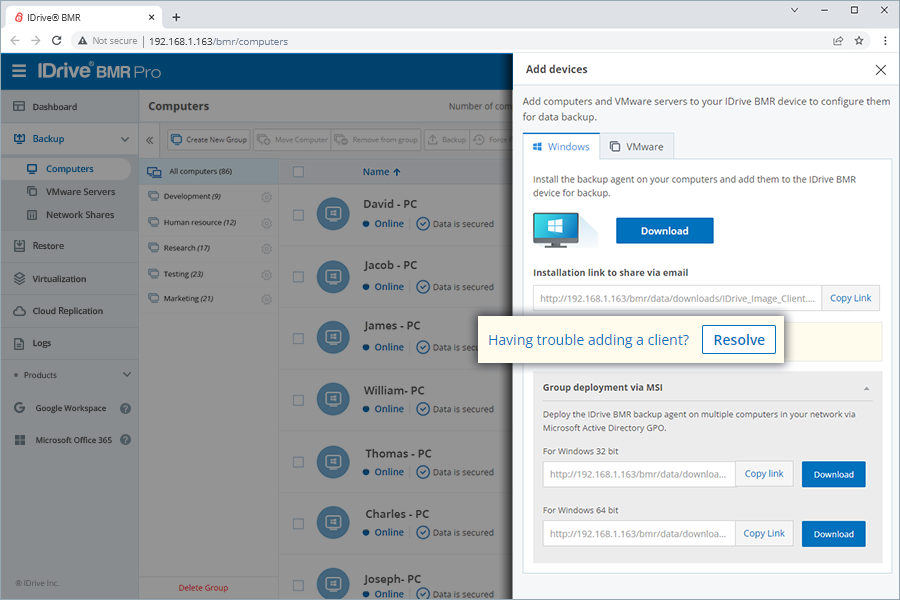
Once the installation is complete, the IDrive BMR device detects the agent and adds your device to the Computers page for backup. In the rare instance that the agent fails to auto-detect the client, click the Having trouble adding a client? link for instructions.
A full image backup of your computer will start automatically as per the global backup schedule. Click View details to track the backup progress.
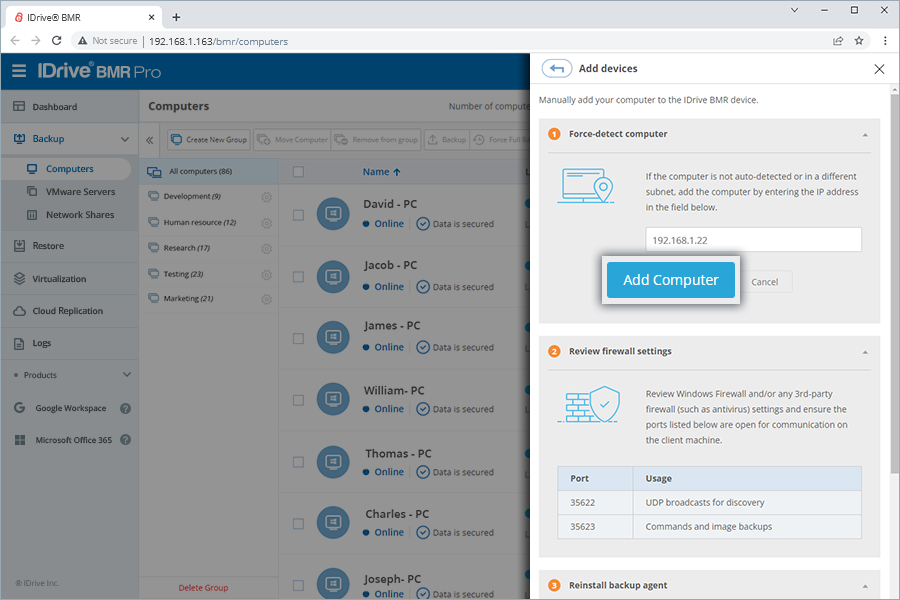
The backup agent has not detected the client. How do I add the client for backup?
It takes the backup agent a few seconds to detect the computer. If it takes longer, click to force detect computers via IP for issue resolution.
For further assistance, go to Add Device > Windows and click Having trouble adding a client?.
How do I install the IDrive BMR backup agent on multiple PCs in one go?
You can use the IDrive BMR MSI package to remotely add your Windows computers and servers to the IDrive BMR device for backup.
Prerequisites for remote deployment of IDrive BMR MSI package:
IDrive BMR MSI installer package
Shared folder accessible via all the domain users
Active Directory environment
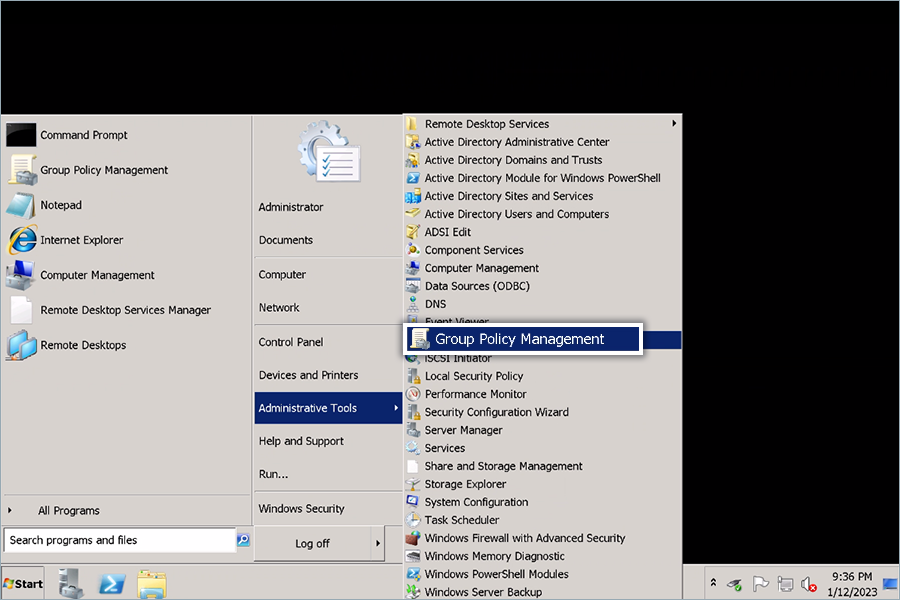
First, create a Group Policy Object (GPO) under the active directory environment:
Launch Group Policy Management from the Start menu.
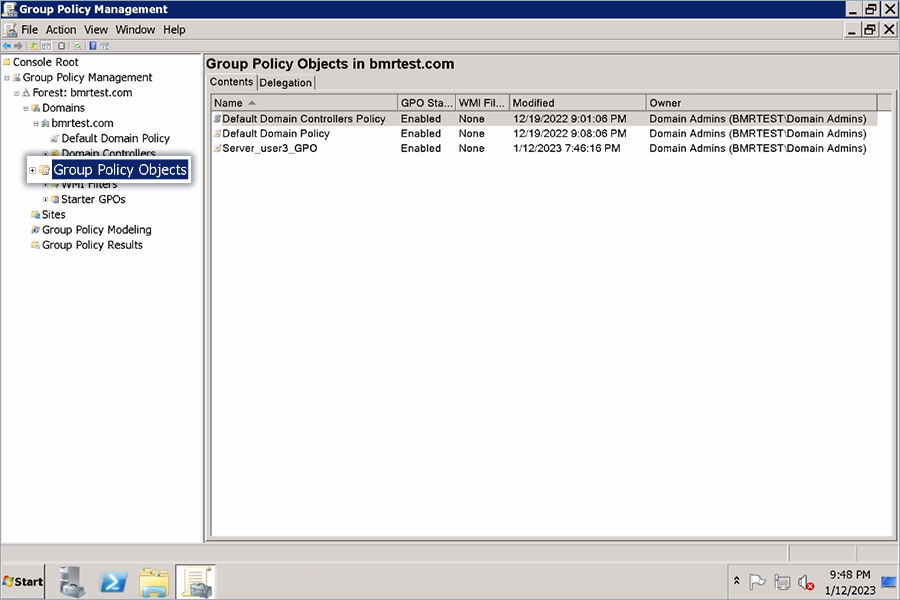
Navigate to Forest, the folder for creating group policy.
Double-click Domains and navigate Group Policy Object.
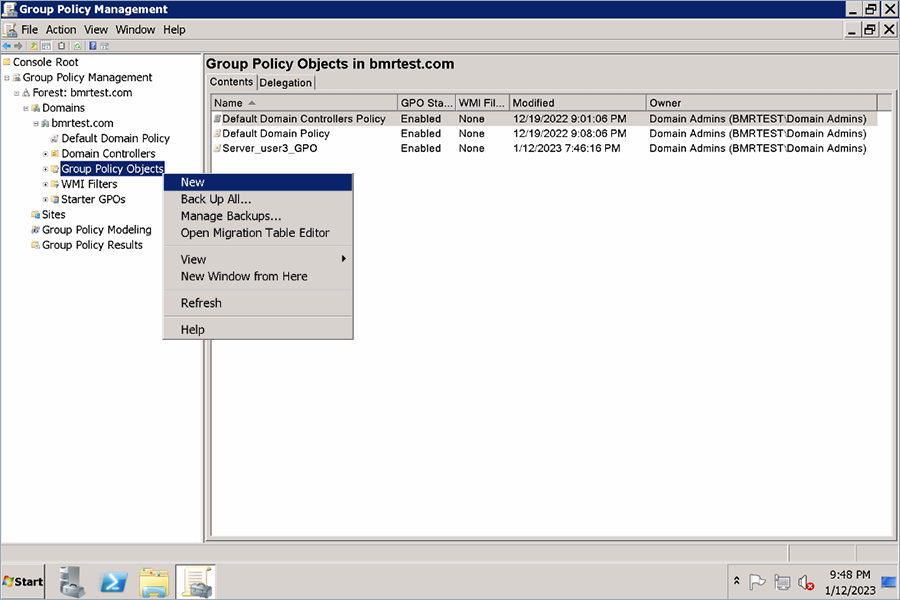
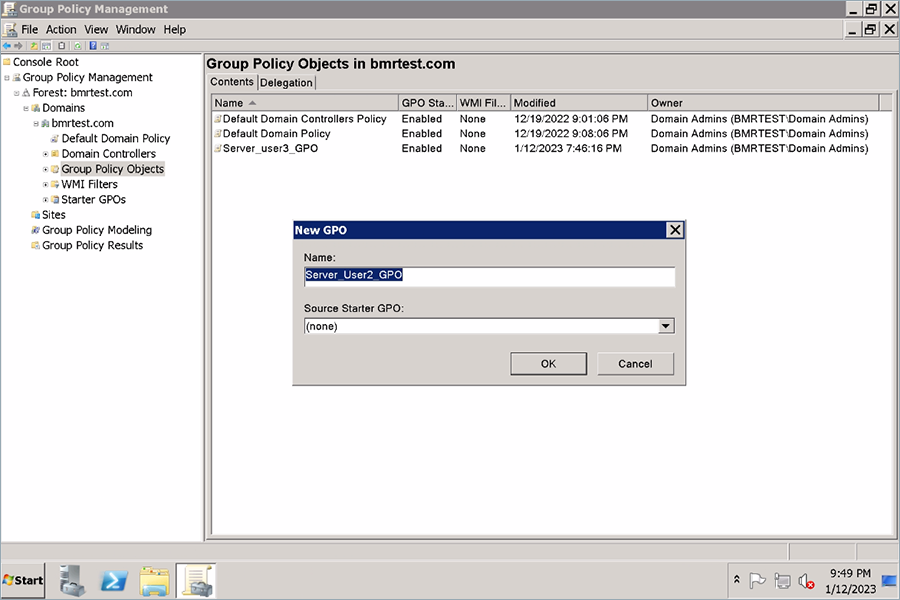
Right-click Group Policy Object and click New.
Assign a group name and click OK.
Next, assign the IDrive BMR MSI package to the domain computers:
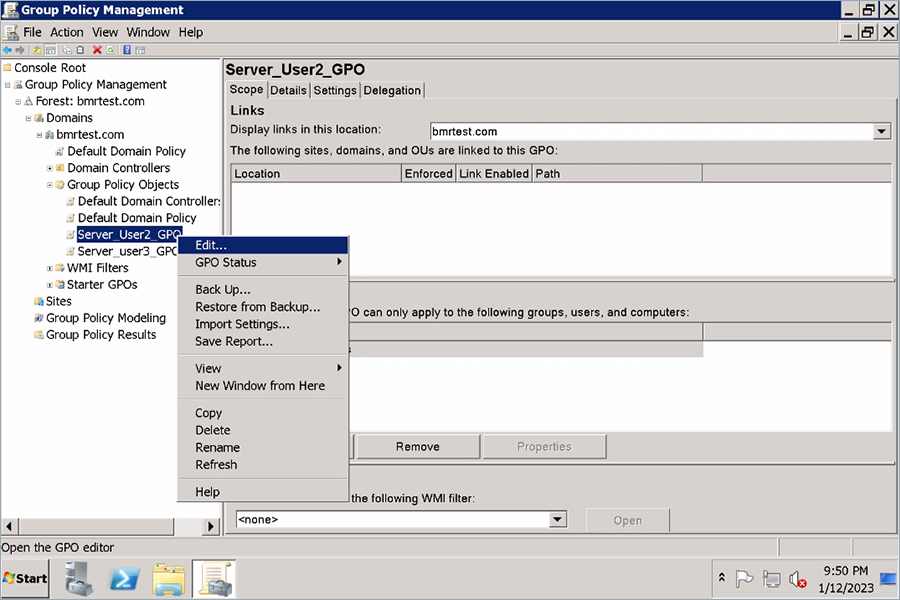
Right-click the new group policy and click Edit. This will launch the Group Policy Management Editor.
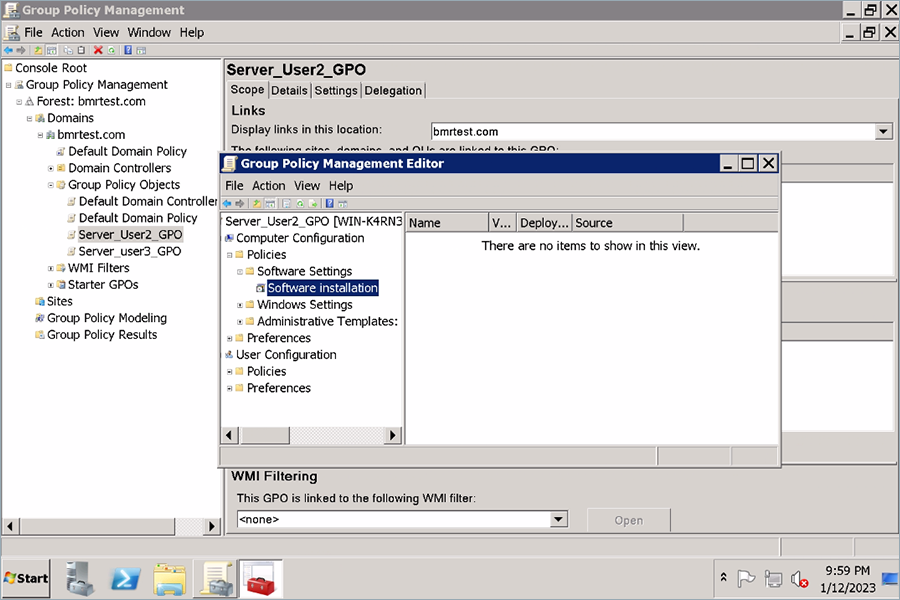
Go to Computer Configuration > Policies > Software Settings > Software installation.
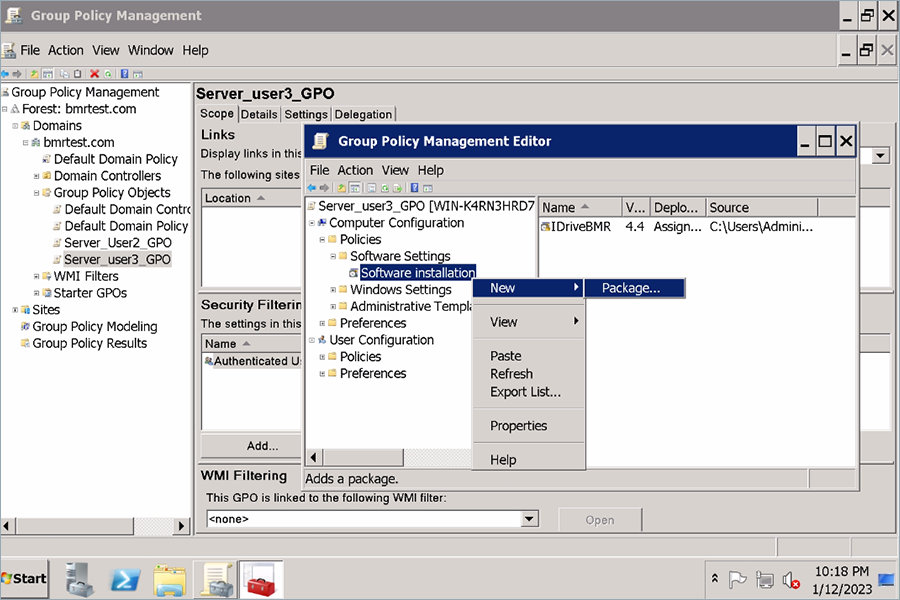
Right-click Software installation and navigate to New > Package.
Locate and select the shared network folder with the IDrive BMR MSI installer package and click Open to add to the software installation container.
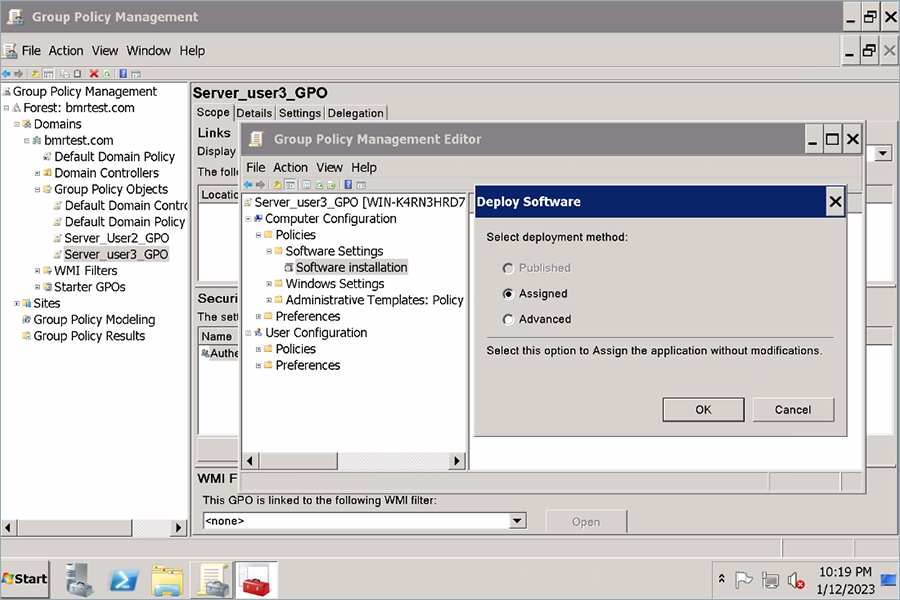
Select Assigned and click OK. The process may take a while, depending on the size of the software.
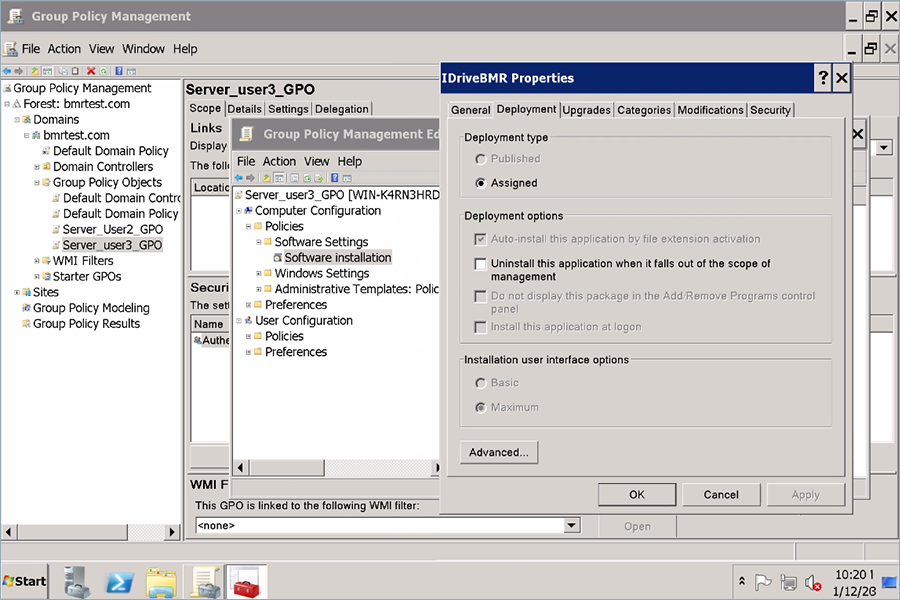
Right-click on the MSI package and click Properties. The IDriveBMR Properties window appears.
Click Deployment.
Under Deployment type select Assigned. Under Deployment options, Install this application at logon will be selected by default and grayed out.
Click OK.
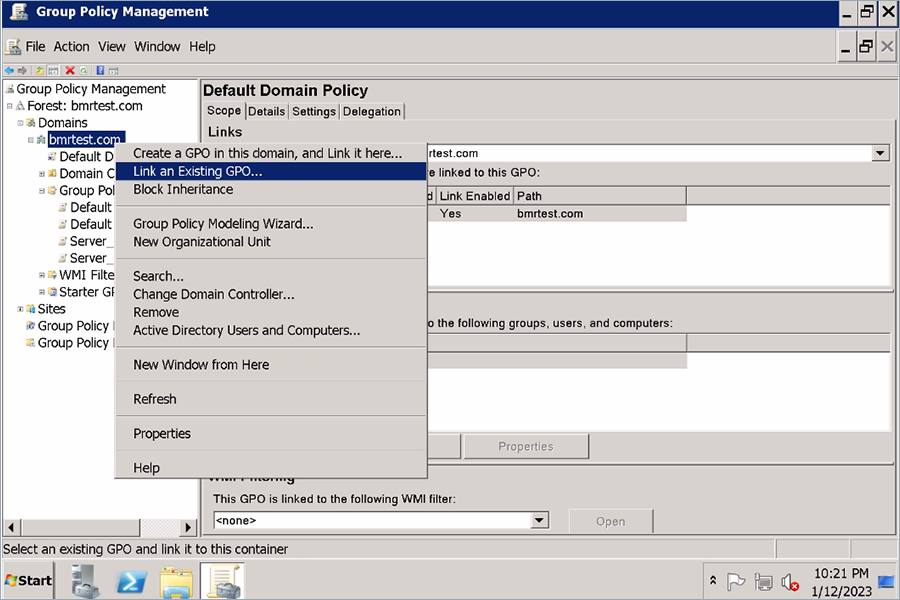
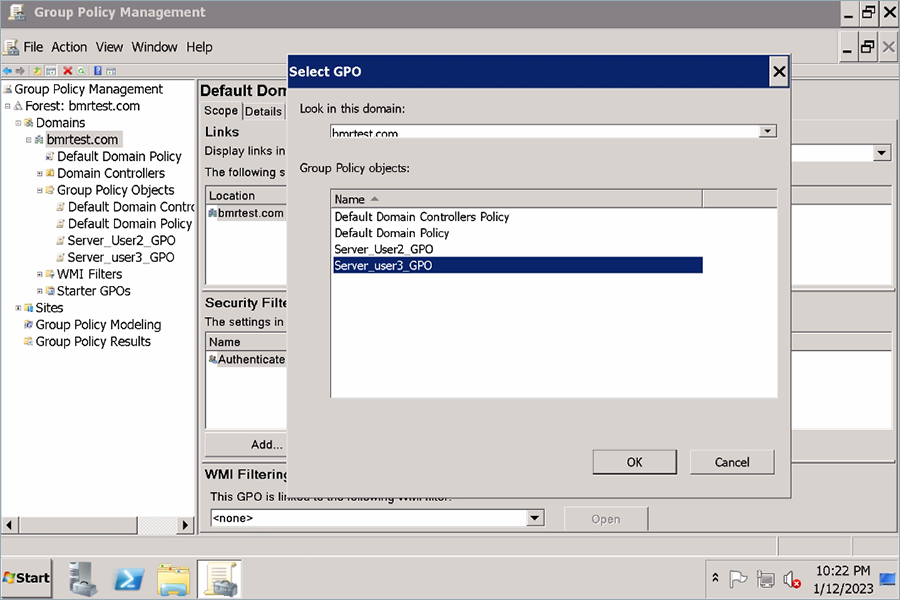
Right-click the domain and click Link an Existing GPO. The Select GPO screen appears.
Select the newly created Group Policy and click OK. The IDrive BMR application will be assigned to the domain computers on the next reboot and to the domain users on the next sign-in.
Does IDrive BMR support bare-metal backup and restore of dynamic, logical, and Microsoft storage spaces?
In case you have upgraded to version 8.4.0 or above, make sure to install the latest backup agent that supports the aforementioned advanced backup and perform at least one image backup. If you attempt restoring exclusively from older versions where the OS disk is dynamic, you may have OS boot issues. Similarly, use the updated WinRE Recovery Media Builder to create and upload a new WinRE recovery media to the IDrive BMR device.
Note: Bare-metal recovery of dynamic OS disk with GPT partition is not supported.
How do I backup multiple computers in one go?
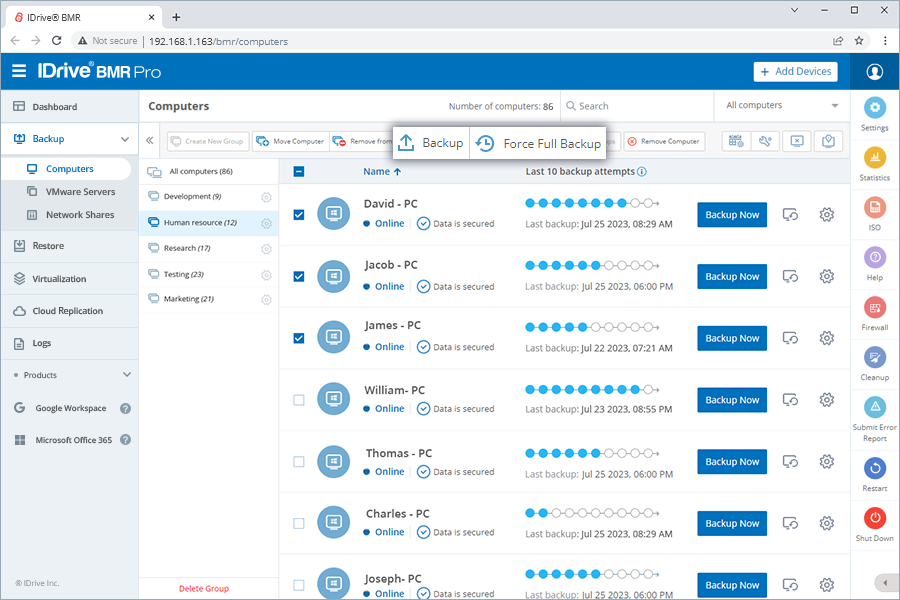
To manually backup multiple computers,
Connect to the IDrive BMR device interface.
Go to Backup > Computers.
Select the computers you wish to backup and click Backup.
Click View details corresponding to a computer to track the backup progress.
Note: Go to Backups > Computers and click to open Advanced backup settings and manage the Max simultaneous backups limit.
To force a full image backup for multiple computers,
Connect to the IDrive BMR device interface.
Go to Backup > Computers.
Select the computers you wish to backup and click Force Full Backup.
Click Force Full Backup again to confirm.
Note: If you try to force a full image backup the second time, although the IDrive BMR device displays full image backup in the UI, a synthetic full backup is performed to save time and storage space.
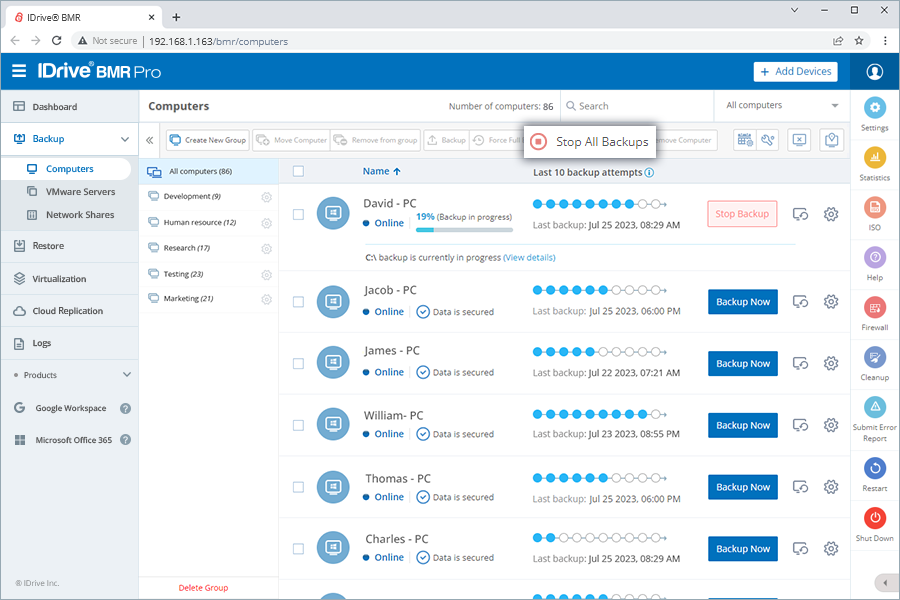
Can I stop all ongoing computer backups?
Yes, you can stop all ongoing computer backups with a single click,
To stop the ongoing backups,
Connect to the IDrive BMR device interface.
Go to Backup > Computers.
Click Stop All Backups.
Click Stop to confirm. All the ongoing backups will stop and resume at the next schedule.
Note: To stop backup for a specific computer, click Stop Backup corresponding to it.
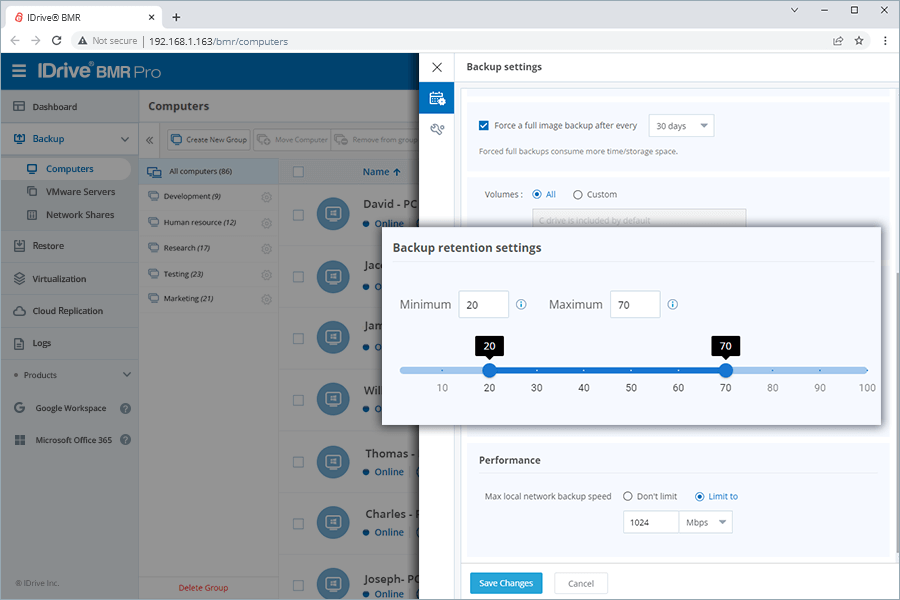
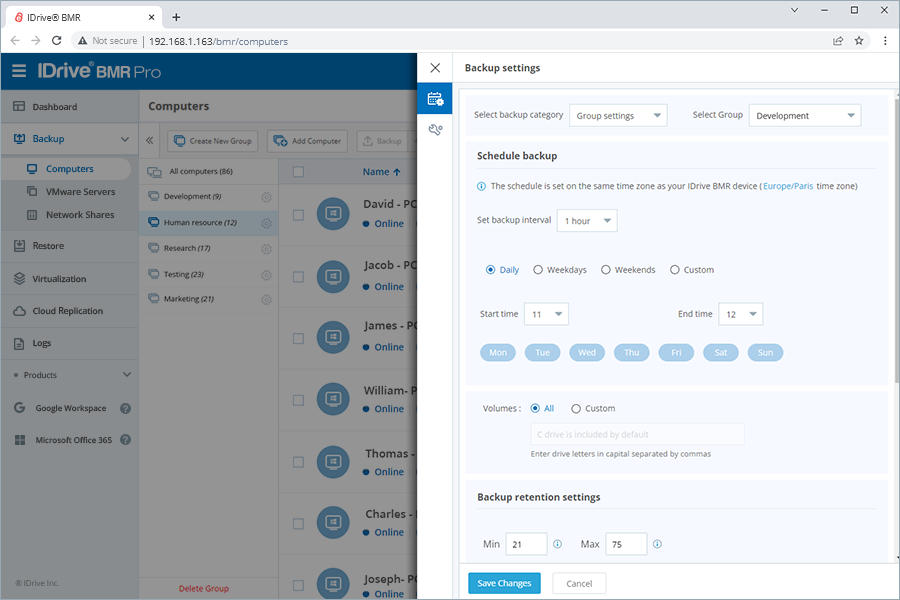
How do I schedule the backup of my computers?
To view and manage the local backup settings for your computers,
Click . This will open the Backup Settings slider.
Configure the following backup parameters:
Select backup category: Choose the appropriate option from the dropdown to modify: global, group or computer settings. By default, global settings will be selected. To apply settings to an individual computer, or group, select the appropriate option from the drop-down.
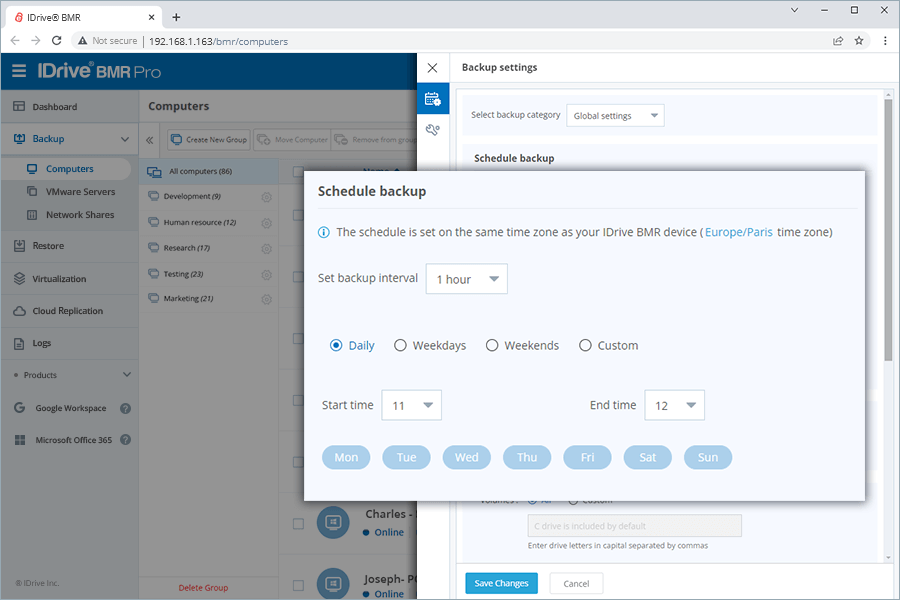
Schedule backup: Set the desired interval between two consecutive backups of a computer from the Set backup interval dropdown. Schedule your backups daily or on weekdays/weekends and set the start and end times for the backup in this section.
Note: Start Time and End Time are soft cut-offs. The actual start and end times are dependent on the ongoing tasks.
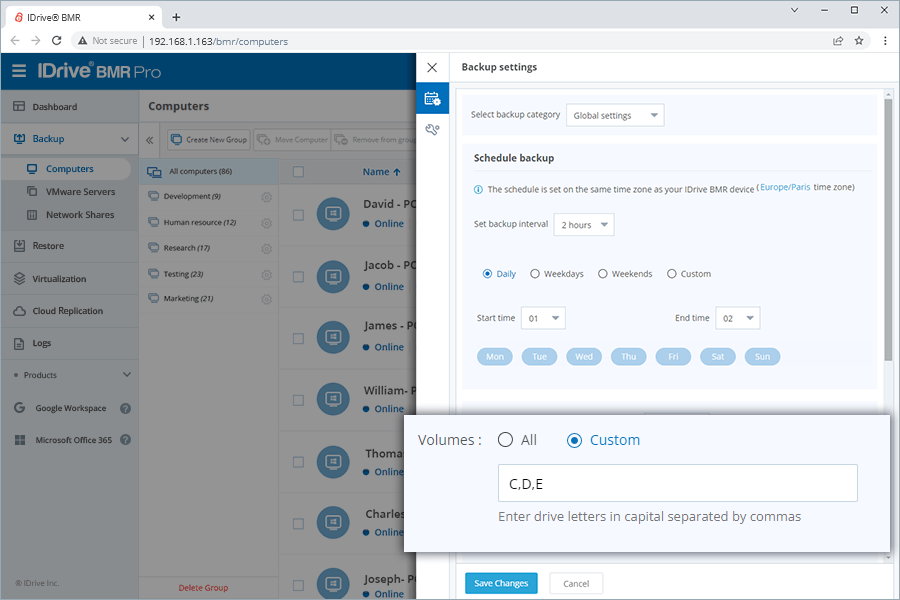
Volumes: Set the volumes you wish to backup as All or select Custom and specify the volumes you want to backup.
Note: Take care to specify the correct volumes for backup, especially when modifying global or group settings for backup. If you specify the volumes that do not exist, the backup will fail.
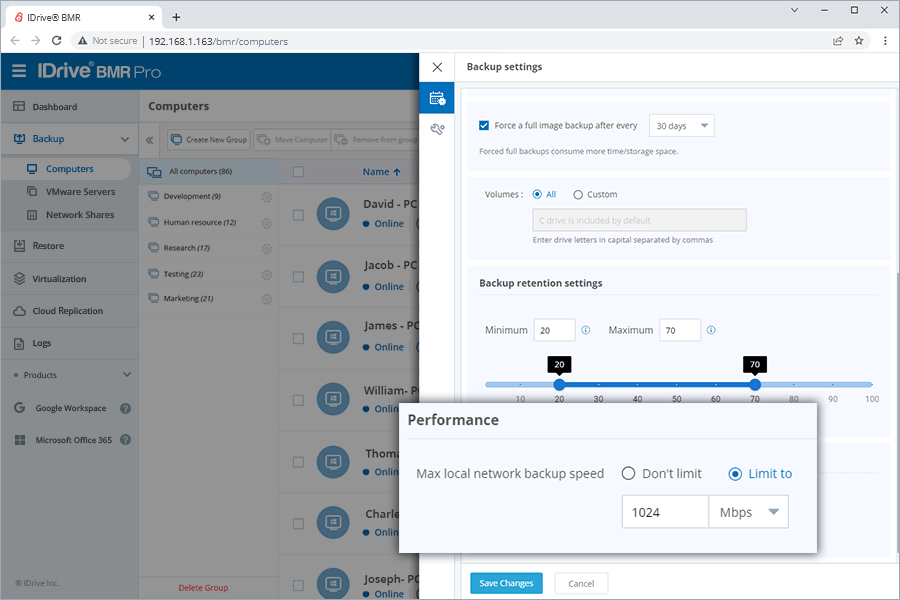
Backup retention settings: Use the slider to set the minimum and the maximum number of image backups that the device should retain for a computer.
Performance: You may choose to select Don't Limit and allow full network access or select Limit To and set a limit on the local network usage during backup.
Force a full image backup after every: Specify the interval for forcing a full image backup (Periodic forced full backups are recommended to maintain a healthy chain of backups).
Click Save Changes to save any edits made to the backup settings.
Note: You can edit/manage the backup settings of a specific computer by clicking corresponding to the required computer.
How do I control network bandwidth during backup operations?
To control the network bandwidth of the backup operations,
Connect to the IDrive BMR device interface.
Go to Backup > Computers and click .
Configure the Max local network backup speed. You may choose to select Don't limit and allow full network access or select Limit to and set a limit on the local network usage during backup.
Click Save Changes.
What is the local backup speed that I can expect?
The max local backup speed is dependent on various factors such as the disk-read speed on the computer, local network infrastructure, ongoing simultaneous backups, and so on. Under ideal conditions, with good network infrastructure, you can expect a speed of up to 850 MiB/s. However, in average conditions, you can expect around 200 MiB/s.
How do I exclude certain volumes from being backed up?
You can exclude certain volumes from being backed up by specifying the volumes that you want to backup. Go to Backup > Computers > > Volumes, select Custom and specify the drives to be included for backup.
Note:
Enter the drive names separated by commas. C: drive is considered for backup by default and therefore does not need to be specified.
Be sure to specify the correct volumes for backup, especially when modifying global and group settings for backup. If you specify the volumes that do not exist, the backup will fail.
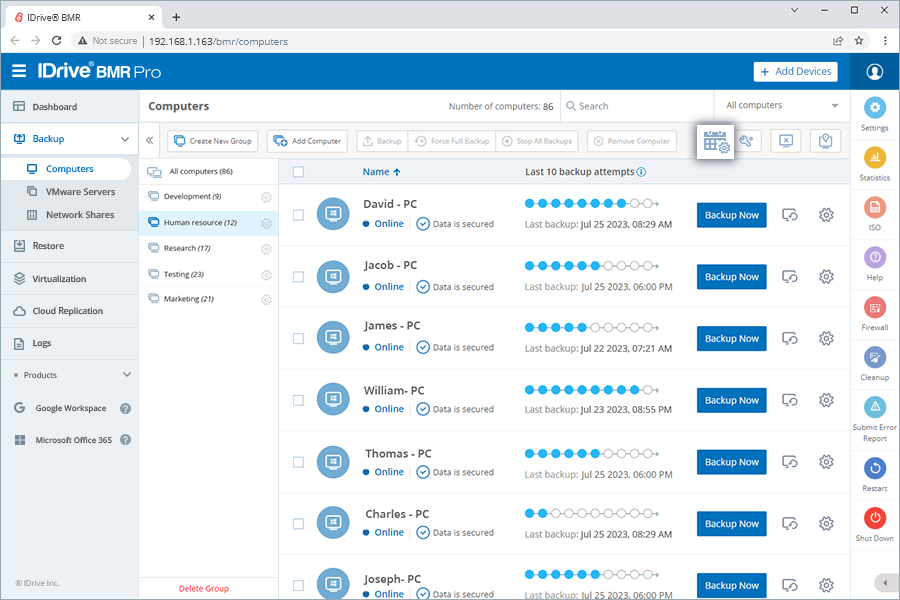
Can I perform simultaneous backups?
Yes, you can perform simultaneous backups within the specified limit.
To view/edit the limit on simultaneous backups,
Go to Backups > Computers.
Click to view the advanced backup settings.
Max simultaneous backups will display the limit. The higher the number of backups, the higher the time required to complete the backups.
Note: A range of 2 to 3 simultaneous backups is recommended for optimum backup performance and time.
Here, you can also configure the Max recently active computers and set a limit on the number of active computers when adding a new computer to the device.
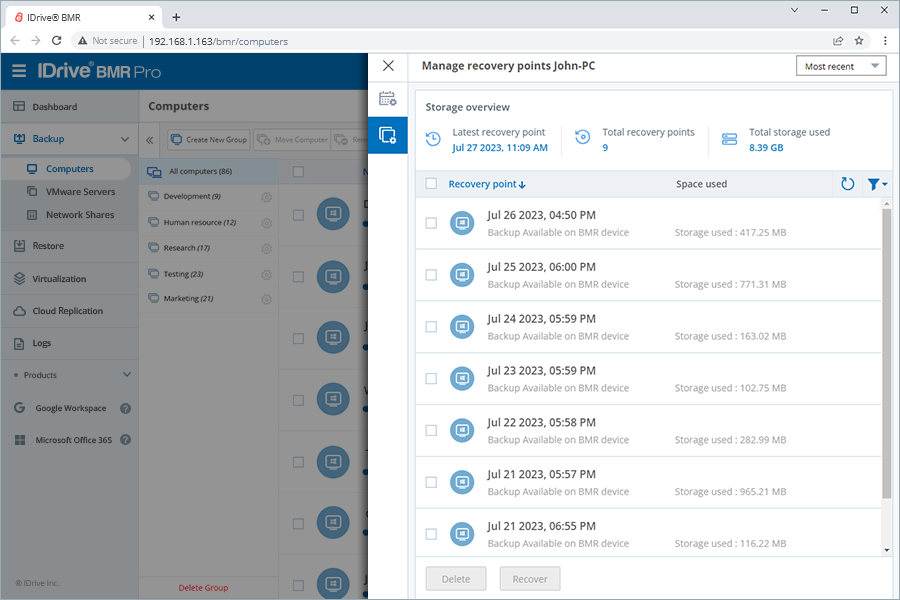
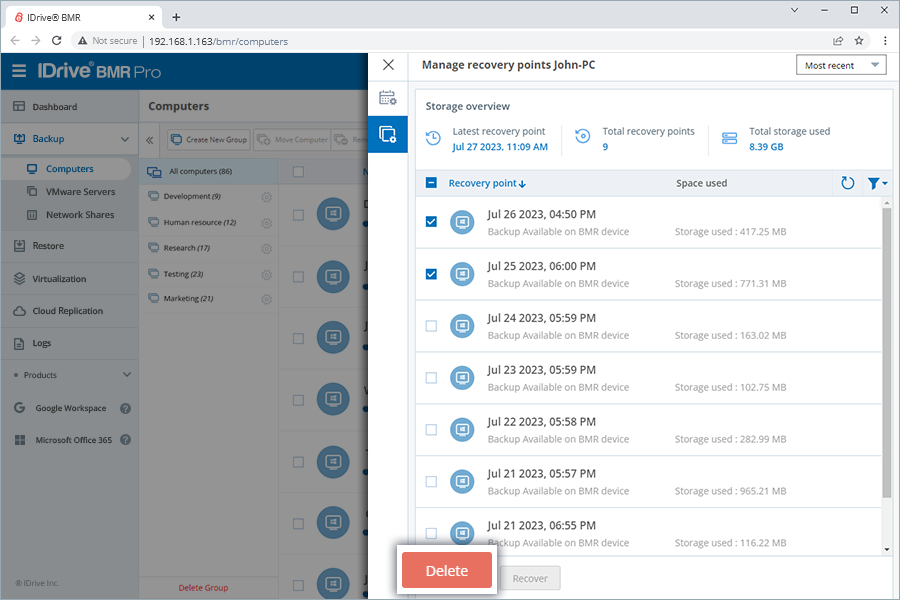
Can I manually delete the recovery points of my computers?
Yes, you can manually view and delete the recovery points of your computers.
To view and manage the recovery points of a computer,
Connect to the IDrive BMR device interface.
Go to Backups > Computers. The Computers will appear listing out all the added computers.
Click corresponding to the required computer. The Backup settings slider appears.
Click Manage recovery points.
Use the filter to view Available recovery points.
Select the recovery point(s) you wish to delete and click Delete. Alternatively, click corresponding to a recovery point to delete it. These recovery points will be queued for deletion and permanently removed from the IDrive BMR device in the order they are added to the queue.
Note: Click to view the latest status of the recovery points.
Until a recovery point is deleted, you can recover it from the deletion queue. Set the filter to In deletion queue, select the required recovery points, and click . Alternatively, set the filter to In deletion queue and click corresponding to a recovery point to delete it permanently.
How do I perform data cleanups on the IDrive BMR device?
You can delete old and incomplete backups from the IDrive BMR device via cleanup.
To configure and schedule your cleanup,
Connect to the IDrive BMR device interface.
Click Cleanup.
Set the Global filesystem quota limit at 80% (recommended) or as required. When the device storage crosses this limit, the device will suspend all operations and redirect to the cleanup maintenance page.
Schedule the cleanup operation in the Cleanup time window section. You can schedule cleanups daily or on weekdays/weekends by selecting the days and hours as required from this section. The device deletes old and incomplete backups as per the schedule and your backup retention settings.
In the Storage section, select All, Computers, or VMware servers from the Cleanup dropdown.
Click Cleanup.
In the popup window that appears, click Confirm.
Once these steps are completed, the manual cleanup operation will be initiated.
Note: The device interface will be inaccessible for the duration of the cleanup.
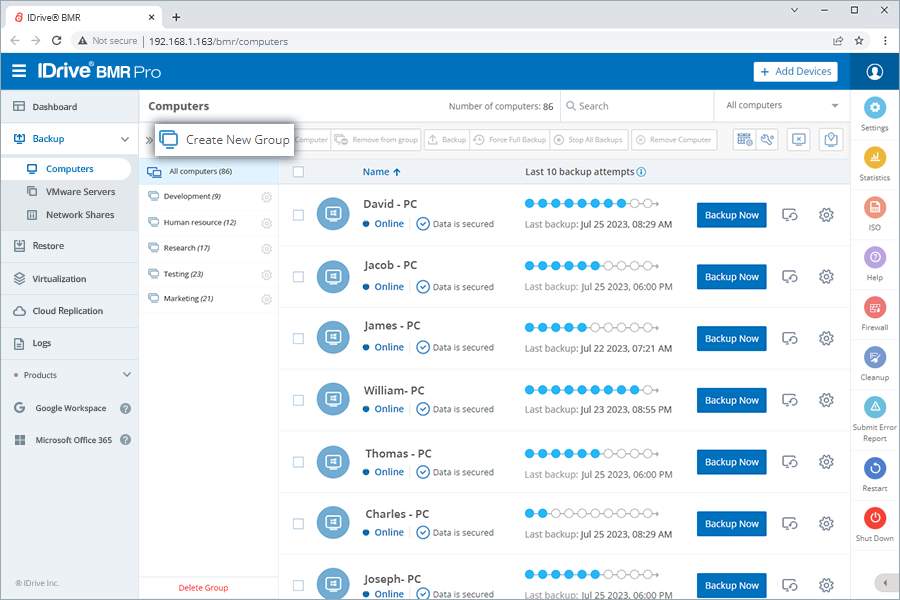
What is a group and how do I create one?
A group is a collection of computers organized together for efficient backup management. You can create unlimited groups and a computer cannot be added to more than one group. Additionally, you can apply local backup settings to the created group, which will be applicable to all the associated computers.
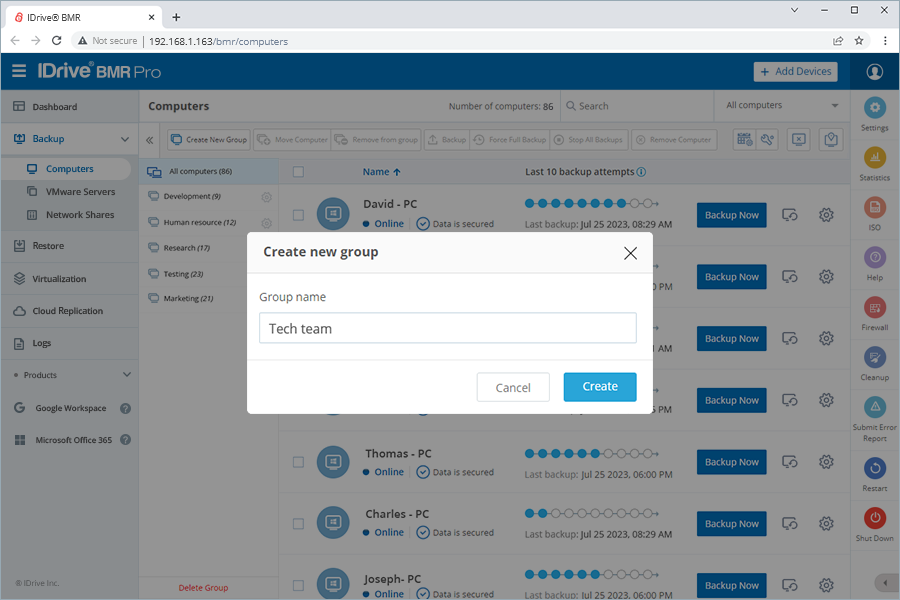
To create a group,
Connect to the IDrive BMR device interface.
Click Computers > Create New Group.
Enter a name in the Group name field and click Create. The new group appears under Computers.
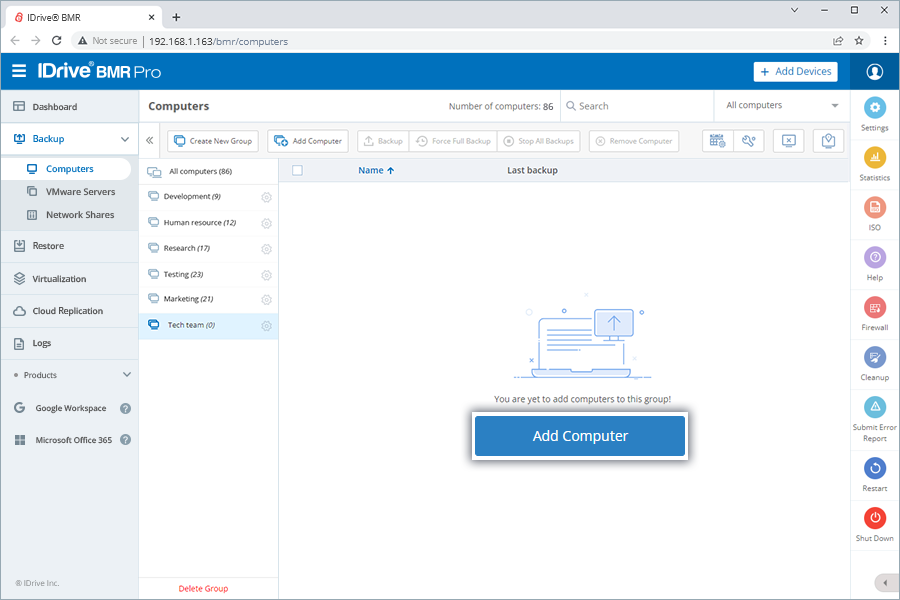
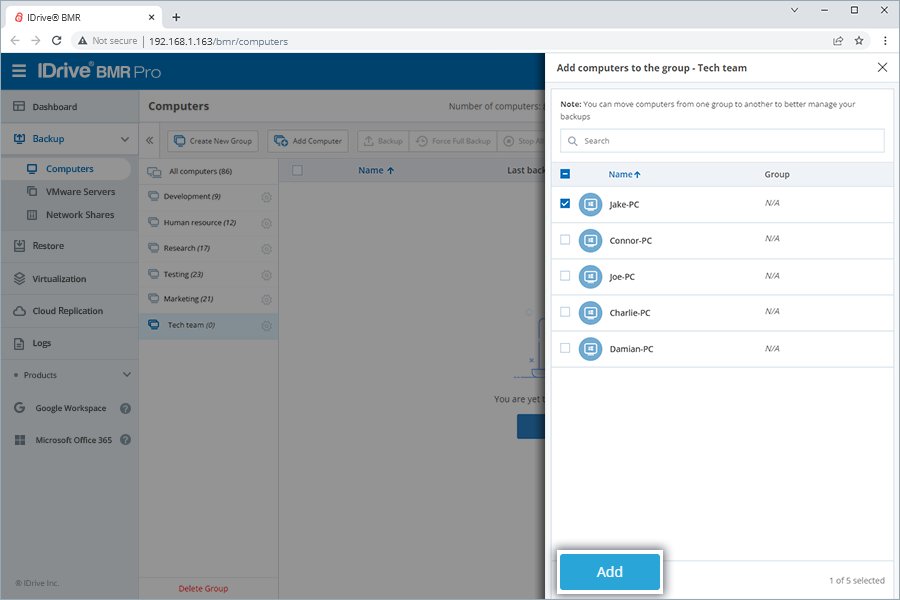
Click Add Computer on the empty screen of the new group. The Add computers to the group slider will appear.
Select the required computers and click Add. The selected computers will be added to the group.
To add more computers to the group later,
Click Computers.
Click the required group.
Click Add Computer.
Select the required computers and click Add. The selected computers will be added to the group.
How do I move a computer from one group to another?
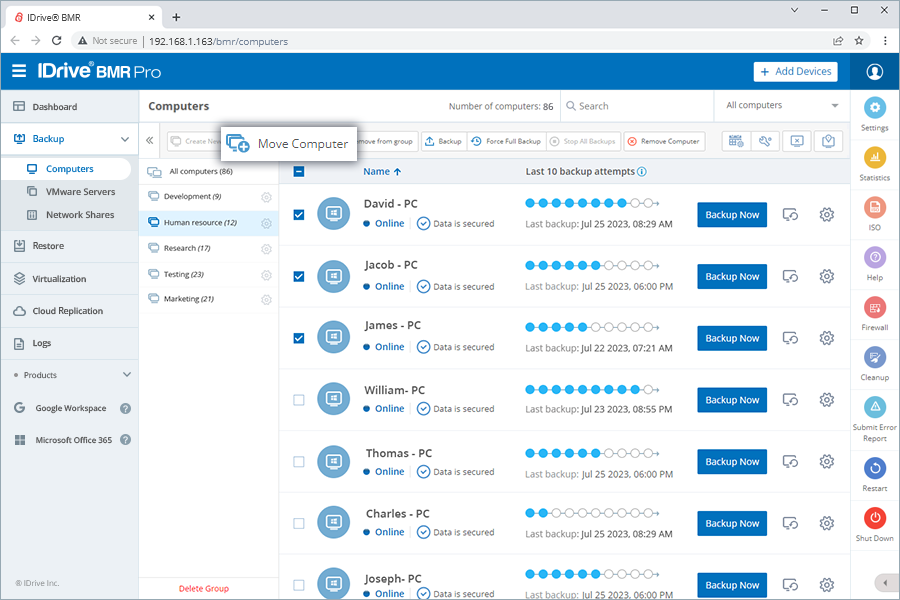
To move computer(s) between two groups,
Connect to the IDrive BMR device interface.
Select the required computer(s) and click Move Computer. A slider will display all the other groups.
Select a group and click Move. The selected computer(s) will be moved to this group.
Can I perform backup of a group?
Yes, you can initiate full or incremental image backup of all the computers in a group with one click.
To perform full or incremental image backup,
Connect to the IDrive BMR device interface.
Click Computers.
Click the required group or use the checkbox to select all computers.
Click Backup to start an incremental backup of all the computers in the group. Alternatively, click Force Full Backup to force a full backup.
How do I apply local backup settings to a group?
To apply local backup settings to a group,
Connect to the IDrive BMR device interface.
Go to Backup > Computers and click .
Select Group settings in the Select backup category dropdown.
Select the required group from the Select group dropdown.
Set a backup interval and schedule the backup.
Specify the volumes for backup.
Configure the backup retention settings.
Click Save Changes.
Note: Ensure to specify the correct volumes for backup, especially when modifying global settings for backup. If volumes that do not exist are specified, the backup will fail.
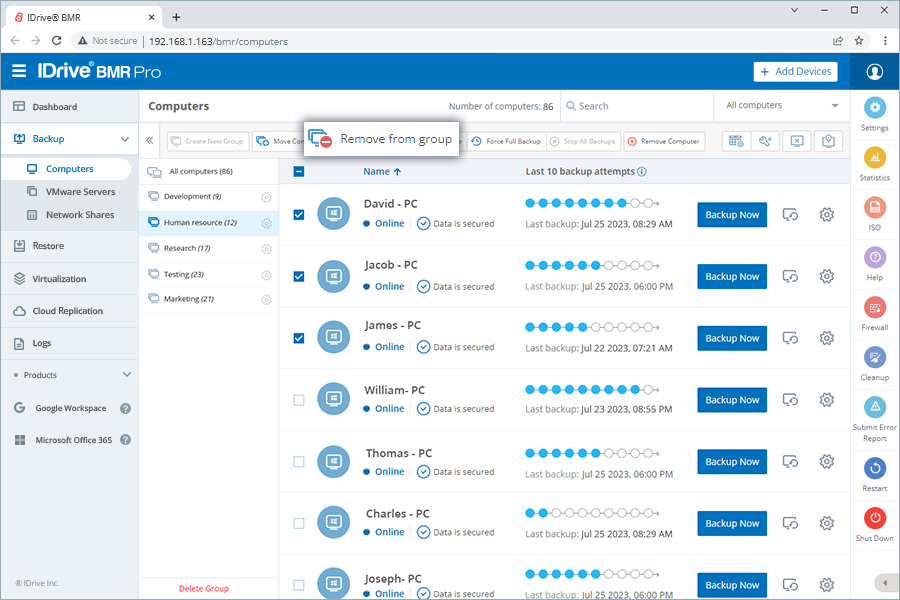
Is it possible to remove computers from a group?
Yes, you can remove computers from a group. Once a computer is removed from a group, it will automatically adopt the global backup settings.
To remove computer(s) from a group,
Connect to the IDrive BMR device interface.
Click Computers.
Click the required group.
Select the computer(s) to be removed by checking the corresponding checkbox.
Click Remove From Group and then click Remove in the confirmation window.
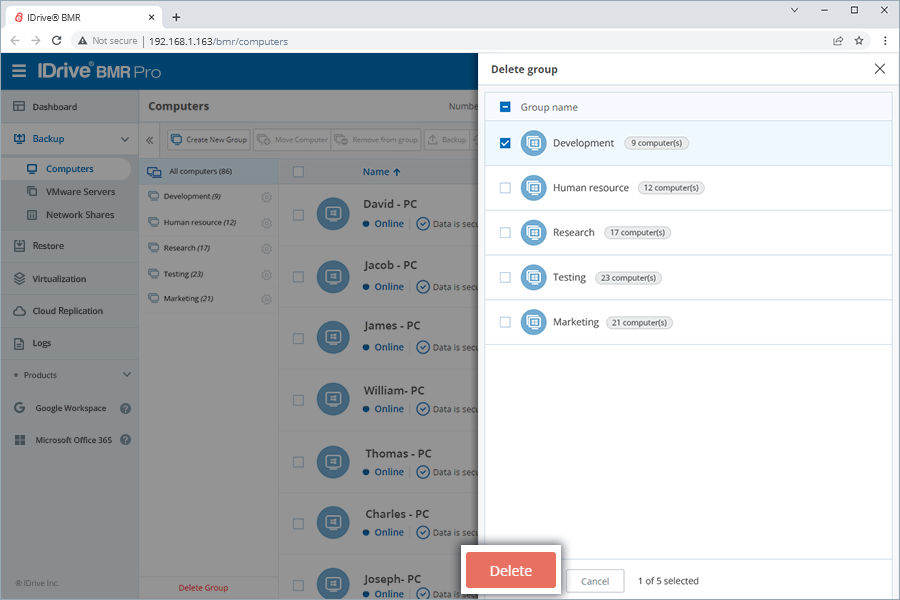
How do I delete a group?
To delete a group,
Connect to the IDrive BMR device interface.
Click Computers.
Click Delete Group. The Delete group screen appears listing all the groups.
Select the group(s) to be removed and click Delete.
Note: When you delete a group, the applied settings will be lost and all the computers of that group will adopt global backup settings.
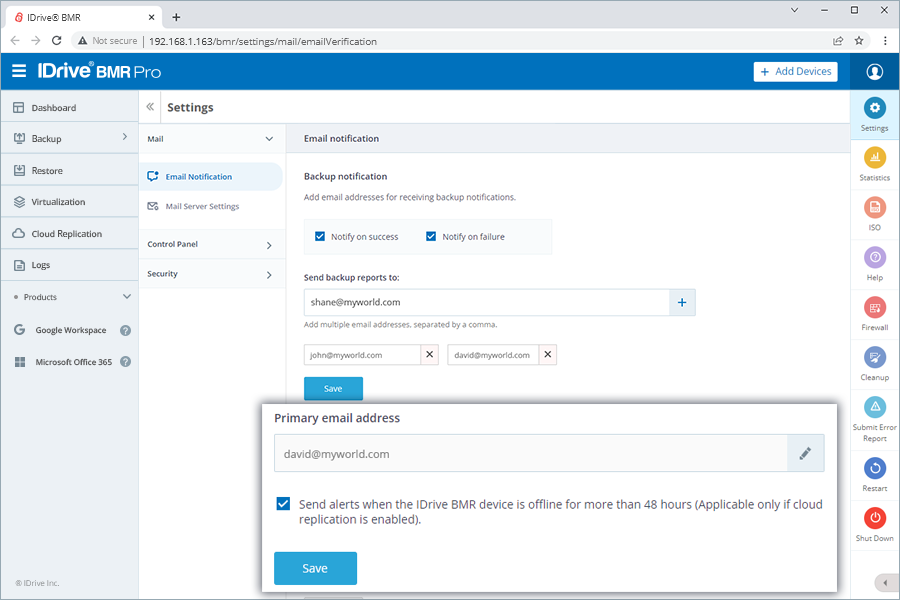
Can I receive notifications on backups?
Yes, you can receive notifications on the backup status for computers and VMware servers.
To receive notifications on backups,
Connect to the IDrive BMR device interface.
Click .
Go to Go to Email Notification > Backup notification and select the checkboxes Notify on success and Notify on failure as required.
Add the recipient email addresses in the Send backup reports to field and click
Click Save. The added email addresses will receive notifications on backup.
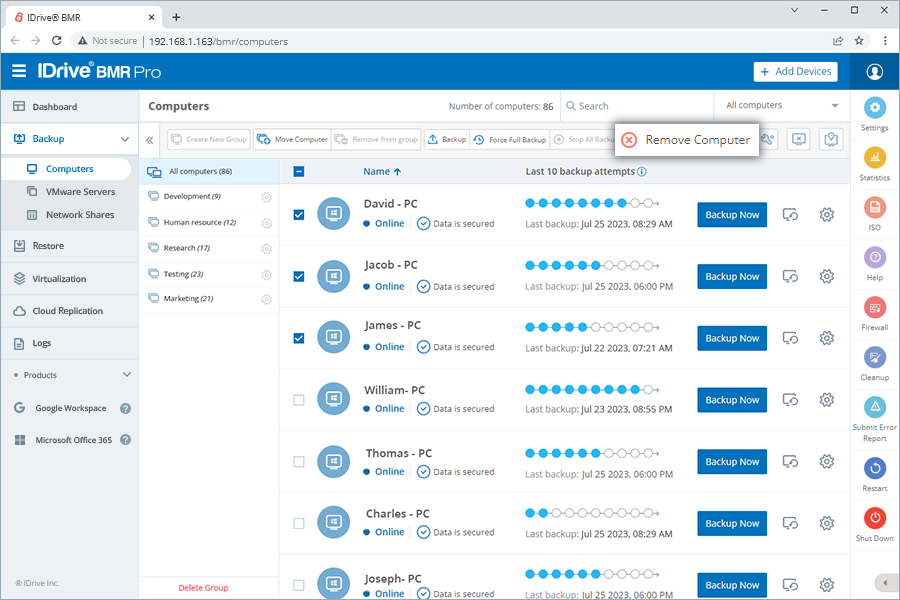
How do I delete a computer from the IDrive BMR device?
Before you delete a computer from the IDrive BMR device, we recommend you uninstall the backup agent from the machine. If you remove the machine without uninstalling the backup agent, the device may detect the agent and add the machine to the device again.
To remove one or more computers from the IDrive BMR device,
Connect to the IDrive BMR device interface.
Go to Backup > Computers.
Select the computer(s) and click Remove Computer.
Note: Removing a computer will also remove the backups of the computer from the IDrive BMR device during the next cleanup operation.
Click Remove in the confirmation window. The selected computer will be removed during the scheduled cleanup operation performed by the IDrive BMR device.
Note: In case one or more computers have an active restore and/or virtualization instance on the IDrive BMR device, a popup window will prompt you to delete the same in order to continue.
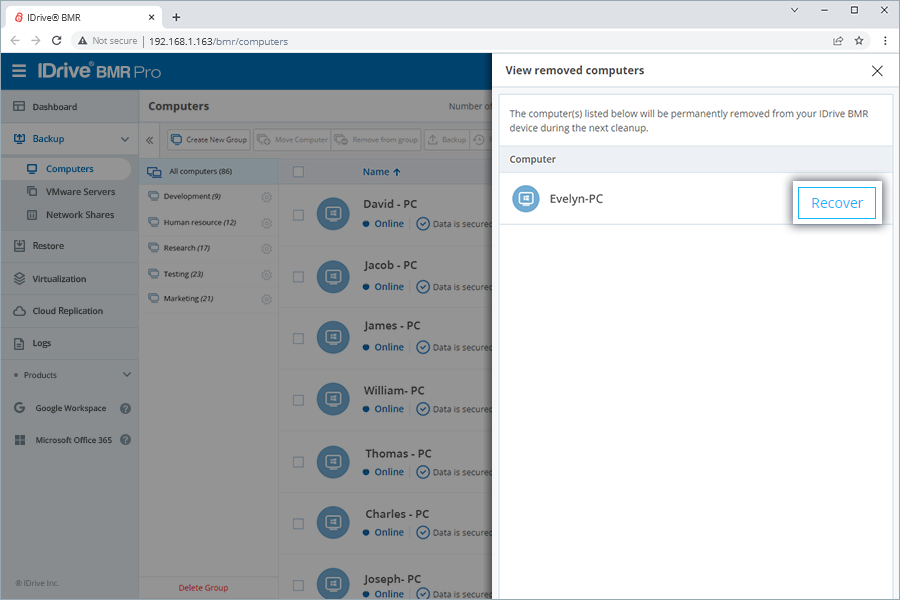
Is it possible to recover a computer after removing it from the IDrive BMR device?
Yes, you can recover a computer after removing it from the IDrive BMR device.
To retain a computer,
Connect to the IDrive BMR device interface.
Go to Backup > Computers.
Click . The View removed computers screen appears displaying the list of removed computers.
Click Recover corresponding to the computer(s) you wish to recover. The computer(s) will be recovered from the deletion queue.
My local data backup is slow. Why?
There may be two possible issues slowing down the backups:
Network: Check the traffic of the local network to which the IDrive BMR device and the computers are connected. It is recommended to use compatible network cables and devices that support gigabits of data transfer. Try running the backups during off-peak hours when the local network bandwidth usage is relatively low.
Disk Input/Output load on the computers: Check the I/O load on all the drives on the computers. Heavy I/O load on the disks slows down the read and write operations, resulting in slower backups.
You can check the I/O load using the in-built utilities in Windows. Launch the Command Prompt as an administrator and run the following command:
.winsat disk -drive d
Here, d is the drive you wish to test.
If the average IO load is high, backups can take more time to complete. You may try running the backup during off-peak hours.
Why does the IDrive BMR device report 'Server rejected' for a computer and does not backup that computer?
This issue occurs when there is more than one IDrive BMR device connected to the same Local Area Network (LAN):
Because of security reasons, the backup agent will allow only one IDrive BMR device to identify it and add the computer for backup. If any other IDrive BMR device tries to identify the backup agent and add the computer, the process will fail and the device will report this message.
Contact the support team if you want to add a computer to another IDrive BMR device within the same LAN.
I am unable to install the backup agent on my Windows 8.1 32-bit machine. I am getting the following error:
If the Windows 8.1 32-bit machine does not have the latest updates, it will throw an error while installing the backup agent.
Make sure your Windows is up to date. If the issue persists, follow the below steps to install the dependencies manually:
On the same page, click Click here to download manually and download and install Windows 8.1-KB2919355-x86.msu.
You will be prompted to restart the system. Click Restart. After the computer restarts, install the backup agent.
Why does the connection status show 'Client service has stopped' on my Windows 8.1 (32-bit) machine?
The current version of the IDrive BMR client is not fully compatible with Windows 8.1 (32-bit). As a result, the client services may fail to run on these systems.
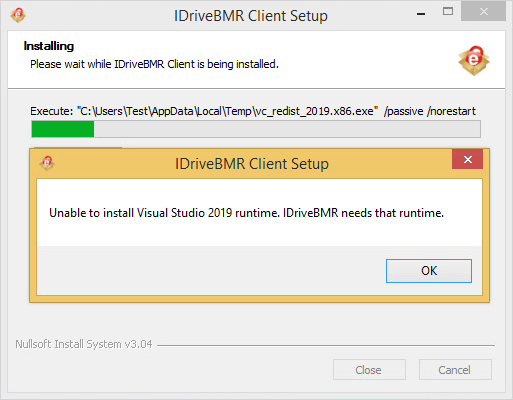
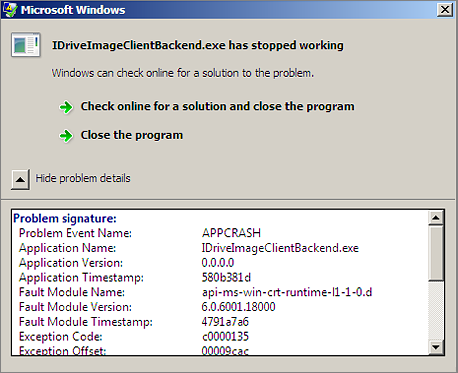
Why does the backup agent crash while getting installed on my Windows operating system?
While installing agent software on a Windows (mostly in Server 2008/Vista) operating system, the installer may crash with an error as shown in the image below:
The agent software requires 'Universal CRT' dependency to run successfully. This may not be present on your restored computer if the operating system is not up-to-date.
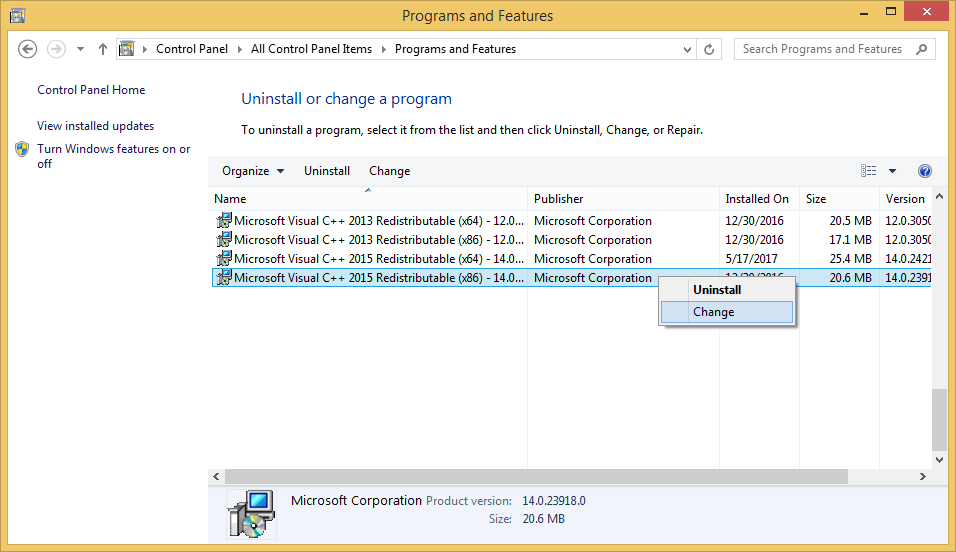
To resolve the issue,
Enable Automatic update on the Windows operating system where you want to run the agent software. This will ensure it is updated to the latest available Service Pack.
Note: Wait until all available updates are installed.
Go to Start > Control Panel > Programs & Features.
Right-click Microsoft Visual C++ 2015 Redistributable.. and click Change.
Click Repair to run the repair installation.
Reboot the computer.
To verify if the application is working fine, after reboot, go to Services and check the status of IDrive client service for backups. You will come across either of the following scenarios:
If the status is displayed as Running, then the agent software is working fine.
If the status is not displayed, then right-click IDrive client service for backups and click Start to start the service manually. If the manual start also fails, contact IDrive BMR support for further assistance.
Does IDrive BMR support the backup of BitLocker-enabled drives?
Yes, IDrive BMR supports the backup of BitLocker-enabled drives. The following is a guide on backup of BitLocker encrypted drives:
Encrypted and locked:
Appearance: Gold lock icon in Windows Explorer
Compatibility: Backup of locked drives is not supported by IDrive BMR.
Solution: Unlock the drive using its password. Once the drive is unlocked backups can be initiated.
Encrypted and unlocked:
Appearance: Silver unlocked padlock icon in Windows Explorer
Compatibility: Backup of unlocked drives is supported by IDrive BMR.
Solution: Restart the BMR service to detect volume and select the volume to add it for backup.
Not encrypted:
Appearance: No padlock icon in Windows Explorer.
Compatibility: Backups are supported as in the case of any normal drive
What countries are blocked from accessing IDrive® BMR?
We are currently blocking access from the following countries for security and compliance reasons:
Russia
China
Ukraine
Paid users from these countries can send request for allowing IPs but each request is subject to review and may not be approved. If your IP address changes frequently, you will need to provide updated information for consideration.

 to force detect computers via IP for issue resolution.
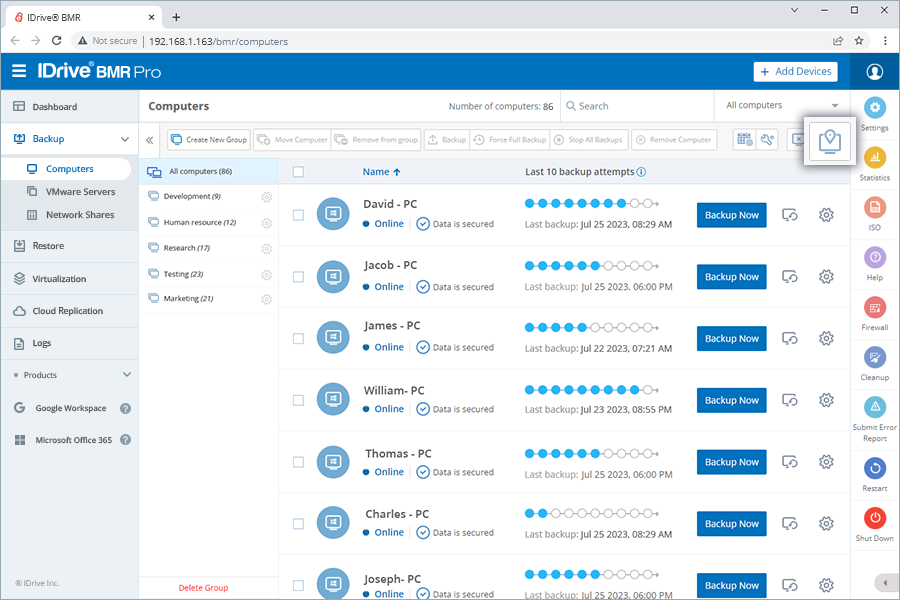


 . This will open the Backup Settings slider.
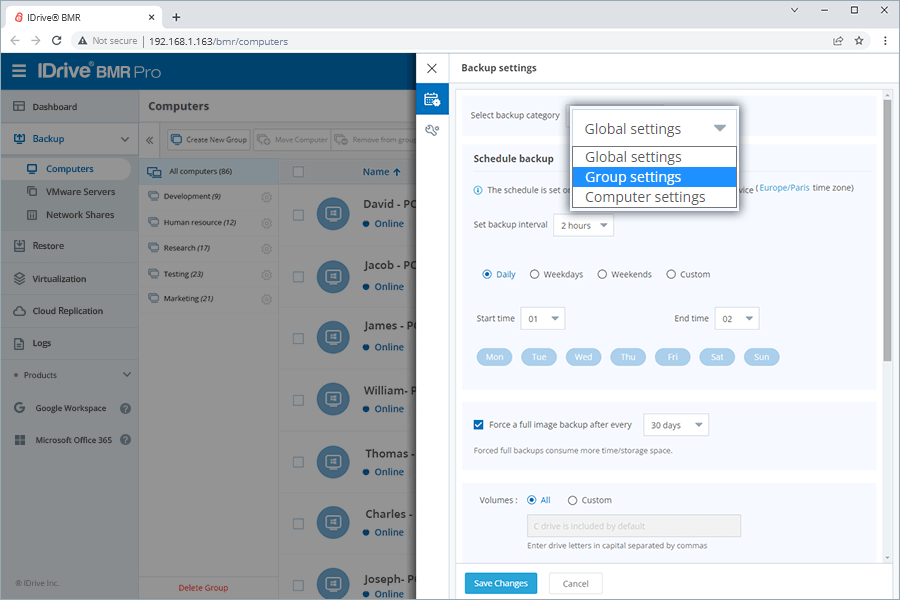


 . Alternatively, set the filter to In deletion queue and click
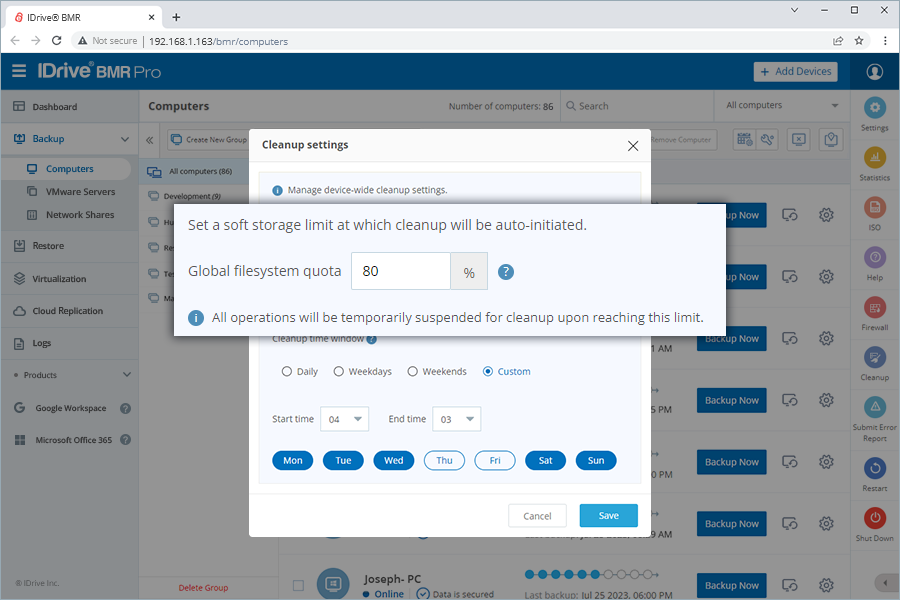

 .
.
 . The View removed computers screen appears displaying the list of removed computers.