Frequently Asked Questions
- Getting Started
- Backup Console
- Management Console
- Windows Backup
- Mac Backup
- Linux Backup
- Mobile Backup
- Cloud Applications Backup
- Server Cloud Backup
- Mass Deployment
- Entire Machine Backup
- Google Drive Backup
- IDrive® 360 Express
- Single Sign-On
- System Requirements
- Account Management
- Security
- Firewall Guidance
Entire Machine Backup
If your question is not addressed below, contact us through our support form and we will get back to you shortly.
- What is entire machine backup?
- How do I perform an entire machine backup for an individual machine?
- What is the minimum space required for creating a shadow copy of a volume?
- Which hardware RAID versions support Entire Machine backup?
- How do I perform the entire machine backup for multiple machines?
- How do I edit Entire Machine backup plan?
- Why is the file count of the entire machine backup folder more than the files uploaded to the cloud?
- Can I perform simultaneous backups?
- What is 1-step entire machine restore?
- What is 2-step entire machine restore?
- What are the prerequisites to perform the 1-step restore?
- How to recover the entire machine backup using the 1-step restore?
- Why do snapshots for entire machine restore show a different time?
- What are the prerequisites to perform the 2-step restore?
- How to recover the entire machine backup using the 2-step restore?
- How do I restore files and folders from entire machine backup?
- How can I restore an entire machine backup as a virtual machine (VM) on a VMware ESXi host?
- How can I restore an entire machine backup as a virtual machine (VM) on a Hyper-V server?
- How to create a bootable WinRE restore media for entire machine restore?
- How can I build a bootable WinRE media that includes wireless Wi-Fi support?
- How do I create a bootable USB flash drive to restore entire machine backup?
- Why am I being prompted to activate my Windows license after an entire machine restore?
- Can I perform Entire machine Backup on my machine with BitLocker or EFS (Encrypted File System) encryption enabled?
- Does the entire machine backup support dynamic disks?
- Does IDrive® 360 support entire machine backup for Mac and Linux users?
- I am getting the message 'No bitmap data available for the drive. Run the 'chkdsk' command on logical drives (NTFS) to perform an incremental scan' in my backup logs. What should I do?
- Does the entire machine backup perform backup of Microsoft OneDrive?
- How can I find the path of the Wi-Fi driver used by my machine?
- What are the various Wi-Fi authentication methods supported by IDrive WinRe?
- Can I use the Archive Cleanup feature for entire machine backup data sets?
- Are there any limitations for entire machine backup?
- Does entire machine backup support Spanned\Striped\Mirrored volumes?
- Can I perform an Entire Machine Backup on a computer with BitLocker encryption enabled?
- Can I perform an Entire Machine Backup on a computer with EFS (Encrypted File System) encryption enabled?
What is entire machine backup?
Entire machine backup is the complete backup of a Windows computer or server that includes the operating system, system files, installed programs, system settings, and boot files. It lets you quickly recover/restore your machine to its initial state in the event of any disaster or natural calamity.
Backing up an entire machine is one of the secure ways to protect your data. In case of operating system failure/crash, you just need to run the bootable recovery and select the target hard disk for restoration. This will create a partition similar to the partitions of the original machine and restore the OS to its earlier state.
Note: Entire machine backup is a file-level backup of your entire machine.
For recovery limitations, click here.
How do I perform an entire machine backup for an individual machine?
To perform entire machine backup for existing machines,
- Sign in to your IDrive® 360 account.

- Navigate to the 'Devices' > 'Computers'.
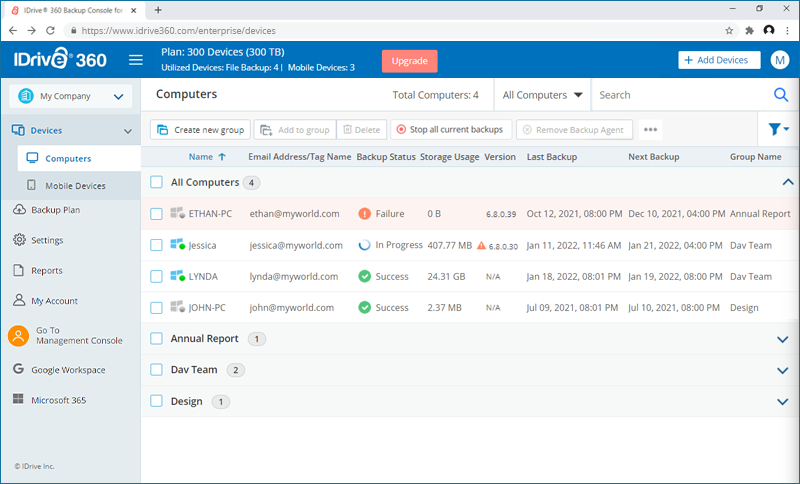
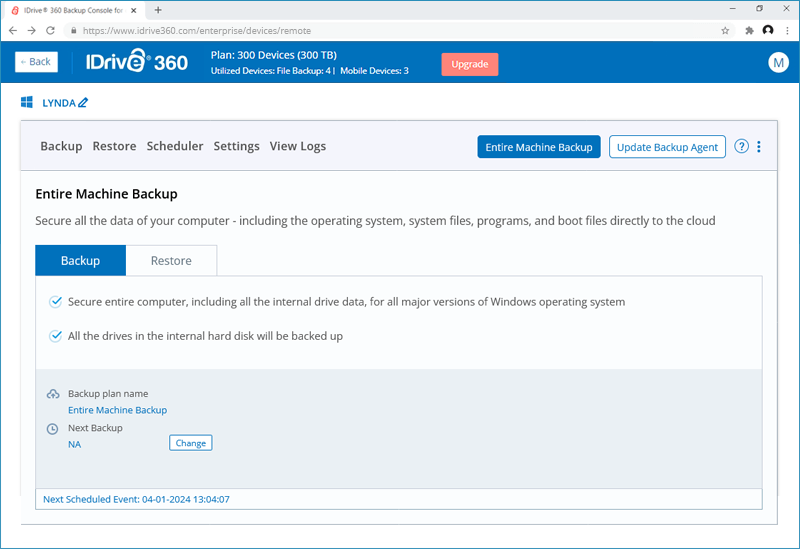
- Click on the machine you wish to perform the entire machine backup. It will open a remote management console.
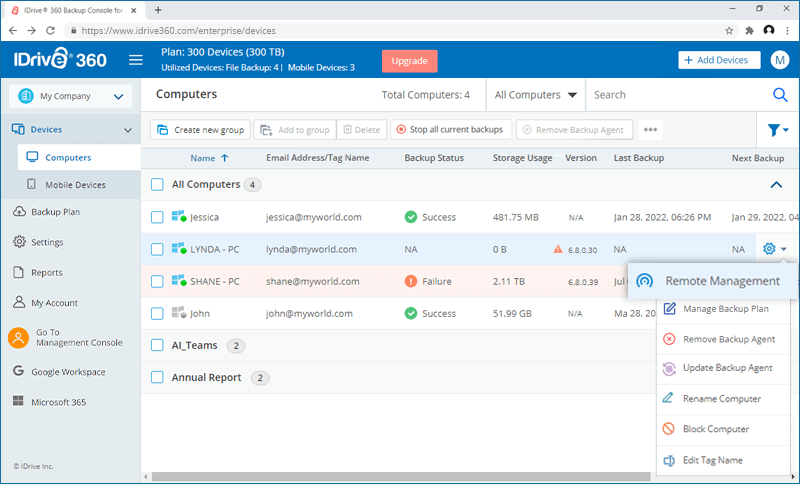
Alternatively, you can click
 and select 'Remote Management'.
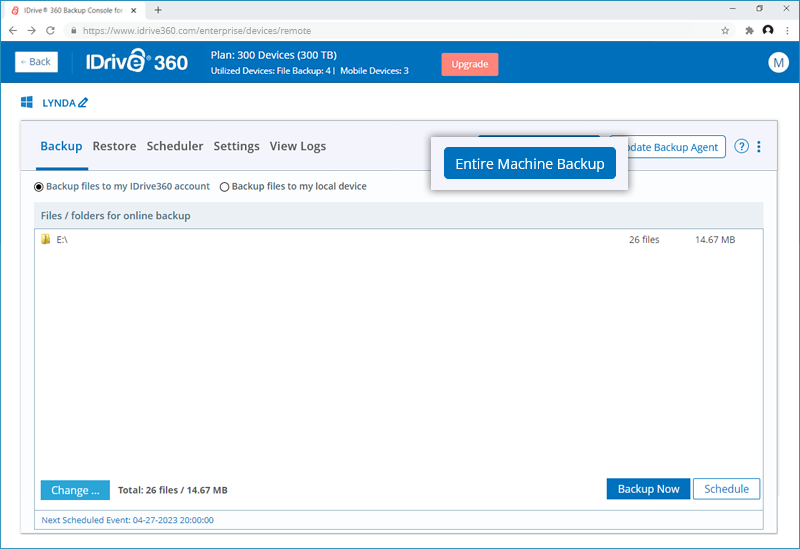
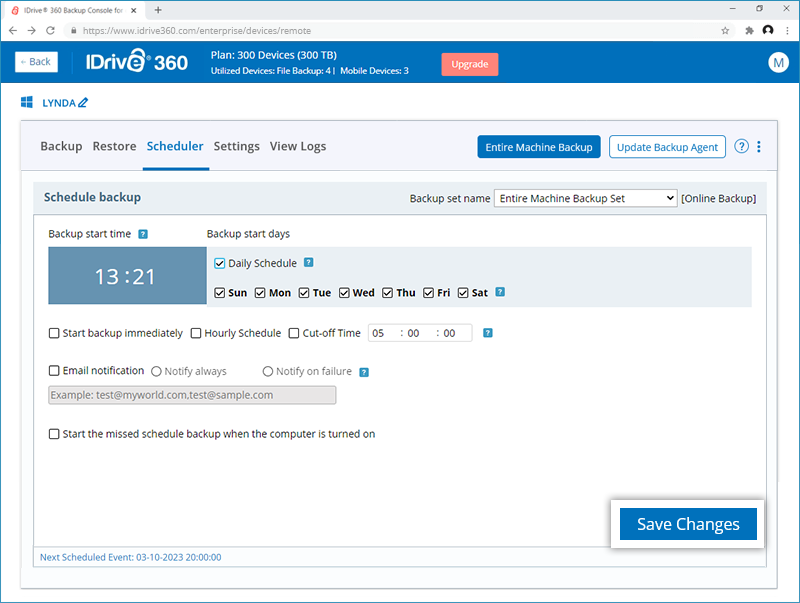
- Click 'Entire Machine Backup' and navigate to 'Backup' > 'Schedule'.
- Create a schedule for performing regular entire machine backup and click 'Save Changes'.
To enable Entire Machine Backup for your new device,
- Sign in to your IDrive® 360 account.
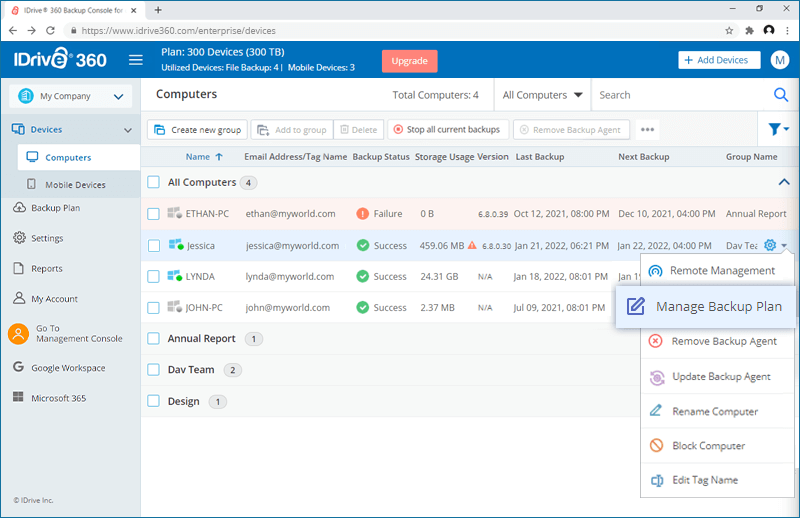
- Click
 corresponding to the required computer and select 'Manage Backup Plan'.
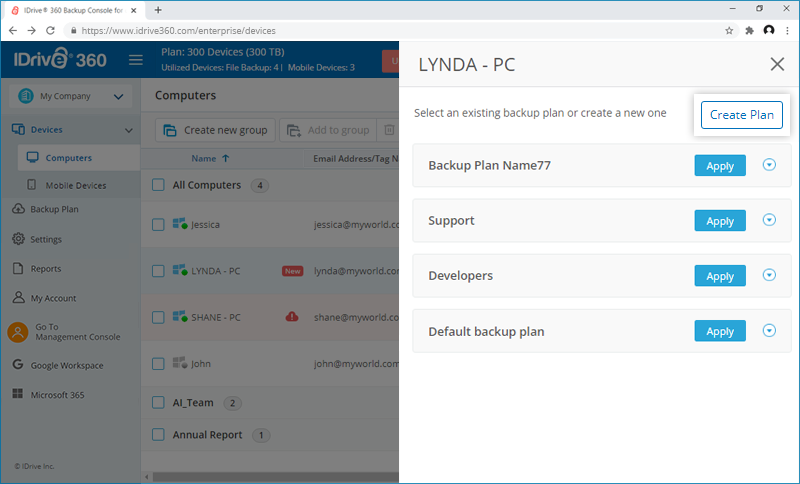
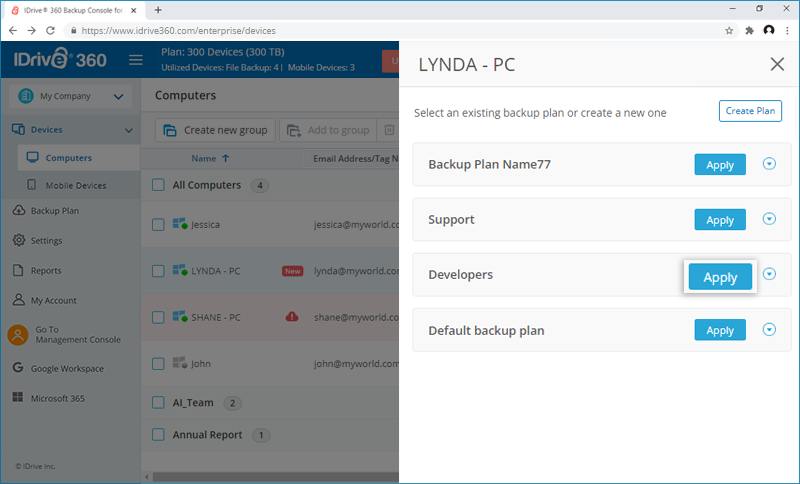
- Choose an existing backup plan or create a new plan for this device.
- If you are creating a new plan, select 'Entire Machine' under 'What to Backup'. The default backup location is 'Cloud Storage'.
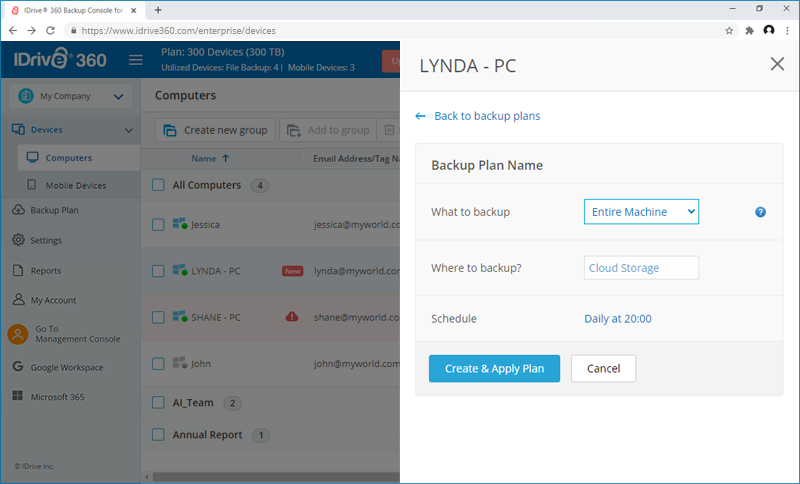
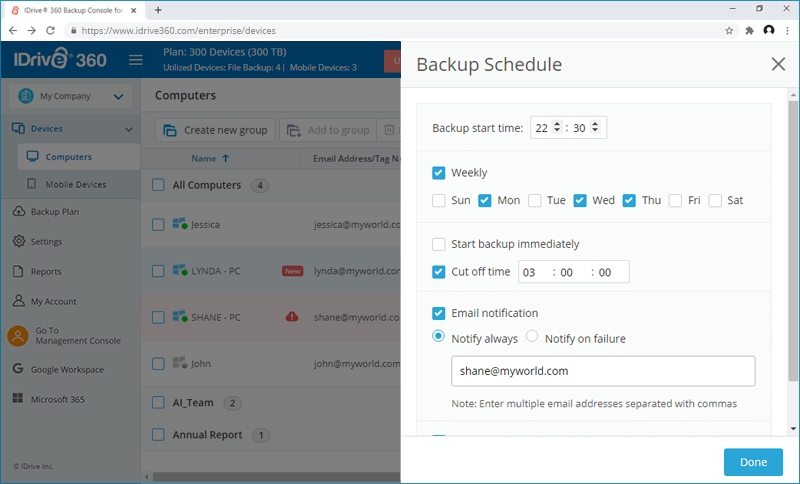
- Under Schedule option, choose backup time, days, cut-off time, and email notification preferences and click 'Done'.
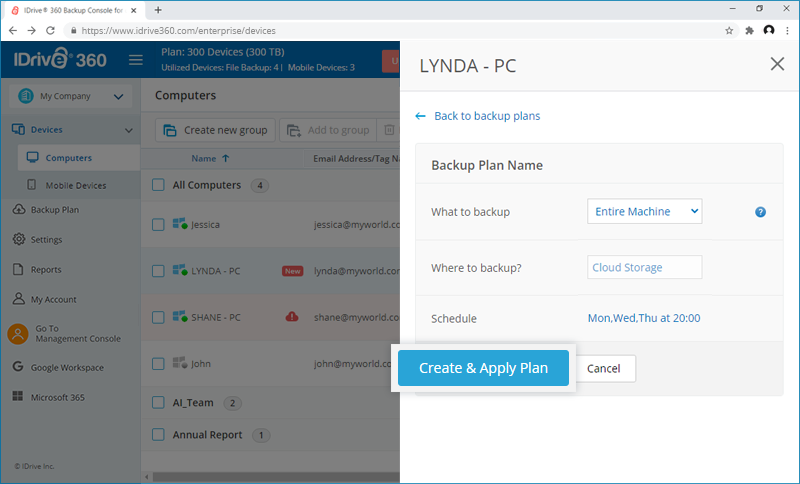
- Once the updates are completed, click Create & Apply Plan'.
Alternatively, if you are choosing an existing plan with 'Entire Machine Backup', click 'Apply' and edit any options if required.
- If you are creating a new plan, select 'Entire Machine' under 'What to Backup'. The default backup location is 'Cloud Storage'.
- The backup process will begin according to the schedule.
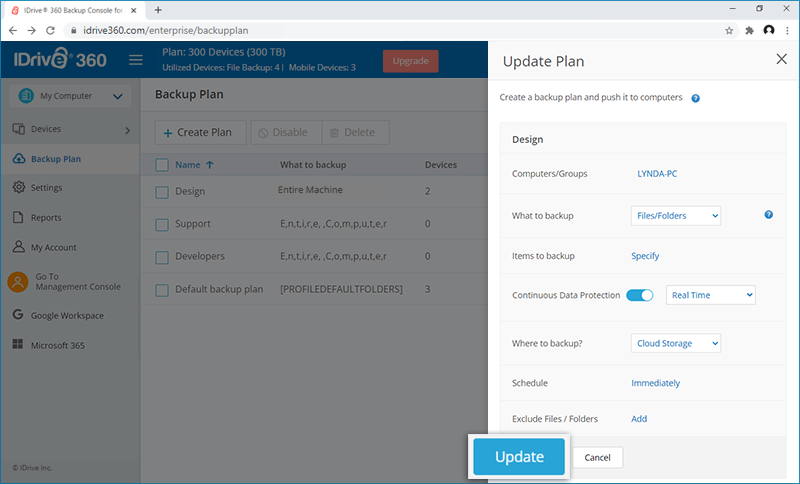
To update the entire machine backup schedule, go to the 'Backup Plan' tab and click on the required computer. Update the backup plan schedule and click 'Update'.
What is the minimum space required for creating a shadow copy of a volume?
IDrive® 360 uses the VSS service to capture point-in-time data of the system. It requires a minimum of 10% of the volume space for shadow copy creation.
Which hardware RAID versions support Entire Machine backup?
The following RAID versions support Entire Machine backup:
- RAID 1
- RAID 0
- RAID 1 + 0
- RAID 0 + 1
- RAID 5
For recovery limitations, click here.
How do I perform the entire machine backup for multiple machines?
To perform entire machine backup for multiple machines,
- Sign in to your IDrive® 360 account.
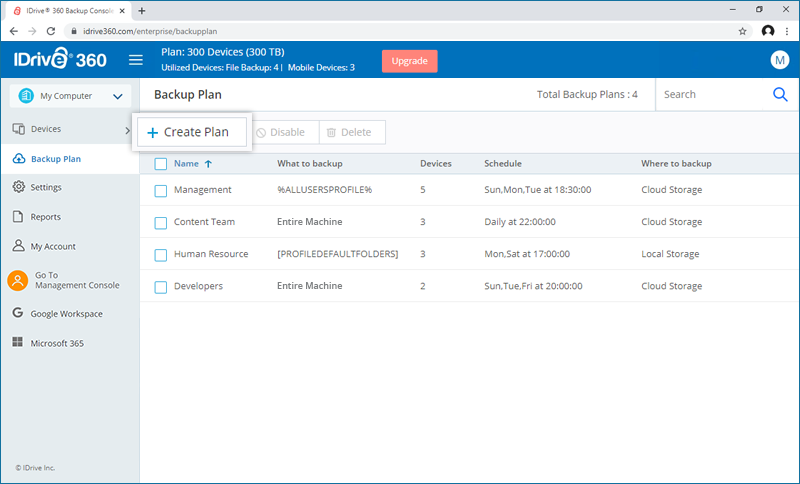
- Navigate to the 'Backup Plan' and click 'Create Plan'.
- Modify the backup plan name and choose the required machines or groups for backup.
- Select the 'Entire Machine Backup' from the dropdown against the ‘What to backup’ option.
- Select the backup destination under the 'Where to backup' option.
- The default backup destination is selected as 'Cloud Storage'.
- Create a schedule for a backup plan, specify the backup start time, select the days of the week, enable email notification, enter the email address, and click 'Done'.
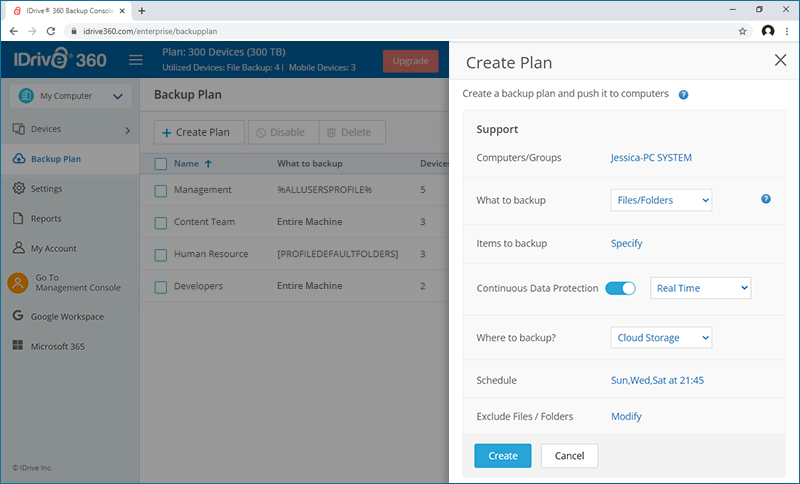
The backup plan will be created and applied to the selected devices or groups.
How do I edit Entire Machine backup plan?
To edit a backup plan,
- Sign in to your IDrive® 360 account.
- Navigate to the 'Backup Plan' and click on the backup plan you wish to edit. Alternatively, click
 .
.
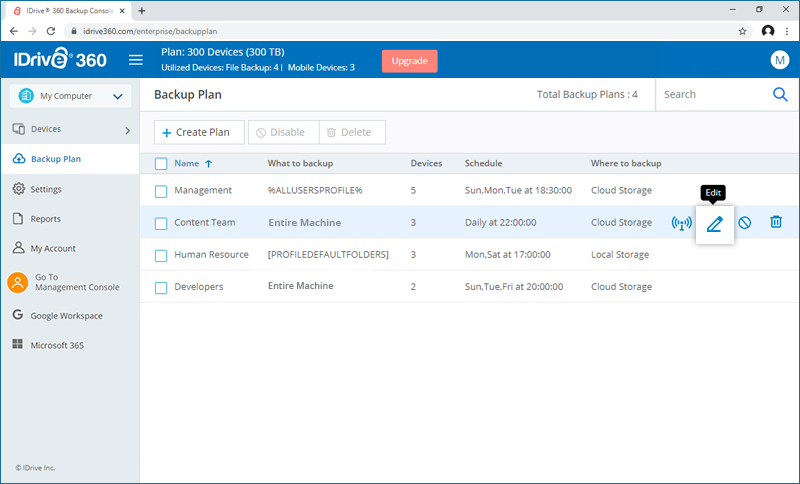
- Modify the backup plan as required and click ‘Update’ to save the changes.
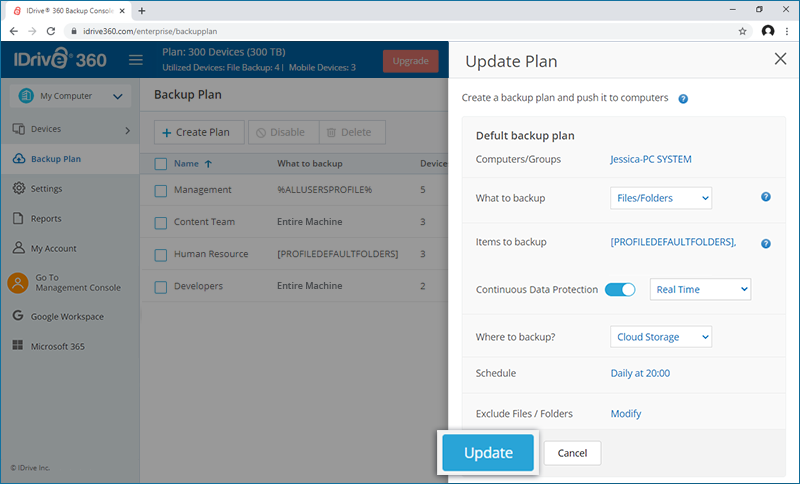
The updated backup plan will be applied to the selected devices or groups.
Note: A backup plan can also be propagated, disabled, and, deleted.
Why is the file count of the entire machine backup folder more than the files uploaded to the cloud?
In addition to the files uploaded from the machine, we upload supporting files (ACL). Therefore, the entire machine backup folder(IDMachineBackup) will show a higher file count.
Can I perform simultaneous backups?
Yes, backups can be scheduled simultaneously. The backups will be prioritized in the following order: entire machine backup to the cloud, file backup to the cloud Backup, and file backup to the local drive.
What is 1-step entire machine restore?
You can restore your entire machine to its earlier state directly from the cloud using 1-step restore.
1-step restore lets you recover your entire machine by using the backed-up boot files directly from the cloud. It restores your entire machine including the OS, program, files, and, system settings to its earlier stage with the same partitions as the original machine.
You can also recover the data to a different machine with or without similar hardware.
What is 2-step entire machine restore?
2-step restore lets you recover your entire machine to a local machine or an external device. It helps recover the OS to its earlier state, with the same partitions as the original machine.
In 2-step restore, initially you download the IDMachineBackup folder from the cloud to an external disk. Now, you can use WinRE bootable disk to restore your entire machine to a different machine with or without similar hardware.
What are the prerequisites to perform the 1-step restore?
Following are the prerequisites,
- A USB bootable flash drive to boot your machine.
- Download the WinRE ISO file and double click to mount it.
- Copy the entire content to a USB bootable flash drive.
How to recover the entire machine backup using the 1-step restore?
To recover the entire machine backup using 1-step restore,
- Connect the WinRE boot disk (USB bootable flash drive) to the machine.
- Launch the machine from the USB to boot to the Windows Recovery Environment. The Entire machine Restore wizard will appear.
- Sign in to the Entire machine Restore wizard using your IDrive® 360 account credentials.
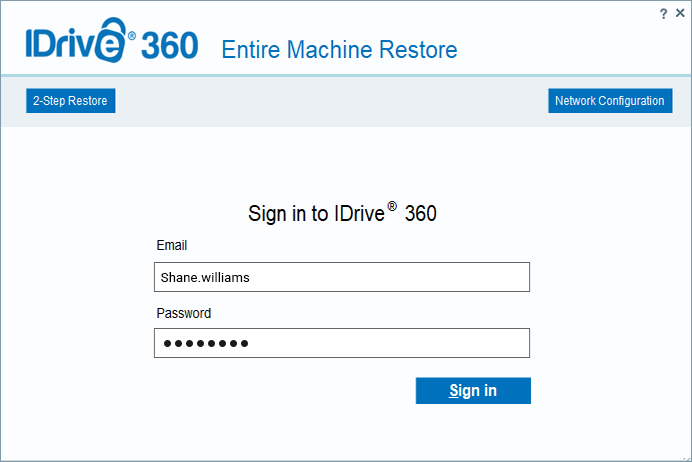
- Click the device and in case your device is configured with private encryption, you will be prompted to enter the private key. Provide the private key to proceed and Select the IDMachineBackup folder.
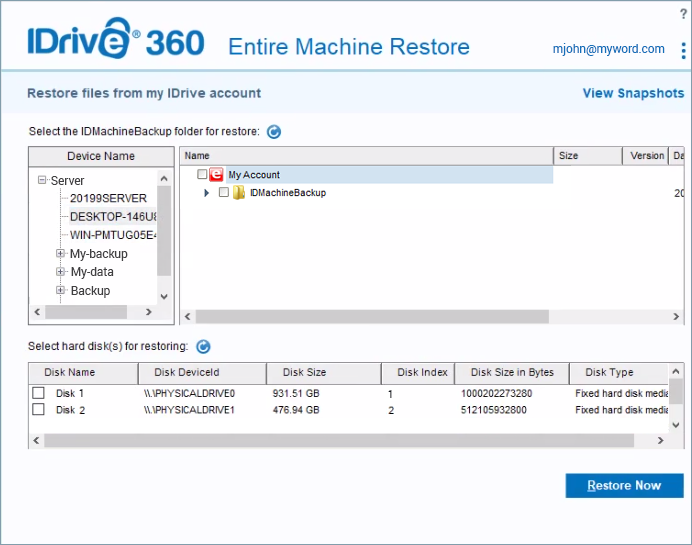
- Select the target hard disk for restoring the data.
- Click 'Restore Now'.
- A popup will appear with the message requesting confirmation to override the existing contents of the selected device. Click 'Yes' to confirm.
- The entire machine will be restored to the target device. Once the restoration is complete, select your hard disk in BIOS and boot your machine to restore the operating system.
Connect to the internet via Wi-Fi or ethernet for downloading the IDMachineBackup folder. To configure the network, click 'Network configuration' and click 'Connect to the Wi-Fi'. Select the Wi-Fi profile and enter the password to connect.
To perform snapshot-based restore,
- Select your device and click the 'IDMachineBackup' folder.
- Click 'View Snapshots'.
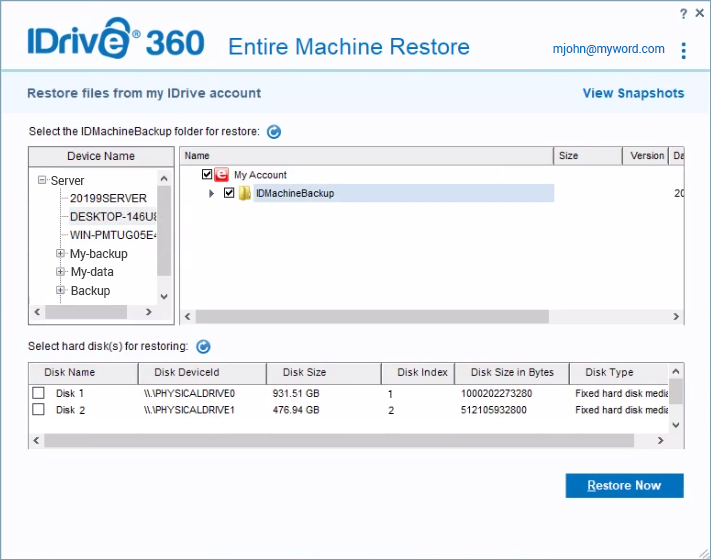
- Choose the snapshot date from the dropdown to view all data backed up on or before that date.
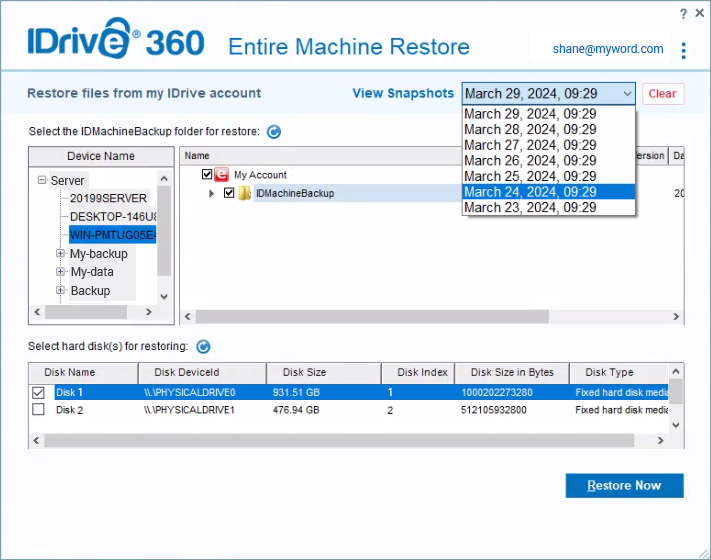
- Click 'Restore Now'.
You can view the progress of the restore on the Entire Machine Restore window. Once the restoration is complete, select your hard disk in BIOS and boot your computer to get the operating system.
Note: After successful restore, install Windows OS updates in the restored system.
For Windows 11 Microsoft Store update
After restoring the system, follow these steps:
- Click Windows key + R to open the 'Run' dialog box.
- Type "wsreset.exe" (without quotes) and click 'Enter'.
The Command Prompt window will appear briefly, followed by the launch of the Windows Store. - Allow some time for the process to complete, then restart your computer.
Why do snapshots for entire machine restore show a different time?
The entire machine restore environment by default uses the (UTC-08:00) Pacific time(US and Canada) time zone. Hence your snapshots may show a different time than actual.
What are the prerequisites to perform the 2-step restore?
Following are the prerequisites,
- A USB bootable flash drive to boot your machine.
- Download the WinRE ISO file to mount it.
- Copy the entire content to a USB bootable flash drive.
- Download the IDMachineBackup folder to an external drive.
- A target hard drive or device with sufficient storage to perform the restore.
How to recover the entire machine backup using the 2-step restore?
To recover the entire machine backup using 2-step restore,
- Connect the WinRE boot disk to the machine.
- Launch the machine from the USB to boot to the Windows Recovery Environment. The Entire machine Restore wizard will appear.
- Click '2-Step Restore'.
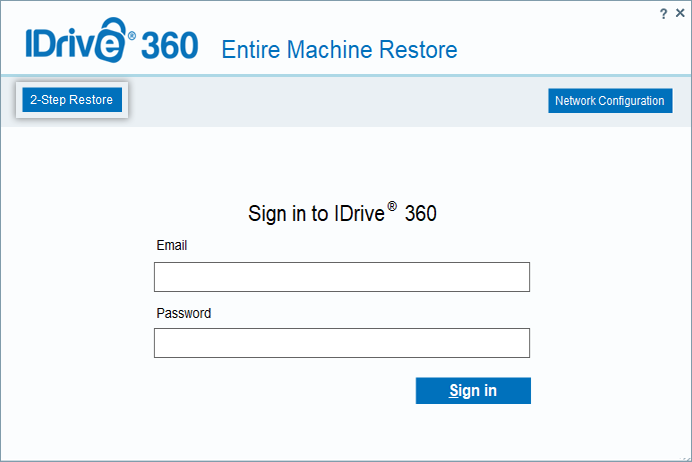
- Click
 . Navigate and select the entire machine backup folder (IDMachineBackup), pre-downloaded from your IDrive® 360 cloud backup account for restore.
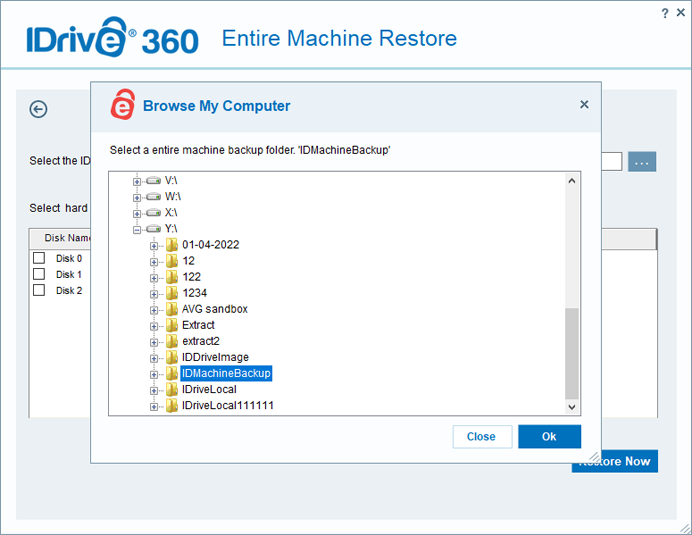
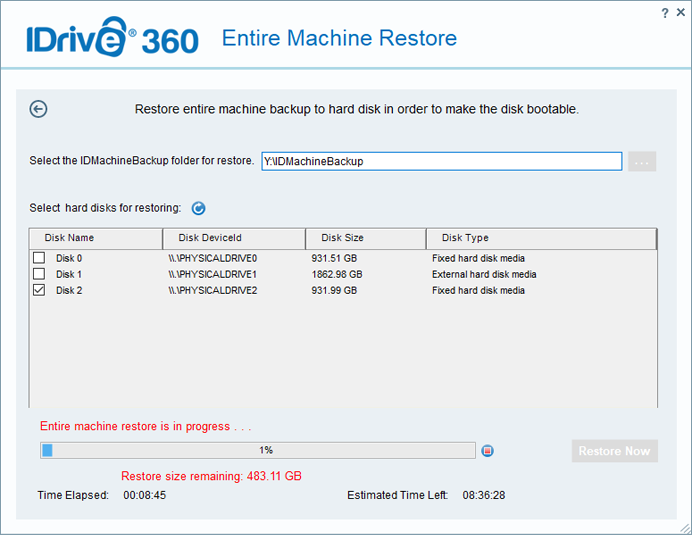
- Select the target hard disk and click 'Restore Now'.
- A popup will appear with the message requesting confirmation to override the existing contents of the selected device. Click 'Yes' to proceed with the restore.
- Once the entire machine restore is completed, select your hard disk in BIOS and boot your machine to restore the operating system.
How do I restore files and folders from entire machine backup?
You can easily restore your files and folders from entire machine backup.
To restore,
- Sign in to your IDrive® 360 account
- In the 'Backup Console' -> 'Devices' tab, hover over the computer you wish to restore and click
 .
. - Go to the 'Restore' tab. If you had set a private encryption key while signing in to the application for the first time, then provide the same.
- Choose 'Restore files from my IDrive360 account'.
- Select 'IDMachineBackup' folder and choose the files/folders to restore.
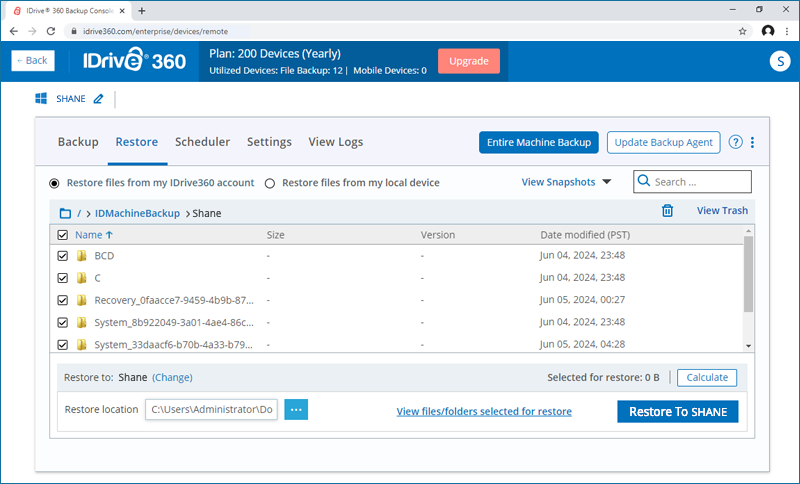
- Click
 to choose a restore location on the local computer.
 - Click 'Change' if you want to perform the restore on a different computer. Choose the desired machine and click 'Yes'.
- Click
- Click 'Restore to <computer name>'.
How can I restore an entire machine backup as a virtual machine (VM) on a VMware ESXi host?
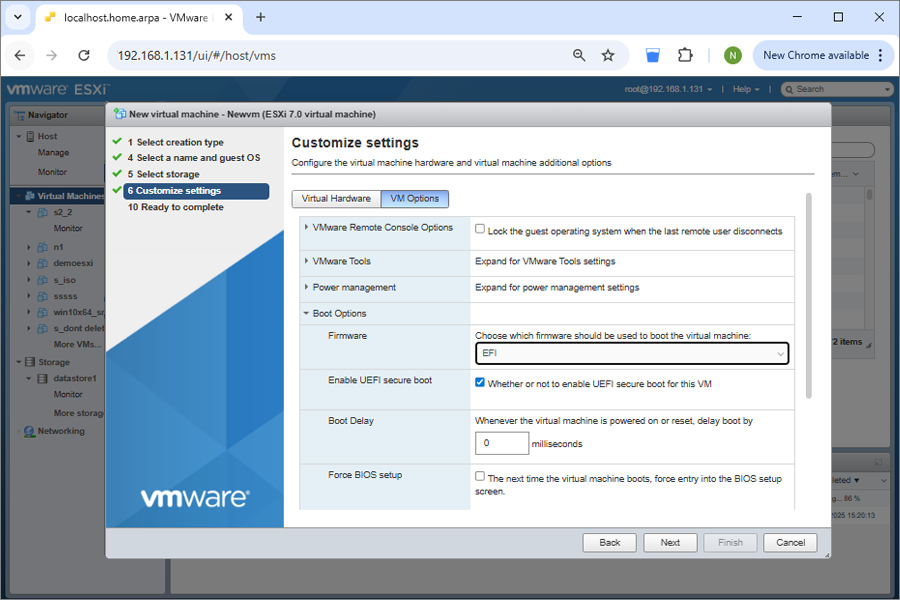
To restore a virtual machine (VM) on a VMware ESXi server using an entire machine backup, you should first create and configure a new VM that aligns with the original system configuration. This involves uploading the recovery ISO, selecting the correct firmware (BIOS or EFI), and booting into the IDrive® 360. Once the VM is running, you can restore the entire system from your IDrive® 360 account or a locally connected external drive.
Ensure prerequisites are met before starting the restore process.
To restore a physical machine as a new VM in an ESXi server,
- Sign in to your ESXi host using the vSphere Client or Web Client.
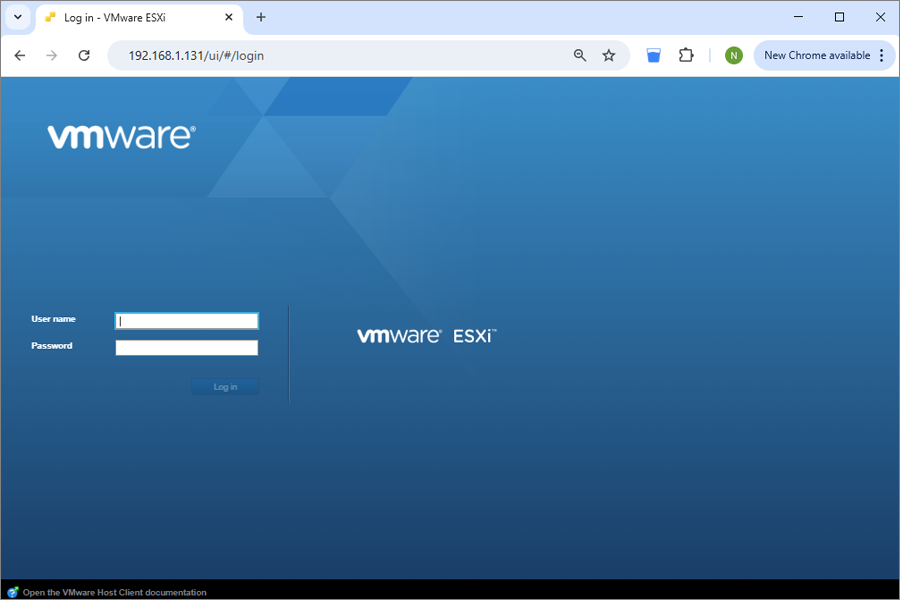
- Upload the system recovery ISO:
- Go to Storage > Datastore browser > Upload.
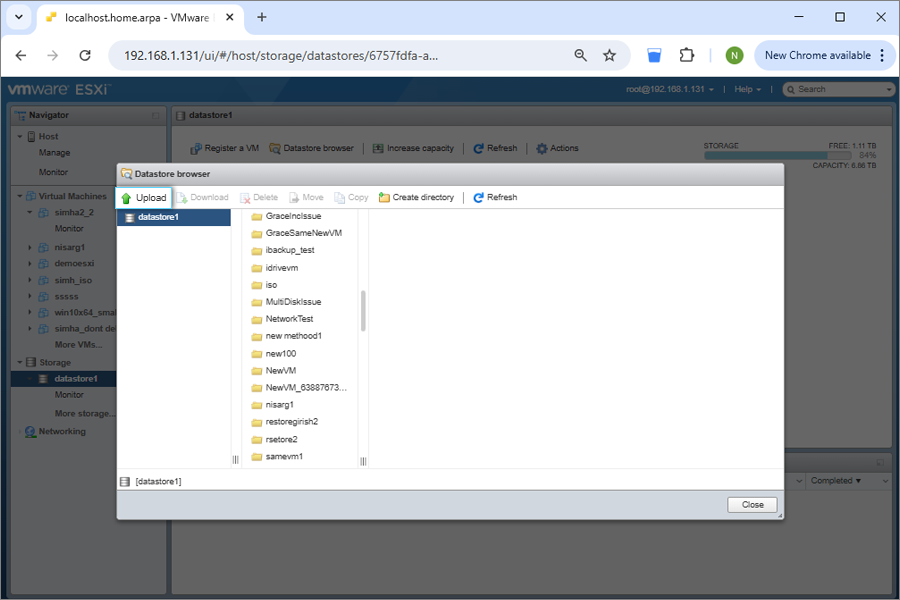
- Upload the correct IDrive360WinRE.iso file (based on the partition type in state.xml).
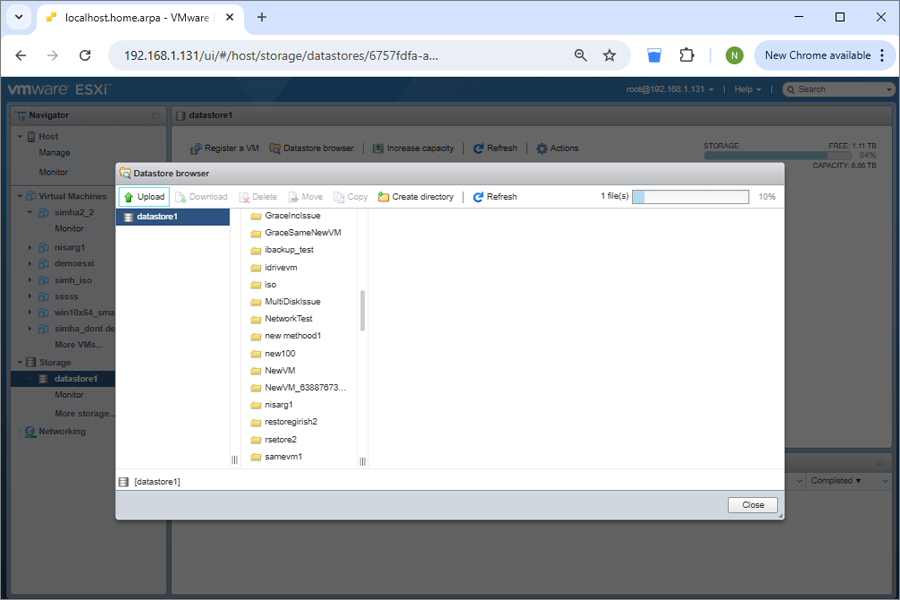
- Go to Storage > Datastore browser > Upload.
- Create and configure the virtual machine:
- Click Create/Register VM.
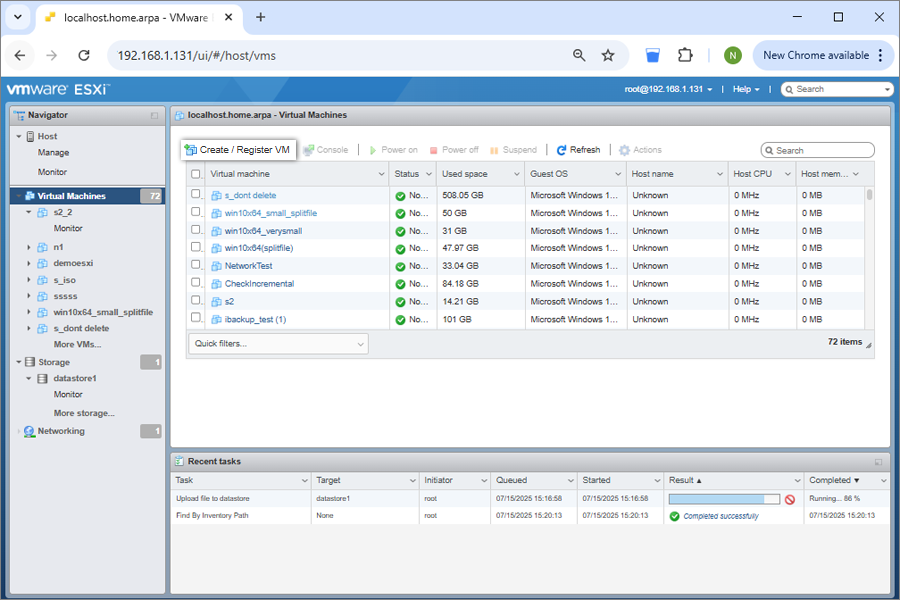
- Enter a name and select the Guest OS (based on state.xml).
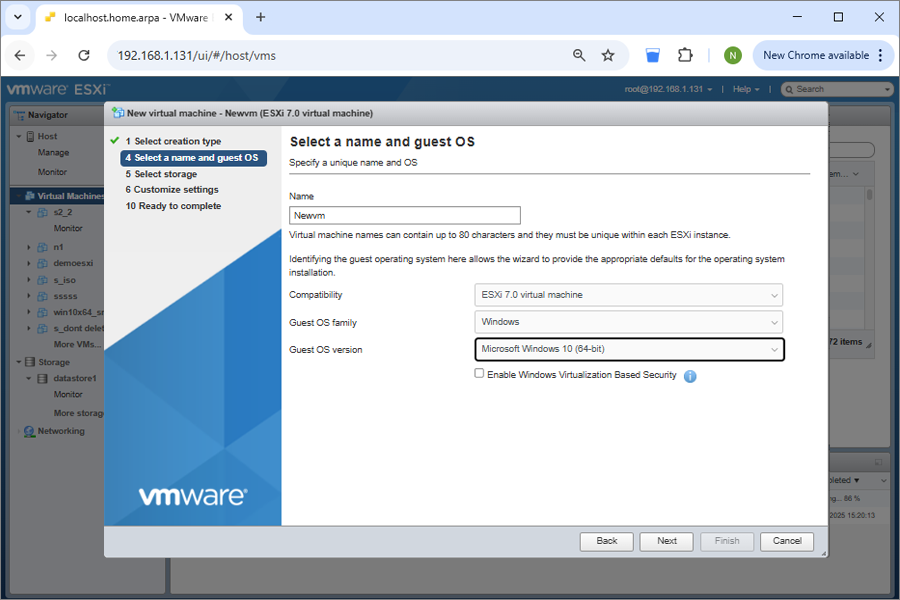
- Choose the target datastore and configure virtual hardware.
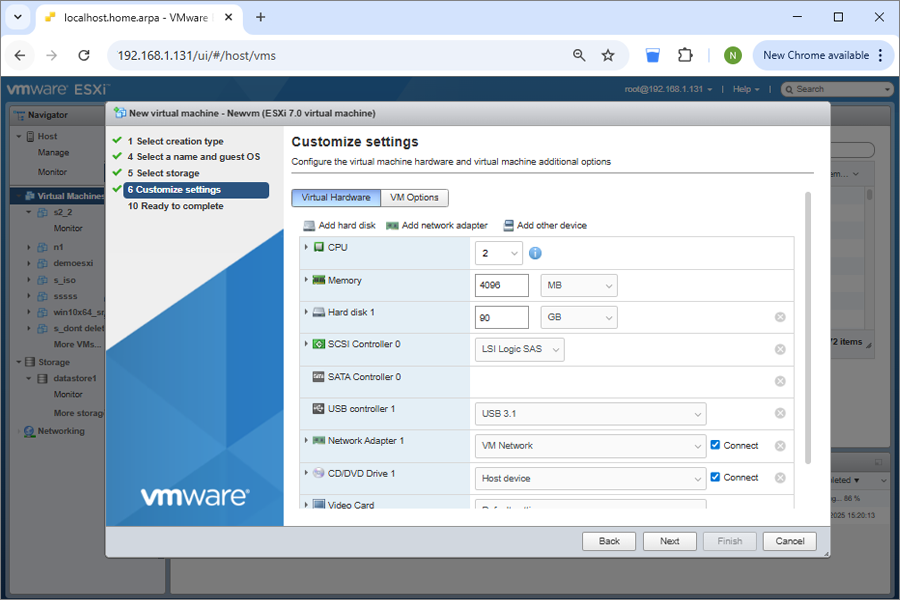
- Click Create/Register VM.
- Create a hard disk size (equal to or larger than the size in state.xml).
- Select CD/DVD Media and select Browse the downloaded SystemWinRE.iso.
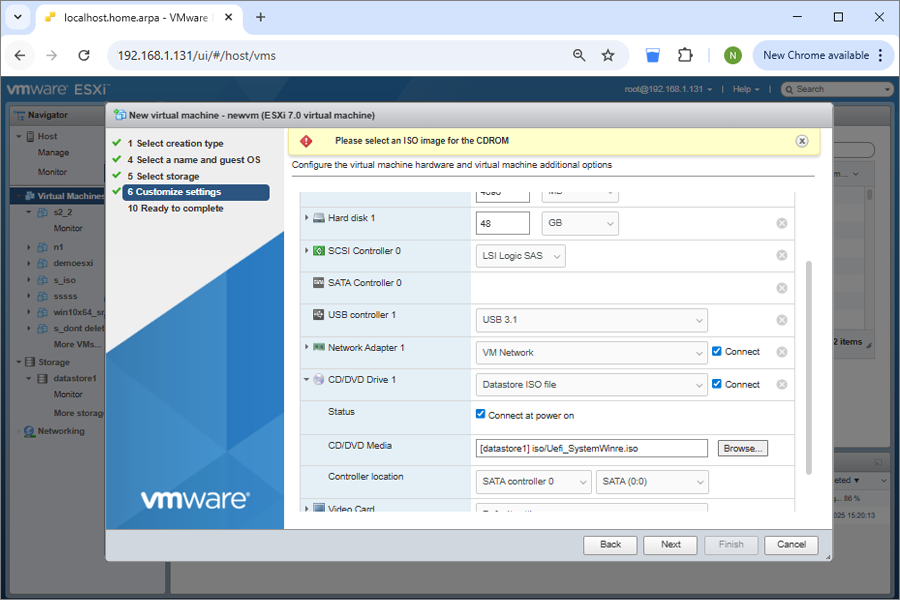
- Set the firmware under VM Options > Boot Options:
- Save the changes and finish VM creation.
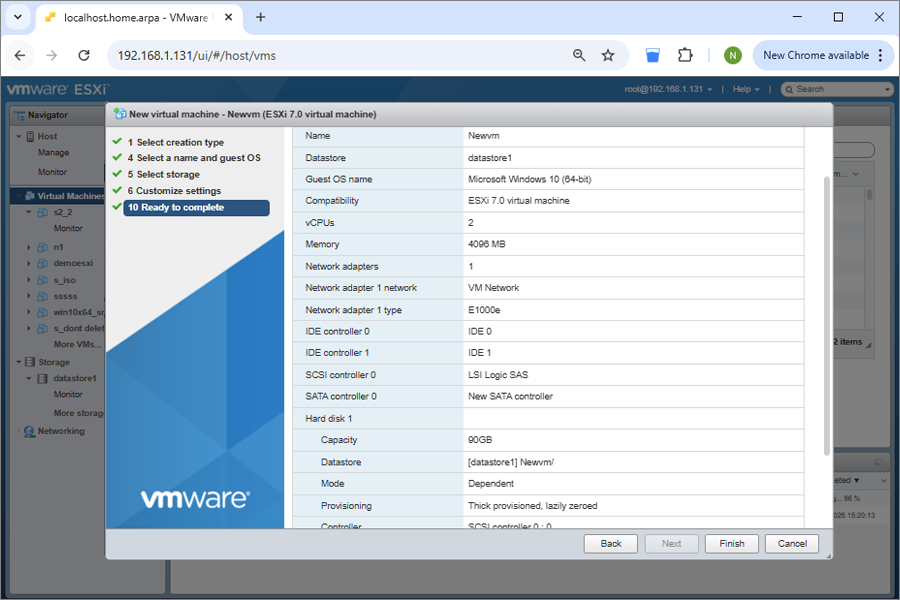
- Boot the VM and start the restore:
- Power on the VM. The VM will boot into the IDrive® 360 recovery environment.
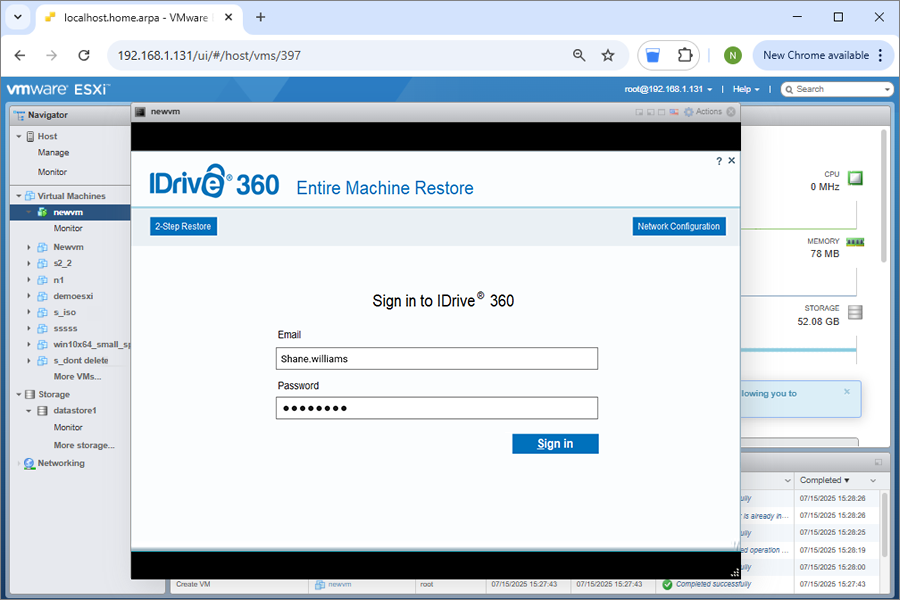
- Power on the VM. The VM will boot into the IDrive® 360 recovery environment.
- Sign in to your IDrive® 360 account, or connect an external HDD.
- Select the device and in case your device is configured with private encryption, you will be prompted to enter the private key. Provide the private key to proceed.
Choose the Entire Machine Backup folder (IDMachineBackup) to restore the data. - Select the hard disk to which you wish to restore the data and click on Restore Now.
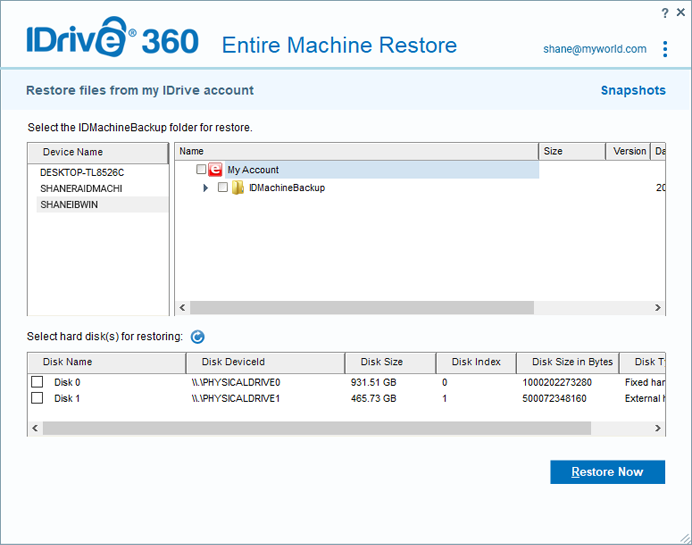
- In the pop-up window for confirmation to override the existing contents present in the device, click Yes if you wish to proceed.
- Select a restore method:
- 1-step restore – In the event of a disaster, quickly recover your entire machine, including the operating system, applications, and data, directly from the IDrive® 360 web application. 1-step restore uses the backed-up boot files stored in the cloud to restore the OS to its previous state, ensuring seamless recovery. Click here to learn more.
- 2-step restore – In the event of a disaster, recover your entire machine, including the operating system, applications, and data, using IDrive® 360. With 2-step restore, backed-up boot files are first restored to external device, enabling you to recover the OS to its previous state. Click here to learn more.
- View important notes and compatibility requirements for the restoration process.
How can I restore an entire machine backup as a virtual machine (VM) on a Hyper-V server?
To restore a virtual machine (VM) on a Microsoft Hyper-V environment using an entire machine backup, you should first create and configure a new VM based on your original system’s configuration. This includes attaching the recovery ISO, selecting the correct VM generation (Gen 1 or Gen 2), and booting into the IDrive recovery environment. Once the VM is running, you can restore your system from the IDrive® 360 account or a connected external drive.
Ensure prerequisites are met before starting the restore process.
To restore a physical machine as a new VM in Hyper-V:
- Open Hyper-V Manager on your Windows system.
- Create and configure the virtual machine:
- Click New > Virtual Machine and follow the wizard.
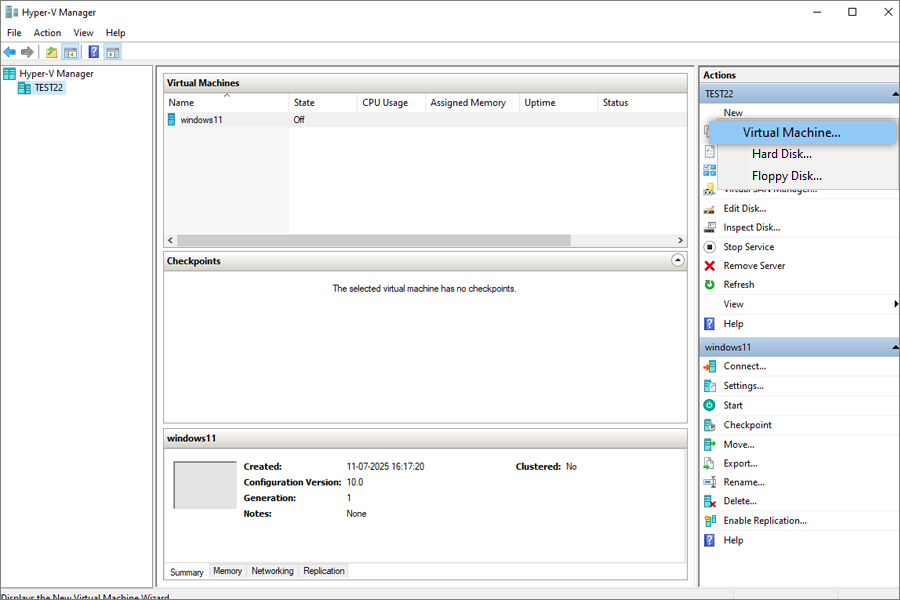
- Enter a name for the VM.
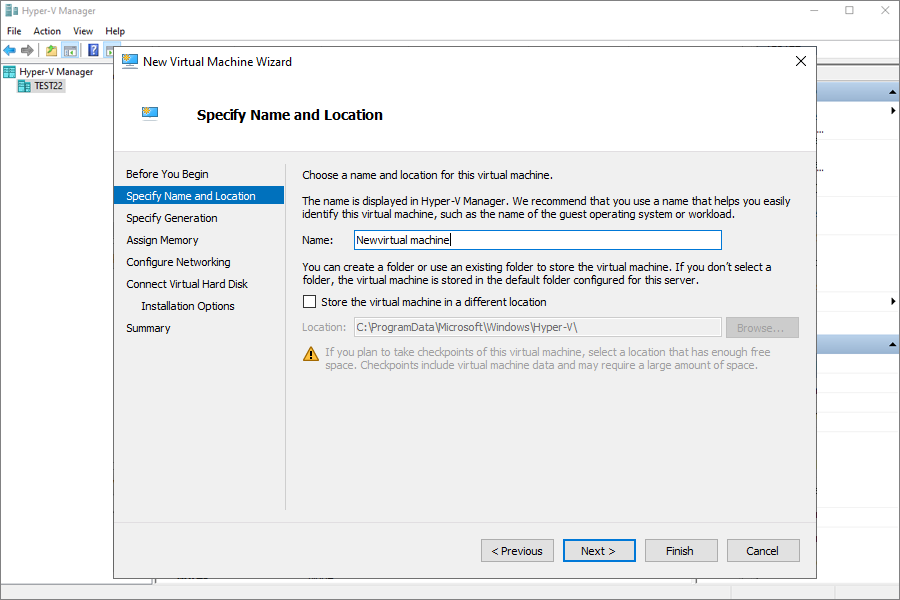
- Click New > Virtual Machine and follow the wizard.
- Select the correct generation:
- Generation 1 for MBR (as per state.xml)
- Generation 2 for GPT
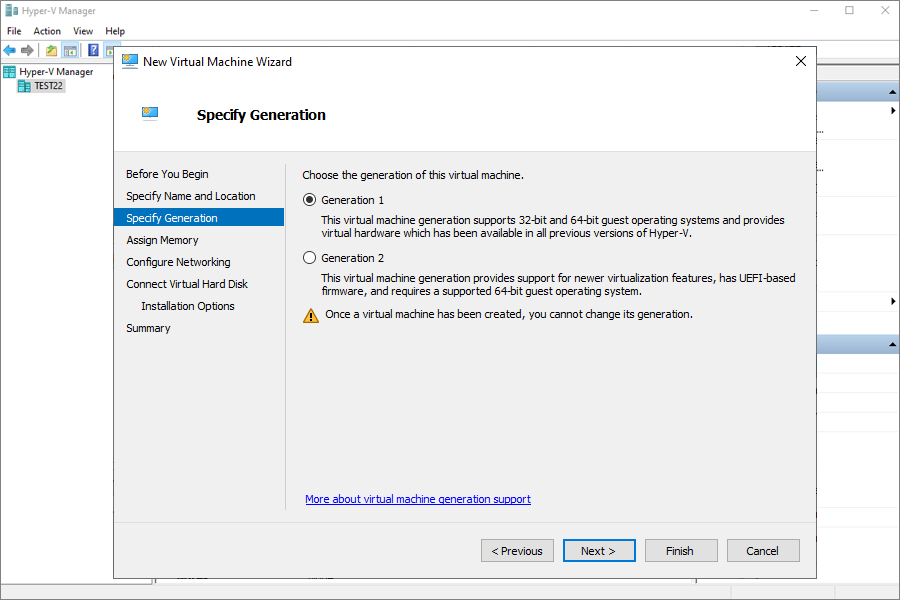
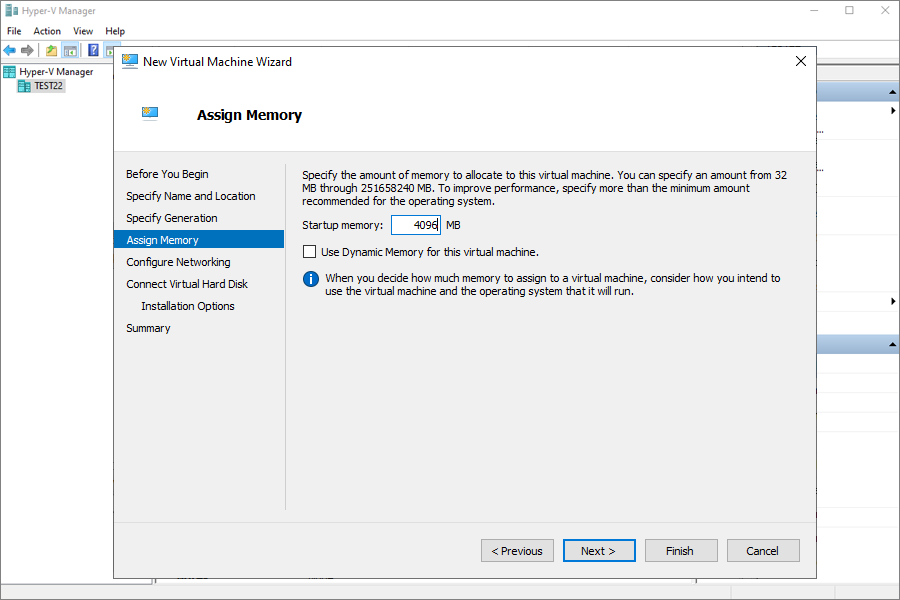
- Allocate at least 4096 MB of memory.
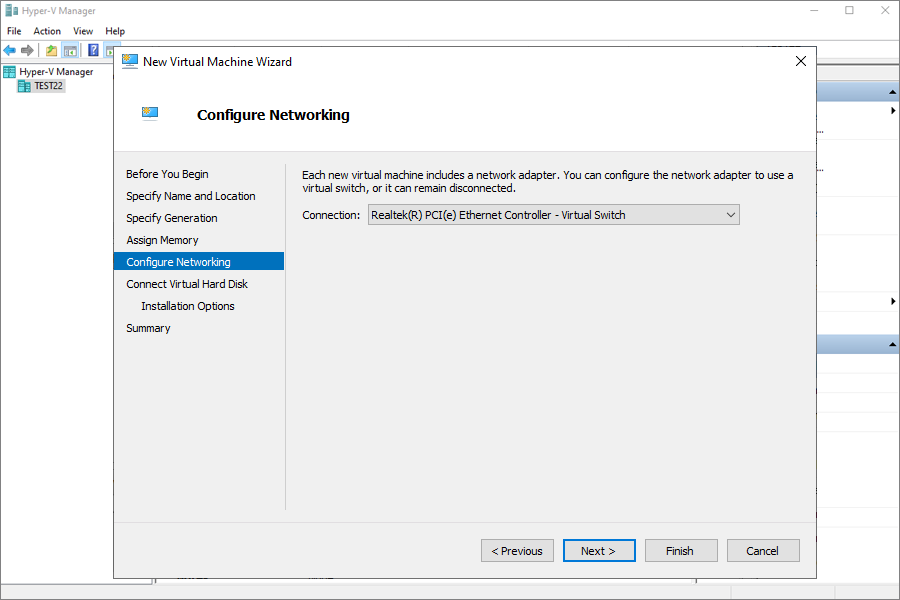
- Select the Default Switch for network configuration.
- Create a new virtual hard disk (equal to or larger than the size in state.xml).
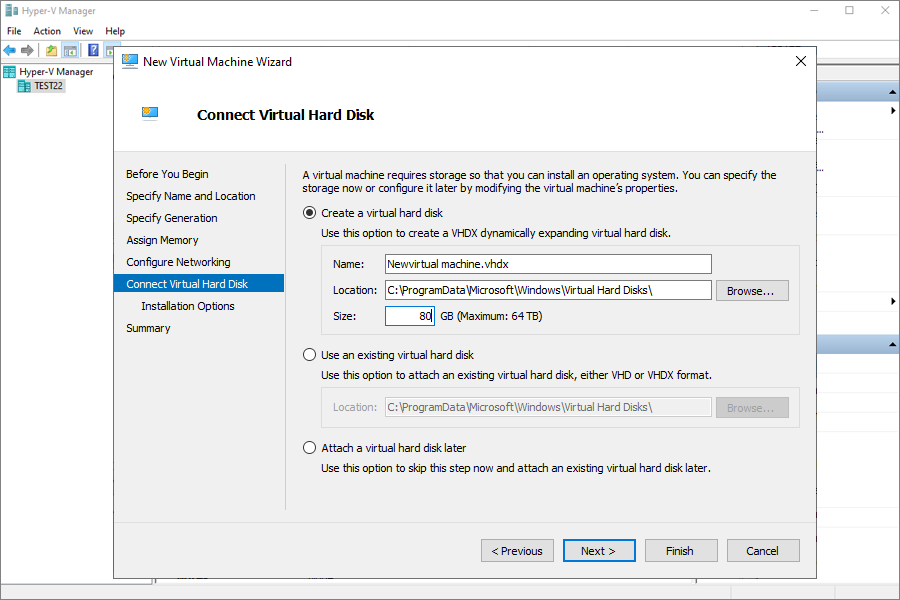
- Under Installation Options, select Bootable CD/DVD-ROM, and then attach the downloaded IDrive360WinRE.iso.
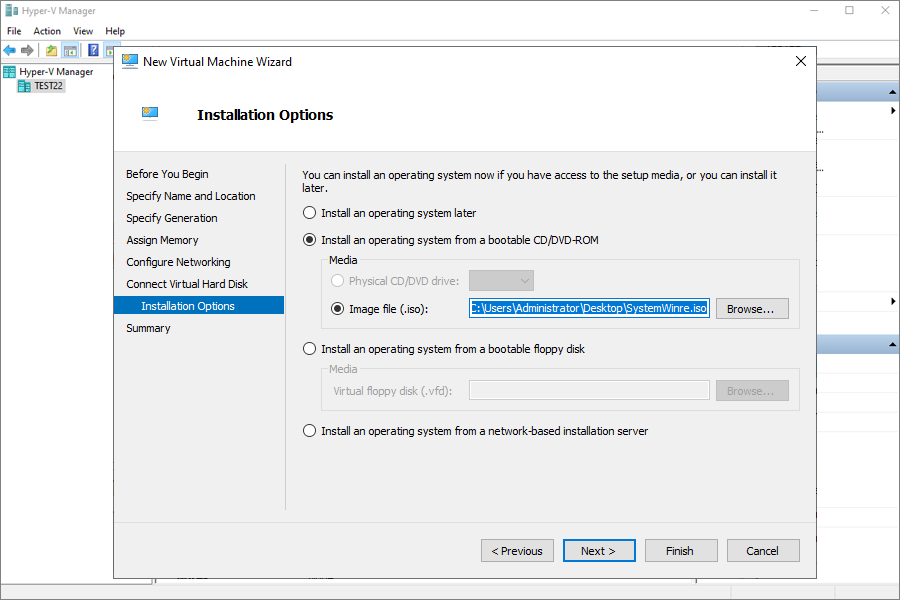
- Review the configuration and click Finish.
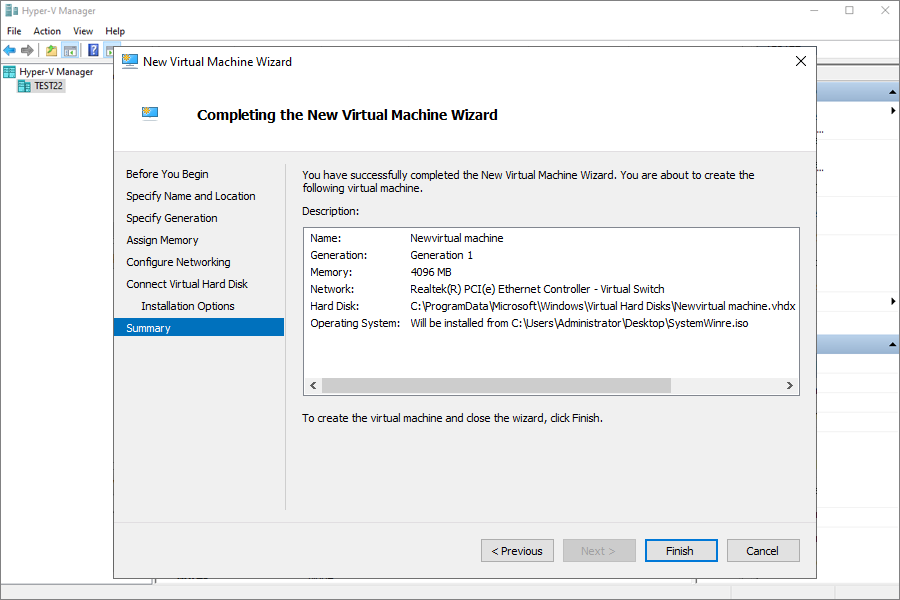
- Boot the VM and start the restore:
- Power on the VM. The VM will boot into the IDrive® 360 recovery environment.
- Sign in to your IDrive® 360 account, or connect an external HDD.
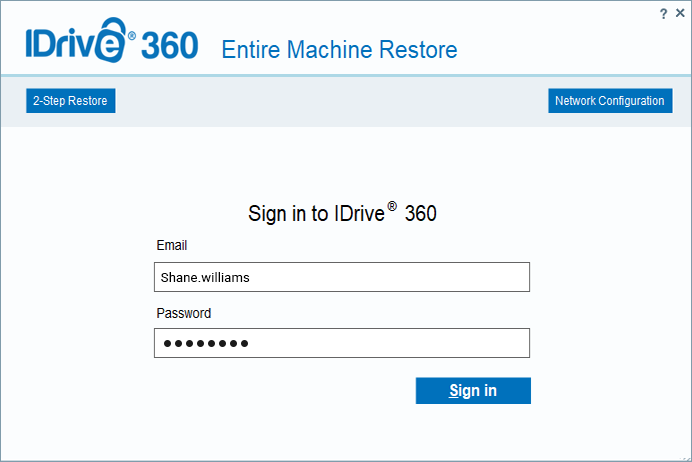
- Select the device and in case your device is configured with private encryption, you will be prompted to enter the private key. Provide the private key to proceed.
Choose the Entire Machine Backup folder (IDMachineBackup) to restore the data. - Select the hard disk to which you wish to restore the data and click on Restore Now.

- In the pop-up window for confirmation to override the existing contents present in the device, click Yes if you wish to proceed.
- Select a restore method:
- 1-step restore – In the event of a disaster, quickly recover your entire machine, including the operating system, applications, and data, directly from the IDrive® 360 application. 1-step restore uses the backed-up boot files stored in the cloud to restore the OS to its previous state, ensuring seamless recovery. Click here to learn more.
- 2-step restore – In the event of a disaster, recover your entire machine, including the operating system, applications, and data, using IDrive® 360. With 2-step restore, backed-up boot files are first restored to a local machine or external device, enabling you to recover the OS to its previous state. Click here to learn more.
Connecting an external USB drive to a Hyper-V virtual machine
To restore from an external USB drive, follow these steps,
- Connect the USB drive to the host machine (running Hyper-V).
- On the host, open Disk Management (diskmgmt.msc).
- Locate the USB drive, right-click, and select Offline.
- Launch and open the Hyper-V Manager.
- Right-click on the virtual machine to which you want to add the drive and select Settings.
- Navigate to SCSI Controller (or IDE Controller), click Add > Physical Hard Disk.
- To select the USB drive, choose the offline USB drive from the dropdown menu, then click Apply and OK.
- Power on the VM, the external USB drive will now be accessible inside the virtual machine.
- View important notes and compatibility requirements for the restoration process.
How to create a bootable WinRE restore media for entire machine restore?
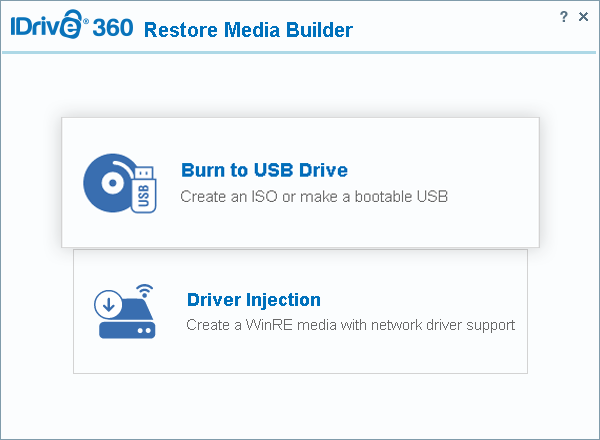
In order to initiate a WinRE-based entire machine restore, you need to create a bootable USB or media device using the IDrive® 360 Restore Media Builder app. You can use this bootable WinRE-based recovery media to boot up a Windows computer on which restore needs to be initiated.
To create a bootable recovery media,
- Launch the IDrive® 360 Restore Media Builder setup.
- Select 'Burn to USB Drive'.
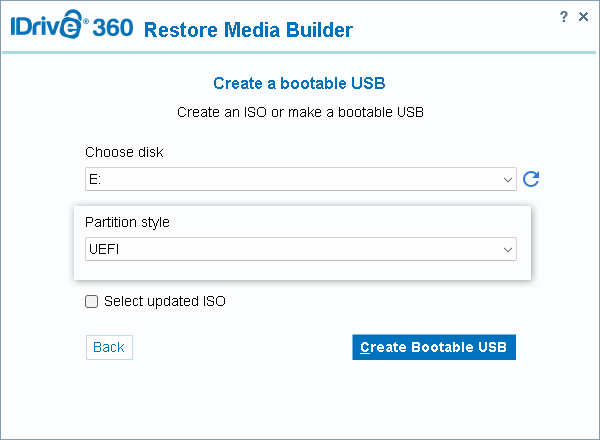
- Choose the required USB drive as the target disk from the dropdown.
- Choose the desired partition style from the dropdown.
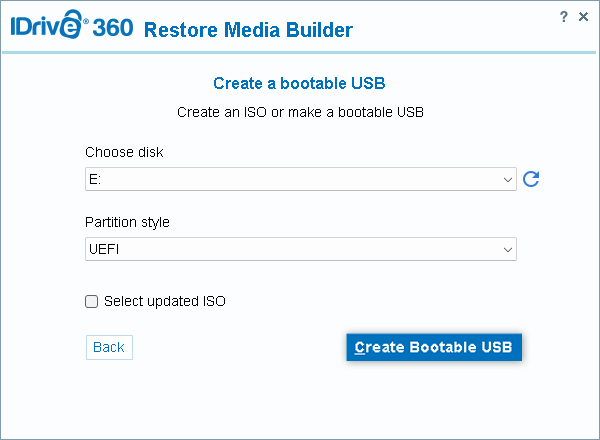
- Click 'Create Bootable USB'.
- Click 'Yes' in the confirmation popup to format the selected USB drive. The selected drive associated with the disk will be formatted completely.
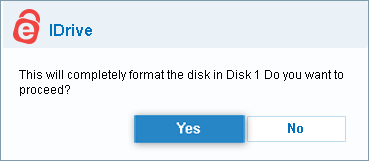
A bootable ISO file will be automatically downloaded and the entire content inside the ISO file will be copied to the selected USB thumb drive.
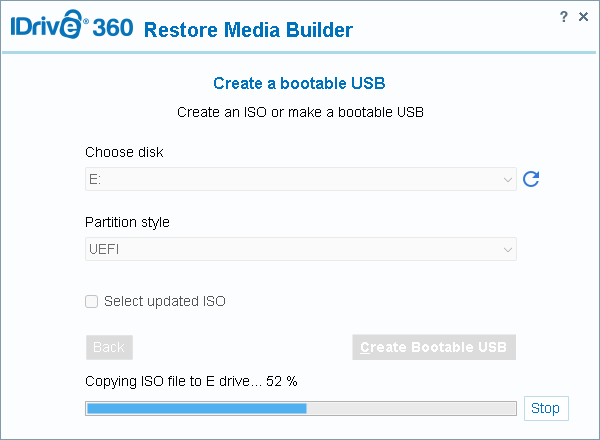
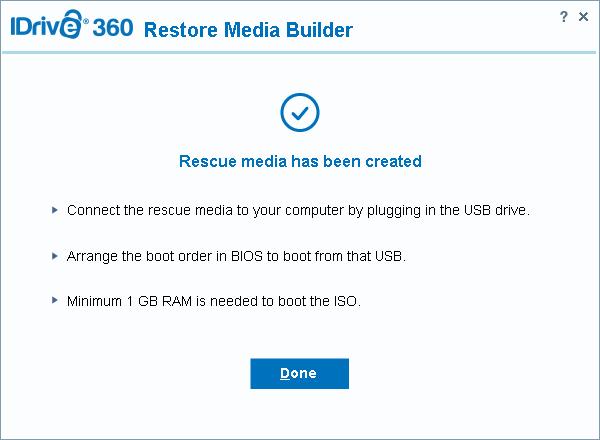
The progress will be displayed on the screen. You will be notified once the bootable USB device is created along with further instruction to use the bootable device.
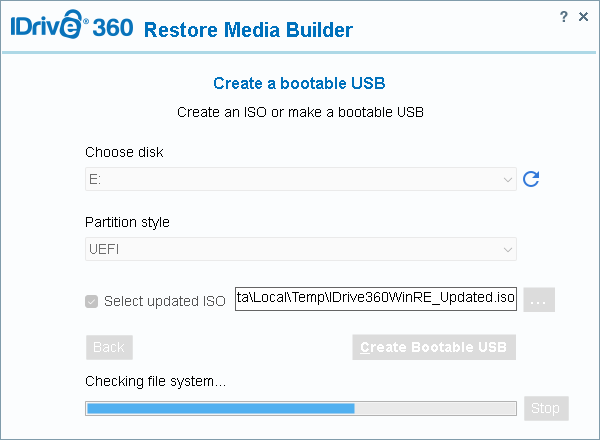
If you are using a WinRE media with wireless network support, then follow steps 1 through 4 mentioned above and perform these two additional steps before clicking 'Create Bootable USB'.
- Click the 'Select updated ISO' checkbox.
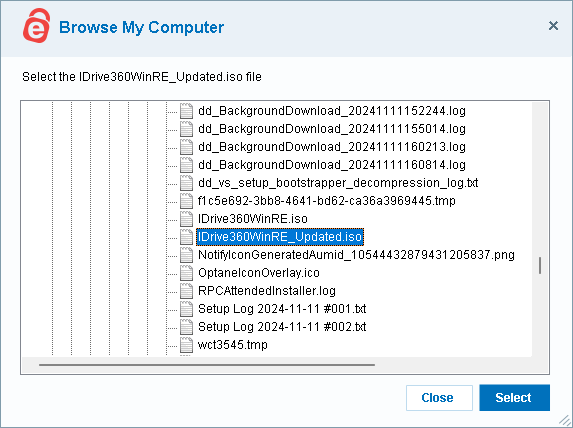
- Browse and select the 'IDrive360WinRE_Updated.iso' file.
How can I build a bootable WinRE media that includes wireless Wi-Fi support?
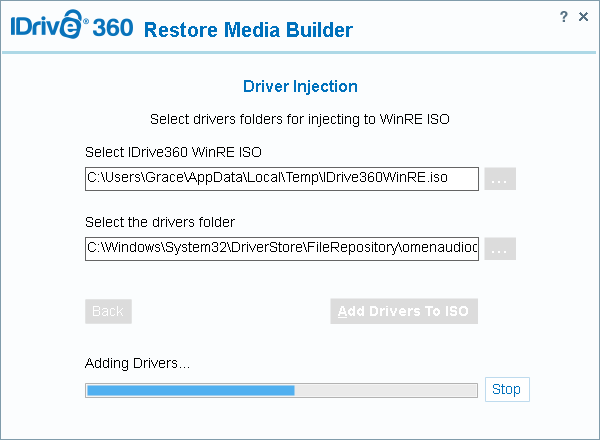
To create a WinRE media with support for a wireless network, follow these steps:
- Launch the IDrive® 360 Restore Media Builder setup.
- Select 'Driver Injection'.
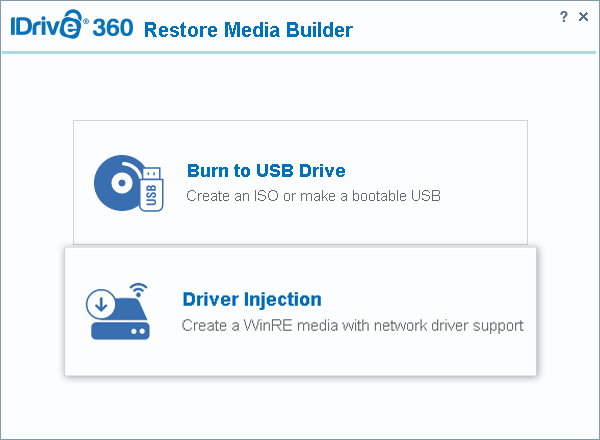
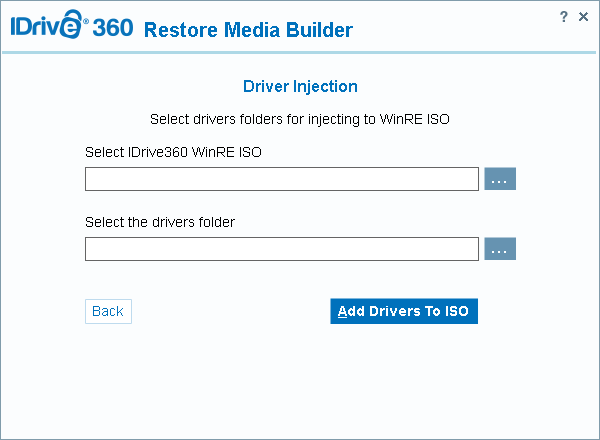
- Select the 'IDrive360WinRE.iso' by browsing.
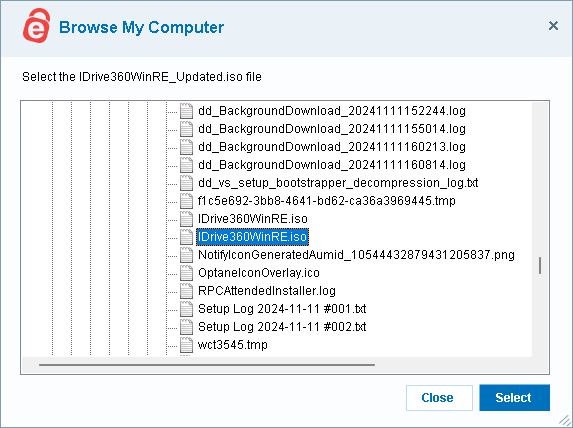
- Select the Wi-Fi drivers folder.
- Click 'Add Drivers To ISO'.
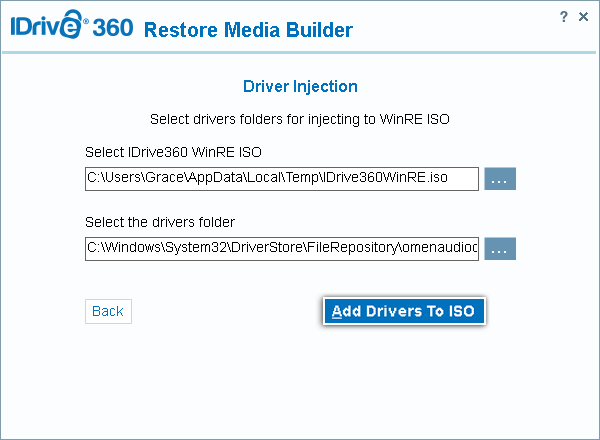
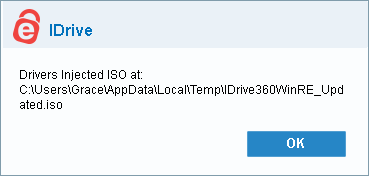
An updated ISO with the selected WiFi drivers added to it will be created.
How do I create a bootable USB flash drive to restore entire machine backup?
To create a bootable USB flash drive,
- Plugin a USB flash drive to your machine.
- Run the 'Command Prompt' as an administrator.
- Use the following command to view the list of disks: DISKPART > list disk
- Use the following command to select a drive: DISKPART > select disk X Here 'X' is the drive number or drive letter of the USB flash drive.
- Use the following command to delete all the data from the USB flash drive:
DISKPART > clean - Enter the following command to create the required partition.
DISKPART > create partition primary - Use the following command to select the required partition:
DISKPART > select partition 1 - Use the following command to restore MBR machine backup partition (legacy):
DISKPART > format fs=ntfs quick
DISKPART > active - Use the following command to restore GPT machine backup partition (UEFI):
DISKPART > format fs=fat32 quick
Why am I being prompted to activate my Windows license after an entire machine restore?
Activation code pairs your product key with your machine’s hardware configuration. It helps verify that your Windows is genuine. Therefore, if there is a hardware change, your machine might forget its license after reinstalling and Windows may prompt you to re-activate it.
To fix this issue in the case of a retail license, simply enter the product key on the new machine and activate the Windows license again.
Note: Retail licenses can only be installed on one machine at any particular time. It can be used on multiple machines.
In the case of an OEM license, the product key is linked to your machine's motherboard and that is non-transferable. To secure OEM license activation for a restored machine, you require to contact your OEM-license provider.
IDrive® 360 cannot assist you with third-party licensing issues.
Can I perform Entire Machine Backup on my machine with BitLocker or EFS (Encrypted File System) encryption enabled?
Encrypted File System (EFS) file system is used to control who can read the file and BitLocker encrypts the entire contents of the operating system drive. If these are enabled on your machine, you cannot perform the entire machine backup.
To perform the entire machine backup, you will need to disable the BitLocker or EFS (Encrypted File System) encryption from your machine.
Does the entire machine backup support dynamic disks?
Yes, the entire machine backup supports dynamic disks with simple volumes.
For recovery limitations, click here.
Does IDrive® 360 support entire machine backup for Mac and Linux users?
No, currently the entire machine backup is only available for Windows users.
I am getting the message 'No bitmap data available for the drive. Run the 'chkdsk' command on logical drives (NTFS) to perform an incremental scan' in my backup logs. What should I do?
IDrive® 360 may perform a full system scan to check if there is any inconsistency in the file system within the backed up machine.
To resolve this issue and perform an incremental scan,
- Navigate to 'Start' > 'Command Prompt', and run as administrator.
- Run the following command:
chkdsk <DISK>: /f /r
Where, <DISK> specifies the drive letter of the partition to be checked. Checking the drive C: may require you to reboot the machine.
Does the entire machine backup perform backup of Microsoft OneDrive?
Yes, the entire machine backup can backup OneDrive if its files \ folders are saved on the local drive. To save files \ folders locally, you will need to disable the 'Files On-Demand' feature.
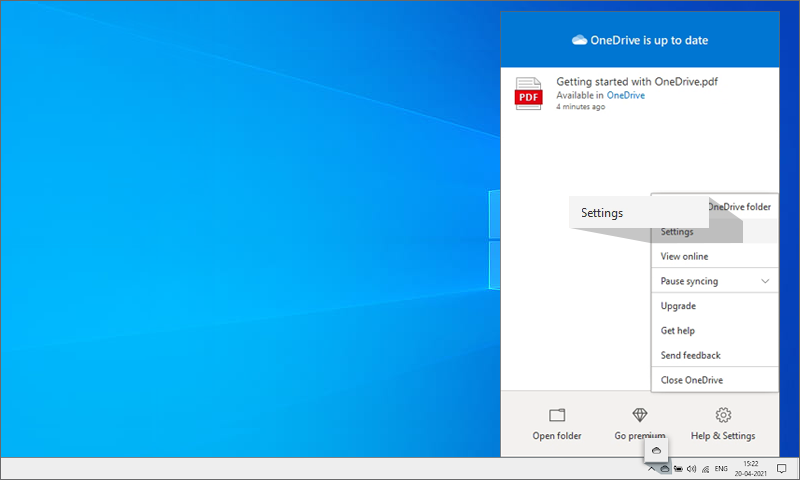
To disable OneDrive's Files On-Demand feature,
- Right-click the 'OneDrive' icon on your system tray and select 'Settings'. This will open the Microsoft OneDrive 'Settings' tab.
- Uncheck the box under 'Files On-Demand'.
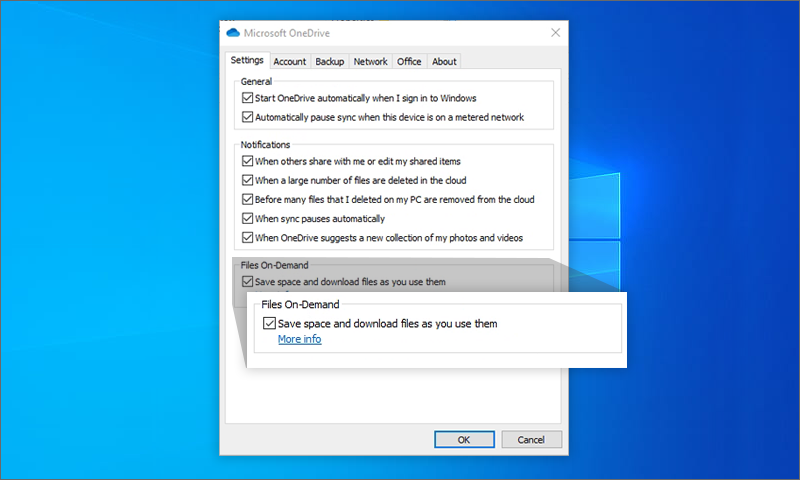
- Click 'OK' to confirm disabling of the 'Files On-Demand' feature.
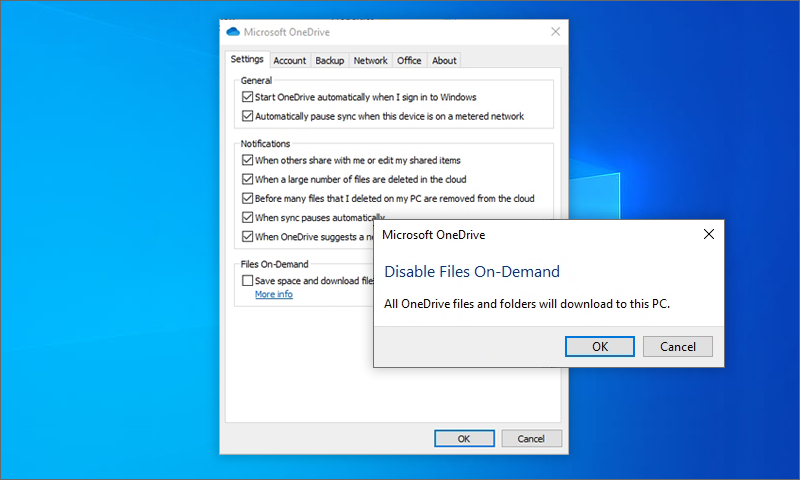
- Click 'OK' in the OneDrive Settings tab and save the changes.
OneDrive files and folders will now be available on the local device and will be backed up during the next entire machine backup.
Further, you can choose the files and folders to backup from your OneDrive folder.
To select the OneDrive files / folders for backup,
- Right-click the 'OneDrive' icon on your system tray and select 'Open your OneDrive folder'.
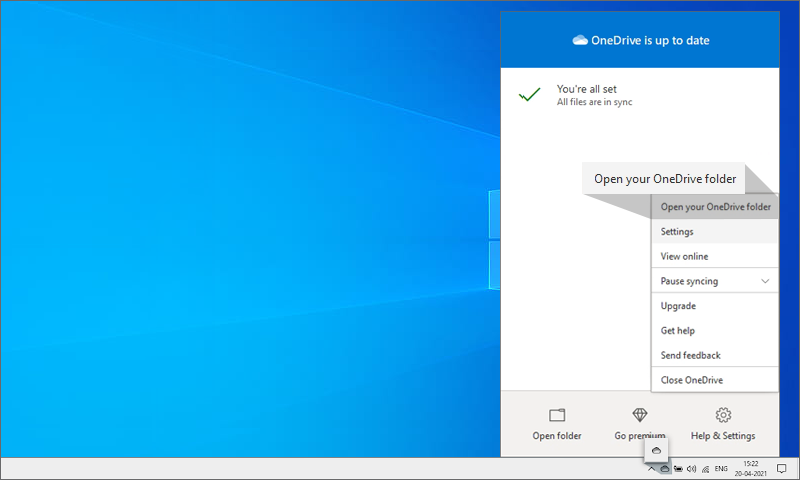
- Select the folders / files you wish to backup.
- Right-click and select 'Always keep on this device'.
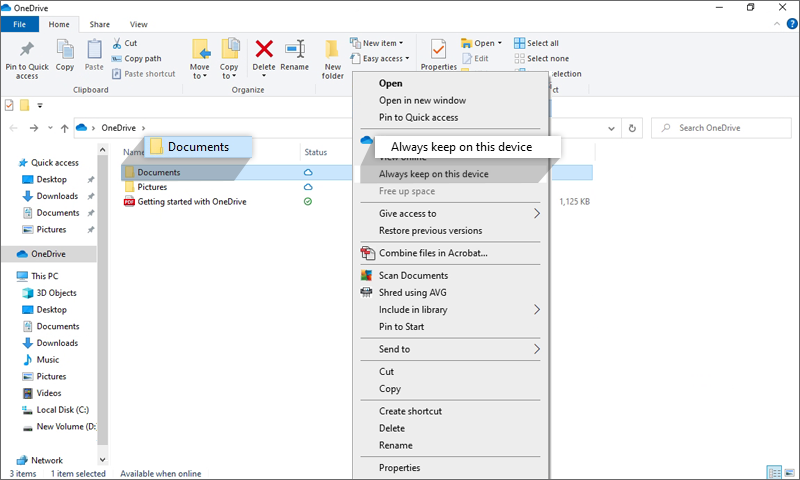
These files and folders will now be available on the local device. The next scheduled backup operation will backup these OneDrive files and folders.
How can I find the path of the Wi-Fi driver used by my machine?
To connect to a Wi-Fi network via WinRE, you need to add the relevant driver for your machine to the IDrive® Restore Media Builder. Navigate to 'Windows Device Manager' to know which system uses which Wi-Fi drivers.
Following are the steps to find the Wi-Fi driver:
For Windows 8 or Windows 10
- Right-click the 'Windows Start' button.
- Select 'Device Manager' from the list.
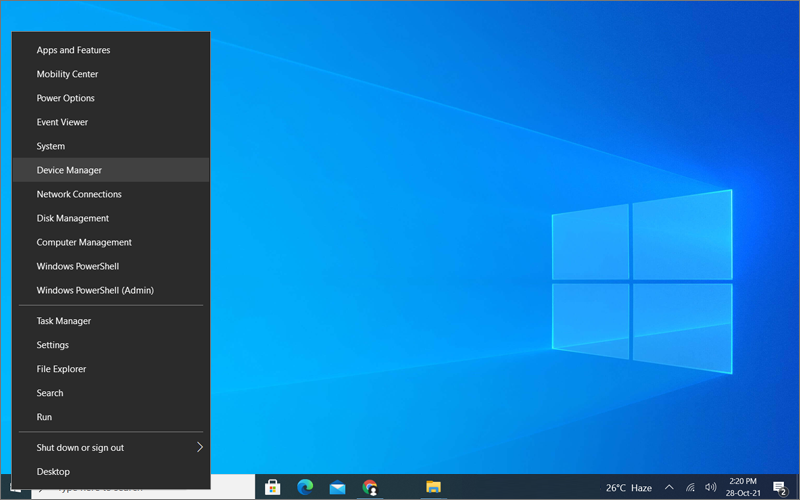
- Navigate to 'Network Adapters' and click on it to view the list of all the network adapter devices in the system.
- Select the 'Qualcomm Atheros QCA61x4 Wireless Network Adapter' from the list as it is used for Wi-Fi (wireless connections) on the machine in the cited example.
Note: A device having an exclamation mark indicates that the device or its drivers are not installed properly. Fix the issue by installing the updated drivers or reverting to the previous drivers before progressing.
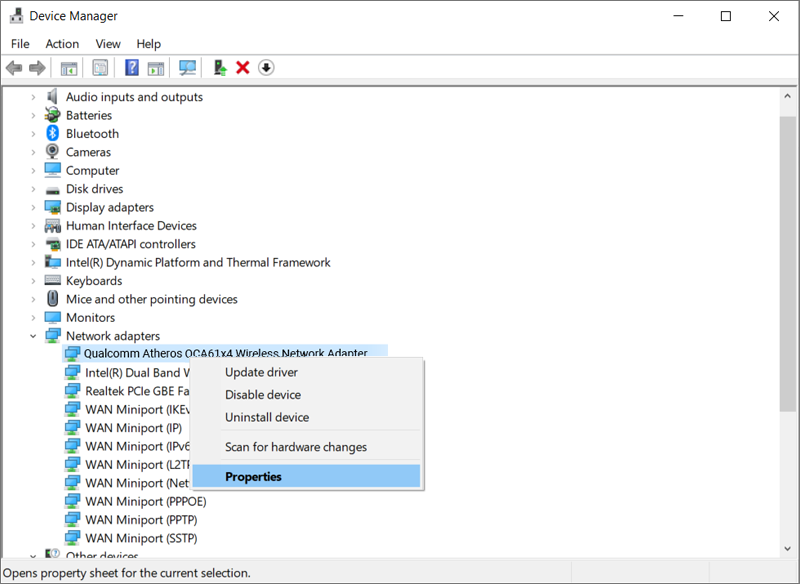
Following are the steps to find the driver used for the selected wireless network adapter:
- Double-click the preferred 'Network Adapter'.
- Select the 'Driver' tab, in the 'Properties' window.
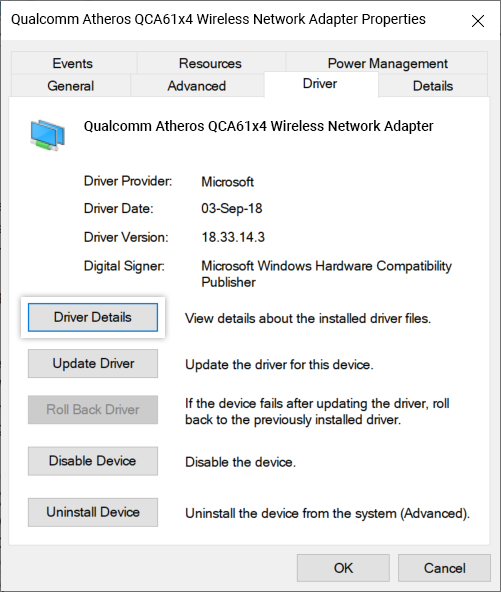
- Click the 'Details' tab in the 'Properties' window.
- Select 'Inf name' from the drop-down menu in the 'Property' section.
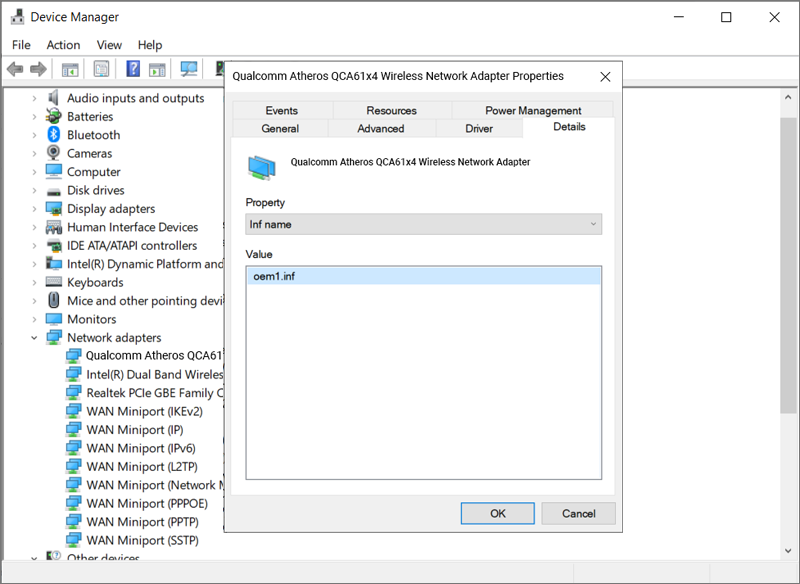
Note down the 'Driver Date' and the 'Driver Version' for future reference.
In the given example, the details are as follows:
Driver Date: 28-Oct-2016
Driver Version: 4.0.3.262
The driver for the Qualcomm Atheros QCA61x4 Wireless Network Adapter in the given example is:
OEM42.inf
Dated 28-Oct-2016
Version 4.0.3.262
Following are the steps to find the location of the driver in the Windows OS:
This guide uses the Pnputil to find the Wireless Network (WiFi) driver. Pnputil is a utility that helps to manage device drivers in a Windows OS and determine the driver file location.
- Open the Admin Command Prompt in administrator mode.
Note: The path 'C:\Windows\system32>' indicates that the prompt has been opened as an administrator. - Run the following command:
pnputil /enum-drivers
- A list of all the device drivers on your machine (including both the 'Published name' and the 'Original name') will be displayed.
- Find the 'Published Name' OEM42.inf from the list and verify the date and the driver version. Once confirmed, note down the 'Original Name' of the driver, as this will help you to discover the driver location. In the cited example, the original name of the Wireless Network (Wi-Fi) driver is 'netathr10x.inf.'
- To locate the Wireless Network (Wi-Fi) driver, run the following command:
dir infame /s
- In the example below, we have run 'dir netathr10x.inf /s' and received this output:
The output will show the path to the driver file location in the 'Windows Driver Store File Repository' - Note down the folder path and install the IDrive Driver Injection tool to provide the Driver folder. Add the Driver folder to the WinRE-based Recovery media.
What are the various Wi-Fi authentication methods supported by IDrive WinRe?
The different authentication methods supported by IDrive WinRe are as follows:
- WPA3
- WPA2-Personal
- WPA2
- WPA2-Enterprise
- WPA2PSK
- WPA-Personal
- WPA
- WPAPSK
- Open System Authentication
Can I use the Archive Cleanup feature for entire machine backup data sets?
No, the Archive Cleanup feature is not supported for entire machine backup data sets.
Are there any limitations for entire machine backup?
IDrive® 360 Entire Machine Backup provides comprehensive data protection, securing all data on your computer with the ability to restore it in the event of a disaster. However, please note the following:
Recovery Limitations: The restoration and booting of your computer from an entire machine backup may not be successful in all scenarios. Factors such as dissimilar hardware, boot file issues, RAID configurations, or other unforeseen circumstances may cause the restore process to fail. It is not guaranteed that a successful backup will restore the system to its original state under all conditions.
Alternative Recovery Options: If a full system restore fails, users can still recover individual files and folders from their backups, ensuring that critical data remains accessible.
Users are advised to regularly test their backups and ensure compatibility with their system's hardware to mitigate potential recovery issues.
Does entire machine backup support Spanned\Striped\Mirrored volumes?
No, entire machine backup supports only simple volumes.
