- Getting Started
- Backup Console
- Management Console
- Windows Backup
- Mac Backup
- Linux Backup
- Mobile Backup
- Cloud Applications Backup
- Server Cloud Backup
- Mass Deployment
- Entire Machine Backup
- Google Drive Backup
- IDrive® 360 Express
- Single Sign-On
- System Requirements
- Account Management
- Security
- Firewall Guidance
Mass Deployment
If your question is not addressed below, contact us through our support form and we will get back to you shortly.
Windows
- How do I install the IDrive® 360 application on multiple Windows computers in one go?
- How do I register a set of Windows computers under a particular group via Group Policy?
- Is it possible to register a set of Windows computers under a particular group with Private Key encryption via Group Policy?
- How do I register a set of Windows computers with a tag name?
- How do I deploy IDrive® 360 using the EXE installer?
Mac
- What are the prerequisites to install IDrive® 360 application on multiple Macs via Apple Remote Desktop?
- How do I deploy the IDrive® 360 package on multiple Mac machines?
How do I install the IDrive® 360 application on multiple Windows computers in one go?
You can use the IDrive® 360 MSI package to remotely install the IDrive® 360 application on multiple computers.
Prerequisites for remote deployment of IDrive® 360 MSI package:
- Login and download the IDrive® 360 MSI installer package
- Shared folder accessible via all the domain users
- Active directory environment
To create a Group Policy Object (GPO) under active directory environment,
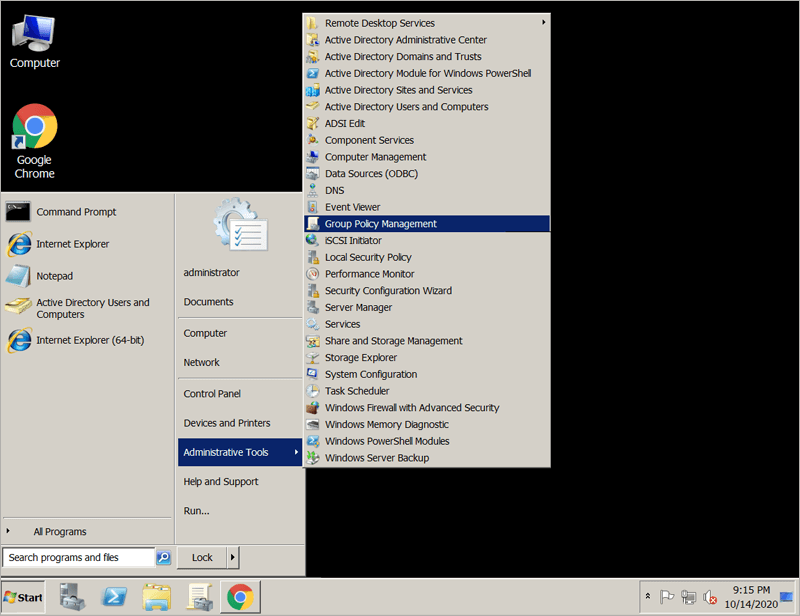
- From the 'Start' menu, go to 'Administrative Tools' and open 'Group Policy Management'.
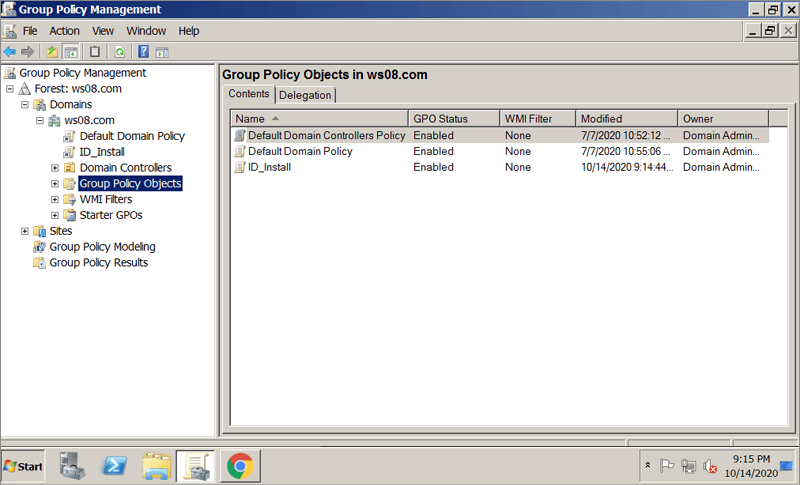
- In the 'Group Policy Management' console, navigate to 'Forest', the folder for creating group policy.
- Double-click 'Domains' and navigate to 'Group Policy Object'.
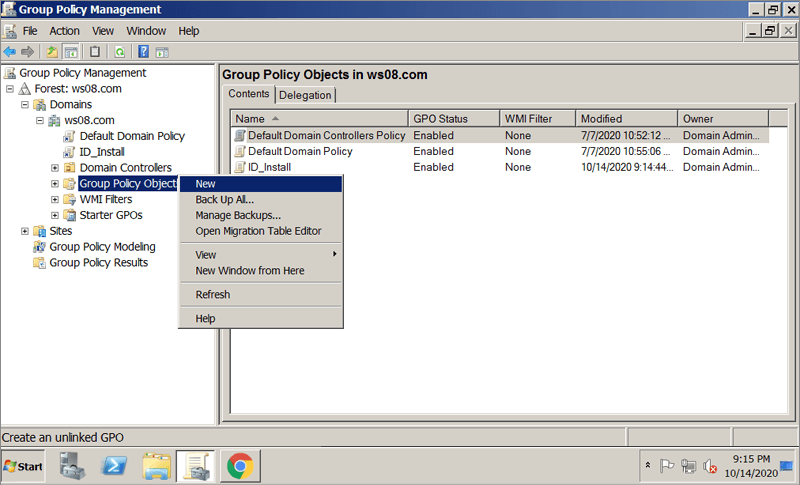
- Right-click 'Group Policy Object' and select 'New' from the drop-down menu.
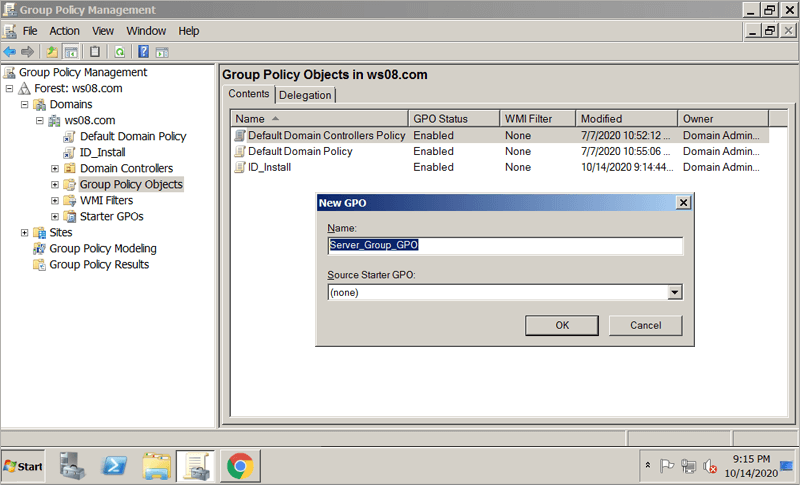
- Assign a name to the GPO group and click 'OK'.
To assign and install the IDrive® 360 application on domain computers,
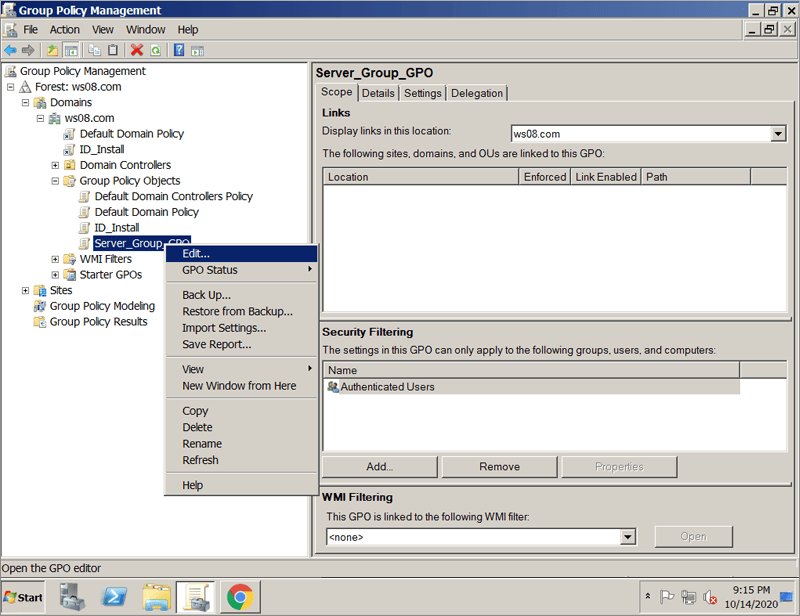
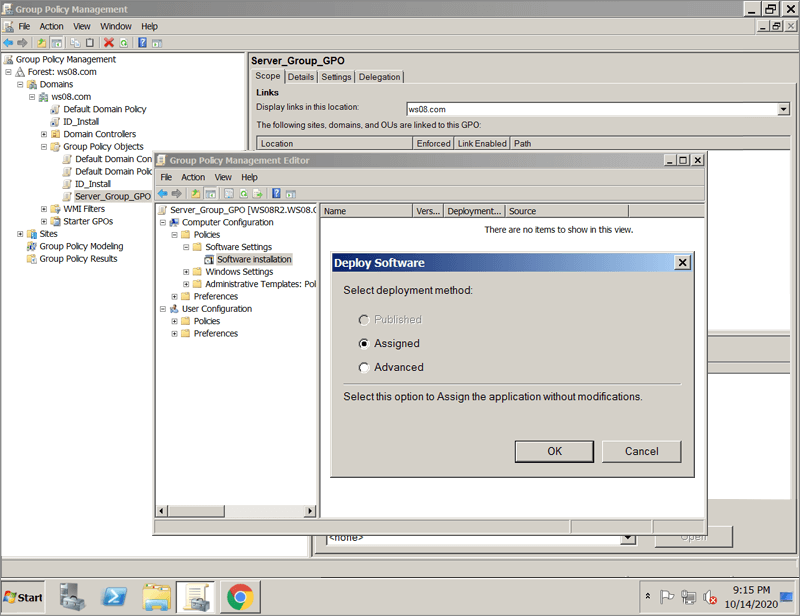
- Right-click the new group policy and select 'Edit' from the drop-down menu. This will launch the 'Group Policy Management Editor'.
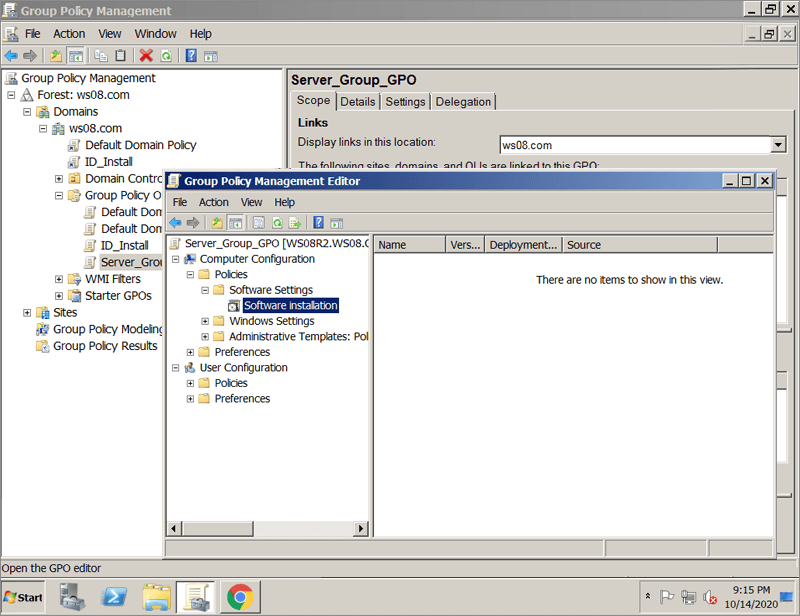
- Navigate to 'Computer Configuration' > 'Policies' > 'Software Settings' > 'Software installation'.
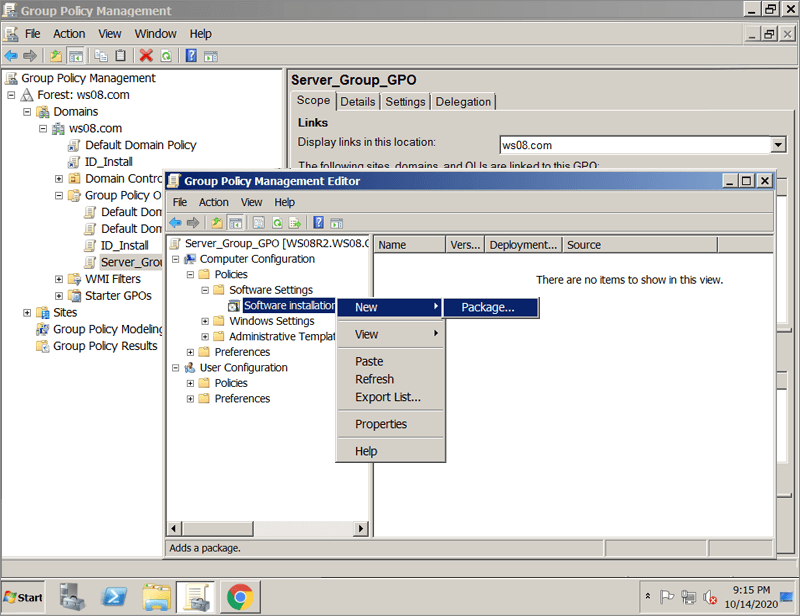
- Right-click 'Software installation' and navigate to 'New' > 'Package'.
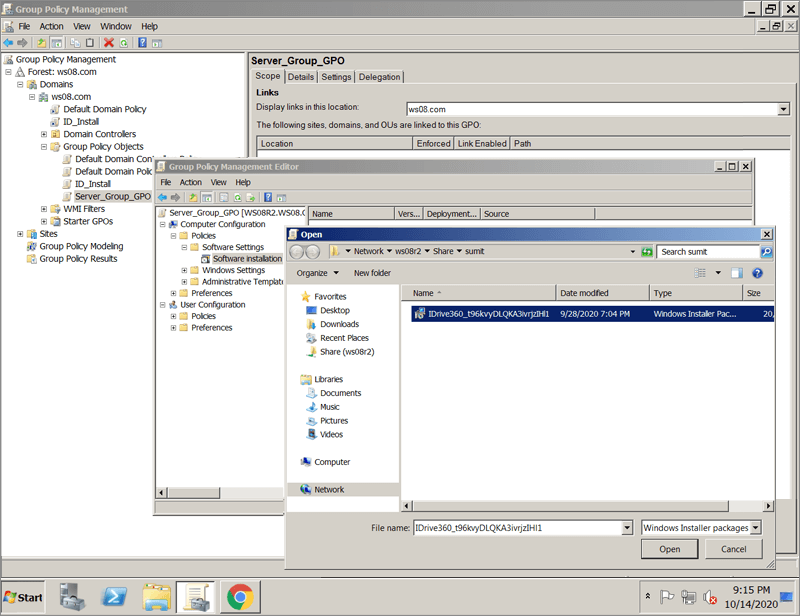
- Locate the shared network folder with the IDrive® 360 MSI installer package.
- Select the package and click 'Open' to add to the software installation container.
- Select 'Assigned' and click 'OK'. This process may take a while depending on the size of the software.
- Right-click on the MSI package and select 'Properties'. The 'IDrive® 360 Properties' window appears.
- Go to the 'Deployment' tab. Under 'Deployment type', select 'Assigned' and under 'Deployment options', select 'Install this application at logon' for the 'User Configuration' type, and click 'OK'.
- Right-click the domain and select 'Link an Existing GPO'. The 'Select GPO' screen appears.

- Select the newly created Group Policy and click 'OK'.
The IDrive® 360 application will be assigned to the domain users on the next sign in and to the domain computers on the next reboot.
How do I register a set of Windows computers under a particular group via Group Policy?
To register a set of computers under a particular group via Group Policy,
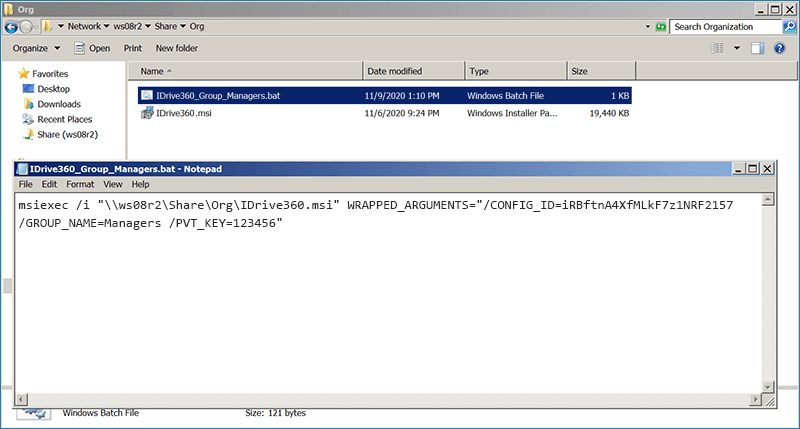
- Create a batch file with (eg: IDrive360_Register_Group.bat) with the following command:
- IDrive360.msi: The setup downloaded from the 'Add Devices’ page. Place the file in a shared location accessible to all domain users.
- WRAPPED_ARGUMENTS="/CONFIG_ID=iRBftnA4XfMLkF7z1NRF2157 /GROUP_NAME=Managers": The group name is 'Managers'. Before proceeding, replace Config_ID with the Config ID copied from the console.
- /nodesktopicon: Prevents creation of the IDrive® 360 desktop shortcut during installation. By default, the desktop icon is created.
- In the group policy, instead of IDrive® 360 installer, use the above batch file.

- Deploy the batch file via GPO to add the computers to respective groups.
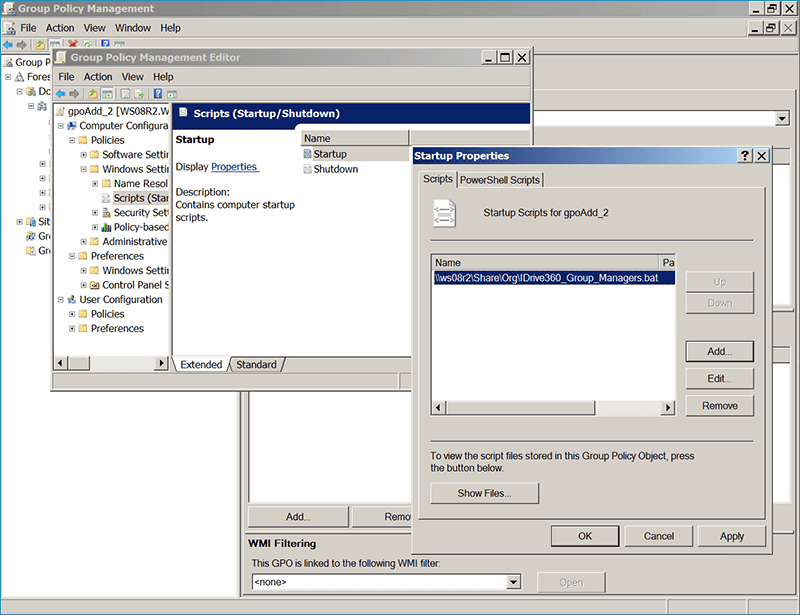
- Upon successful deployment, the computers will be listed under the specified group name.
msiexec /i "D:\IDrive360.msi" WRAPPED_ARGUMENTS="/CONFIG_ID=Config_ID /GROUP_NAME=Group_Name"
Example :
msiexec /i "\\ws08r2\Share\Org\IDrive360.msi" WRAPPED_ARGUMENTS="/CONFIG_ID=iRBftnA4XfMLkF7z1NRF2157 /GROUP_NAME=Managers"
where:
Is it possible to register a set of Windows computers under a particular group with Private Key encryption via Group Policy?
Yes, you can register a set of Windows computers under a particular group with Private Key encryption via Group Policy.
To do so,
- Sign in to your IDrive® 360 account.
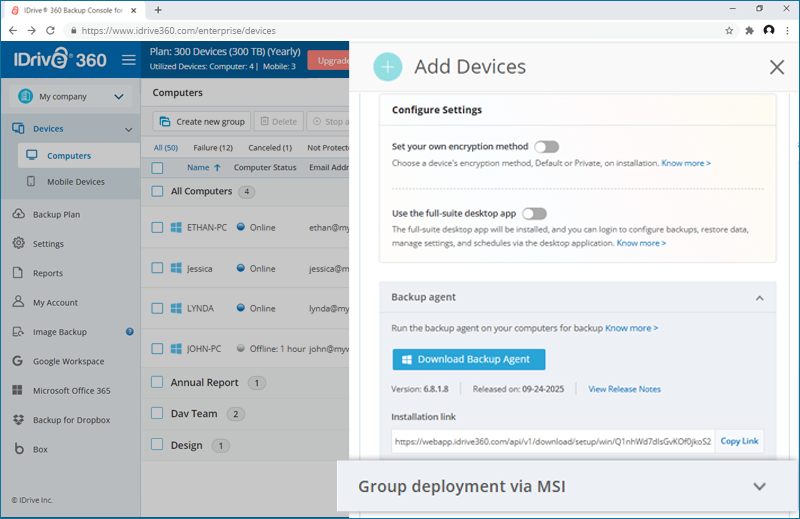
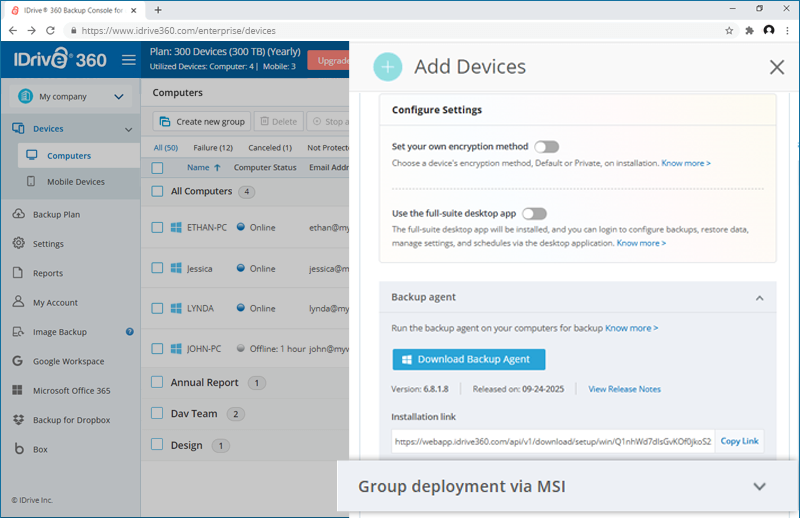
- Click the 'Add Devices' button, select the 'Set your own encryption method' check-box and click 'Download MSI' to download the IDrive® 360 MSI setup with private key encryption option.
- Create a batch file with (eg: IDrive360_Private_Key.bat) with the following command
msiexec /i "D:\IDrive360.msi" WRAPPED_ARGUMENTS="/CONFIG_ID=iRBftnA4XfMLkF7z1NRF2157 /GROUP_NAME=Group_Name /PVT_KEY=Pvt_Key"
Example:
msiexec /i "\\ws08r2\Share\Org\IDrive360.msi" WRAPPED_ARGUMENTS="/CONFIG_ID=iRBftnA4XfMLkF7z1NRF2157 /GROUP_NAME=Managers /PVT_KEY=123456"
where :
- IDrive360.msi: The setup with encryption key option downloaded from the 'add devices' page. Make sure the file is placed in share and the same is accessible across domain users.
- WRAPPED_ARGUMENTS="/CONFIG_ID=iRBftnA4XfMLkF7z1NRF2157 /GROUP_NAME=Managers /PVT_KEY=123456": The group name is ‘Managers’ and the private key is ‘123456’. Before proceeding, replace Config_ID with the Config ID copied from the console.
- /nodesktopicon: Prevents creation of the IDrive® 360 desktop shortcut during installation.By default, the desktop icon is created.
Note:
The encryption key must contain minimum 6 characters and maximum upto 250 characters.
- In the group policy, use the created batch file to deploy the setup.
- Deploy the batch file via GPO to add the computers to respective groups with the private encryption option.
- Upon successful deployment, the computers will be listed under the specified group name with the specified private encryption key.
- Always make sure to use the same private encryption key during any re-installation as used during the original installation.
- IDrive® 360 does not store your private encryption key on its servers. It is recommended that you archive it safely to backup and restore your data. However, if you choose the default encryption key, you need not remember it.
Note:
How do I register a set of Windows computers with a tag name?
To register a set of Windows computers with a tag name,
- Copy the configuration ID from the 'Add Computers' section in the Backup Console.
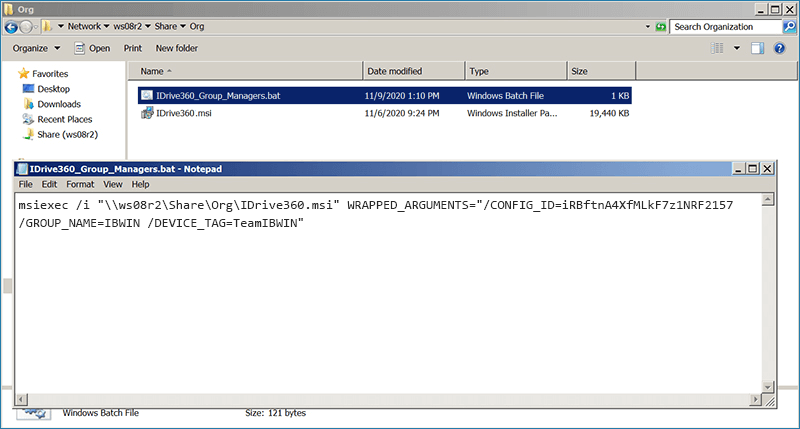
- Create a batch file with (eg: IDrive360_Register_Group.bat) with the following command
msiexec /i "sharepath of the MSI setup file" WRAPPED_ARGUMENTS="/CONFIG_ID=iRBftnA4XfMLkF7z1NRF2157 /GROUP_NAME=groupname /DEVICE_TAG=Tag/Email address"
Example:
msiexec /i "\\ws08r2\Share\Org\IDrive360.msi" WRAPPED_ARGUMENTS="/CONFIG_ID=iRBftnA4XfMLkF7z1NRF2157  /GROUP_NAME=IBWIN /DEVICE_TAG=TeamIBWIN"
where :
- IDrive360.msi : The setup downloaded from the 'add computers' page. Make sure the file is placed in share and the same is accessible across domain users.
- /GROUP_NAME=IBWIN: The group name to assign.
- /DEVICE_TAG=TeamIBWIN is the parameter for the user to define the TAG name or email address.
- /nodesktopicon: Prevents creation of the IDrive® 360 desktop shortcut during installation. By default, the desktop icon is created.

- In the group policy, instead of IDrive® 360 installer, use the batch file.
- Deploy the batch file via GPO to add the computers to respective groups.
- Upon successful deployment, the computers will be listed under the specified group name.

How do I deploy IDrive® 360 using the EXE installer?
You can deploy IDrive® 360 using the EXE installer for mass deployment by running the installer with supported command-line parameters.
Syntax

  "D:\IDrive360.exe" /remote /verysilent /GROUP_NAME=Group_Name /CONFIG_ID=Copied_Configuration_ID /DEVICE_TAG=Tag_Name
Example

IDrive360.exe /remote /verysilent /GROUP_NAME=Managers /CONFIG_ID=eyJ0b2tlbiI6ImxjcjgxaW1NyIsImRlc2t0b3BBcHBTdGFVuY3aXJlZCI6ZmFsc2V9 /DEVICE_TAG=Development_Default
| Parameters | Description |
| D:\IDrive360.exe | Path to the IDrive® 360 EXE installer |
| verysilent | Installs IDrive® 360 silently without UI |
| CONFIG_ID | Mandatory. This is the unique configuration ID copied from the 'Add Computers' section in the Backup Console. |
| /nodesktopicon | Prevents creation of the IDrive® 360 desktop shortcut. By default, the desktop icon is created. |
| GROUP_NAME | Name of the group to which the computer will be assigned. |
| PVT_KEY | Private encryption key. Required only if private encryption is enabled. The key must contain 6–250 characters. |
| DEVICE_TAG | If the installation is configured with a device tag, the corresponding tag name must be passed for it to appear under the 'Email Address/Tag Name' column in the IDrive® 360 dashboard. |
Sample Commands
Register computers under a group
IDrive360.exe /remote /verysilent /GROUP_NAME=Managers /CONFIG_ID=Copied_Configuration_ID
Register computers under a group with a private encryption key
IDrive360.exe /remote /verysilent /GROUP_NAME=Managers /PVT_KEY=123456 /CONFIG_ID=Copied_Configuration_ID
Register computers with a device tag
IDrive360.exe /remote /verysilent /GROUP_NAME=Managers /CONFIG_ID=Copied_Configuration_ID /DEVICE_TAG=TeamIBWIN
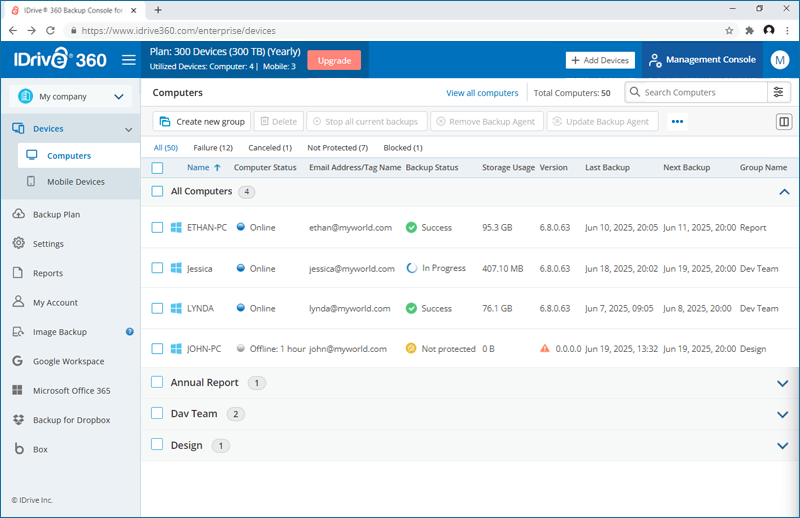
After installation completes, verify the device under ‘Devices’ > ‘Computers’ in the IDrive® 360 dashboard.
- CONFIG_ID is mandatory
Note:
What are the prerequisites to install IDrive® 360 application on multiple Macs via Apple Remote Desktop?
Using the IDrive® 360 group deployment package, remotely deploy the application on multiple Mac computers or groups in the same network using Apple Remote Desktop software installed on administrator's computer.
To use Apple Remote Desktop, you need Apple Remote Desktop Admin and Apple Remote Desktop client installed on your administrator Mac and client Macs respectively.
Apple Remote Desktop client will be installed automatically during the standard macOS installation. However, the Apple Remote Desktop Admin is not a part of the standard installation. You will have to obtain the software from the Apple store and install it on the Mac from which you are deploying the IDrive® 360 application.
Read the detailed steps below to know more about how to deploy the IDrive® 360 package with Apple Remote Desktop.
Prerequisites for remote deployment:
- Login and download the IDrive® 360 mass deployment package
- Apple Remote Desktop Admin software installed on administrator Mac
To configure Remote Management Services on target Macs
For a remote management tool like Apple Remote Desktop to work, the remote management services have to be configured in Mac OS on each individual Mac. In order to do so, you need to log in to each Mac and perform the following steps:
- In Mac OS, open 'System Preferences' > 'Sharing' and select 'Remote Management' under the service list.
- Click 'Options' and select the following options:
- Observe
- Control
- Open and quit applications
- Change settings
- Delete and replace items
- Copy items
- Click 'OK' and close the 'System Preferences' window.

Set up Task Server in the administrator Mac
To set up a Task Server,
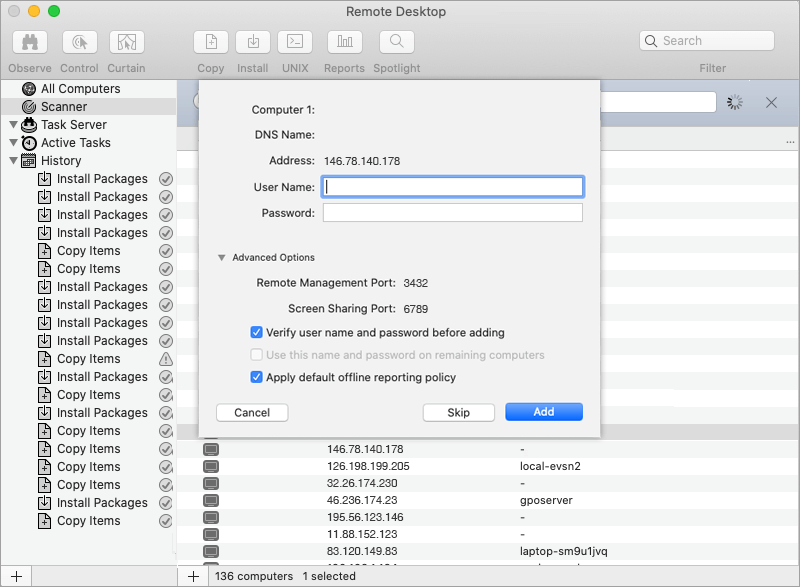
- Open the Apple Remote Desktop Admin software installed on your administrator Mac, and navigate to 'Remote Desktop' > 'Preferences'.
- Click on the 'Task Server' tab and select 'Allow remote connections to this server'.

- Go to the 'Scanner' tab and select 'Local Network' from the drop-down.
- From the computer list that appears, double-click on the computer which you wish to add to the Apple Remote Desktop.
- Enter a valid system credential and click 'Add'.
Steps to register a set of computers under a particular group or with a Private Key encryption method
Admin may choose to register a set of computers under a particular group or with a private key encryption method during the mass deployment.
The installation requires configuring a .plist file and installing it along with the IDrive® 360 mass deployment package.
The com.idrive360.packageinstaller.plist file can contain the following keys:
| Key | Value | Description | Default |
| groupName | String | Machine registers under this particular group | No group |
| encryptionKey | String | Machine registers with this private encryption key | No encryption key |
| configurationID | String | You can find this parameter in your IDrive 360 account | No configuration ID |
| trayHidden | Number | 1 - Enabling this option will prevent users from accessing the tray options on their computers 0 - Unhide tray and allow users to access tray options | 0 |
| deviceTag | String | Machine registers under this tag | No Tag |
Click here to download a sample com.idrive360.packageinstaller.plist file.
Note:
- The encryption key can contain minimum of 6 characters and maximum upto 250 characters.
- Always make sure to use the same private encryption key during any re-installation as used during the original installation.
- IDrive® 360 does not store your private encryption key on its servers. It is recommended that you archive it safely to backup and restore your data. However, if you choose the default encryption key, you need not remember it.
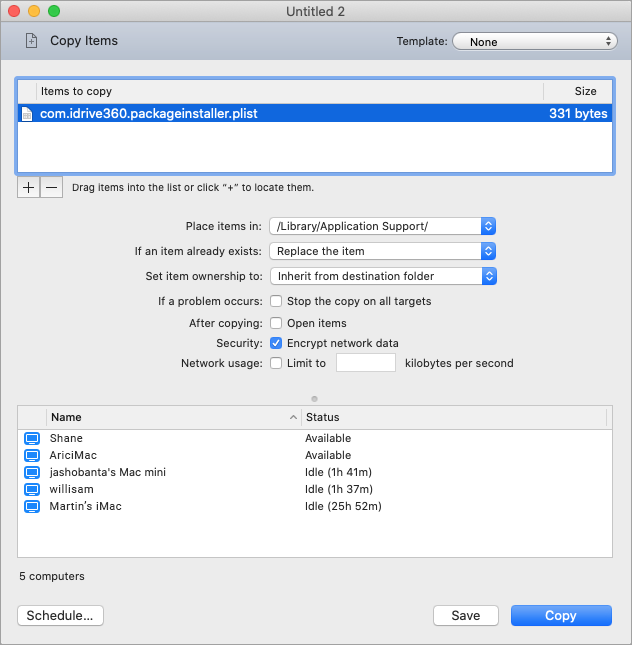
To copy the com.idrive360.packageinstaller.plist file to Mac machines,
- Open the Apple Remote Desktop Admin software installed on your administrator Mac, and click the 'All Devices' tab.
- Select the desired destination Macs, and click the 'Copy' button in the Apple Remote Desktop toolbar.
- In the 'Copy Items' window that appears, add the com.idrive360.packageinstaller.plist file to the Items to copy list either by dragging it there with the mouse or by locating the file using
 button.
 - Under the 'Place items in' drop-down, select 'Specify full path' and enter the path as /Library/Application Support/.
- Under the 'If an item already exists' drop-down, select 'Replace the item'.
- Click 'Copy'.
Admin may skip the above steps, if they do not wish to configure a .plist file. The IDrive® 360 application will then be deployed with the default configuration.
How do I deploy the IDrive® 360 package on multiple Mac machines?
To deploy the IDrive® 360 package to Mac,
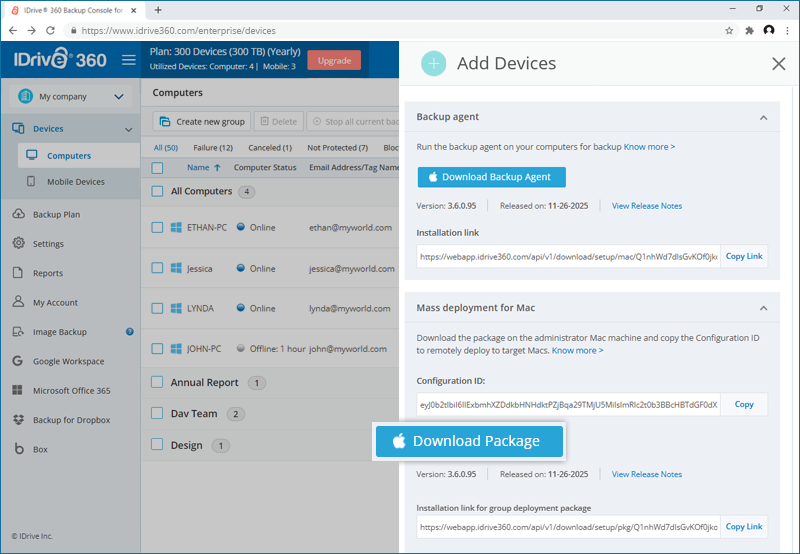
- Sign in to your IDrive® 360 account.
- Click the 'Add Devices' button and click 'Download Package' under the 'Mass deployment for Mac' section to download the IDrive® 360 mass deployment package.
Note: If the com.idrive360.packageinstaller.plist file is configured with a Private encryption key, then make sure to select the 'Set your own encryption method' check-box in the 'Add Devices' page, and then click the 'Download Package' button.
- Open the Apple Remote Desktop Admin software installed on your administrator Mac, and click the 'All Devices' tab.
- Select the destination Macs in which you wish to install the IDrive® 360 application, and click the 'Install' button in the Apple Remote Desktop toolbar.
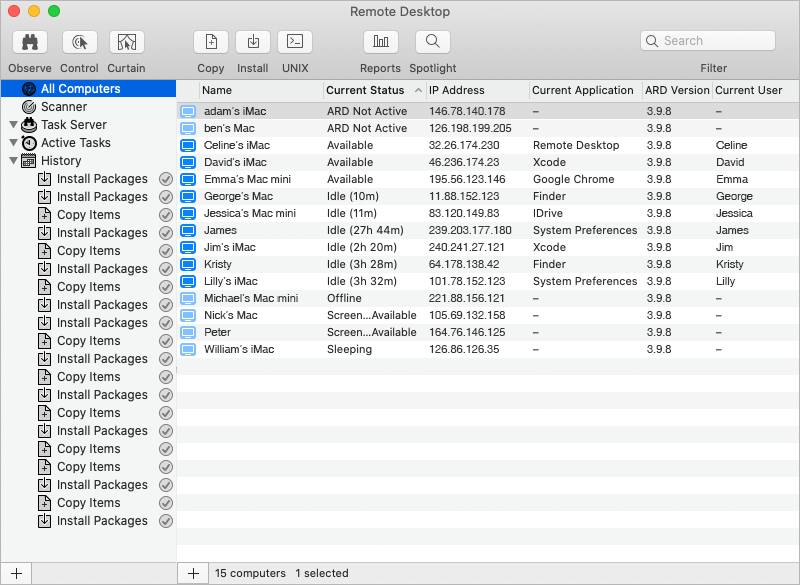
- In the 'Install Packages' window that appears, add the IDrive® 360 package file to the 'Packages List' either by dragging it there with the mouse or by locating the package using button.
- Click 'Install'.
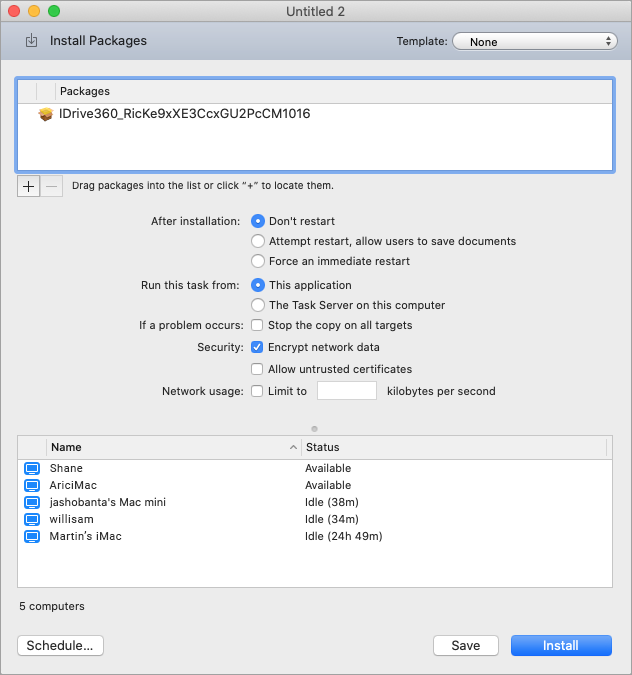
Once the package is distributed to Online Macs, it executes and installs the IDrive360 application on client Macs.