What is IDrive BMR?
IDrive BMR is an onsite bare-metal disaster recovery solution
with cloud replication features. You can perform full,
incremental, and manual backup of Windows computers (servers,
desktops, laptops) and VMware virtual machines to your local BMR
device. The backups stored on your IDrive BMR device can be
transferred to your cloud account via manual and scheduled cloud
backup for a secondary backup. Bare-metal recovery is available
via WinRE based restore, file-level recovery, and instant local
and cloud virtualization.
Additionally, you can use your BMR device storage to create,
host, and backup NAS and iSCSI shares.
|
|
Are IDrive BMR backups
HIPPA-compliant?
Yes, IDrive BMR helps healthcare establishments stay compliant
with the federal mandates of HIPPA. IDrive BMR also supports the
high compliance standards of SOX, GLBA, and SEC/FINRA.
Read
our Compliance Statement >
Place
your request for your Business Associate Agreement (BAA)
>
|
|
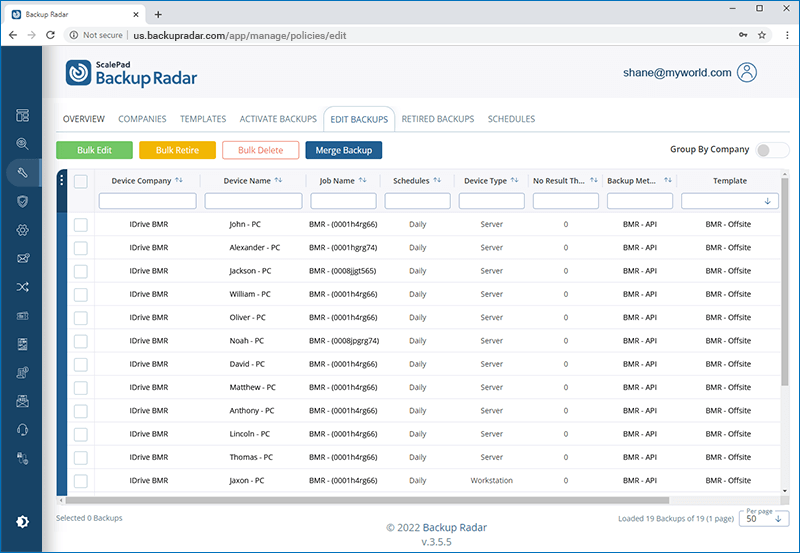
How do I integrate IDrive BMR with Backup Radar?
Integrate IDrive BMR with Backup Radar and manage the entire backup process in one platform.
Backup Radar will automatically and continuously parse any new reports that arrive in the inbox of your Backup Radar email address. To integrate via email parsing,
- Go to your IDrive BMR account, click 'Settings' and go to the 'Mail' tab.
- Under 'Server Alert Notification' click
 and add the email address used to create a Backup Radar account. and add the email address used to create a Backup Radar account.
- Monitor your IDrive BMR backups and gain valuable insights from the Backup Radar platform.
|
|
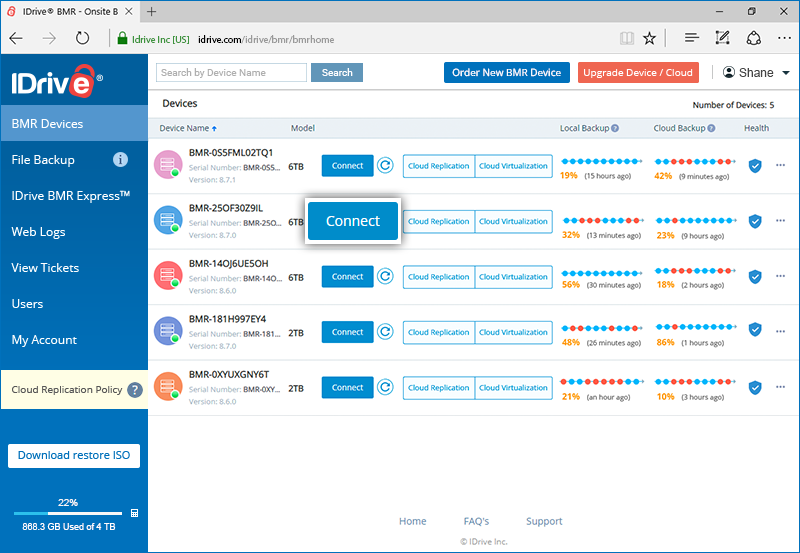
How do I access the BMR
device interface?
Access the web interfaces of your devices from anywhere via cloud
manage. To access your device(s):
- Sign in to www.idrive.com with your
IDrive BMR credentials. All your devices are listed in the 'All
BMR Devices' tab.
- Click the 'Connect' button corresponding to the required
device. A remote access to the device interface is established
via your browser.
- Manage your BMR device settings and operations.
Alternatively, you can access the BMR device interface from any
machine that is on the same network as the BMR device. You can
access the interface with any browser, using the following
methods:
Via bmrdevice.idrive.com: Navigate to bmrdevice.idrive.com on
your browser. The page will display a list of online BMR devices
on the network along with their IP addresses. Click 'Connect'
against the required BMR device and the sign-in page of the BMR
device interface will be launched in a new tab.
Via IP address: Navigate to the BMR device
interface by using the IP address as the application's URL.
To know the IP address of a BMR device,
- Connect a monitor to the device.
- Press the power button on the front panel to start the device.
- Once the device has completed the start-up process, the
dashboard will be displayed on the monitor along with the BMR
device's IP.
Via serial key: Enter the serial key of the BMR
device in small case, followed by '.local' on the address bar of
your browser. (For example: If your device serial number is
BMR-34KF3ZQTYI, navigate to the following address:
http://bmr-34kf3zqtyi.local.) The sign-in page of your BMR device
interface will be displayed.
|
|
What is the IDrive BMR device
interface and what operations can I perform from here?
IDrive BMR device interface is a centralized management system
that lets you manage all your backup, recovery, and cloud
replication requirements. You can access the IDrive BMR device,
add your computers and ESXi/vCenter to the BMR device and schedule
their data backups/restores from anywhere.
You can also,
- Perform local
backup and restore
operations
- Organize physical and VMware machines into groups, and apply
separate settings for them
- Create virtual instances of your machines on the BMR device or
the cloud instantly
- Manage and schedule cloud
replication of your local backups
- Change the cleanup, backup, and mail settings
- Manage control panel related settings
- View the health status of your drives
and devices,
and review storage utilization
- View system logs and logs of all backup, restore, and cloud
replication activities of physical and VMware machines
|
|
Can I perform power operations on a
BMR device via the web interface?
Yes, you can shutdown or restart the BMR device from the 'Admin'
dropdown.
|
|
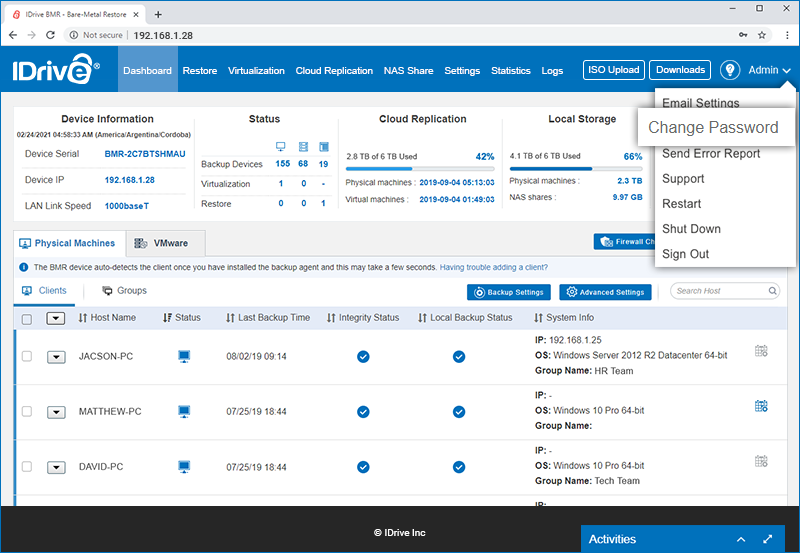
Can I view and change my profile
information?
Yes, you can change your email address and password from the
IDrive BMR’s device web interface.
To change the account password,
- Click the username displayed on the top-right corner of the
page and click 'Change Password'.
- Enter a new password and confirm the same in the 'Change
Password' window.
- Click 'Change Password'.
|
|
How do I configure my IDrive BMR
device with encryption?
The encryption configuration for your BMR device is done only
once, at the beginning of the device setup.
To configure encryption on your BMR device,
- Sign in to IDrive BMR’s device web interface.
- You will be prompted with a message to configure your device
with encryption. Choose default encryption or private encryption
based on your requirements.
- To set 'Default encryption key', click 'Continue'.
- Alternatively, to set 'Private encryption key', enter a
private encryption key of your choice in the respective field
and confirm the same. Click ‘Continue’.
|
|
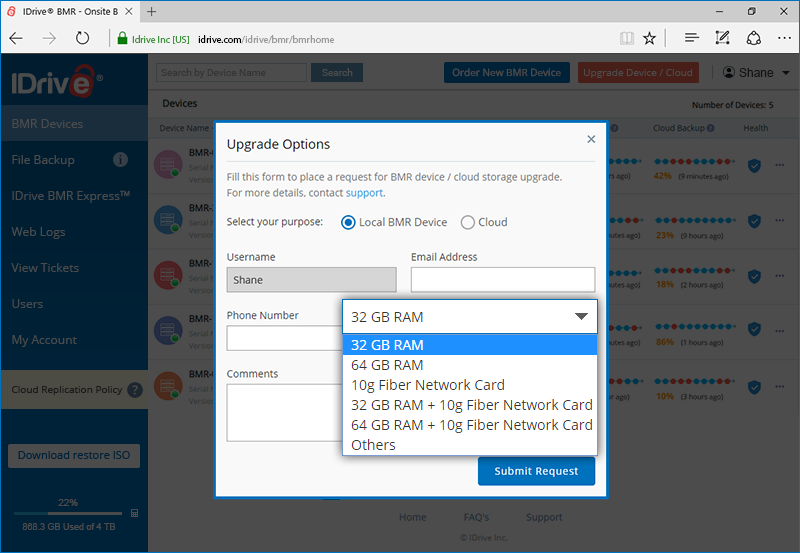
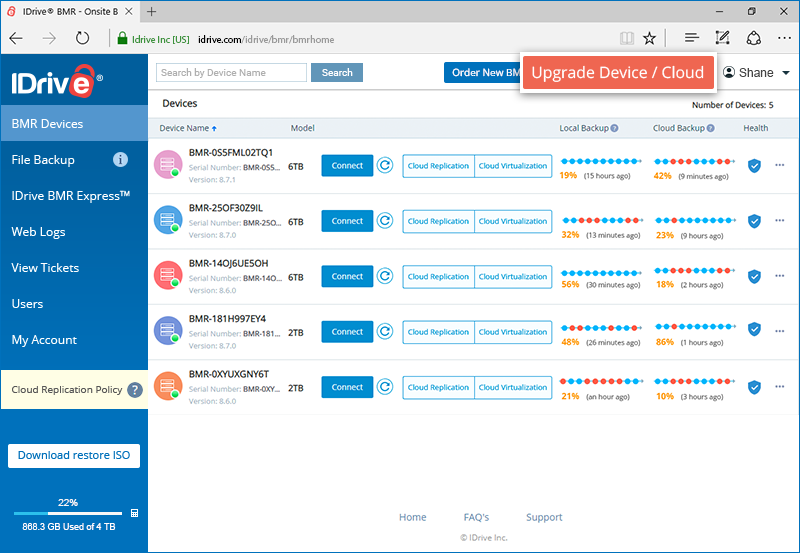
How do I upgrade my local
BMR device?
You can choose any of the hardware add-ons to upgrade your local
BMR device.
To upgrade,
- Sign in to the IDrive BMR web console and click 'Upgrade Device / Cloud' at the top-right corner of the page.
- In the window that appears, enter your username, email
address, and phone number.
- Choose a hardware add-on from the respective dropdown.
- Click 'Submit Request'.
Once this is completed, our sales team will contact you to
upgrade your BMR device.
|
|
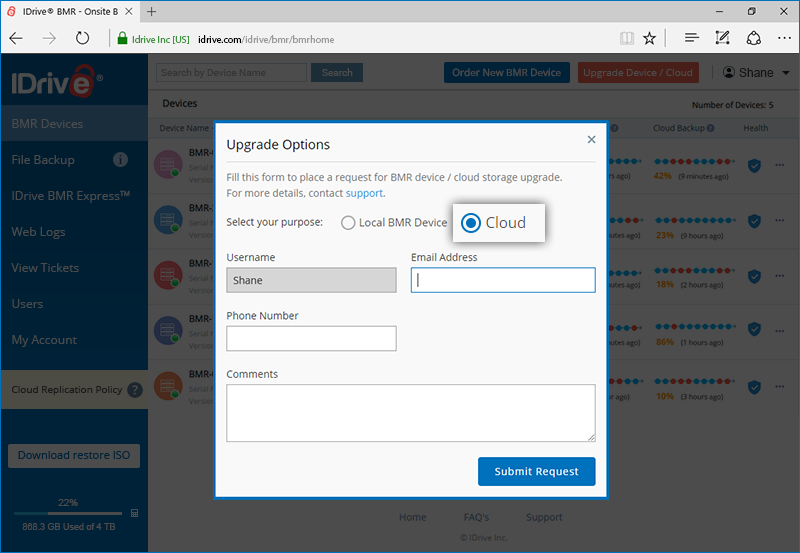
How do I upgrade cloud storage
space?
To upgrade cloud space,
- Sign in to the IDrive BMR web console and click 'Upgrade Device / Cloud' at the top-right corner of the page.
- In the window that appears, select 'Cloud'. Enter your
username, email address, and phone number.
- Click 'Submit Request'.
Once this is completed, our support team will contact you to
upgrade your cloud space.
|
|
Which network ports are to be used
for IDrive BMR devices and client computers?
Following network ports are to be used for IDrive BMR devices and
client computers:
For IDrive BMR device:
| Port |
Usage |
Incoming/Outgoing |
| 55414 |
HTTP web interface |
Incoming |
| 35623 |
UDP broadcasts for discovery |
Outgoing |
For client computer:
| Port |
Usage |
| 35622 |
UDP broadcasts for discovery |
| 35623 |
Commands and image backups |
For Cloud Manage:
| Port |
Destination |
Protocol |
| 5349 |
bmrturn.idrivelite.com |
UDP & TCP - Inbound/Outbound |
For Partner Manage:
| Port |
Destination |
Protocol |
| 443 |
us-west-1.idrivetunnel.com |
TCP & TLS Outbound |
| 443 |
accessbmr.idrive.com |
TCP Outbound |
|
|
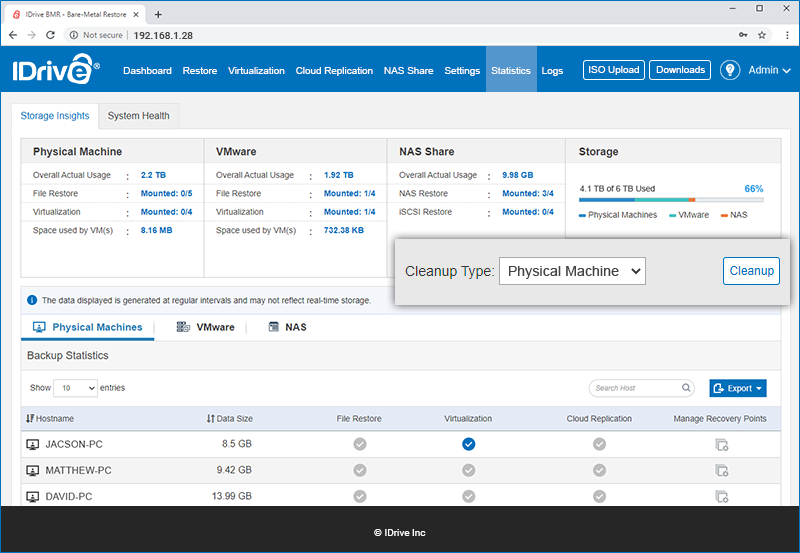
How do I perform data cleanups on
the IDrive BMR device?
You can delete old and incomplete backups from the BMR device via
cleanup.
To configure and schedule your cleanup,
- Sign in to the IDrive BMR device web interface and click
'Cleanup Settings'.
- Schedule the cleanup operation in the 'Cleanup time window'
section. You can schedule cleanups daily or on weekdays /
weekends by selecting the days and hours as required from this
section. The device deletes old and incomplete backups as per
the schedule and your backup retention settings. Read more about
backup retention settings in this FAQ.
- Set the ‘Global soft filesystem quota’ limit at 80%
(recommended) or as required. When the device storage crosses
this limit, the device will suspend all operations and redirect
to the cleanup
maintenance page.
To perform a manual cleanup,
- Go to 'Statistics' > 'Storage Insights'.
- Select 'All', 'Physical Machine', or 'VMware' from the
'Cleanup Type' dropdown.
- Click 'Cleanup'.
- In the popup window that appears, click 'Confirm'.
Once these steps are completed, the manual cleanup operation will
be initiated.
Note: The device interface will be inaccessible
for the duration of the cleanup.
|
|
I
am not able to access the BMR device interface. Instead, a cleanup
window is displayed. Why?
When the local storage utilization on your BMR device exceeds
your global soft filesystem quota, all the backup and restore
operations will be temporarily suspended to prevent the storage
from filling up further. You will be redirected to the cleanup
maintenance page.
Solution: All the protected
physical and VMware machines will be listed under respective
tabs along with their backup retention settings. Adjust the
'Min' and 'Max' image backups retention for all machines as
needed and click 'Cleanup Now'.
Note: If the
cleanup does not effectively reduce storage below the specified
global soft filesystem quota, you will again be directed to this
page. Reduce the retention settings further and reattempt
cleanup to reinstate normal operations.
Alternatively, you can also click the 'Manage Recovery Points'
button corresponding to any physical or VMware machine to view and
manage backups at the machine level.
|
|
What is the hardware
configuration of the IDrive BMR device?
The IDrive BMR device is designed for better performance and
reliability, therefore hardware components are chosen
accordingly. It is optimized to support the backup appliance and
its workload.
Hardware configuration of
IDrive BMR device (6TB models or higher):
Hardware configuration of
IDrive BMR device (4TB models):
- Processor:
Features Intel Core CPUs
- Memory:
Non-ECC DDR4 memory modules
- Network: One
network Ethernet port
- Power
Supply: Desktop grade power supply
- Form Factor:
Mini tower
Hardware configuration of
IDrive BMR Cube (2TB models):
These are powered by the Intel NUC Mini-PC devices.
|
|
In case of a device
issue, will I be alerted?
In case of a device issue or if your BMR device is offline for
more than 48 hours, you will be notified on your primary email
and the subscribed additional emails if any.
Note: For
devices on firmware 8.3.0 or below, server alert notifications
are applicable only if cloud replication is enabled.
|
|
Will I be notified if any of the machines are not recently backed up?
Yes, you will be notified if any physical or VMware machine is not backed up for more than 30 days. You will receive email notification with the list of machines that have not been backed up to the local IDrive BMR device and cloud.
|
|
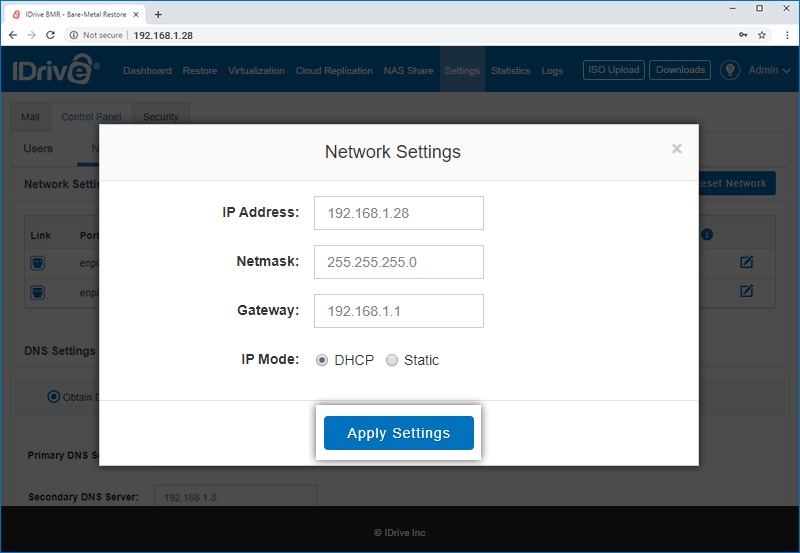
How do I configure
network settings for my IDrive BMR device?
During the initial sign-in, by default the device will be
configured to DHCP mode. You can change the default settings
from the 'Settings' tab.
To change network settings,
- Sign in to the IDrive BMR’s device web interface.
- Go to the 'Settings' tab and click 'Control Panel'.
- Under the 'Network Settings' tab, click
 against the required ethernet port entry. The
'Network Settings' window appears. against the required ethernet port entry. The
'Network Settings' window appears.
- Select 'IP Mode' as 'Static' and provide the required
information such as IP address, Netmask, and Gateway in the
respective fields.
- Click 'Apply Settings'.
To change DNS settings,
- In the 'Network Settings' tab, select 'Use the following DNS
server address' under the 'DNS settings' section.
- Provide primary and secondary DNS server address in the
respective fields and click 'Apply'.
|
|
Is it possible to change
the time zone for the IDrive BMR device according to my location?
Yes, you can change the time zone for the IDrive BMR device
according to your location.
To change,
- Sign in to the IDrive BMR’s device web interface.
- Go to the 'Settings' tab and click 'Control Panel'.
- Go to the 'Time Zone' tab and choose your region from the
'Select Time Zone' drop-down list.
- Select your country and zone.
- Click 'Save'.
|
|
What happens when I reset the
network settings?
When you click 'Reset Network' under the 'Network Settings' tab,
the following actions take place:
- Both the network interfaces on this device will be set to DHCP
mode.
- The Device will reboot to apply the changes. Ensure no backups
are in progress at this time.
- After reboot, the device will try to obtain DHCP-provided IP
from your network.
|
|
Data backed up to the
IDrive BMR device is reliable for restore?
Yes, all data backed up to the IDrive BMR device is reliable for
restore.
To ensure the reliability of the backed-up data, the BMR device is
programmed to perform a three-tier check:
- Firstly, a block-by-block checksum verification before and
after data transmission.
- Secondly, a built-in error correction mechanism that verifies
data before writing it on the device.
- And finally, after the backup is completed, a filesystem mount
check is executed to verify the availability of the data needed
for a successful restore. The status of this final check is
displayed in the BMR device UI and also notified to email
addresses specified in the 'Backup Report Notification' section.
Additionally, it is recommended that you perform routine local
virtualization of your backups to ensure successful restores.
|
|
Is there an integrity check
for the data stored on the cloud?
Yes, the BMR device and IDrive cloud file-system routinely
performs self-healing scan functions to check for data errors and
attempts to fix them as and when they are detected.
|
|
What are the system
requirements for IDrive BMR?
IDrive BMR currently supports bare-metal backup only from client
computers running on Windows OS.
Following are the system requirements for IDrive BMR:
Operating Systems:
- Windows Vista (with all Windows updates installed)
- Windows Server 2008 (with all Windows updates installed)
- Windows Server 2008 R2
- Windows 7
- Windows 8
- Windows 8.1
- Windows 10
- Windows 11
- Windows Server 2012
- Windows Server 2012 R2
- Windows Server 2016
- Windows Server 2019
- Small Business Server 2011
File System:
- IDrive BMR supports backup from only NTFS formatted volumes
Disk Partition Style:
VMware:
- ESXi Hosts: IDrive BMR supports ESXi server versions 5.5, 6.0,
6.5, 6.7 and 7.0; we do not support free ESXi
- VMs guest OS: Works for any application, file-system and
operating system that is supported by VMware
Note:
-
Backup and restore of dynamic (simple, mirrored, spanned,
striped), logical, and Microsoft storage space (Raid-5 with
resiliency type-parity) is supported for 8.4.0 and above.
However, bare-metal recovery of dynamic OS disk with GPT
partition is not supported.
(In case you have upgraded to version 8.4.0 or above, make
sure to install the latest backup agent that supports the
latest backup features and perform at least one image
backup. If you attempt restoring exclusively from older
versions where the OS disk is dynamic, you may have OS boot
issues. Similarly, use the updated WinRE Recovery Media
Builder to create and upload a new WinRE recovery media to
the BMR device.)
- The CBT feature is not supported for certain older operating
systems such as Windows Vista, Windows Server 2008, and the
32-bit version of both Windows 7 and Windows Server 2008R2.
|
How do I enable two-factor authentication for my IDrive BMR device interface?
The two-factor authentication provides additional security to your IDrive BMR device interface and helps in preventing unauthorized access. Once two-factor authentication is enabled for the device interface, in addition to the device password, you will be required to enter a verification code sent to the admin email address / your phone number.
To enable two-factor authentication,
- Sign in to the IDrive BMR device interface.
- Go to 'Settings' > ''Security' > 'Two-factor Authentication'.
- Click 'Enable Two-factor Authentication'.
- Select 'Email Address' or 'Phone Number' for the code verification process and click 'Confirm'.
In case you select 'Phone Number', enter your phone number and click 'Send Code'.
- Enter the one-time authentication code sent to the admin email address / your phone number and click 'Verify and Enable'. The two-factor authentication feature will be enabled.
|
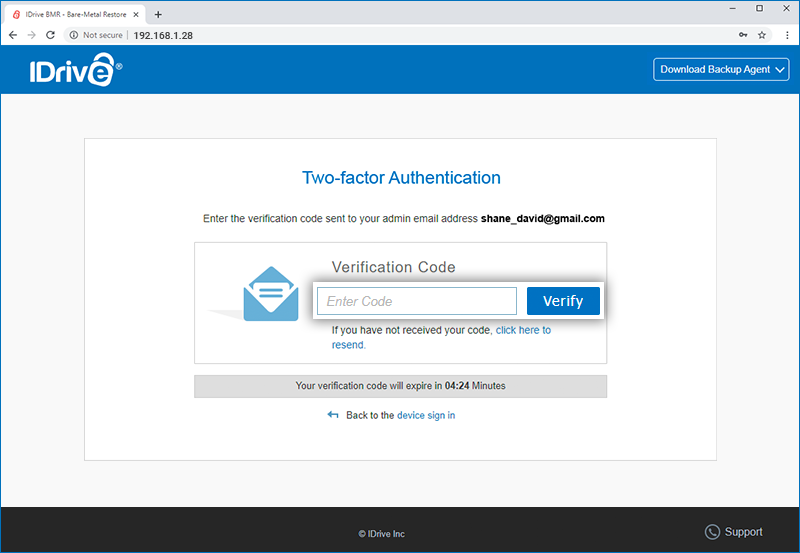
How do I sign in to the IDrive BMR device interface after two-factor authentication is enabled?
To sign in after two-factor authentication is enabled,
- On the sign-in screen, enter the username and password and click 'Sign in'.
- You will be prompted to enter a verification code shared on the admin email address / your phone number. Enter the code.
- Click 'Verify'. You will be signed in.
|
How do I disable two-factor authentication for the IDrive BMR device interface?
To disable two-factor authentication,
- Sign in to the IDrive BMR device interface.
- Go to 'Settings' > 'Security' > 'Two-factor Authentication'.
- Click 'Disable'. The two-factor authentication feature will be disabled.
|
|
What does 'Firewall
Checkpoints' do?
Firewall Checkpoints is a function within the BMR device that
helps you check firewall restrictions, if any. Through this
function, network restrictions on services such as email delivery,
cloud replication, and so on are identified.
To check these settings, click the 'Firewall Checkpoints' button
on the 'Dashboard' page.
Alternatively, you can navigate to 'Settings' > 'Control Panel' >
> 'Network Settings' > 'Firewall Checkpoint' and click 'Check
Now'.
Status of settings:
 Successful - There are no
firewall restrictions and you can continue to use all services
related to BMR
Successful - There are no
firewall restrictions and you can continue to use all services
related to BMR
 Failure - The port has
been blocked
Failure - The port has
been blocked
If you receive a failure alert, contact your network
admin to unblock the network firewall. Here are the port
details:
- General Firewall
Settings - Unblock Port '80' and Port '443' for
'www.idrive.com' and 'www1.idrive.com' servers.
- Mail Settings - Check
your Mail Server Port details and unblock the port, if blocked.
- Cloud Replication -
Contact the BMR support team to receive
the Port details. Then share this information with your network
admin to unblock the respective ports.
- Remote Manage -
Devices with firmware 8.3.0 or below, unlock port 5349 for
bmrturn.idrivelite.com. Devices with firmware 8.4.0 or above,
unlock port 443 for us-west-1.idrivetunnel.com and
accessbmr.idrive.com.
|
|
I am unable to save mail
settings. Why is that?
This could be because the port number used to connect to the mail
server may have been blocked. You can check whether the port is
blocked or not from the BMR device.
To check,
- Sign in to the IDrive BMR's device web interface.
- Click 'Settings' displayed on the menu bar.
- Go to 'Mail' -> 'Mail Server Settings' tab.
- Click 'Firewall Check Now'.
Contact your network admin to unblock the port, if it is blocked.
|
|
Can
I link my BMR cloud account with my IDrive account?
If you have an IDrive Enterprise account and a BMR cloud account,
you can contact BMR support to link both
these accounts. This lets you directly access your BMR cloud
account from IDrive, without the need to enter your BMR user
credentials every time, to sign in.
|
|
Is my data encrypted at
rest?
Yes, your data is encrypted at rest. BMR uses AES-256 CCM
encryption to secure your data when stored on the BMR device and
on the cloud. Your data is also encrypted when transferred to the
cloud account.
|
|
|
Does IDrive BMR offer 24/7
support?
Yes, IDrive BMR offers 24/7 support via live chat. For priority
assistance, call us on 1-855-815-8706 (ext 5), Monday - Friday,
6:00 AM to 6:00 PM PST. You can also arrange a call-back by
filling out the support
form or via chat.
|
|
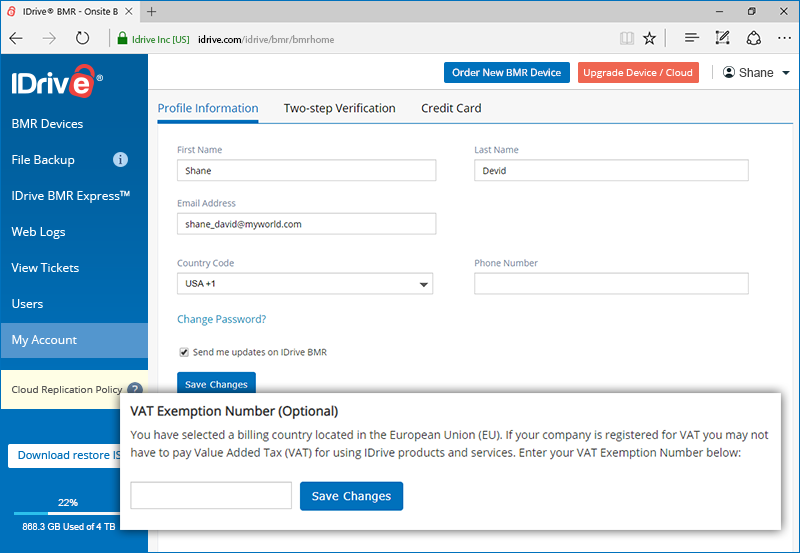
Can I add a VAT ID to my
IDrive BMR account?
Yes, if your business is based in the EU region, you have the
option to add your VAT ID to your IDrive BMR account.
To add your VAT ID,
- Go to www.idrive.com and
sign in with your BMR cloud account credentials.
- Click 'My Account' on the left navigation bar.
- Enter your VAT ID in the 'VAT Exemption Number' section and
click 'Save Changes'. The VAT ID will be updated to your account
and may be validated by IDrive BMR.
Note: The 'VAT
Exemption Number' section will be displayed only if it is
applicable for your chosen country.
|
|
Does IDrive BMR have a VAT
number?
For information related to IDrive VAT number, send an email to support@idrive.com.
|
|
What are the publicly disclosed
vulnerabilities that could be detected in a network scan that
hosts the BMR device?
Currently, there is one low-level disclosed vulnerability. Read
the details and its resolution below.
CVE ID: CVE-1999-0519 and CVE-2000-1200
Description:
A NETBIOS/SMB share password is the default, null, or missing.
The BMR device provides granular file-level restore through SMB
shares hosted on the device. We also have the NAS-capability built
into the product through which you can create SMB shares. These
shares can be set to operate with authentication (recommended) or
without authentication (not recommended). The unauthenticated
share is publicly accessible within the local area network. This
is to support the product's backup and disaster recovery
functionality. The SMB server configurations that support both
these modes of access could cause this vulnerability to be
reported in the scan.
Resolution:
Our technical support team will assist in configuring the SMB
server settings of your BMR device so that only the authenticated
network shares are allowed. However, please note that, if you
still choose to create a network share with the public access
(non-authenticated) thereafter, the applied settings will be
overridden.
If you are concerned about a particular vulnerability other than
this, get in touch with support so we can investigate and provide
a solution.
|
|
|