What are the requirements for a bare-metal restore?
The following are the requirements for performing a bare-metal restore:
- USB drive with a minimum of 4 GB storage - to create USB recovery media
- Ensure that the drives on your target computer are healthy (run SMART checks on the drives if necessary).
- Target computer must be bootable from a USB storage device.
- The BMR device and the target computer should be inside the same LAN.
- Target computer should have wired network connection to the LAN (DHCP is recommended).
- If the target computer has hardware RAID, it should be configured before initiating the restore process.
For optimal performance during bare-metal restore, stop any on-going backup operation.
Note:
- After restoring a machine, Windows may prompt to re-activate your license.
- Bare-metal recovery of dynamic (simple, mirrored, spanned, striped), logical, and Microsoft storage space (Raid-5 with resiliency type-parity) is supported by version 8.4.0 and above. However, bare-metal recovery of dynamic OS disk with GPT partition is not supported.
- In case you have upgraded to version 8.4.0 or above, make sure to install the latest backup agent that supports the forementioned advanced backup and perform at the least one image backup. If you attempt restoring exclusively from older versions where the OS disk is dynamic, you may have OS boot issues. Similarly, use the updated WinRE Recovery Media Builder to create and upload a new WinRE recovery media to the BMR device.new WinRE recovery media to the BMR device.
|
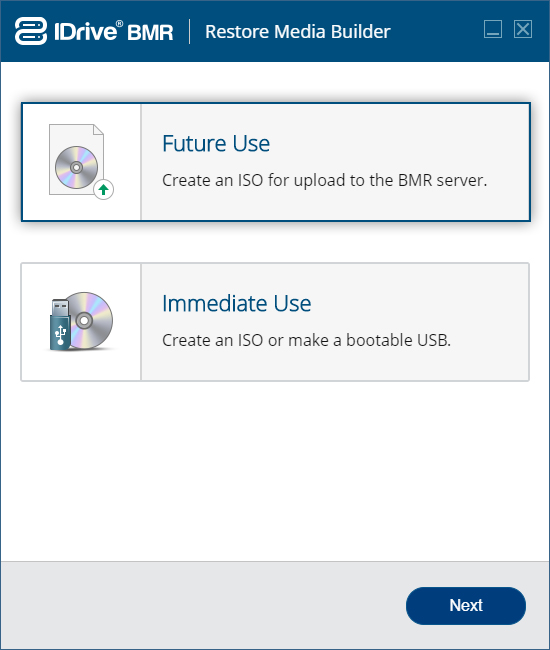
How can I build a WinRE recovery media for BMR?
To build WinRE recovery media for future use,
- Launch the setup.
- Select 'Future Use'.
- Select the ISO image from the 'Browse' button.
- Click 'Next'.
- The ISO progress will be displayed on the page.
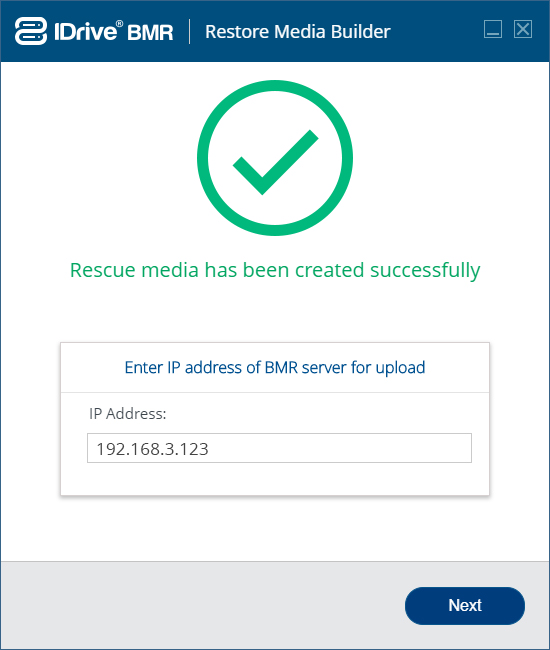
- You will receive a success message once the ISO build is completed. Enter the IP address and click 'Next'.
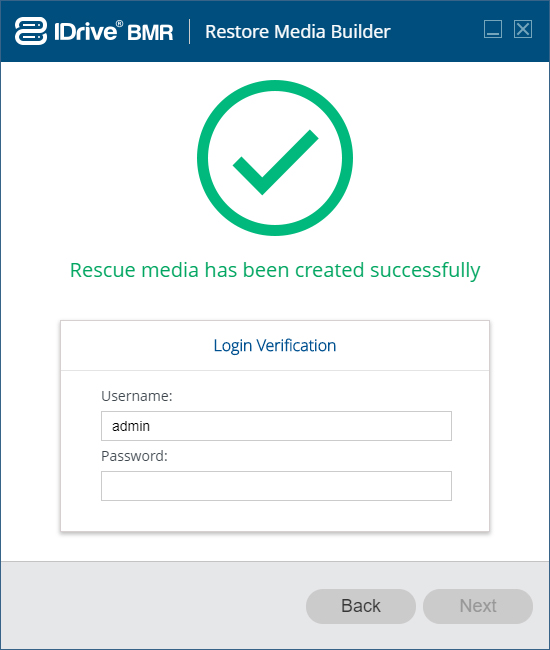
- You will be directed to the sign in page. Enter your sign in credentials and click 'Next'.
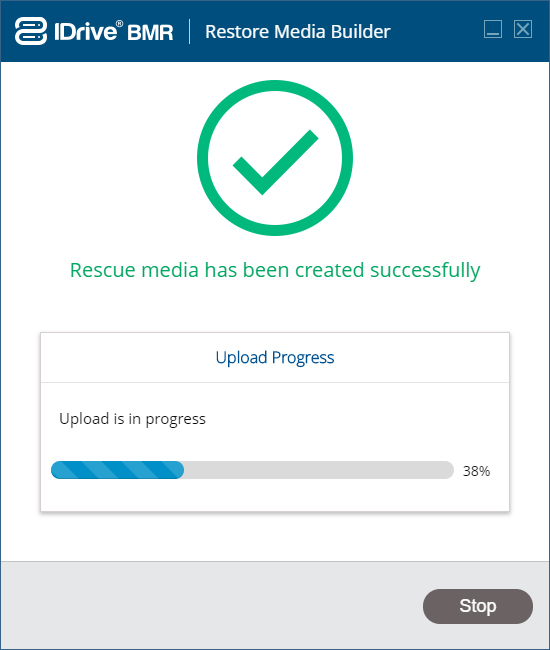
- The upload progress will be displayed.
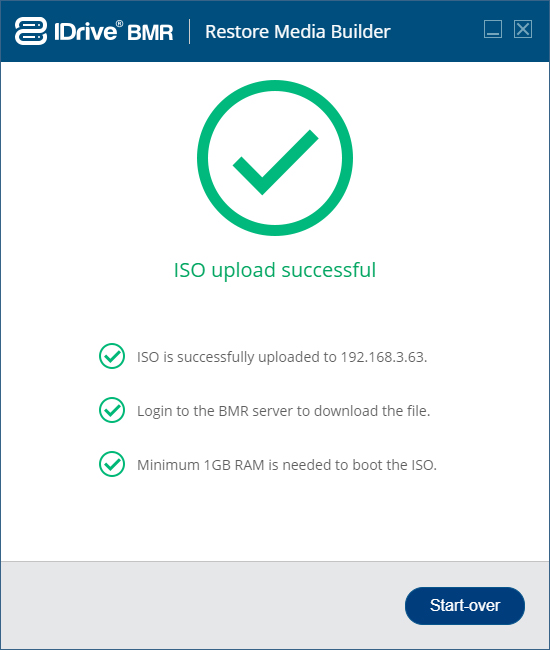
- You will be notified once the upload is completed.
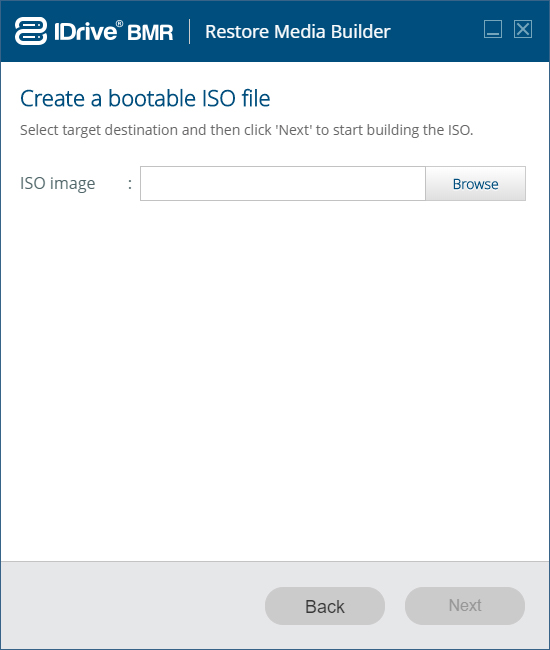
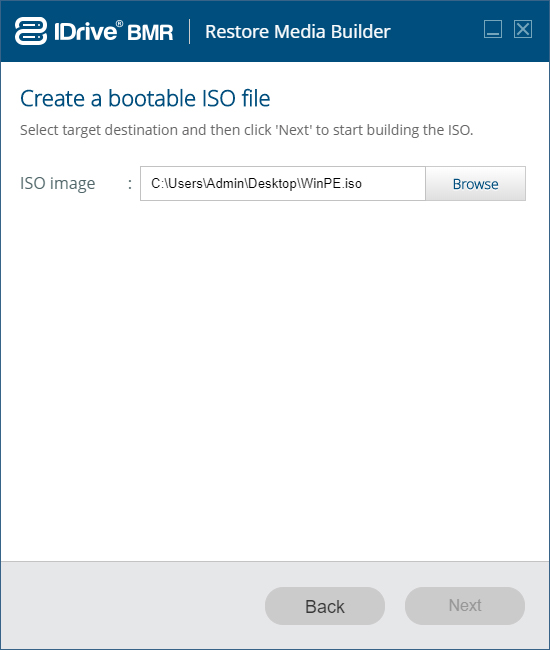
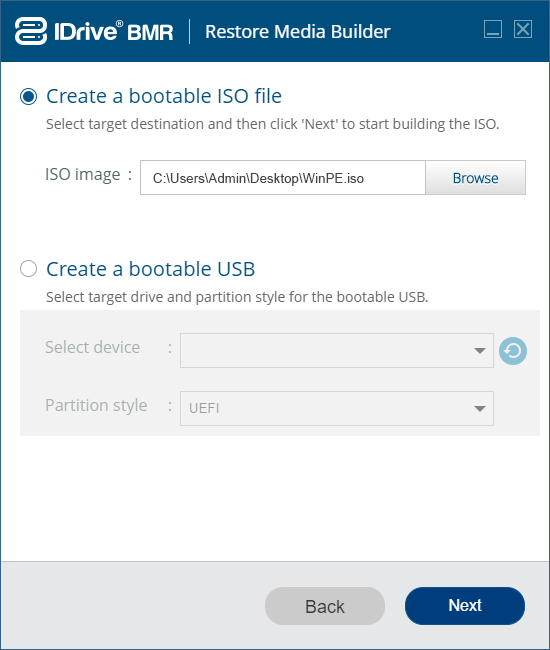
To build WinRE recovery media for immediate use,
- Launch the setup.
- Select 'Immediate Use'
- Choose 'Create a Bootable ISO file' and select the ISO image from the browse button and click 'Next'.
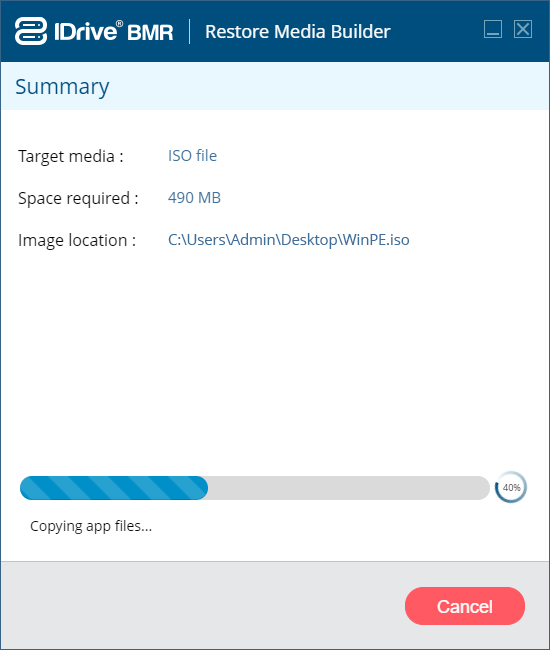
- The ISO progress will be displayed on the page.
- You will receive a success message once the ISO build is completed.
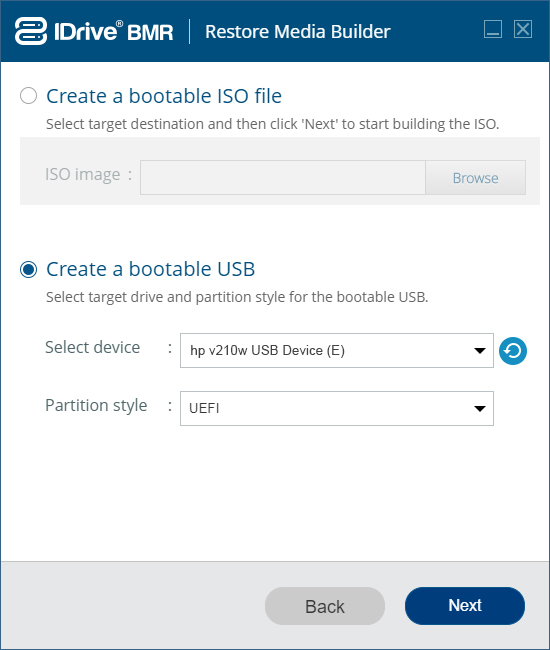
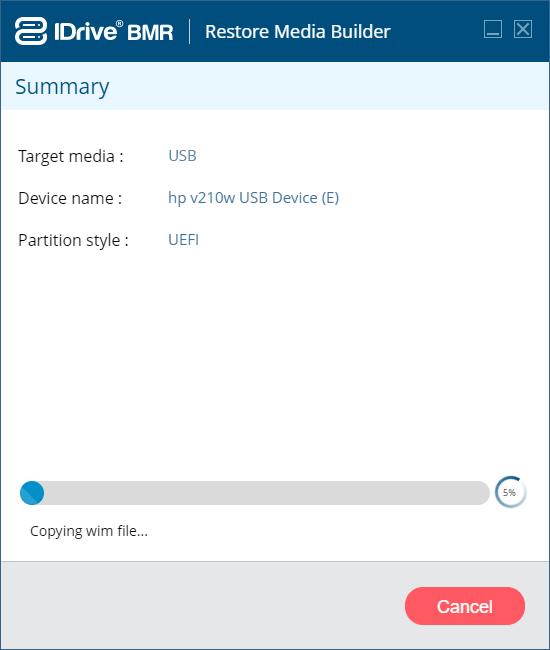
To create a bootable USB for immediate use,
- Select 'Create a bootable USB'. Then select the partition style and the USB device from the respective dropdowns to create the boot device and click 'Next'.
- The USB creation progress will be displayed.
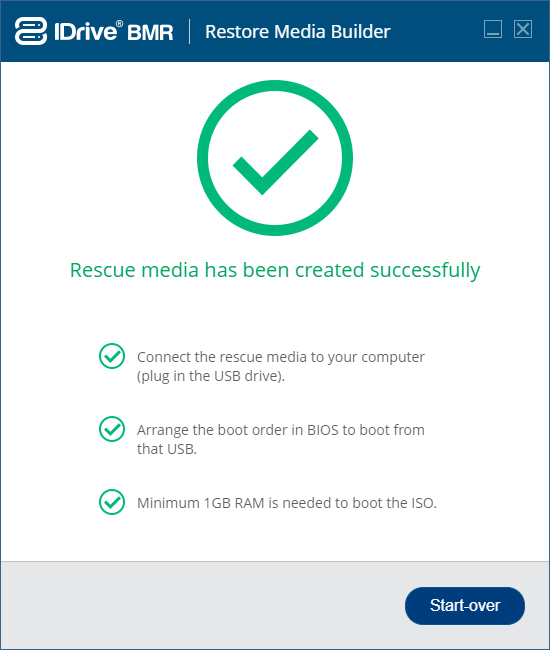
- You will be notified once the USB bootable device is successfully created along with further instruction to use the bootable device.
Note:
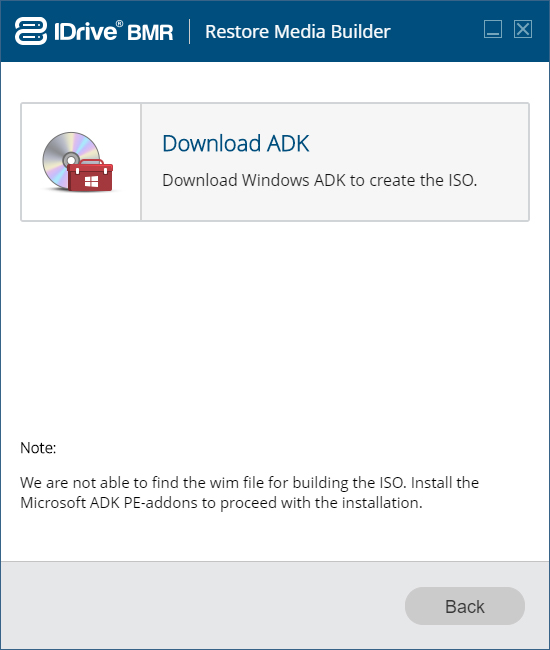
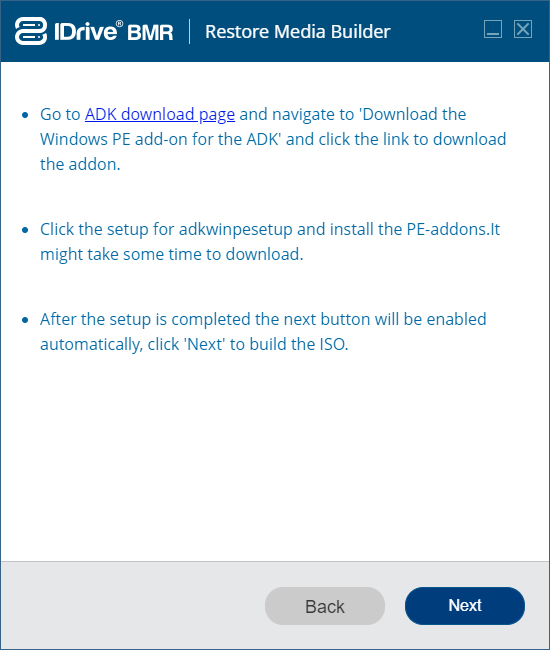
- If the setup is not able to find the .wim file, you will be prompted to download ADK after selecting future use or immediate use option.
- The new page that appears will ask the user to download ADK from the link given in the instruction. After the ADK setup is completed the next button will be enabled.
- Click 'Next' to proceed with the aforementioned options.
|
|
How do I perform system restore from IDrive BMR device?
View the setup instructions to build the ISO using the WinRE builder app
You can restore data to a target machine that is connected to the same network as that of your BMR device. Create a bootable USB or media device using the WinRE builder app. Then boot your target replacement machine using the USB or media device.
To initiate restore,
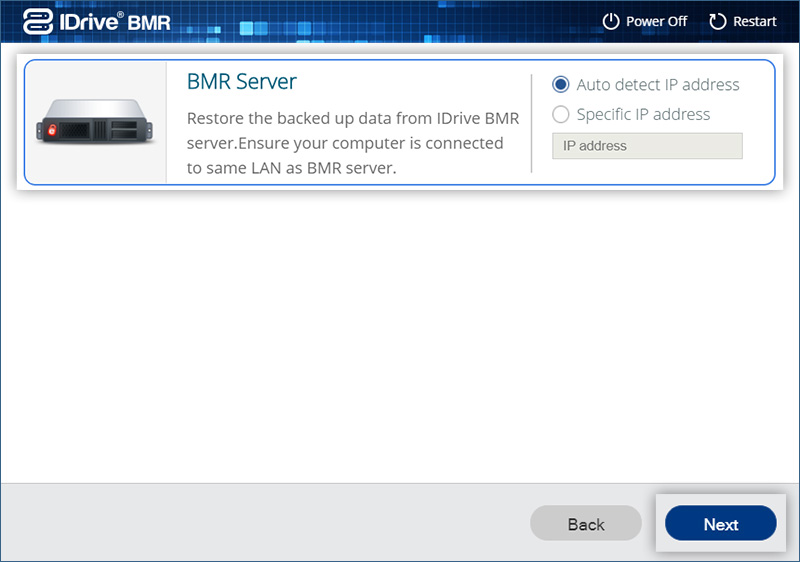
- Connect to the BMR device.
- With the 'Auto-detect IP Address' option (recommended), you can connect automatically to any available BMR device within the network.
- With the 'Specific IP Address' option, you can connect to a particular BMR device. This is useful when you want to connect to a specific device in a network having multiple BMR devices installed.
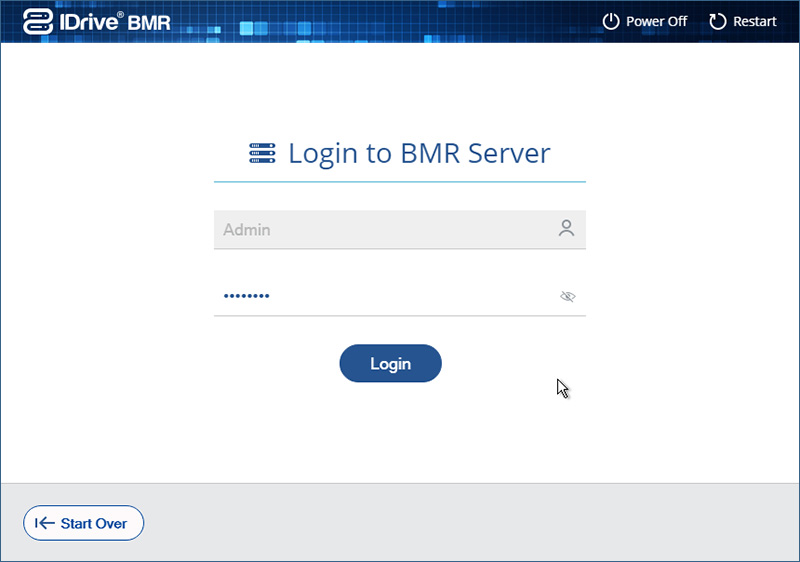
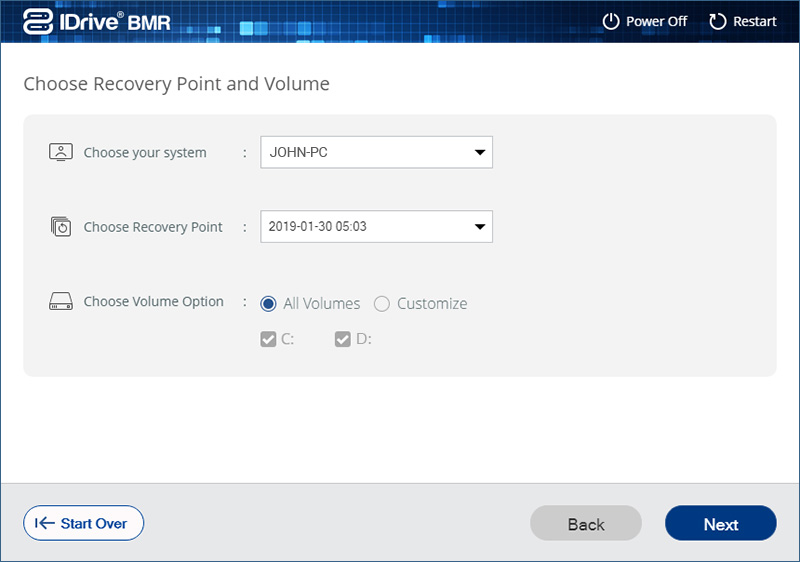
- Sign in to the BMR device with your user credentials.
- Choose the system and recovery point from the respective dropdown menu.
- Choose the appropriate volume option and then click 'Next'.
Note: If you click the 'Back' button on this page, you will be signed out of the device. You will have to Sign in again to the device.
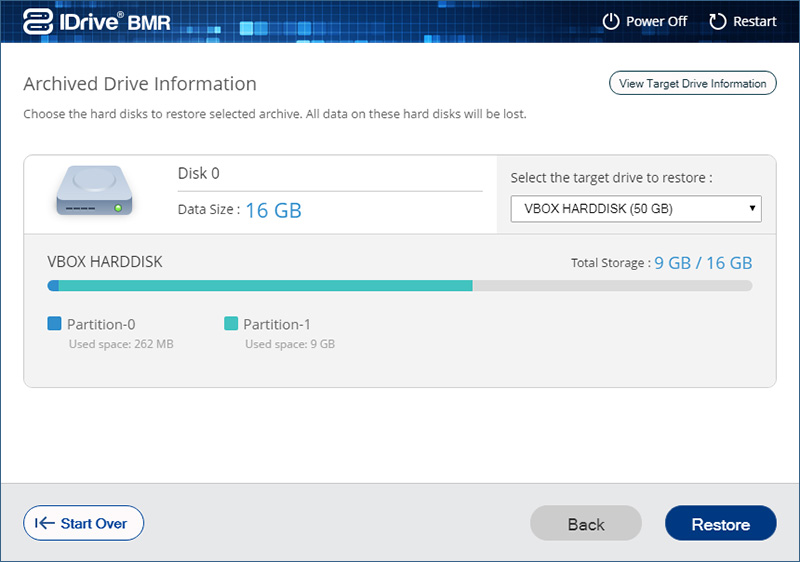
- Select a destination drive.
Note:
- Once the restore process is initiated, any previously existing data on the chosen destination drive will be deleted.
- Select a drive with equal or greater storage than the original machine.
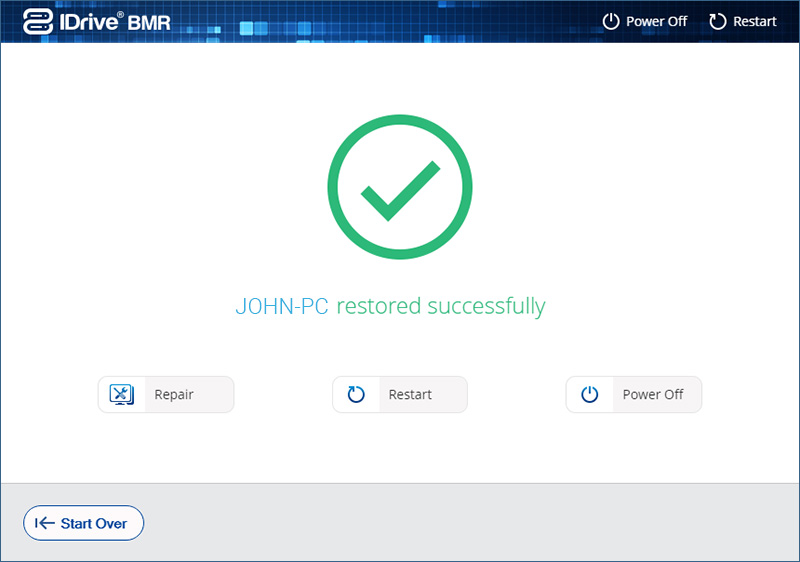
- You will receive a confirmation message when the restore is successfully completed.
|
|
Linux Recovery ISO
Before proceeding with system restore, you need to create a bootable CD or a bootable USB thumb drive using an ISO file and boot your computer.
The required ISO file and related information for creating bootable CD or a bootable USB thumb drive is available on the shipped device.
Perform the following steps to boot your computer:
Note:
Screenshots used in the following scenario is just an example. Depending on the BIOS manufacturer you would get a different menu options.
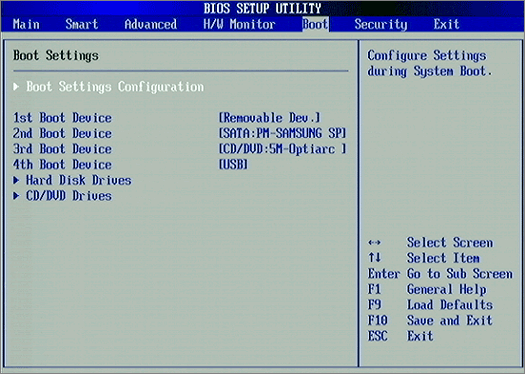
- Switch on the computer and press ESC, F1, F2, F8 or F10 during the initial startup screen. Depending on the BIOS manufacturer, a menu would appear.
- Go to BIOS setup and select 'BOOT' tab.
- To set a boot sequence priority, perform the following steps:
- If you are using a restore CD/DVD, then move the 'CD/DVD..' to the first position in the list.
- If you are using a USB drive instead, then move the 'USB' to the first position in the list.
- Save and exit the BIOS setup.
You can now proceed with the restore process.
- Boot your computer using IDrive BMR Restore CD or a USB thumb drive which has restore environment.
- After booting your system, click 'Next' in the welcome page.
- Select 'BMR Server' and click 'Next'.
- Enter the BMR device password and click 'Sign in'.
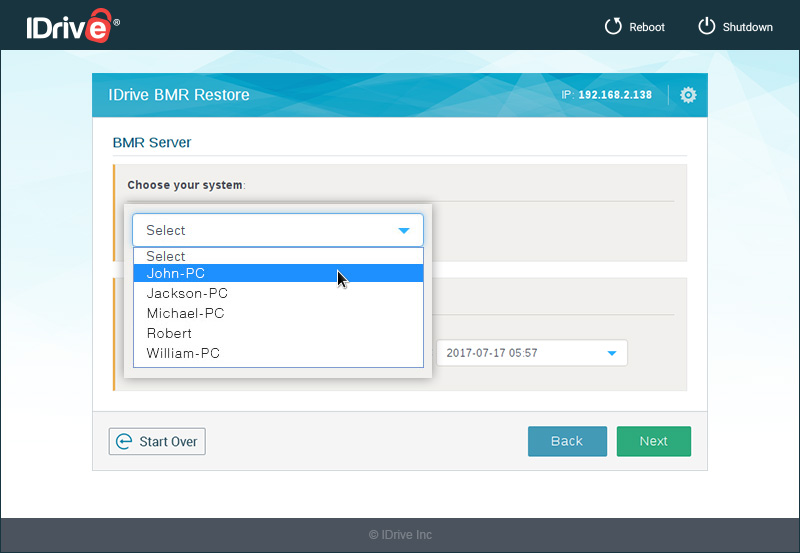
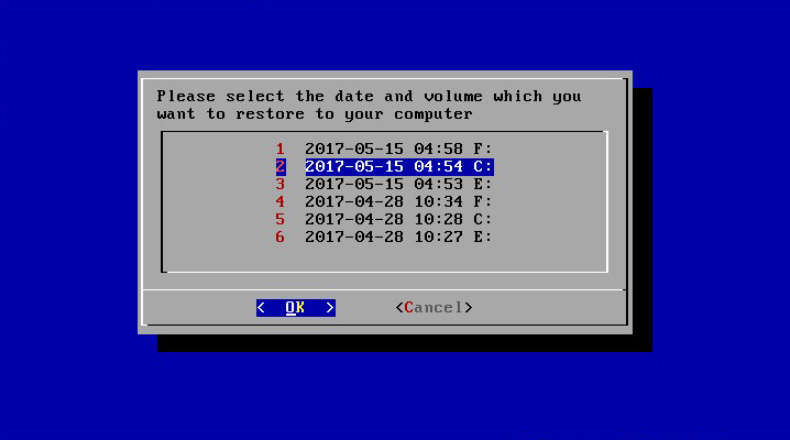
- Select the system from which you want to restore the data, from 'Choose your system' drop-down menu.
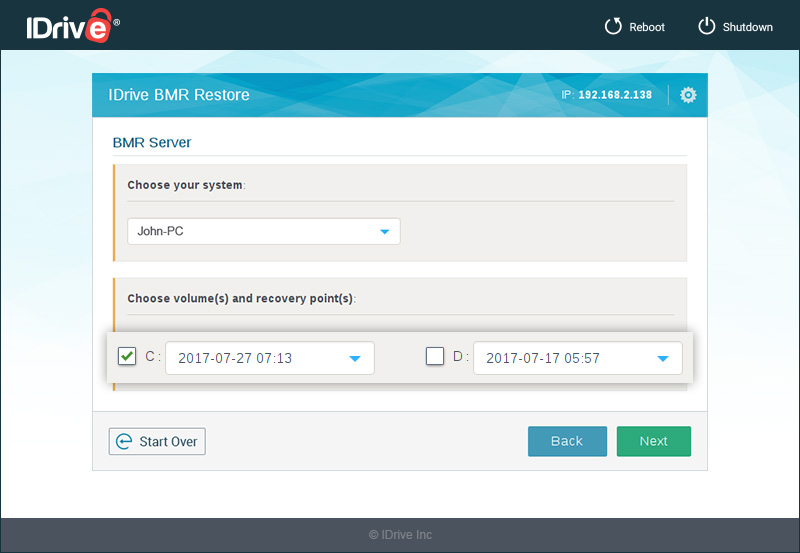
- Select the required volumes and their recovery points to restore, from 'Choose Volume(s) and recovery point(s)' section and click 'Next'.
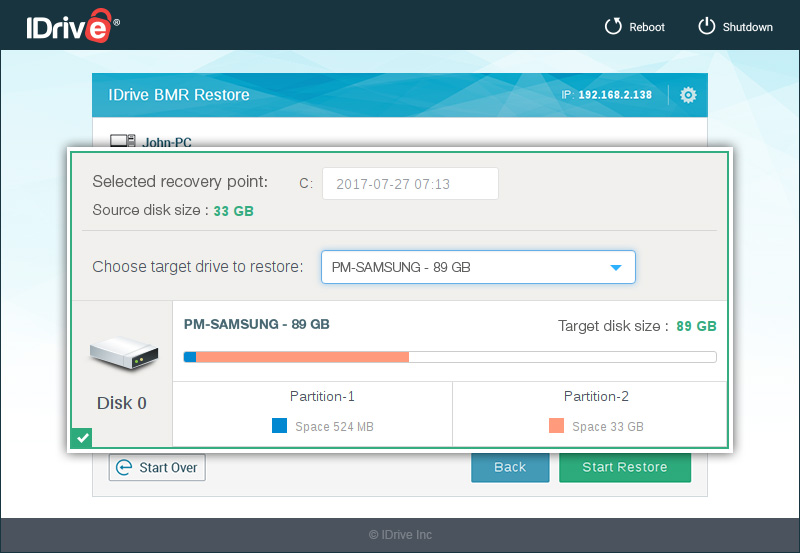
- Select the drive to which you want to restore data, from 'Choose target drive to restore' drop-down menu.
- Click 'Start Restore' and click 'Yes' in the confirmation window to start the restore process.
- After exiting from BIOS setup, click 'OK' in the confirmation window.
- Provide your username and password.
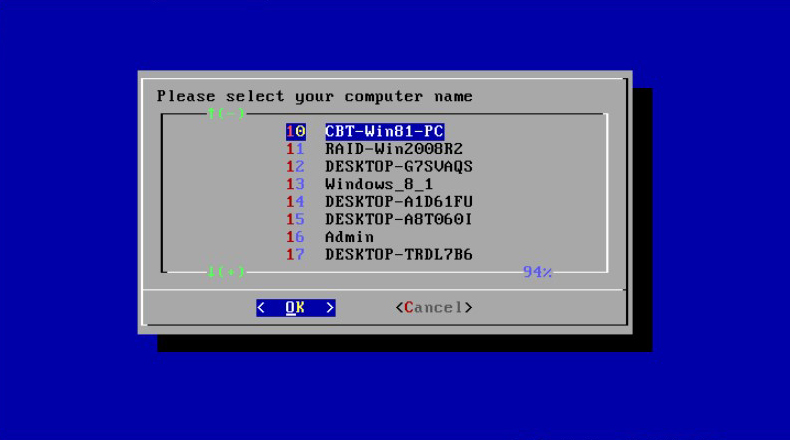
- Select the particular computer from the list of computers and click 'OK'.
The list of drives with date and time of the last backup is displayed.
- Select the particular drive you want to restore.
- Select the target drive to which you want to restore data.
- Click 'OK' in the confirmation window.
Note:
- The 'restore computer' should at least have same hard drive space as 'backup computer'. Also, if the 'backup computer' has multiple drives, ensure that the 'restore computer' also has same number of drives.
- It is recommended that 'restore computer' have same hardware configuration as 'backup computer'. However, you may have to install the required additional drivers if there is any change in the hardware configuration of the 'restore computer'.
|
|
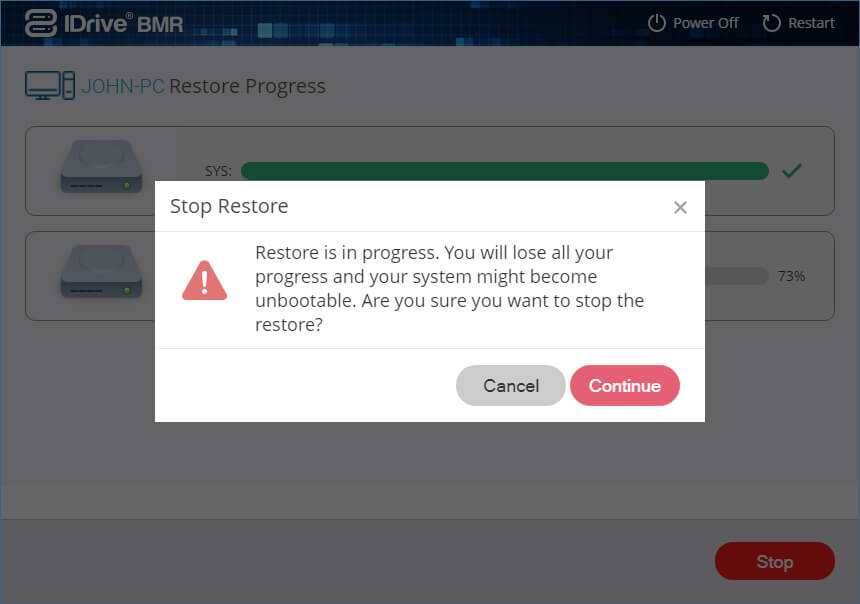
Can I stop the WinRE restore after initiating it?
Yes, you can cancel the restore after it has been initiated, but it is not recommended. If you cancel the restore, you will lose all the progress and your system might become unbootable. Furthermore, you cannot cancel any ongoing restore for individual volumes or disk, during the restore process.
You will be prompted with the following notification:
|
|
What is PE Network?
When users are not able to receive the IP in BMR WinRE through DHCP, they can set up a static IP using the PE Network. This PE Network is included in the 'Tools' section of the BMR application. |
|
Can I perform snapshot restore?
Yes, you can perform snapshot-based image restore for point-in-time recovery. During the restore process, you need to select the particular drive along with the required date on which the data was backed up, to perform bare-metal restore. |
|
How can I perform system restore to multiple computers?
You can perform system restore to multiple computers in one go. All you have to do is boot the computers with the restore CDs/USBs and perform the restore operation. Data can be accessed directly from the IDrive BMR device during restore. |
|
|
How can I access my backed up data if bare-metal restore fails or the computer does not boot up after performing the restore?
The bare-metal restore operation may fail or the computer may not boot up if the restored computer does not have the same hardware configuration as the backup computer. There may be new hardware devices present on the restore computer and the necessary drivers may not be installed. We recommend you to have identical hardware configurations on both computers.
However, you still can access all the backed up data by creating a recovery point. For steps to create recovery points, refer FAQ. |
|
|
Can I perform bare-metal restore with IDrive BMR to any computer with a different hardware configuration?
We do not recommend performing bare-metal restore to a computer with a different hardware configuration, as the restored computer may not boot after restore due to hardware dissimilarity. For the bare-metal restore to be successful, a computer with same or similar hardware configuration as the backup computer is preferred.
Ensure the following conditions are met, if the restore computer has different hardware configuration:
- The restore issue due to hardware dissimilarity is lesser in modern Windows operating systems such as Windows 8.1 and Windows 10.
- The motherboard chipset type (AMD / Intel) should be same in both the backup and restore computer.
- The hard drive storage controller (IDE / SATA) should be same in both the backup and restore computer.
Note: For faster bare-metal restore to a disk with hardware RAID, enable Disk Cache Policy in your BIOS settings.
|
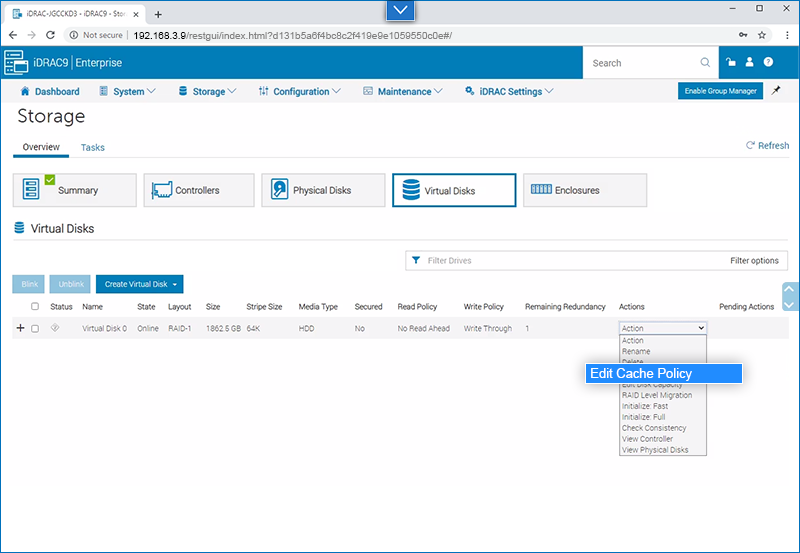
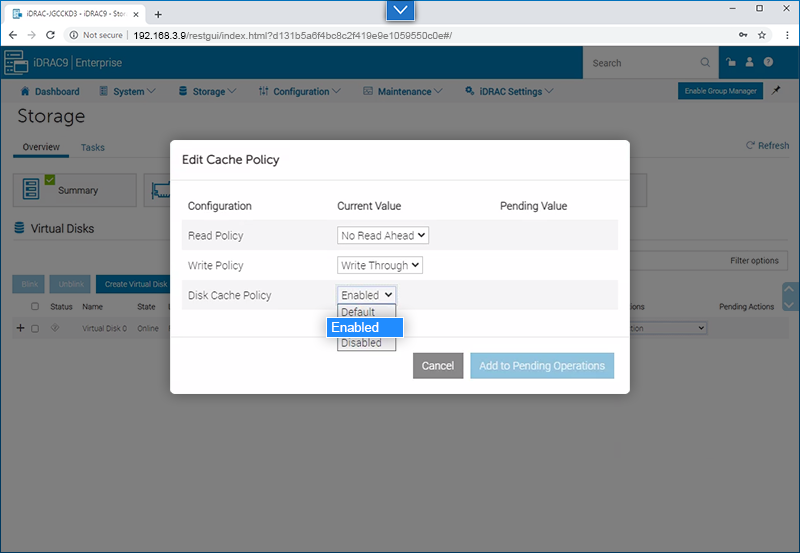
Bare-metal restore to a disk with hardware RAID is slow. How do I increase the restore speed?
For faster bare-metal restore to a disk with hardware RAID, enable ‘Disk Cache Policy’ for virtual disks through your RAID management utility.
- Here are sample screens for enabling disk cache in Dell PowerEdge servers, with IDRAC9 enabled.
Sign in to the IDRAC9 interface > 'Storage' > 'Virtual Disks' > 'Action' > 'Edit Cache Policy' > 'Disk Cache Policy' > 'Enabled'.
Once the disk cache policy is enabled, boot into the BMR WinRE ISO and start the restore process again for faster bare-metal restore.
Alternatively, you can enable disk cache policy for virtual disks from your system BIOS/UEFI utility if your computer does not have a remote management utility such as Dell IDRAC.
|
|
I have backed up my client machine with RAID-based storage to the BMR device. However, I am not able to perform bare-metal restore. Why?
Bare-metal restore for the client machine with RAID-based storage (Hardware or Software RAID) is not supported by IDrive BMR. However, you can still perform file-level restore of the backed up data to the client machine.
Note: Virtualization of the client machine with RAID-based storage may work depending on the RAID type and driver compatibility. |
|
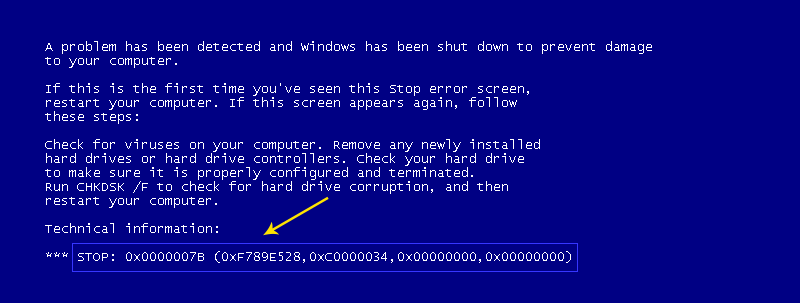
Why do I get a blue screen error with the error code 'Stop x0000007B INACCESSABLE_BOOT_DEVICE' when I try to perform bare-metal restore to a computer with different hardware configuration?
You may get a blue screen with an error code “Stop 0x0000007B INACCESSABLE_BOOT_DEVICE” as shown in the image below.
This is because, when the OS restarts after a bare-metal restore, it automatically disables unused storage drivers to speed up the Windows startup process.
To fix this issue temporarily, you can reset the SATA mode from AHCI or RAID to IDE in BIOS. However, you will get the same error when you reboot the computer.
To fix this issue permanently,
- Sign in to Windows and go to the following path in 'Registry Editor':
- HKEY_LOCAL_MACHINE\SYSTEM\CurrentControlSet\services\msahci
- HKEY_LOCAL_MACHINE\SYSTEM\CurrentControlSet\services\pciide
- Double-click 'Start', set 'Value data' to zero and click 'OK'.
- Close 'Registry Editor' and restart the system.
- Go to BIOS settings and change the SATA configuration settings as per your requirements.
After Windows starts booting up, it will automatically detect the change and install the appropriate drivers. Once the drivers are installed, Windows will boot without any problem. |
|
I am unable to connect to the BMR device when trying to perform restore operation. What should I do?
You are unable to connect to the BMR device due to a network connectivity issue and your machine has not availed the IP address from the router. The connection status will be displayed as 'Connection failure' in the 'IP' field on the top-right corner of the page.
Ensure the following requirements are met and reboot your machine:
- Ethernet cable is properly connected to the primary NIC in your machine.
- DHCP is enabled in the router to which the machine is connected.
Note: If there is any connection failure between the BMR device and the machine when the restore operation is in progress, you should reboot the system and restart the restore operation. |
|
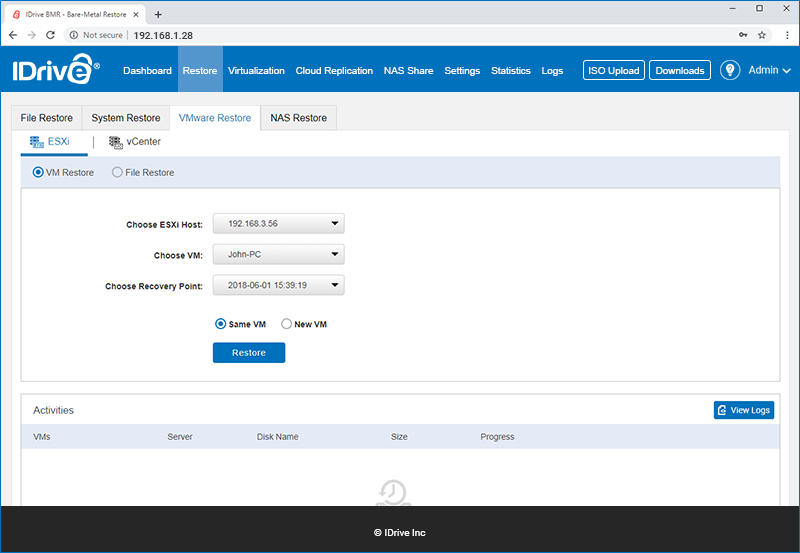
How do I restore VMware ESXi host and vCenter server backed up on the BMR device?
To restore a VM,
- Sign in to Drive BMR’s device web interface and go to the 'Restore' tab.
- Go to 'VMware'–>'ESXi'/vCenter.
- Select 'VM restore'.
- Select the required ESXi host you want to restore.
- Select a VM and the required recovery point.
- Select 'Same VM' if you wish to restore data to the same VM.
- To restore data to another VM, select 'New VM'.
- Select an ESXi host for the new VM.
- Enter a name for the VM and select a data store.
- Click 'Restore' to initiate the restore process.
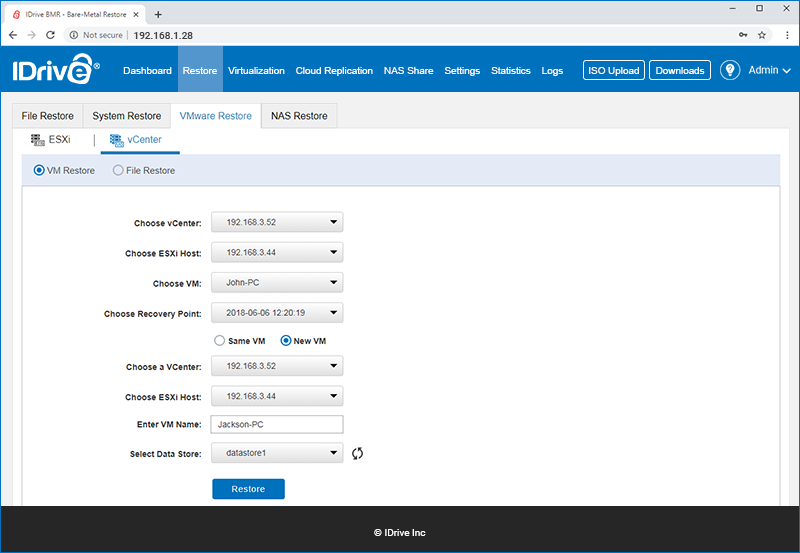
To restore a VM running on vCenter server,
- Sign in to Drive BMR’s device web interface and go to the 'Restore' tab.
- Go to 'VMware Restore'–>'vCenter'.
- Select 'VM restore'.
- Select the required vCenter server you want to restore.
- Select an ESXi host.
- Select a VM and the required recovery point.
- Select 'Same VM' if you wish to restore data to the same VM.
- To restore data to another VM, select 'New VM'.
- Select a vCenter and the required ESXi host for the new VM.
- Enter a name for the VM and select a data store.
- Click 'Restore' to initiate the restore process.
You can view detailed restore progress in the 'Activities' section. |
|
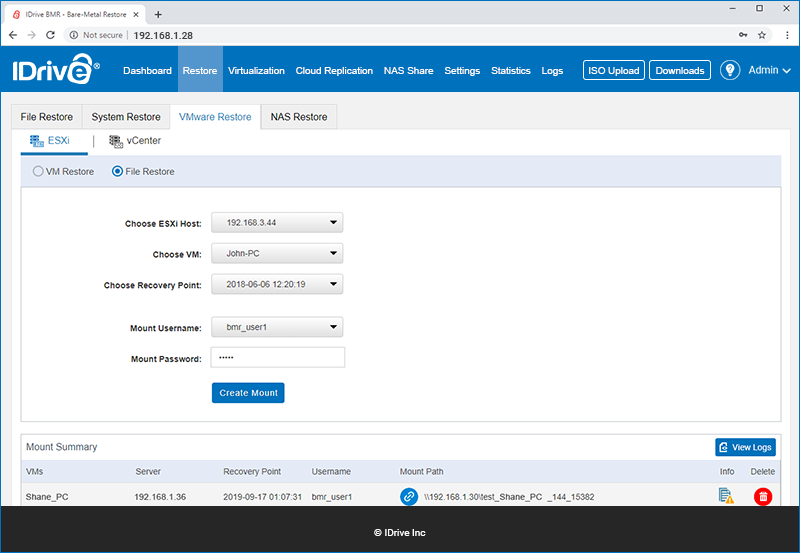
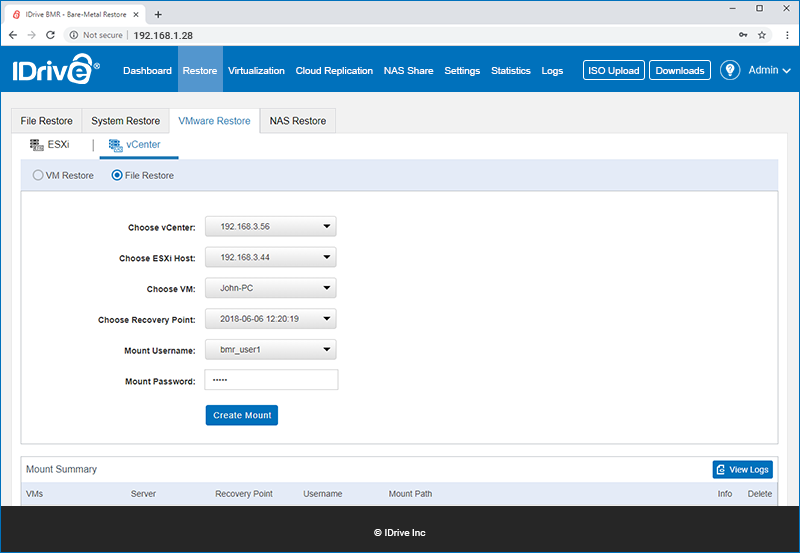
Is it possible to restore individual files/folders from VMware ESXi host and vCenter server backed up on BMR device?
Yes, you can restore individual files/folders, irrespective of the operating system used on the VM. All major file systems on the VM are also supported.
To restore individual files/folders from a backed up ESXi host,
- Sign in to Drive BMR’s device web interface and go to the 'Restore' tab.
- Go to 'VMware Restore'–>'ESXi'.
- Select 'File restore'.
- Select the required ESXi host you want to restore.
- Select a VM and the required recovery point.
- Click 'Create Mount' to initiate the restore process.
To restore individual files/folders from a backed up vCenter ,
- Sign in to Drive BMR’s device web interface and go to the 'Restore' tab.
- Go to 'VMware Restore'–> 'vCenter'.
- Select 'File restore'.
- Select the required vCenter server you want to restore.
- Select an ESXi host.
- Select a VM and the required recovery point.
- Click 'Create Mount' to initiate the restore process.
You can view detailed restore progress in the 'Activities' section. |
|
Why am I being prompted to activate my Windows license after a physical / virtual machine system restore?
Windows licensing links your purchased product key to the hardware configuration of the machine. Therefore, in case of a hardware change, Windows may prompt you to re-activate your license.
The solution depends on the type of your Windows license.
Solution for retail license: Windows allows retail licenses to be transferred to another machine. You can simply enter the product key on the new machine and reactivate the Windows license.
Note: Retail licenses can only be installed on one machine at any particular time. Avoid activating Windows on multiple computers with the same product key.
Solution for OEM license: OEM license is non-transferrable and links your purchased product key to the motherboard. To secure license activation for a restored machine, you will need to contact your OEM-license provider. IDrive BMR cannot assist you with third-party licensing issues.
|
|
Can I retain the static IP configurations on a restored machine?
Your machine's static IP address is set on your ethernet network adapter. When you perform system restore on a new machine, the NIC hardware will be different from the original and will reset the IP to DHCP. If your work environment is static-IP dependent, you will need to manually configure the network settings after restore.
|
|
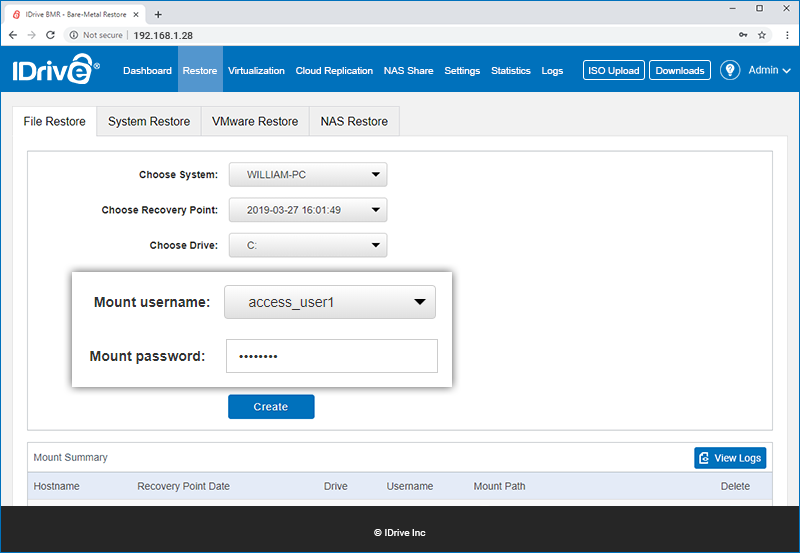
Can I perform file-level restore to a client?
Yes, you can perform file-level restore to a client by creating recovery point.
To create file-level recovery point access,
- On the 'File Restore' tab, select a client from the 'Choose a System' drop-down menu.
- Select recovery point from the 'Choose a Recovery Point' drop-down menu.
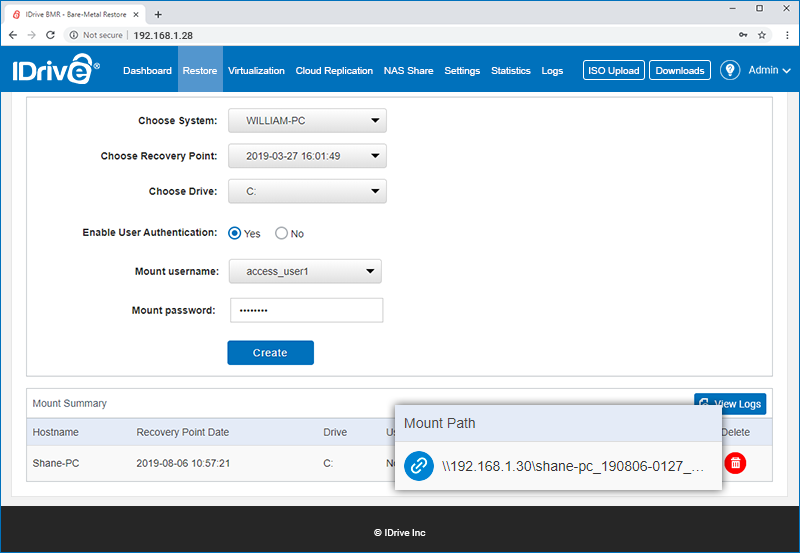
- By default 'Enable user authentication' will be selected as 'No'. This will create an open share that is accessible on the network. To create a secure share,
- Select 'Yes'.
- Select the username from the 'Mount username' drop-down menu.
- Enter the mount password.
- Click 'Create'.
A summary for the selected computer will be created in the 'Mount Path Summary' table. You can use the path displayed under 'Mount Path' to access your backed up data.
|
How many network share can I create for a recovery point?
You can create a maximum of 5 simultaneous network shares collectively for physical machines and VMware servers, irrespective of the authentication type selected. The details of recovery point will be displayed in the 'Mount Path Summary' table. |