- Getting Started
- Backup Console
- Management Console
- Windows Backup
- Mac Backup
- Linux Backup
- Mobile Backup
- Cloud Applications Backup
- Server Cloud Backup
- Mass Deployment
- Entire Machine Backup
- Google Drive Backup
- IDrive® 360 Express
- Single Sign-On
- System Requirements
- Account Management
- Security
- Firewall Guidance
Backup Console
If your question is not addressed below, contact us through our support form and we will get back to you shortly.
Devices
- How can I add computers to my IDrive® 360 account?
- Can I configure encryption for my device backup?
- How do I remove computers from my account?
- How do archived computers affect my account and license?
- How do I remove mobile devices from my account?
- What is a group?
- How can I create a group and add computers to it?
- Can I rename and delete a group?
- How do I move a computer from one group to another?
- How do I move a computer to another company?
- How do I rename a computer configured to my account?
- Can I update the computer name using the device profile name?
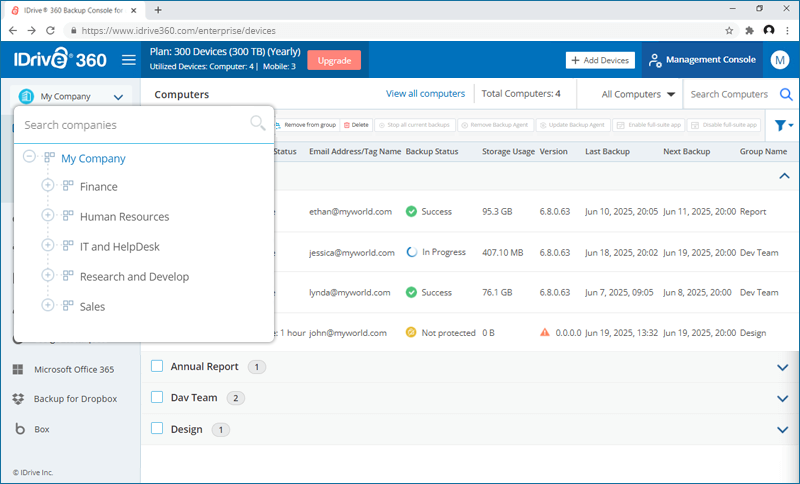
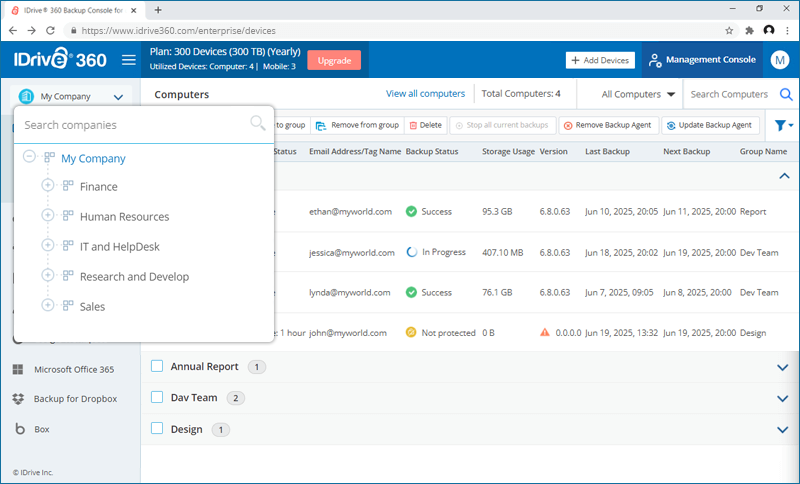
- Can I view all the devices associated with my account?
- Can I view all the devices associated with a particular Company?
- How can I remotely manage my added computers?
- How do I backup files and folders from my computers?
- Does IDrive® 360 support the backup of BitLocker-enabled drives?
- How do I restore my backed up data to a new computer in case my system crashes?
- How do I delete restored files and empty the trash?
- How many computers can I add in one Company?
- Can I stop ongoing backups of all my devices in one click?
- How do I stop an ongoing backup for my computer?
- Can I remove the backup agent from a computer?
- Can I enable or disable the full-suite app on multiple computers at once?
- Is it possible to block a computer?
- How do I update the backup agent on my computers?
Backup Plan
- What is a backup plan?
- Can I define a backup rule for selecting files in my backup plan?
- How to apply a backup plan to my computer?
- How do I Propagate backup plans to Devices and Groups?
- How can I view the propagation status of a backup plan?
- What is Continuous Data Protection (CDP)? How do I enable CDP?
- What are the advantages of Continuous Data Protection?
- Does Continuous Data Protection work if an immediate or scheduled backup job is running?
- I have received a conflict alert while creating a backup plan. What should I do?
- Can I disable the backup plan?
- How can I delete a backup plan?
- How do I modify an existing backup plan?
- How can I exclude certain files/folders from being backed up?
- Can I backup my mapped / external drives with IDrive® 360?
Snapshots
- What are snapshots in IDrive® 360?
- How to perform a snapshot-based restore in IDrive® 360?
- How does versioning work in Snapshots?
- What is immutable storage, and how does it work with IDrive® 360?
- What is legal hold, and how is it supported by IDrive® 360?
Settings
- From where can I manage the alerts and notifications for my backup settings?
- From where can I set the backup settings?
- Can I update the IDrive® 360 application for all my users?
- What is Bandwidth Throttle?
- What is Periodic Cleanup?
- Can I view reports of my backup / restore operations?
How can I add computers to my IDrive® 360 account?
To add computers,
- Sign in to your IDrive® 360 account.
- Click the 'Add Devices' button.
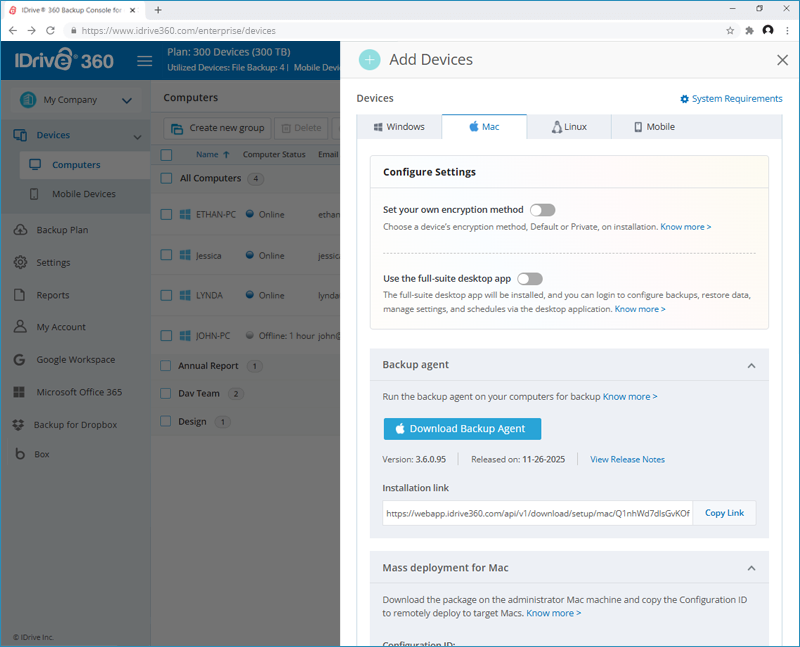
- In the 'Add Devices' screen, go to the required operating system tab.
- Enable 'Set your own encryption method' to select an encryption type for the device, which you can configure after the app is installed.
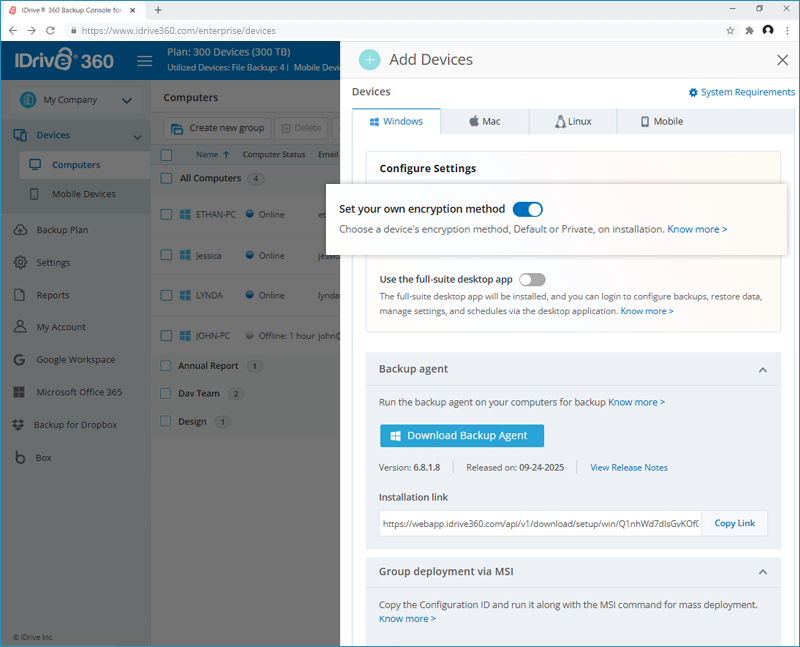
- You can choose to install the thin client application on the computer where the backup agent will run silently in the background after installation.
Or
Enable 'Use the full-suite desktop app' to install the full-suite app. You can sign in to the desktop application, configure backups, restore the backed-up data, manage settings, and schedules.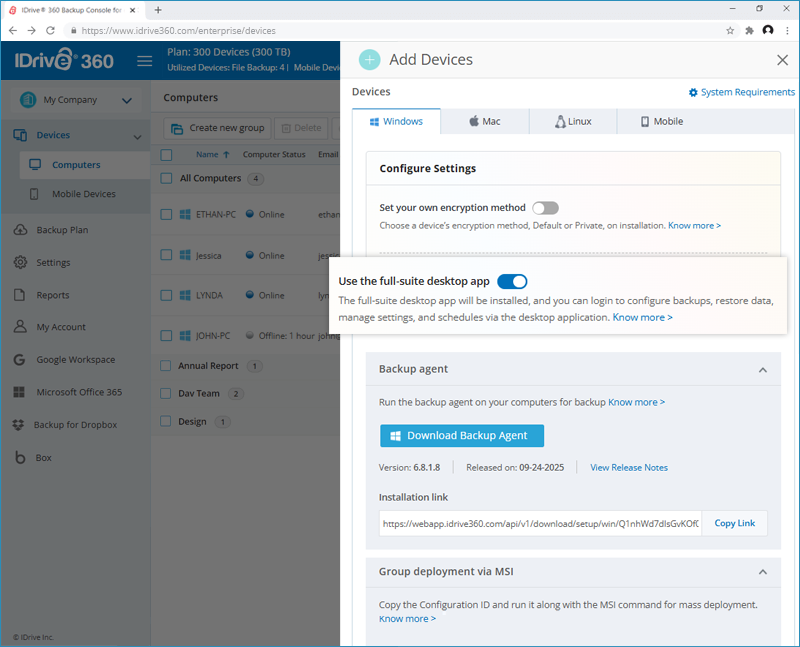
- Click 'Download Backup Agent'. Based on the selection, the full-suite or thin client application will be downloaded.
You can also add computers to your account via an app installation link.
- In the 'Add Devices' screen, choose the type of application - full-suite or thin client - you wish to install on the computers.
- Copy the Installation link appearing against the operating system of your choice.
- Share the installation link with the recipient.
- On receiving the same, the recipient can use the link to download the setup.
To add computers through mass deployment, copy the Configuration ID applicable for your account and click the 'Download MSI' button to download the IDrive 360 MSI file for Windows or click the 'Download Package' button to download the IDrive 360 mass deployment package file for Mac. Read the following steps to know more about:
- How to deploy IDrive 360 MSI package for Windows via Group Policy Objects (GPO)
- How to deploy IDrive 360 mass deployment package for MAC via Apple Remote Desktop
- How to deploy IDrive 360 mass deployment package for MAC via Jamf Pro
To add Linux machines, see steps here.
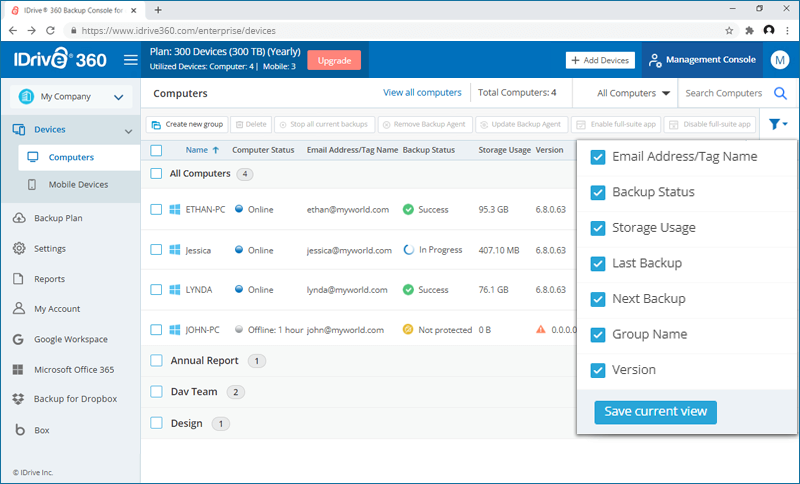
All the added computers appear in the 'Devices' tab. To filter the view, click  , select the required parameters and click 'Save current view'.
Can I configure encryption for my device backup?
Yes, you can configure encryption for your device backup during app installation.
To set your own encryption method,
- Sign in to your IDrive® 360 account.
- Click the 'Add Devices' button.
- In the 'Add Devices' screen, go to the required operating system tab.

- Enable 'Set your own encryption method'.
- Run and install the application on your computer.
- You will be prompted to set a private encryption key.
Click 'Continue' to proceed with default encryption.

Alternatively, select 'Private encryption key', set an encryption key, and click 'Continue'.
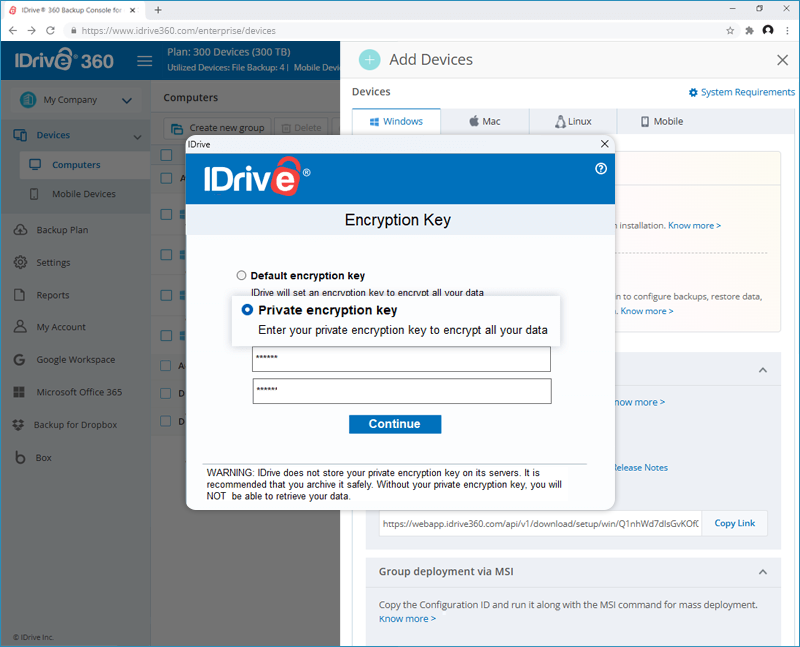
Note: Make a note of the private key as IDrive does not store your private encryption key on its servers. Without your private encryption key, you will not be able to retrieve your data. - On completion of installation, your computer will be added to the account for backup and the backup agent will run silently in the background.
How do I remove computers from my account?
To remove computers from your IDrive® 360 account:
- Sign in to your IDrive® 360 account.
- Go to the 'Backup Console' > 'Devices' > 'Computers' tab.
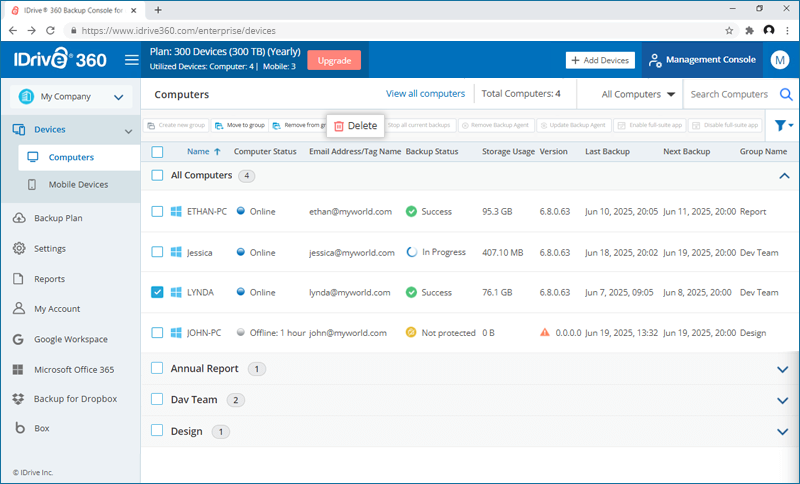
- Select the computers you want to remove and click 'Delete'.
- In the 'Delete Computers' popup, choose one of the following options:
- Delete computer only
The selected computers will be archived, and the backup agent will be uninstalled from them. These computers will appear under the 'Archived Computers' section.
Note: You can unarchive the computers from the 'Archived Computers' section and restore their backup data after reinstalling the backup agent. - Delete backed up data only
Deletes only the backup data associated with the selected computers and moves it to trash. The computers will remain active. - Delete computer and backed up data
Permanently deletes the selected computers and all their associated backup data. This action is irreversible and may take several days to complete.

- Delete computer only
- Click 'Delete' to proceed.
How do archived computers affect my account and license?
When a computer is deleted using 'Delete computer only' option, it is moved to the 'Archived Computers' list. Its backup data remains available for restore, and the license associated with the computer remains active. Archiving a computer does not free up the license. Users can continue to access and use the backup data of archived computers.
Note: If the device is already registered under your account, it cannot be moved back to an active group.
To unarchive an archived device that is not currently registered in the account,
- Click
 next to the required computer.
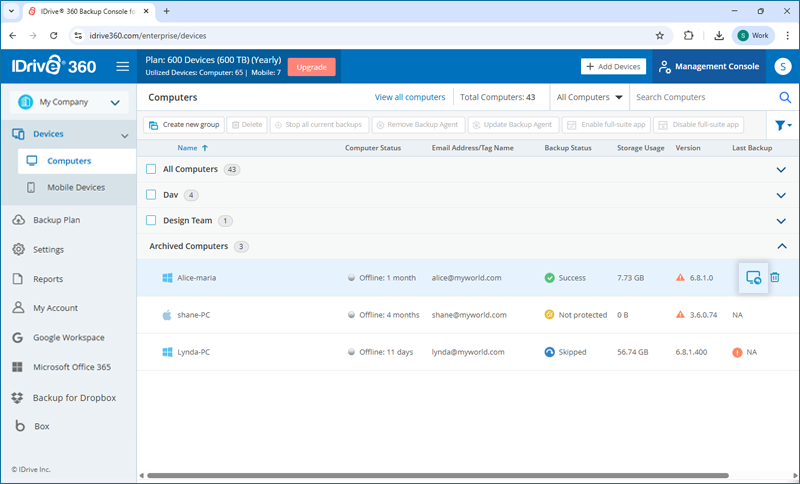
- Click 'Unarchive'. The computer will return to its original group, or 'All Computers' if the original group no longer exists.
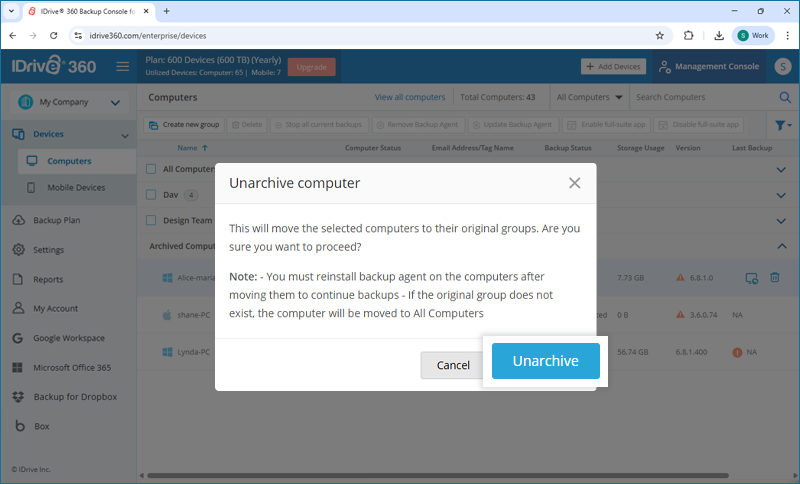
- Reinstall the backup agent to resume backups.
How do I remove mobile devices from my account?
To remove mobile devices from your account,
- Sign in to your IDrive® 360 account.
- Go to the 'Backup Console' > 'Devices' > 'Mobile Devices' tab.
- Select the devices you wish to remove and click 'Delete'.
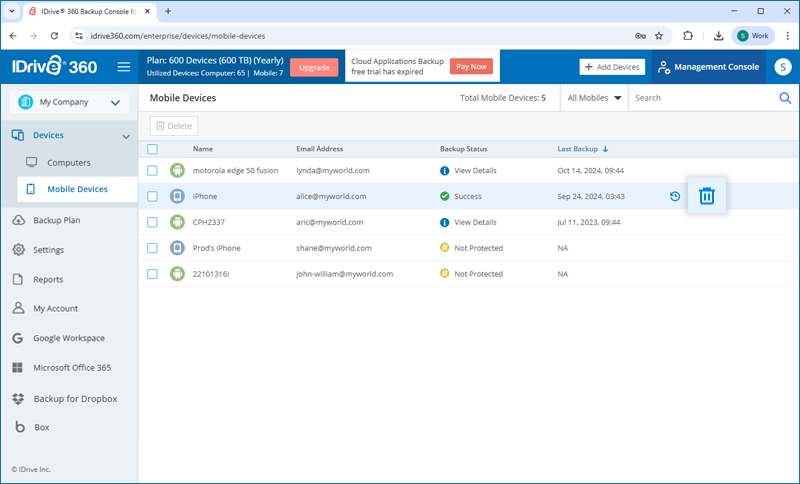
- In the confirmation popup that appears, click 'Delete'.
All the ongoing backups for the selected devices will be stopped, and the devices will no longer appear in your account.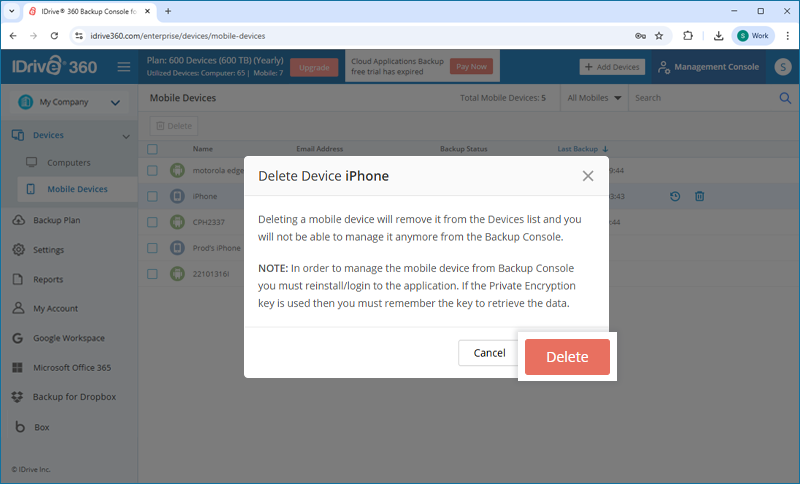
A group is a collection of selected computers. You can create any number of groups, and add computers to it. You can also create and push a backup plan to a group and the same would be applicable for all the computers in the group.
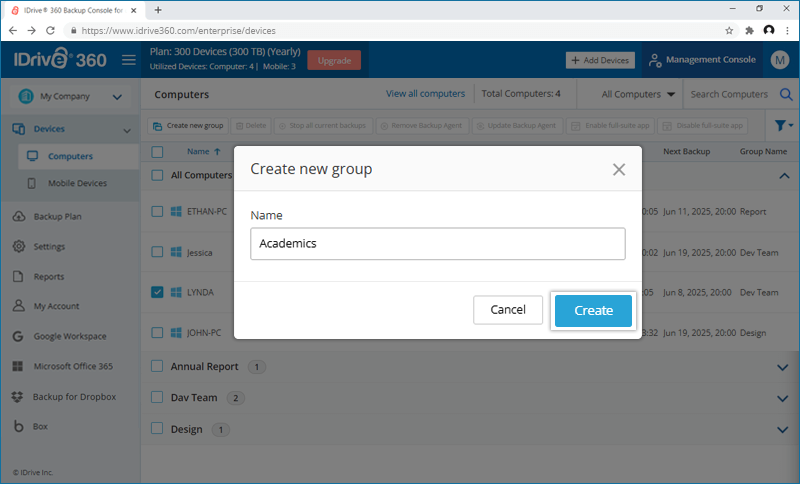
How can I create a group and add computers to it?
To create a group,
- Sign in to your IDrive® 360 account.
- In the 'Backup Console' -> 'Devices' tab, click 'Create new group'.
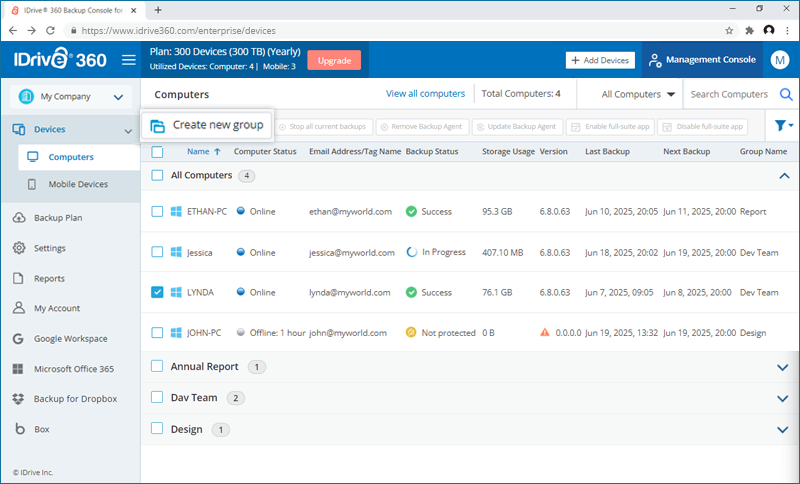
- In the popup that appears, enter a name for the new group and click 'Create'.
To add computers to a group,
- In the 'Backup Console' -> 'Devices' tab, select the computers you wish to add to a group and click 'Add to group'.
- From the list that appears, select the group to which you wish to add the computers, and click 'Add'.
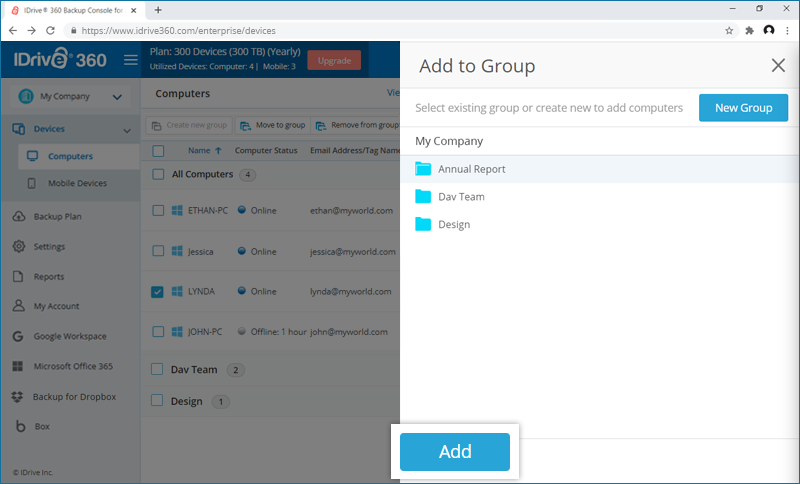
Note: Click 'New Group' to create a new group and add computers to it.
The computers will be added to the selected group.
To remove computers from a group,
- In the 'Devices' tab, click a group name and all the computers in the particular group will be displayed.
- Select the computer(s) you wish to remove, and click 'Remove from group'.
- In the popup that appears, click 'Remove'.

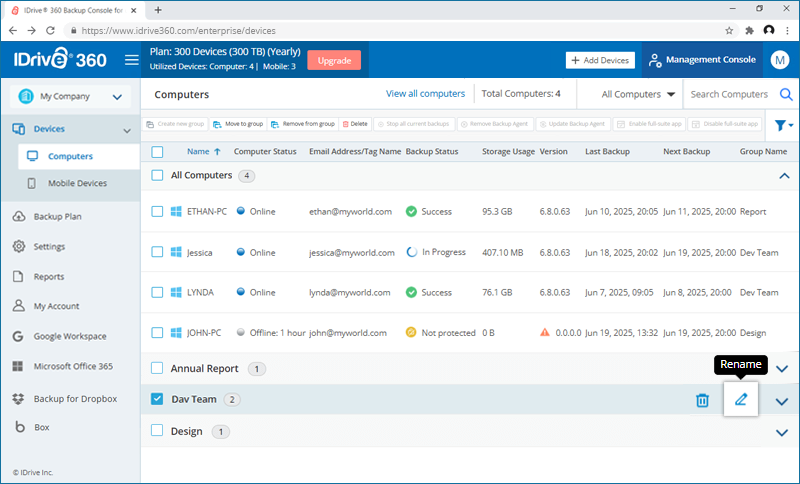
Can I rename and delete a group?
Yes, you can rename as well as delete a group any time.
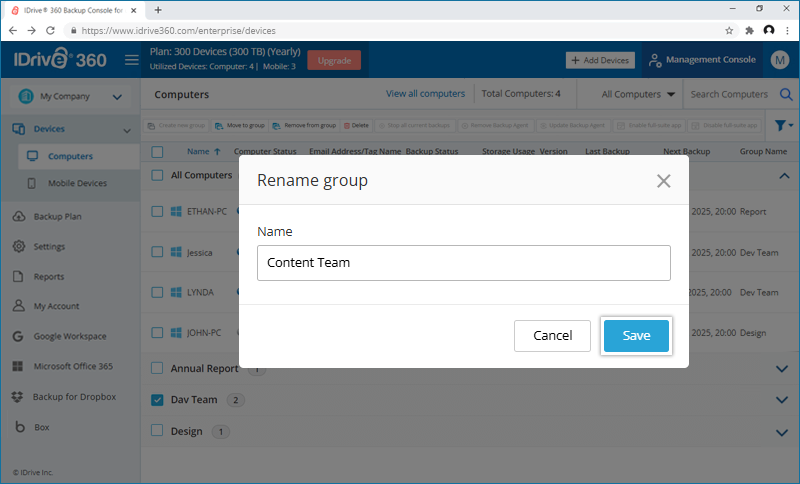
To rename a group,
- Sign in to your IDrive® 360 account.
- In the 'Backup Console' -> 'Devices' tab, all the groups will be listed.
- Hover over the group you wish to rename and click
 .
. - Click 'Rename'.
- Enter a new name in the popup that appears and click 'Save'.
To delete a group,
- In the 'Backup Console' -> 'Devices' tab, all the groups will be listed.
- Hover over the group you wish to delete and click
 .
.
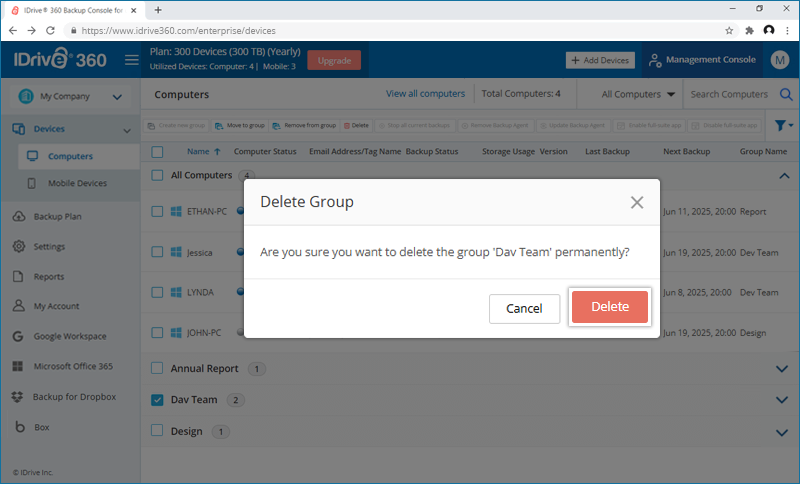
- Click 'Delete'.
- In the popup that appears and click 'Delete'.
How do I move a computer from one group to another?
To move a computer,
- Sign in to your IDrive® 360 account.
- Go to 'Backup Console'.
- Navigate to 'Device' -> 'Computers'.
- Hover on the computer that you want to move and click
 .
. - Select 'Move to group'.
- Select an existing group from the list where you want to move the computer.
- You can also click 'New Group' to create a group.
- Click 'Move'.

The computer will be moved to the selected group.
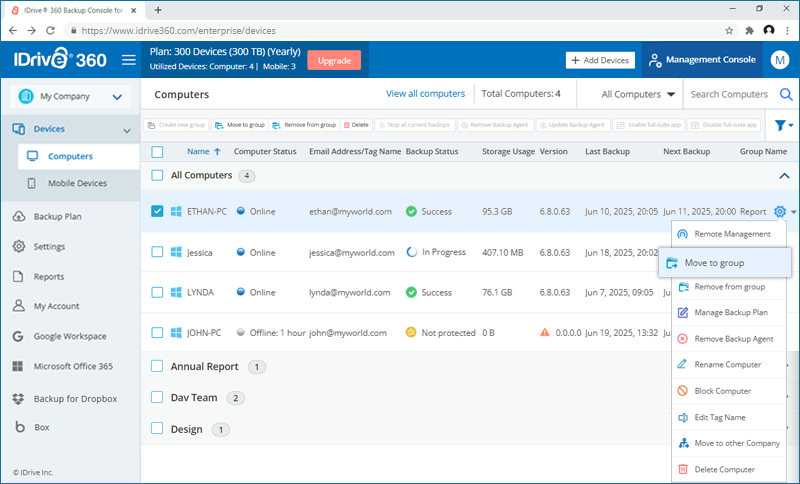
How do I move a computer to another company?
To move a computer,
- Sign in to your IDrive® 360 account.
- Navigate to 'Devices' > 'Computers'.
- Hover on the computer that you want to move and click .
- Select 'Move to other company'.
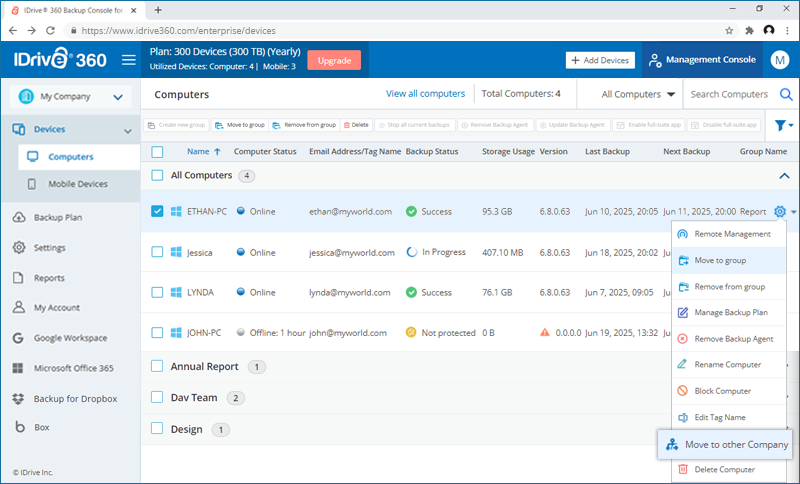
- Select a company from the list where you want to move the computer.
- Click 'Move'.
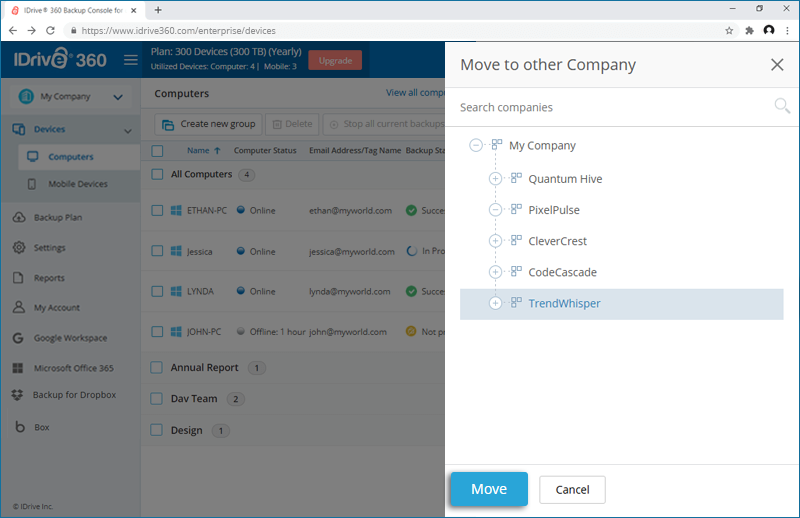
The computer will be moved to the selected company.
How do I rename a computer configured to my account?
To rename a computer,
- Sign in to your IDrive® 360 account.
- In the 'Backup Console' -> 'Devices' tab, hover on the computer that you want to rename and click .
- Select 'Rename Computer'. A popup window will appear.
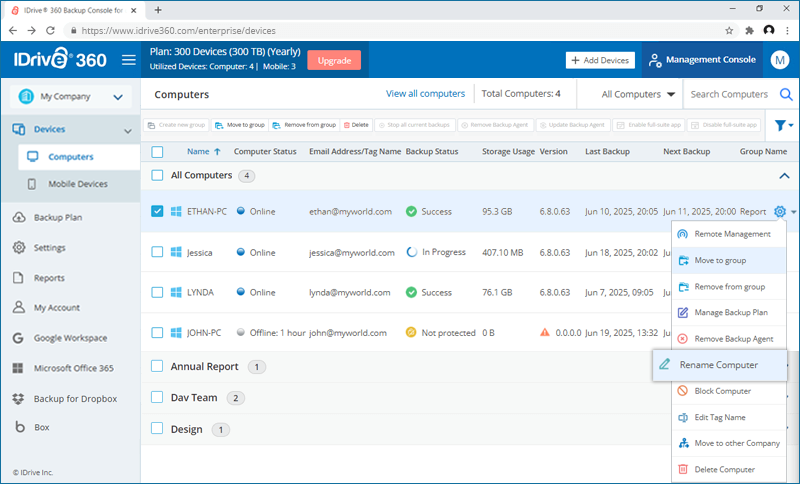
- Enter the new name.
- Click 'Save'.
Alternatively, you can follow these steps to rename a computer:
- In the 'Backup Console' -> 'Devices' tab, click on the required computer. You can also hover over a computer name, click , and select 'Remote Management'.
- In the remote management console click
 next to the computer name. The 'Rename Computer' popup will appear.
 - Enter the new name.

- Click 'Save'.
Can I update the computer name using the device profile name?
Yes, you can use the 'Import Tag Name' feature to update the computer profile name based on the device profile currently used on the computer.
To import the tag name from the device profile,
- Sign in to your IDrive® 360 account.
- In the Backup Console > 'Devices' tab, select the online computers you want to update.
- Click 'Import Tag Name'.
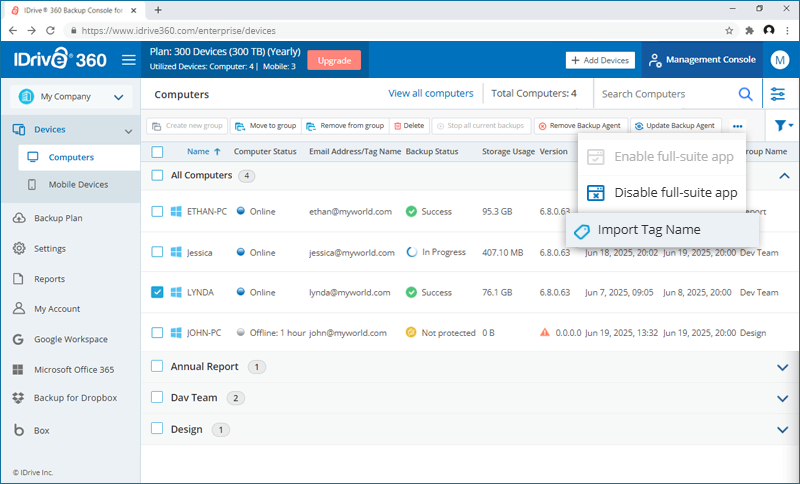
- In the confirmation popup, click 'Import'.

To edit or remove the tag name manually,
- Go to the respective computer, click , and select 'Edit Tag Name'.
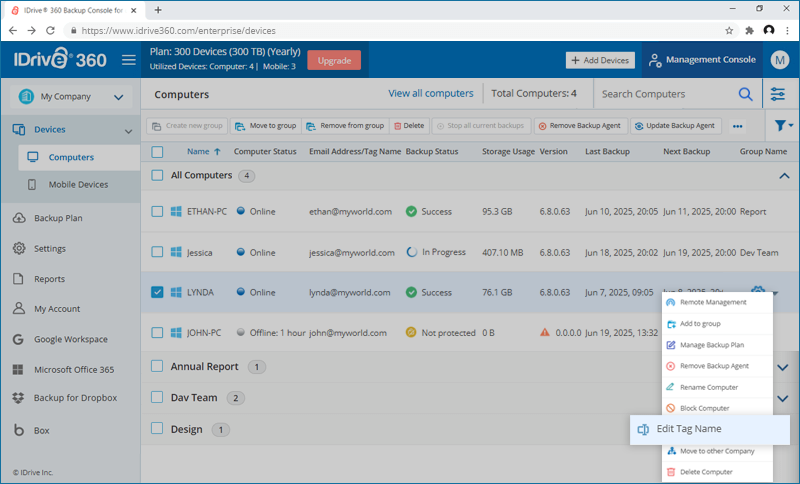
- In the 'Edit Tag Name' popup, you can:
- Enter the required name and click 'Save'.
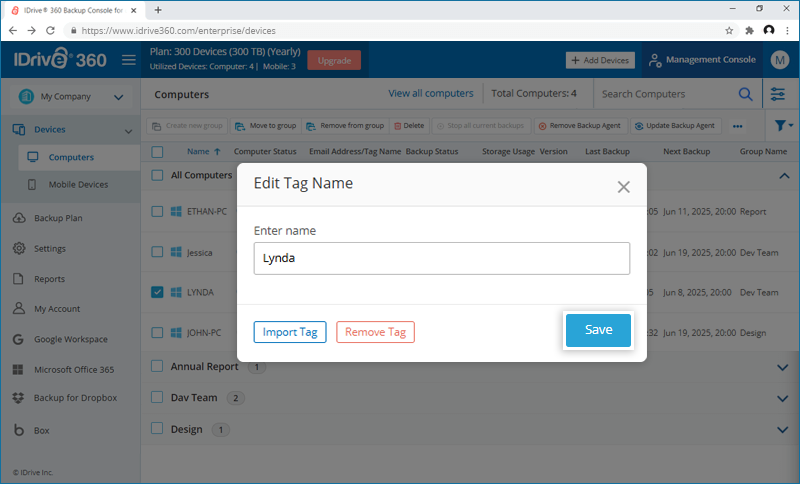
- Click 'Import Tag' to import the profile name from the device.
- Click 'Remove Tag' to remove the existing tag name.
- Enter the required name and click 'Save'.
Note: This feature is available only for online computers running Windows v6.8.2.22, Mac v3.6.1.17, and Linux v1.2.0, or higher.
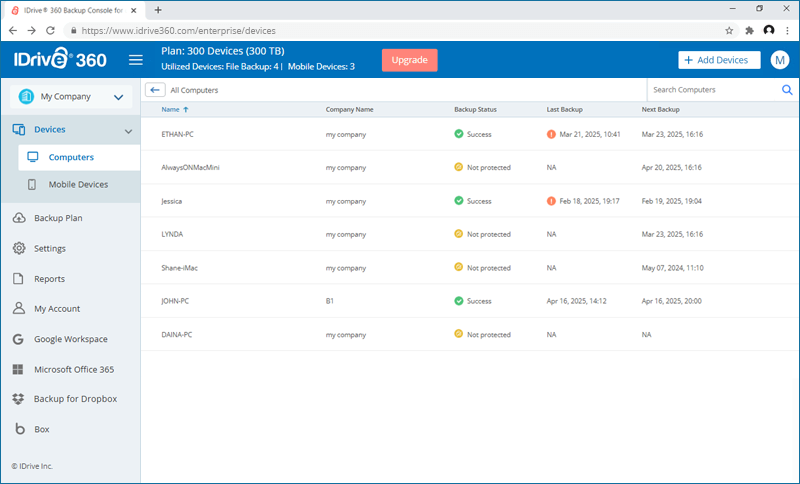
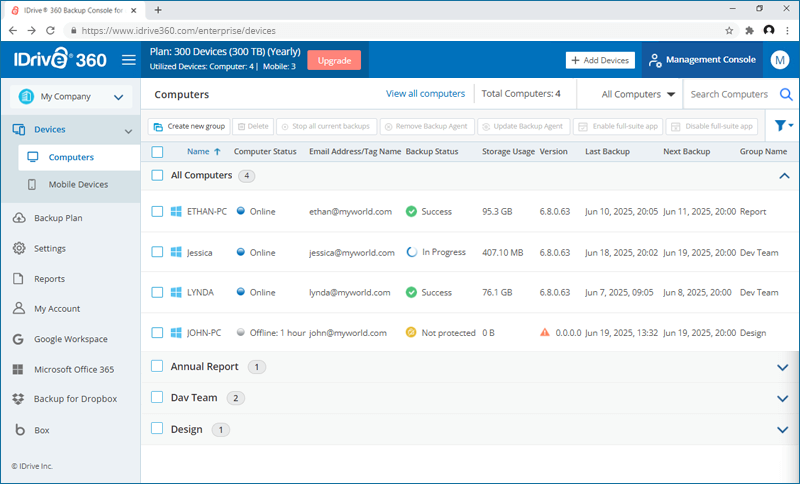
Can I view all the devices associated with my account?
Yes, you can view all the devices that are associated with your account, from the Backup console.
To view all computers,
- Sign in to your IDrive® 360 account.
- In the 'Backup Console', click 'View all computers' from the Computers tab.

- The list of all companies categorized by different companies will appear.
Can I view all the devices associated with a particular Company?
Yes, you can view all the devices that are associated with a particular company, from the Backup console.
To view company level devices,
- Sign in to your IDrive® 360 account.
- In the 'Backup Console', click the company name drop-down. The entire list of companies present will appear.
- Click a particular company to view all the devices attached with the company.
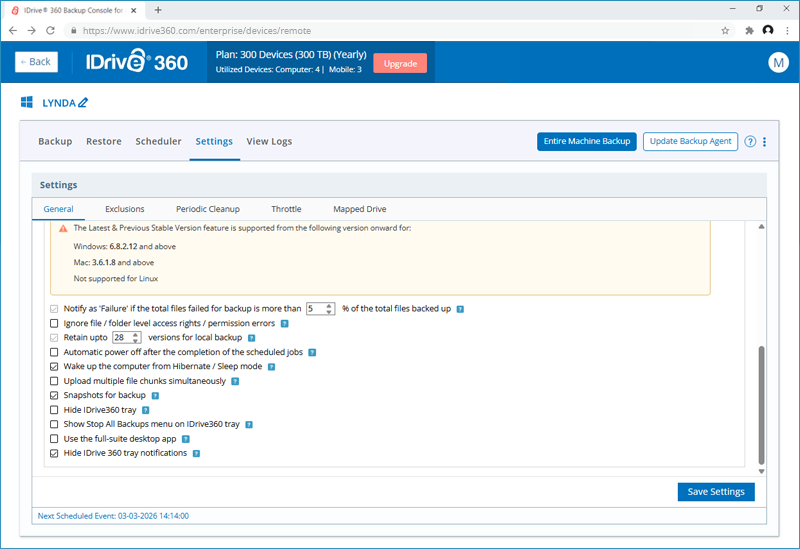
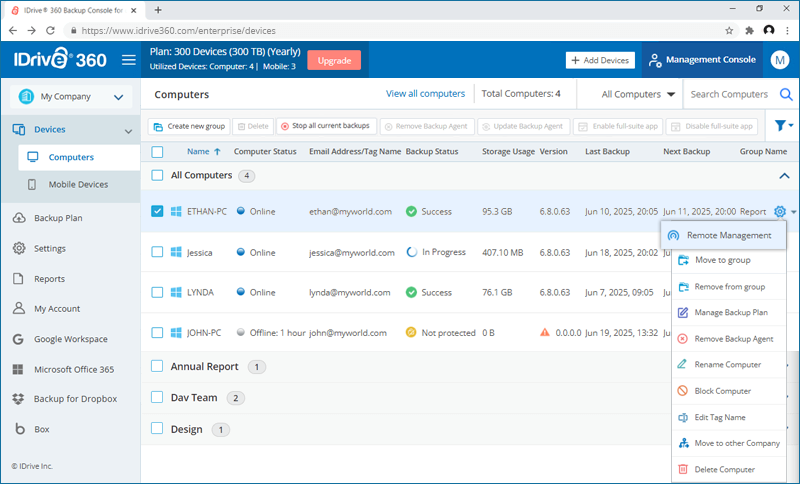
How can I remotely manage my added computers?
To remotely manage your computer,
- Sign in to your IDrive® 360 account.
- In the 'Backup Console' -> 'Devices' tab, click on the required computer. Or hover over a computer name, click , and select 'Remote Management'.
- The remote management console appears. Select the tabs according to the functions to be performed:
- Backup - The default backup set with some pre-selected folders for backup will appear. Perform immediate backup or scheduled backup of your data to your IDrive® 360 cloud account, or a local device.
- Restore - Restore your backed up files / folders from your IDrive® 360 cloud account or from local device, to any location on your computer or a different computer.
- Scheduler - Schedule your backups, with specified days, time, etc. You can even schedule for email notifications.
- Settings - Configure Continuous Data Protection (CDP) frequency, choose general backup preferences such as hiding IDrive 360 tray notifications, and set bandwidth and CPU throttling options.
- Perform some more functions from this screen, like:
- Update Software - Update or reinstall the latest version or the previous stable version of the IDrive® 360 application.
- View Logs - View and download detailed activity logs of your backup / restore operations.
- Send Error Report - Send a detailed report of your concerns to our support team by filling out a simple form.
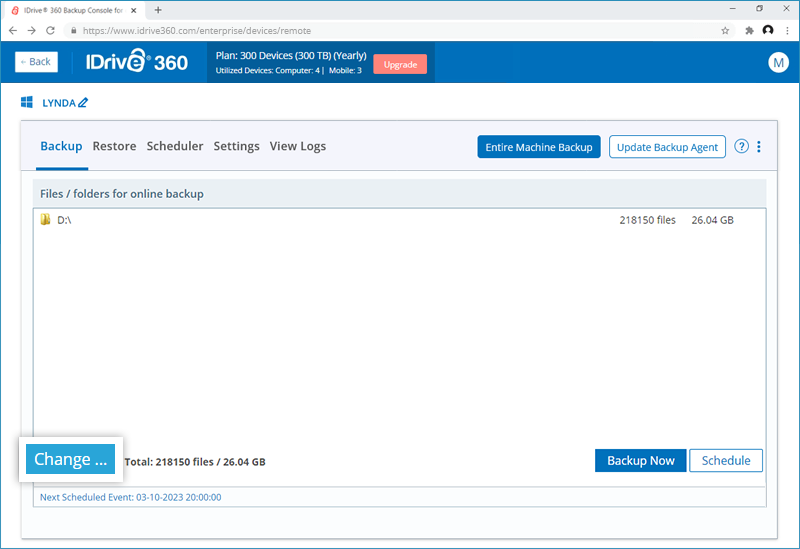
How do I backup files and folders from my computers?
You can manage file backup from the remote management interface.
- Sign in to your IDrive® 360 account.
- In the 'Backup Console' -> 'Devices' tab, click on the required computer. The remote management console appears.
Alternatively, hover over a computer name, click, and select 'Remote Management'. - In the 'Backup' tab, the default backup set with pre-selected folders will appear.
- Click 'Change...' and select the required files and folders.
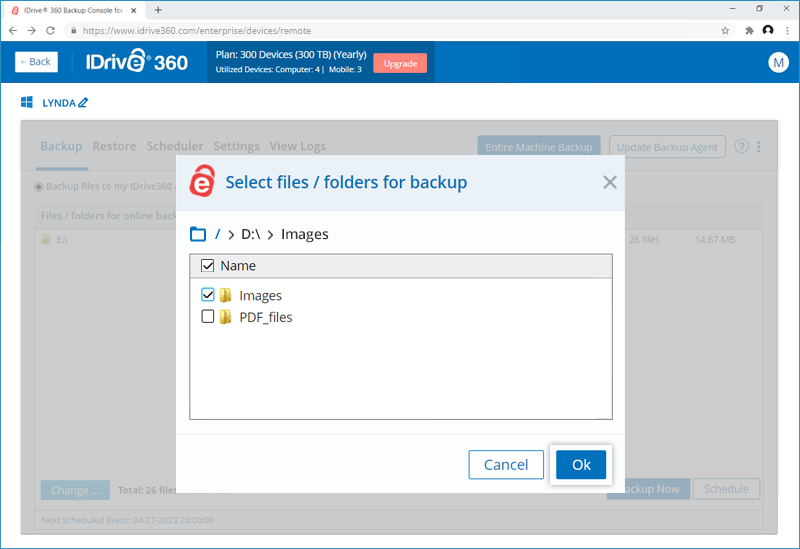
- Click 'Backup Now' to perform immediate backup of your files.
- Alternatively, click 'Schedule' and set the schedule parameters to run a scheduled backup.
Does IDrive® 360 support the backup of BitLocker-enabled drives?
Yes, IDrive® 360 supports the backup of BitLocker-enabled drives. To backup a BitLocker-enabled drive, first, we need to unlock the drive using the password. Once unlocked, the drive will be available for access to the operating system by authorized Windows users.
The gold-colored lock on the drive icon indicates the locked state of the drive. To unlock the BitLocker drive,
- Right-click on the BitLocker drive and select 'Unlock Drive'.
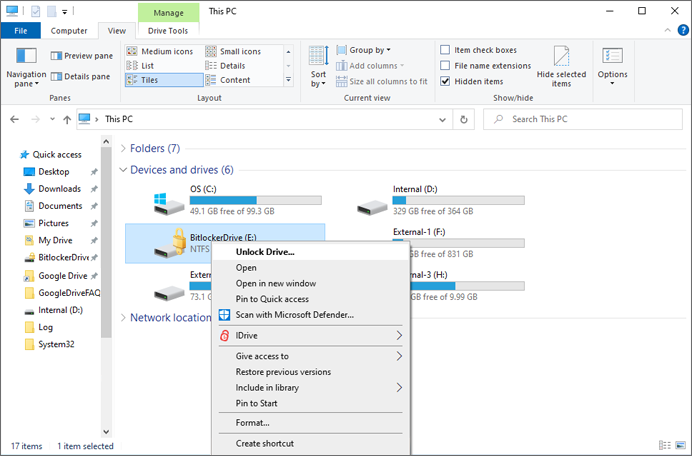
- Enter the password.
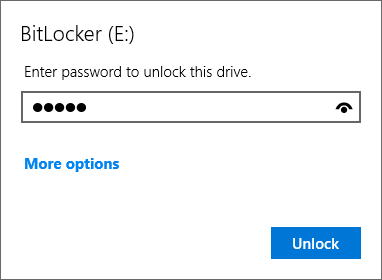
- Click 'Unlock'.
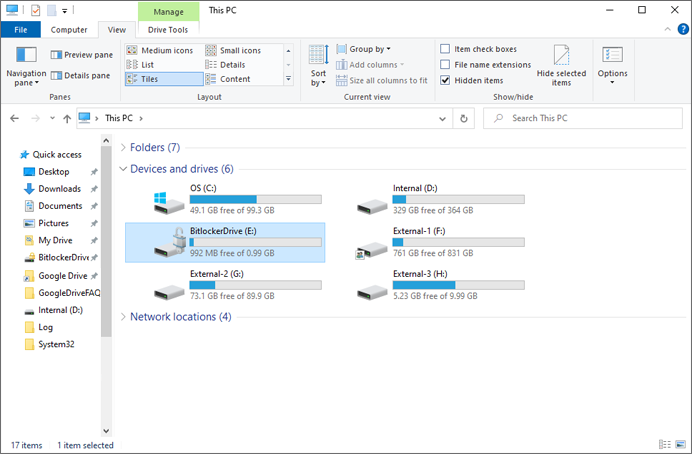
The drive will be unlocked. A silver-colored open lock on the drive icon indicates the drive is ready for Windows operating system access.
Once the drive is unlocked and available for access, either perform an interactive backup or schedule backup as per the requirements.
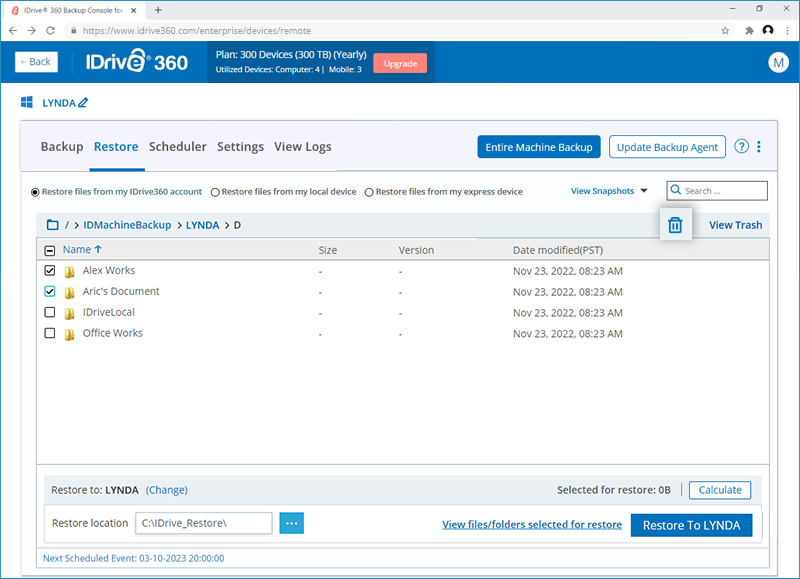
How do I restore my backed up data to a new computer in case my system crashes?
To restore your backed up data,
- Sign in to your IDrive® 360 account.
- In the 'Backup Console' -> 'Devices' tab, click the computer you wish to restore.
- Go to the 'Restore' tab. If you had set a private encryption key while signing in to the application for the first time, then provide the same.
- Choose 'Restore files from my IDrive360 account' if you want to restore files from the cloud or select 'Restore files from my local device' if you want to restore files from a local device.
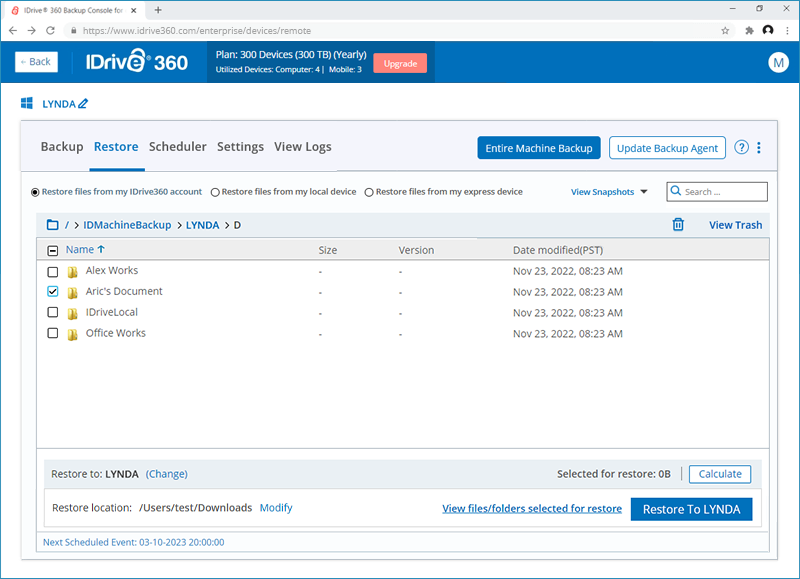
- Select the files or folders to restore.
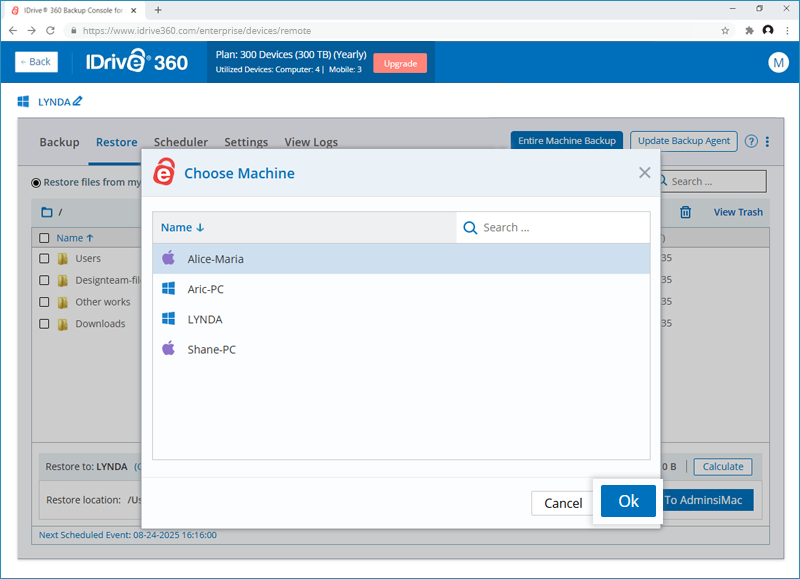
- Click 'Change' if you want to restore to a different computer. Select the desired machine and click 'Ok'.
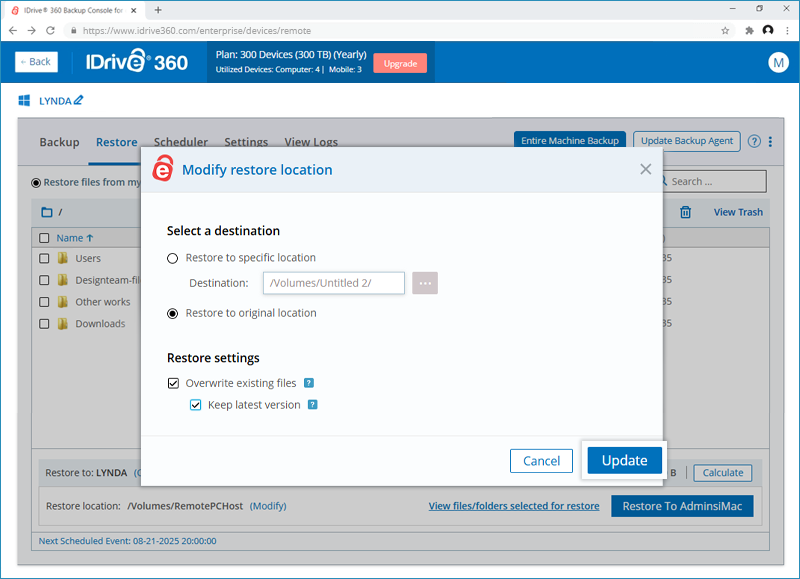
- A restore location on the target device is selected by default. Click 'Modify' to change the restore location.
- In the 'Modify restore location' popup, choose one of the following:
- Restore to specific location - Select a restore location on the local computer.
- Restore to original location - Restore files to their original path on the target computer.
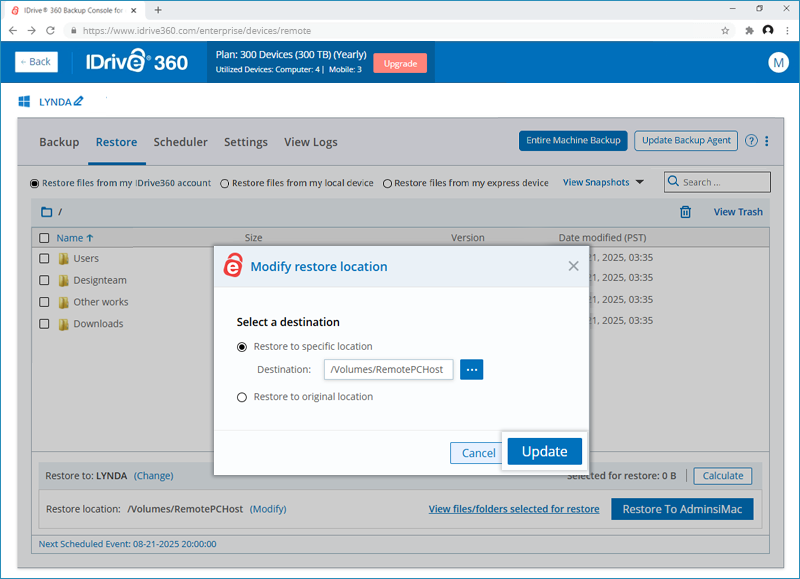
- When restoring to the original location, you can choose the restore settings to apply:
- Overwrite existing files – replaces files in the destination with the versions from backup.
- Keep latest version – restores newer files from cloud or local to the destination.
- Click 'Update'.
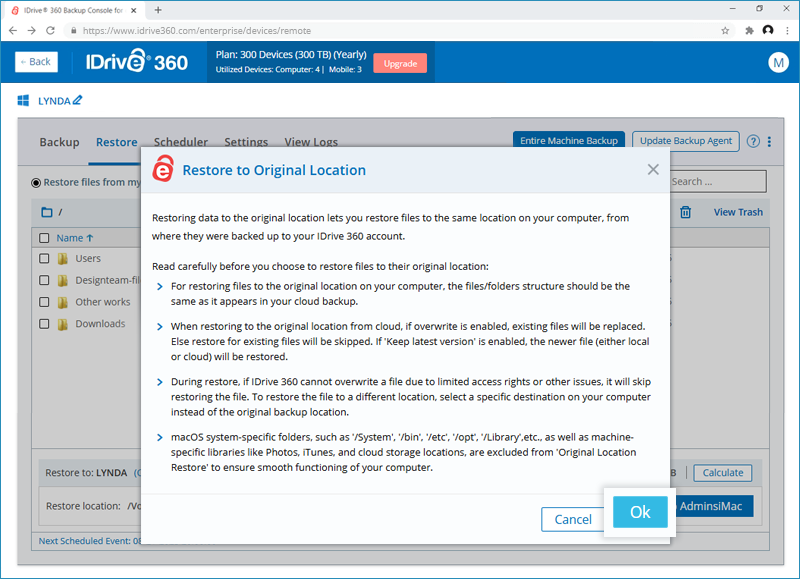
- Click 'Restore to <computer name>'.
How do I delete restored files and empty the trash?
To delete restored files,
- Sign in to your IDrive® 360 account.
- In the 'Backup Console' -> 'Devices' tab, click on the computer from where you wish to delete the restored files. The remote management console appears.
Alternatively, hover over the computer from where you wish to delete the restored files, click, and select 'Remote Management'. - Go to the 'Restore' tab. If you had set a private encryption key while signing in to the application for the first time, then provide the same.
- Select the restored files / folders you want to delete, and click
 .
.
- Select 'Yes' in the popup confirmation that appears.
All the deleted files/folders will be transferred to Trash.
To retrieve deleted files from the Trash,
- In the 'Restore' tab, click 'View Trash'.

- Select the files / folders you want to move back to their original location.
- Click
 .
.
The files will be moved back to their original location.
To empty the trash items completely,
- In the 'Restore' tab, click 'View Trash'.
- Click 'Empty Trash' and select 'Yes' in the popup confirmation that appears.
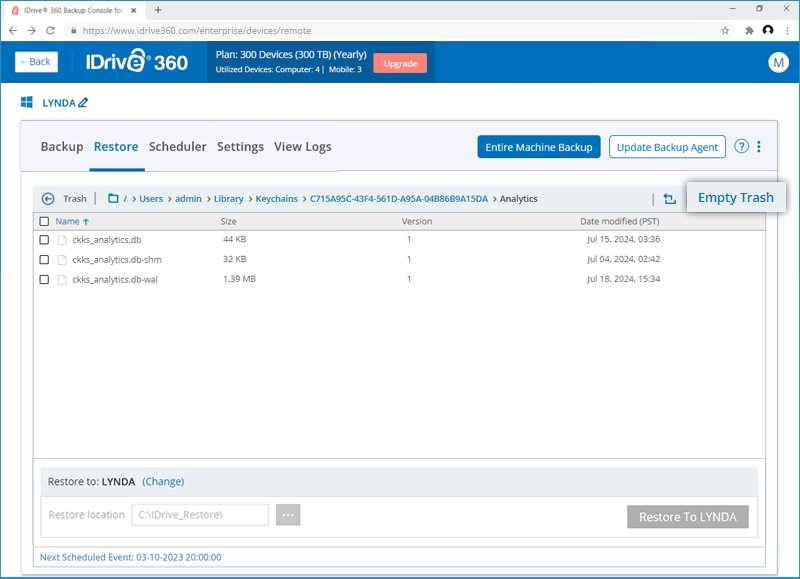
Note: Files / Folders in trash will get automatically deleted after a period of 30 days.
How many computers can I add in one Company?
You can add a maximum of 5000 computers in one company.
Can I stop ongoing backups of all my devices in one click?
Yes, you can stop ongoing backups of all your devices present in a company, in one click.
To stop ongoing backups,
- Sign in to your IDrive® 360 account.
- In the 'Backup Console', go to the 'Devices' tab.
- Click the company name drop-down. The entire list of companies present will appear.
- Select the company in which you wish to stop the ongoing backup operations.
- Click the 'Stop all current backups' button.
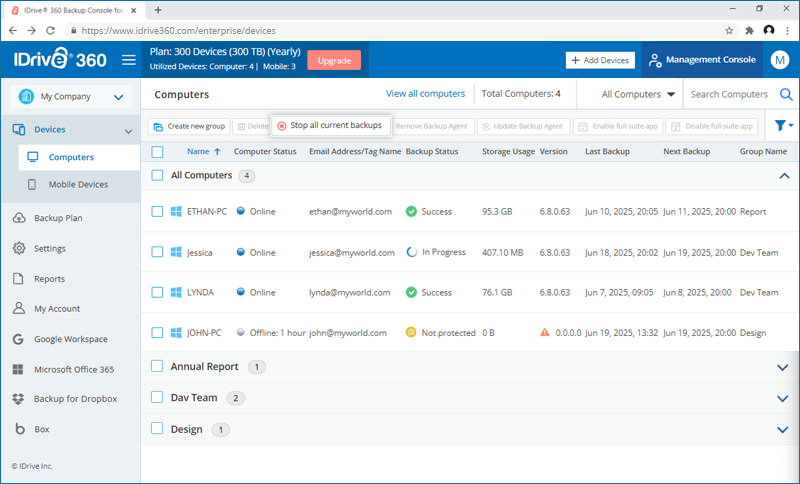
- In the confirmation popup that appears, click 'OK'.
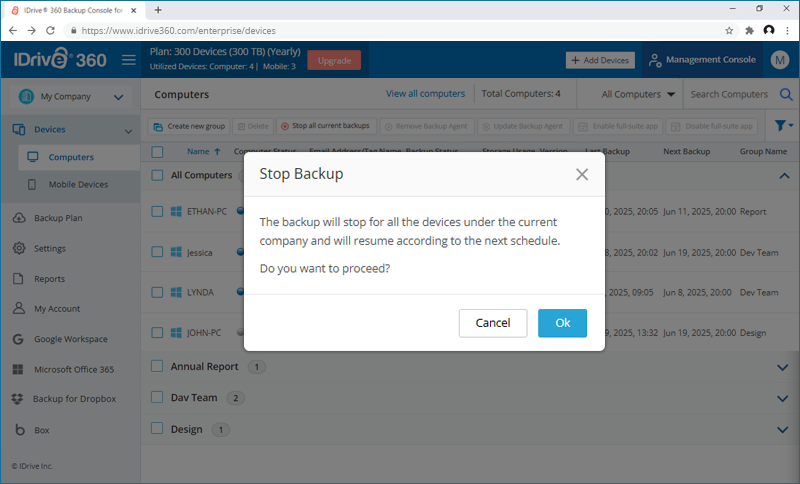
Note: All ongoing backups will stop and will resume at the next schedule. This operation may take some time.
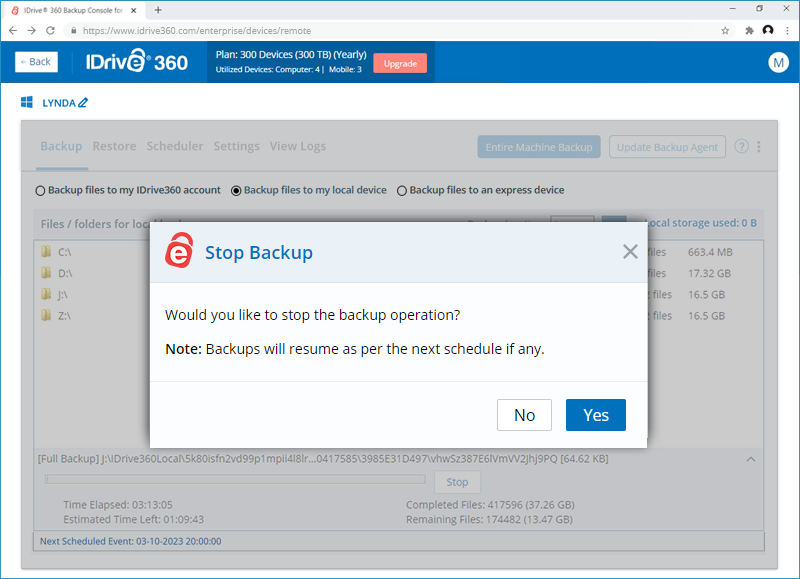
How do I stop an ongoing backup for my computer?
To stop an ongoing backup,
- Sign in to your IDrive® 360 account.
- In the 'Backup Console' -> 'Devices' tab, click on the computer you wish to stop the backup. The remote management console appears.
- Click 'Stop' beside the backup progress bar.
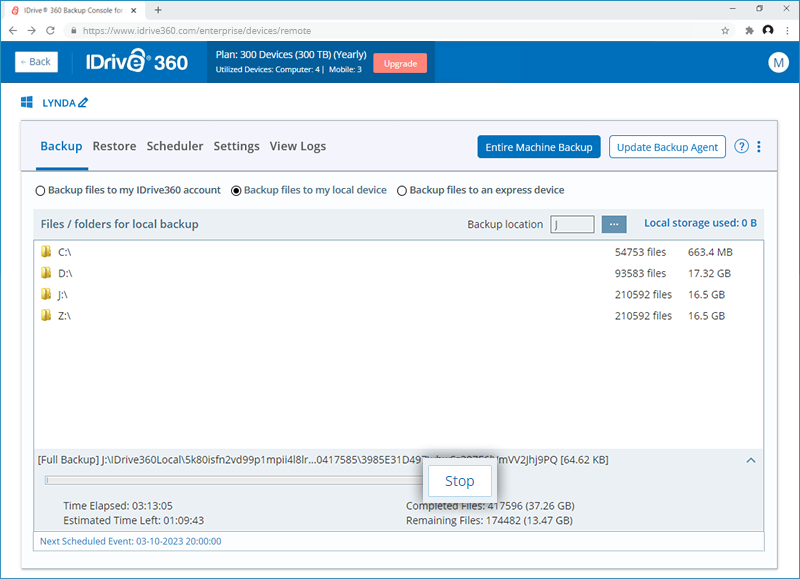
- In the confirmation pop-up window, click 'Yes'.
Can I remove the backup agent from a computer?
Yes, you can remove the backup agent from a computer.
To remove backup agent,
- Sign in to your IDrive® 360 account.
- In the 'Backup Console' -> 'Devices' tab, select the computers where you wish to remove the agent and click 'Remove Backup Agent'.
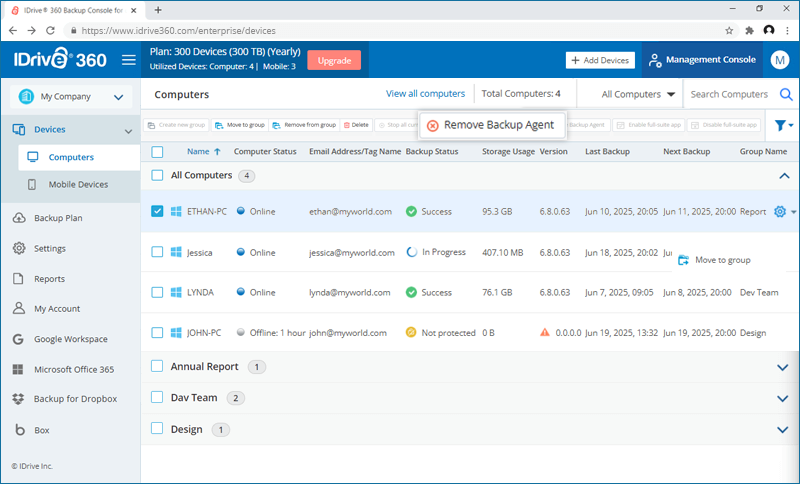
- In the 'Remove Backup Agent' popup that appears, click 'Remove'.
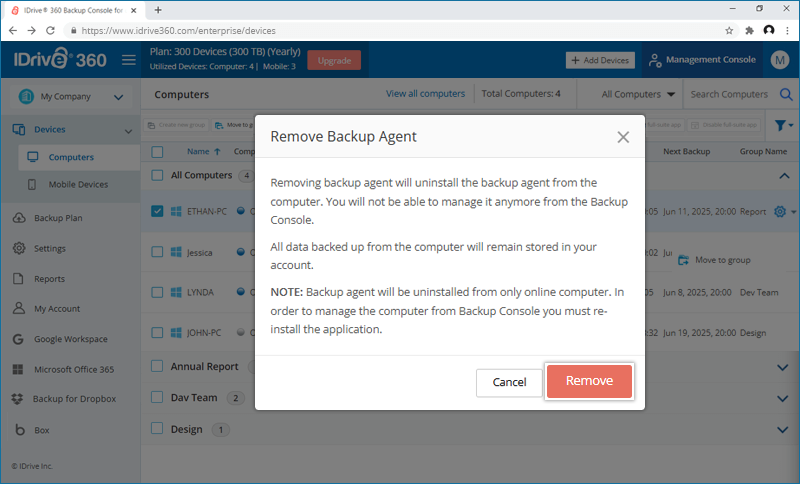
All the ongoing backups of the computer will stop and you will not be able to manage the computer from the Backup Console.
Can I enable or disable the full-suite app on multiple computers at once?
Yes. You can enable or disable the full-suite app on multiple computers in a single action.
To enable or disable the full-suite app,
- Sign in to your IDrive® 360 account.
- In the Backup Console > 'Devices' tab, select the computers you want to update.
- Click 'Enable full-suite app' to use full suite application on the selected computers.
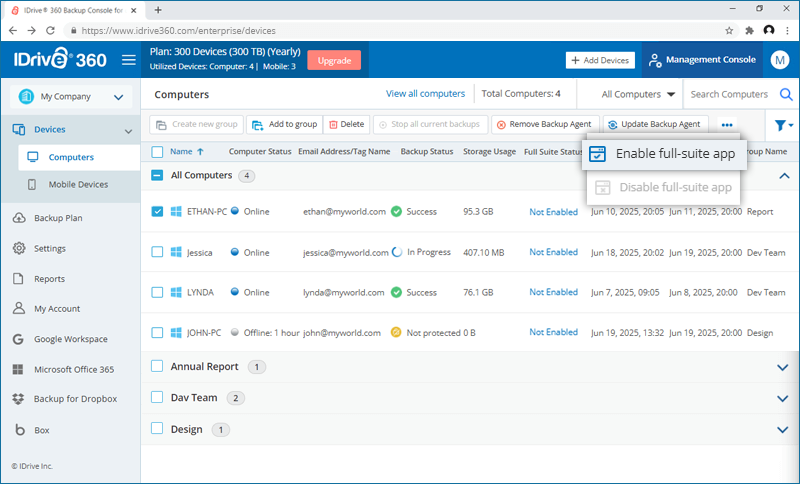
- Click 'Proceed'.

- Click 'Disable full-suite app' to stop using full suite application on the selected computers. These computers will use the thin client application.
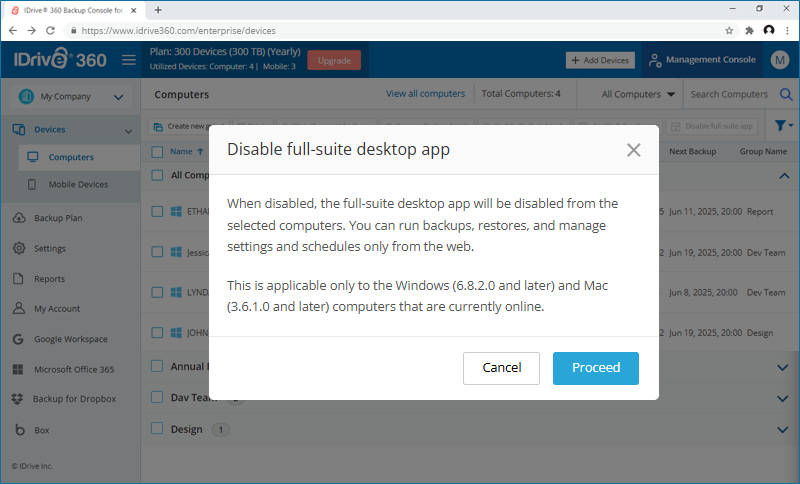
Note: Updates apply only to online machines; offline machines are excluded.
Is it possible to block a computer?
Yes, blocking a computer stops any ongoing or scheduled backup till it is unblocked.
To block a computer,
- Sign in to your IDrive® 360 account.
- In the 'Backup Console' -> 'Devices' tab, hover on the computer that you want to rename and click .
- Click 'Block' in the confirmation popup.
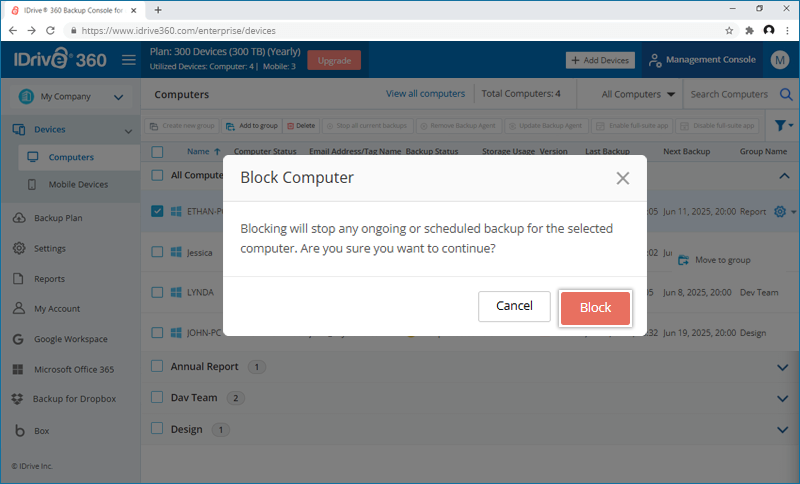
To unblock a computer, hover and click ![]() , select 'Unblock Computer' and click 'Unblock'.
, select 'Unblock Computer' and click 'Unblock'.
How do I update the backup agent on my computers?
You can update the backup agent on one or more computers from your IDrive® 360 account.
To update the IDrive® 360 backup application on a computer,
- Sign in to your IDrive® 360 account.
- In the Backup Console > 'Devices' tab, select the computers you want to update.
- Click 'Update Backup Agent'.
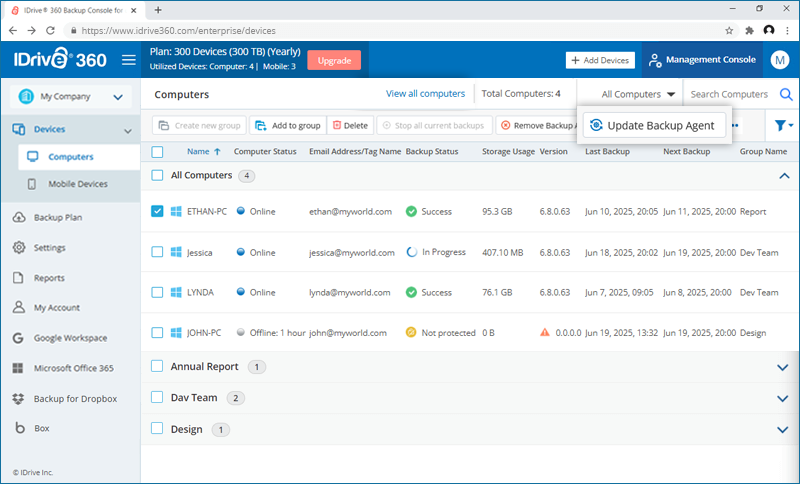
- Choose the version to install:
- Latest: Installs the newest available version of the backup agent.
- Previous Stable: Installs the most recent stable version from earlier releases.
- Click 'Update' to proceed.
Note:
- Desktop access via the web may be temporarily unavailable during installation.
- Make sure no backup or restore operations are in progress before starting the update.
- The update applies only to computers that are currently online.
A backup plan is a set of rules that specify how the data will be protected on a particular computer.
On creating your IDrive® 360 account, a backup plan is created by default with predefined folders and applied to the added computer. The same can be viewed from the 'Backup Plan' tab. You can modify the backup rules, rename the plan name, disable the same, but you cannot delete the default backup plan.
Note: If no backup plan is assigned while adding the device, the default backup plan is applied automatically.
You can also create a backup plan with specific backup configurations and push it to selected computers / groups in a go.
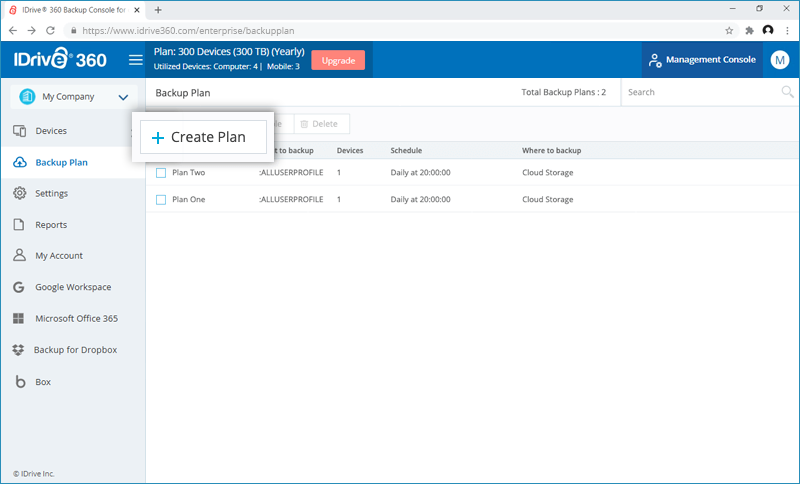
To create a backup plan,
- Sign in to your IDrive® 360 account.
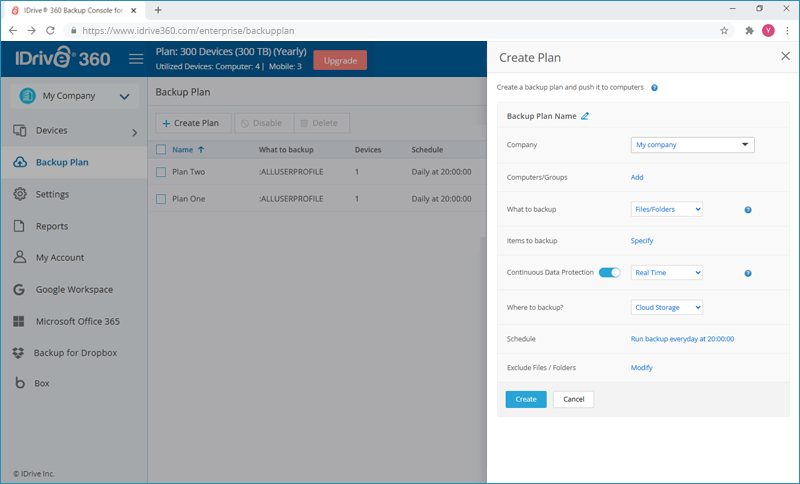
- In the 'Backup Console', go to the 'Backup Plan' tab and click 'Create Plan'.
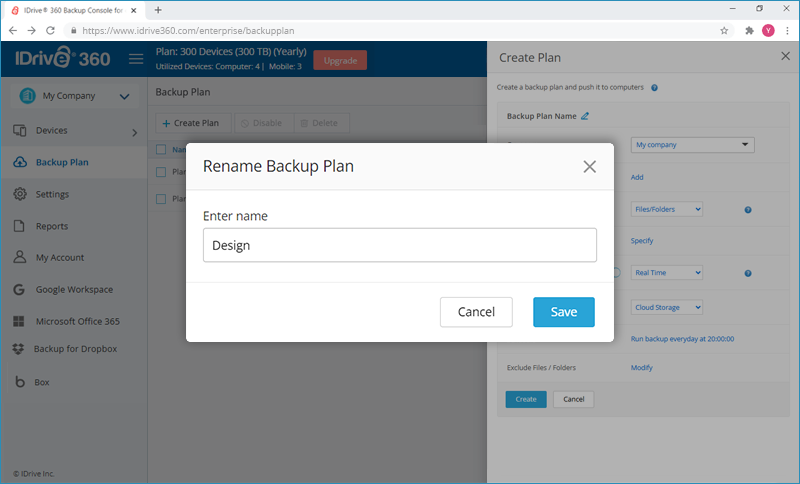
- Hover over the default plan name, click
 and the 'Rename Backup Plan' popup appears. Enter the desired name and click 'Save'.
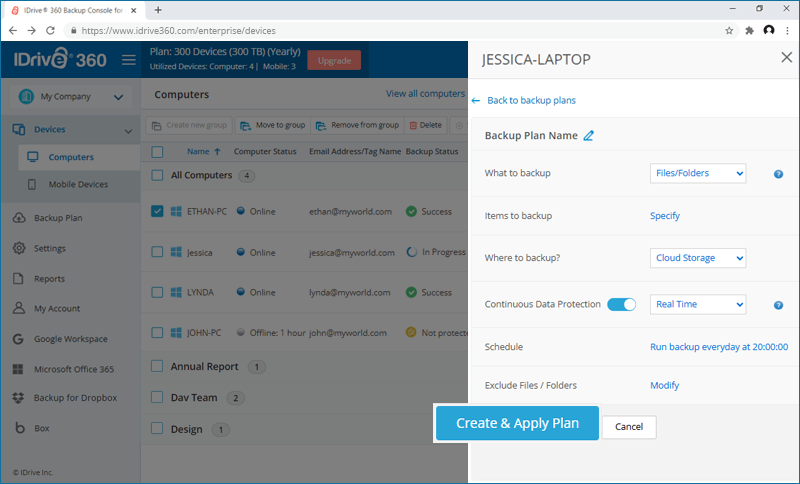
- Modify the menu options:
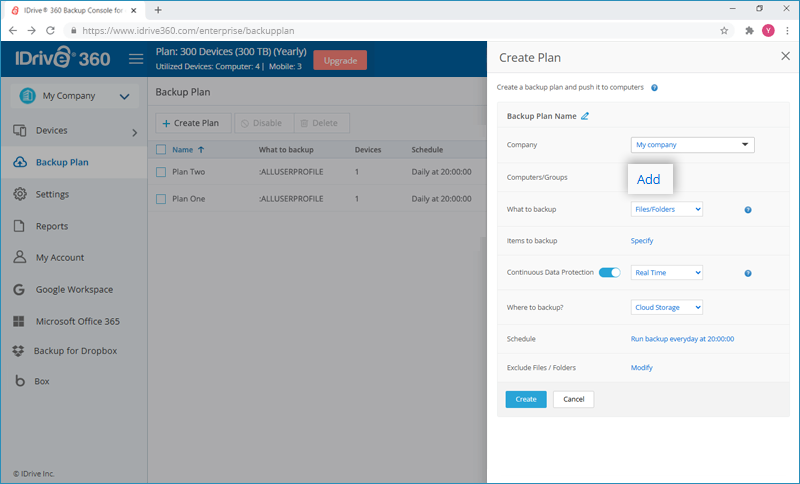
Computers/Groups: Click 'Add'. Select the computers or entire computer groups to be added from the 'All Computers' or 'Groups' tab respectively. Click 'Done'.
What to backup?: Files/Folders are selected by default. You can select 'Entire Machine' if required.
Items to backup: Click 'Specify'. From the 'Using policy rules' drop-down list choose the items for backup. Click 'Customize' to add items to the backup set. Click 'Done'.
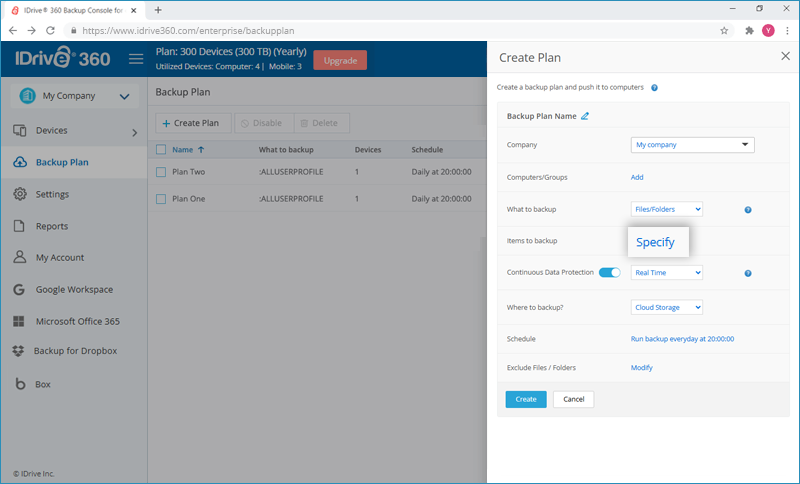
Continuous Data Protection: In the 'Continuous data protection (CDP) section, check the 'Enable continuous data protection' option and set the frequency from the drop-down list.
Where to backup?: Choose 'Cloud Storage' or 'Local Storage' as backup destination.
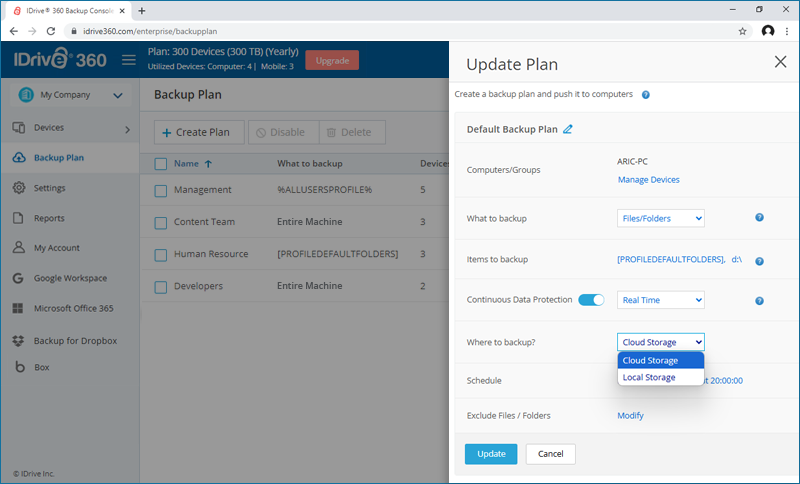
Note: If you select 'Local Storage', the 'Path' field will appear. Enter a valid path where the backup should be saved.
If no path is specified, a default location is used based on the destination computer:
Windows: C:\ drive
macOS: Current system volume (for example, Macintosh HD; volume name may vary)
Linux: /tmp
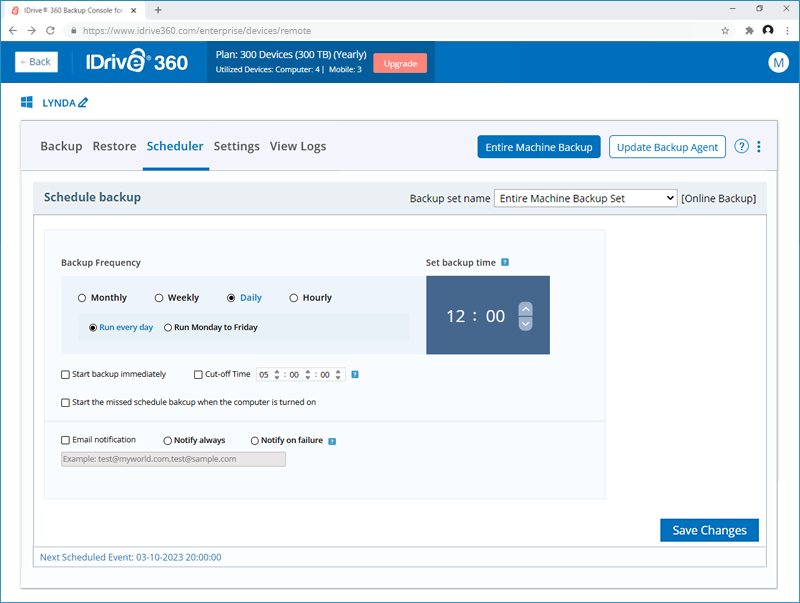
Schedule: You can set your backup schedule here and click 'Done'.
- Backup start time: Set the time at which your scheduled backup should start.
- Daily schedule: Select this option to run your backup jobs daily.
- Weekday(s): Select the days of the week when you wish to run your backup jobs.
- Start backup immediately: Select this option to run a backup job immediately.
- Cut off time: Set the time at which your scheduled backup should stop.
- Email notification: Select this option to receive email notifications on the status of the scheduled backup job. Enter the email address on which you want to receive the notifications.
- Notify always - Select this option to get notifications always.
- Notify on failure - Select this option to get the notifications only when there are failures.
- Start the missed scheduled backup when the computer is turned on: Select this option to resume a missed scheduled backup job due to the computer being turned off.
Exclude Files / Folders: Click 'Modify'. Exclude hidden or system files from the backup set. Add full or partial file/folder names to exclude them from being backed up. Click 'Done'.
- Click 'Create'.
Once created, the backup plan will be applied automatically to the selected computers/groups and the backup will start immediately or at the scheduled time, as per the chosen option.
Note: During software reinstallation or version updates, the existing backup plan is retained and the selected backup plan is not applied.
The selected backup plan is applied only during:
- First-time machine registration
- Re-adding an archived or deleted machine
Can I define a backup rule for selecting files in my backup plan?
Yes, you can define a backup rule to select files or folders in all your backup plans.
There are two ways to do this: by using policy rules or through a customized selection method.
To select files/folders using policy rules,
- Sign in to your IDrive® 360 account.
- In the 'Backup Console', go to the 'Backup Plan' tab and click 'Create Plan'.
- Under 'Items to backup', click 'Specify' and select 'Using policy rules'.

- Click
 and select any of the predefined rules.
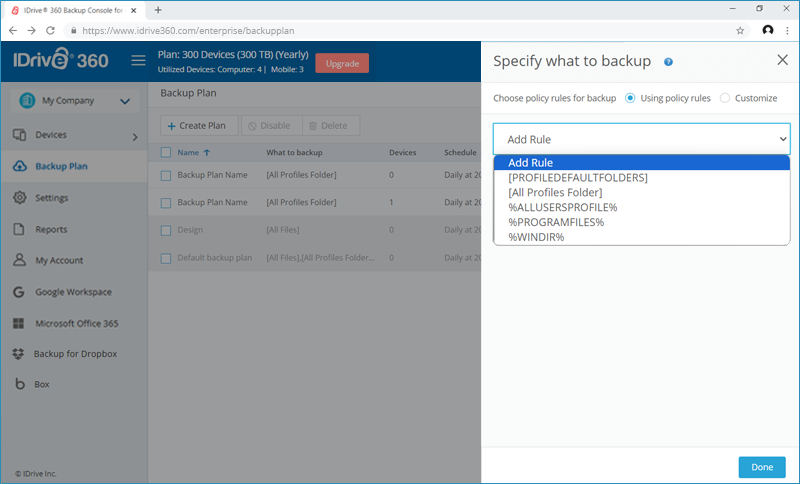
- Click 'Done'.
The selected policy rules will apply to all machines included in the backup plan. If a machine does not contain any data that matches at least one of the selected rules, the backup will fail for that machine.
Selection rules for Windows:
- [PROFILEDEFAULTFOLDERS]: Select the default user profile folders (for example, C:\Users\Anna\Desktop\, C:\Users\Anna\Documents\, C:\Users\Anna\Music\, C:\Users\Anna\Pictures\ and C:\Users\Anna\Videos\).
- [All Profiles Folder]: Selects the folder where all user profiles are located (usually, C:\Users\).
- %ALLUSERSPROFILE%: Selects the folder where the common data of all user profiles is located (usually, C:\ProgramData).
- %PROGRAMFILES%: Selects the Program Files folder (for example, C:\Program Files\).
- %WINDIR%: Selects the folder where Windows is located (for example, C:\Windows\).
Selection rules for Mac:
- [PROFILEDEFAULTFOLDERS]: Select the default user profile folders (for example, /Users/JOHN/Desktop/.txt, /Users/JOHN/Desktop/F.txt, /Users//Desktop/.
- [All Profiles Folder]: Selects the folder where all user profiles are located by default. (usually, /Users/).
Selection rules for Linux:
- [All Files]: Selects root volume of the machine.
- [All Profiles Folder]: Selects /Home. This is the folder where all user profiles are located by default.
- [PROFILEDEFAULTFOLDERS]: Select the default user profile folders (for example, /Users/Anna/Desktop, /Users/Anna/Documents, /Users/Anna/Pictures and /Users/Anna/Music).
To customize and select files/folders:
- In the 'Backup Console', go to the 'Backup Plan' tab and click 'Create Plan'.
- Under 'Items to backup', click 'Specify' and select 'Customize'.
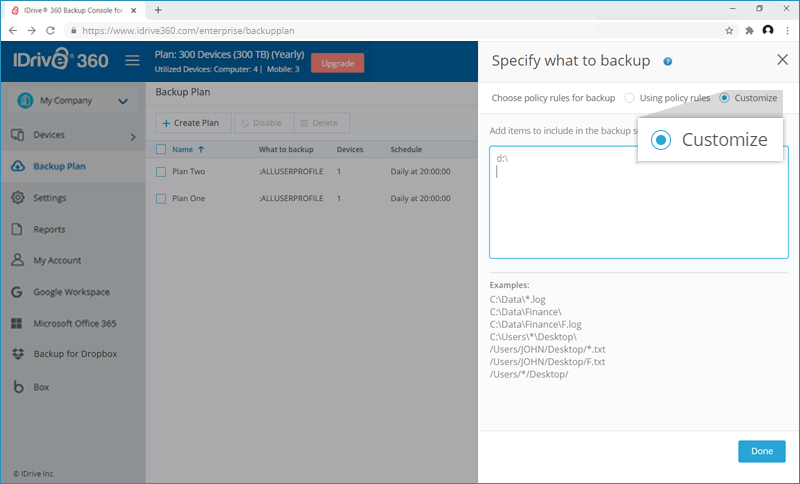
- In the text box, enter the file/folder name, partial name or path of the items to include in the backup set.
Examples: C:\Data\*.log, C:\Data\Finance\, C:\Data\Finance\F.log, C:\users\*\Desktop\, /Users/JOHN/Desktop/*.txt, /User/JOHN/Desktop/F.txt, /Users/*/Desktop/, etc.
Note:
- You can use %CurrentProfile% as a placeholder for the active profile name on Windows or Mac machines. During execution, this will be replaced with the actual username on the machine.
For example,
On Windows: C:\Users\%CurrentProfile%\Desktop\ will appear as C:\Users\John\Desktop\ in the backup set.
On Mac: /Users/%CurrentProfile%/Desktop/ will appear as /Users/John/Desktop/ in the backup set. - You can also add your external drives to the backup set. The external drives must be available at the time of backup.
- You can use %CurrentProfile% as a placeholder for the active profile name on Windows or Mac machines. During execution, this will be replaced with the actual username on the machine.
- Click 'Done'
How to apply a backup plan to my computer?
To apply backup plan to a computer,
- Sign in to your IDrive® 360 account.
- Navigate to 'Devices' > 'Computers'.
- Hover on the computer for which you wish to assign a backup plan. Click
 and select 'Manage Backup Plan'.

- To select an existing backup plan, click 'Apply' beside the backup plan and the plan will be applied.
Alternatively, click 'Create Plan' if you wish to create a new plan. Select the backup parameters and click 'Create & Apply Plan'.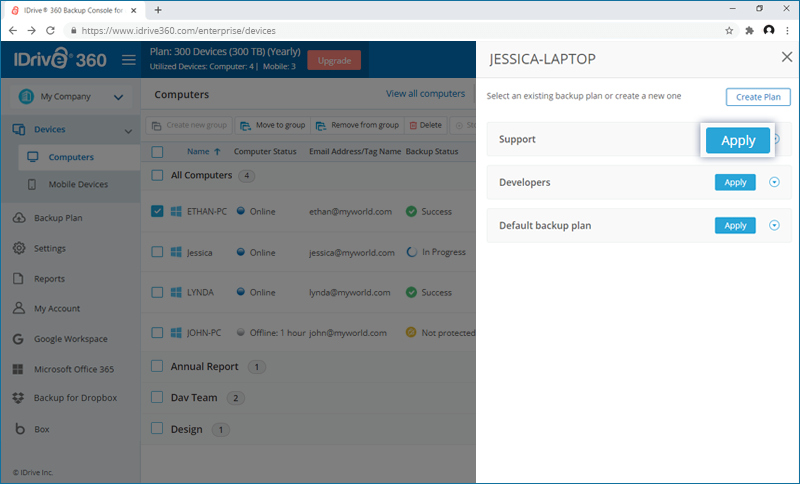
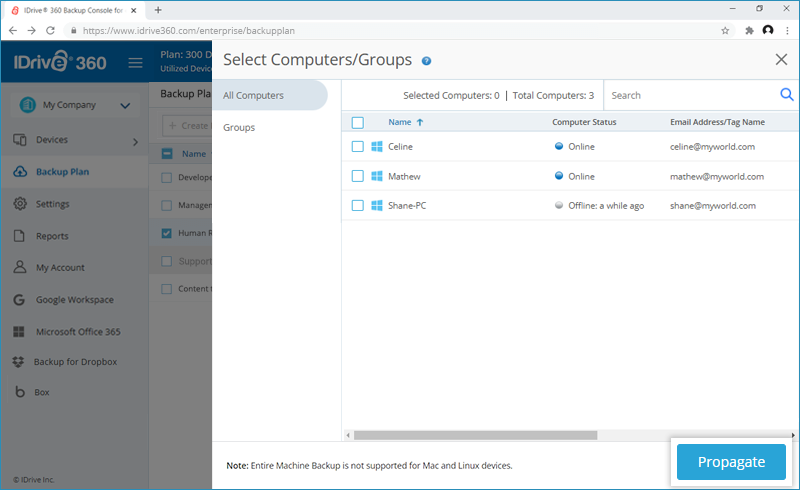
How do I Propagate backup plans to Devices and Groups?
To propagate a backup plan,
- Sign in to your IDrive® 360 account.
- In the 'Backup Console', go to the 'Backup Plan' tab.
- Hover on the backup plan name you wish to propagate, and click
 .
.

- Select the Devices or Groups to which you want to propagate the backup plan from the 'All Computers' or 'Groups' tab, respectively.
- Click 'Propagate'.
How can I view the propagation status of a backup plan?
To view the propagation status,
- Sign in to your IDrive® 360 account.
- In the Backup Console, go to the 'Backup Plan' tab.
- Click
 corresponding to the required plan.
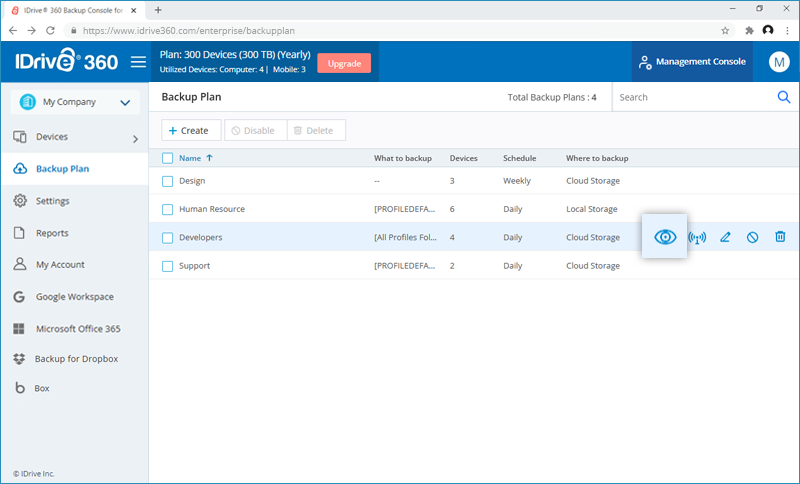
- The 'View Backup Plan Propagation' slider appears on the right-hand side.
The slider displays the number of devices where the plan status is 'Applied', 'Pending', or 'Failed'.
Click 'View List' to see the detailed list of computers under each status.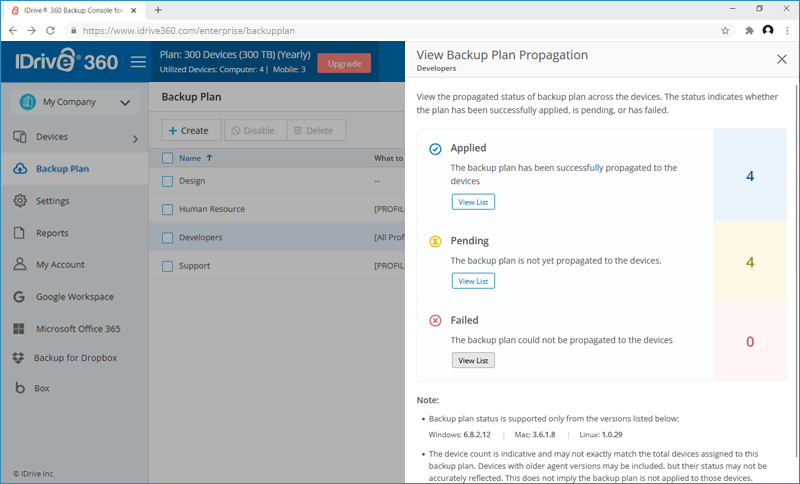
What is Continuous Data Protection (CDP)? How do I enable CDP?
The Continuous Data Protection (CDP) feature automatically recognizes the changes made to the files in your backup set and starts the backup operation in near real-time. The temporary files, system files, network / mapped/external drives are excluded from the operation.
To enable CDP for a backup plan,
- Sign in to your IDrive® 360 account.
- In the 'Backup Console', go to the 'Backup Plan' tab and navigate to the backup plan you wish to modify. Hover on the backup plan name and click
- Enable 'Continuous Data Protection' and set the frequency from the drop-down list.
- Click 'Update'.
What are the advantages of Continuous Data Protection?
Following are the advantages of Continuous Data Protection:
- It prevents loss of data as the modified contents of the files are backed up automatically.
- Frequently modified data starts getting backed up in near real-time. Thus, you can accurately restore an earlier version created on the same day.
Does Continuous Data Protection work if an immediate or scheduled backup job is running?
If an immediate backup is initiated or scheduled backup job is running, Continuous Data Protection (CDP) will be skipped. Once the ongoing backup job is complete, CDP will resume in near real-time (if set) for changes made to the files in your backup set.
Note: CDP is not a replacement for the scheduled backup operation. Scheduled backups protect all the files in your backup set and take place even if you have enabled Continuous Data Protection.
I have received a conflict alert while creating a backup plan. What should I do?
A conflict may occur when you try to create a backup plan for a device that is already part of another backup plan.
In such cases, you can view the details of the conflict and choose to remove the existing backup plan for the device and apply the new plan for the same. The already applied plans will then be disabled for the devices.
Can I disable the backup plan?
Yes, you have the option to disable a backup plan.
To disable,
- Sign in to your IDrive® 360 account.
- In the 'Backup Console', go to the 'Backup Plan' tab and select the backup plan you wish to disable.
- Click the 'Disable' button.
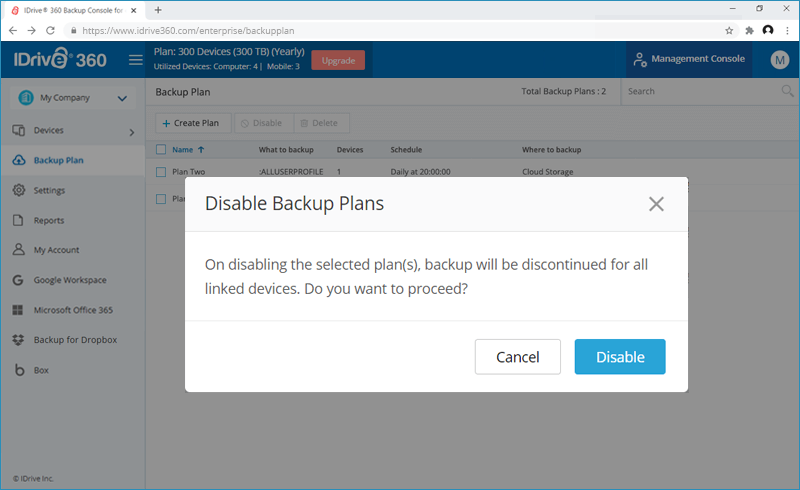
- In the popup that appears, click 'Disable'.
To enable the same, select the backup plan and click the 'Enable' button. Click 'Yes' in the popup that appears.
How can I delete a backup plan?
To delete a backup plan,
- Sign in to your IDrive® 360 account.
- In the 'Backup Console', go to the 'Backup Plan' tab and select the backup plan you wish to delete.
- Click the 'Delete' button.
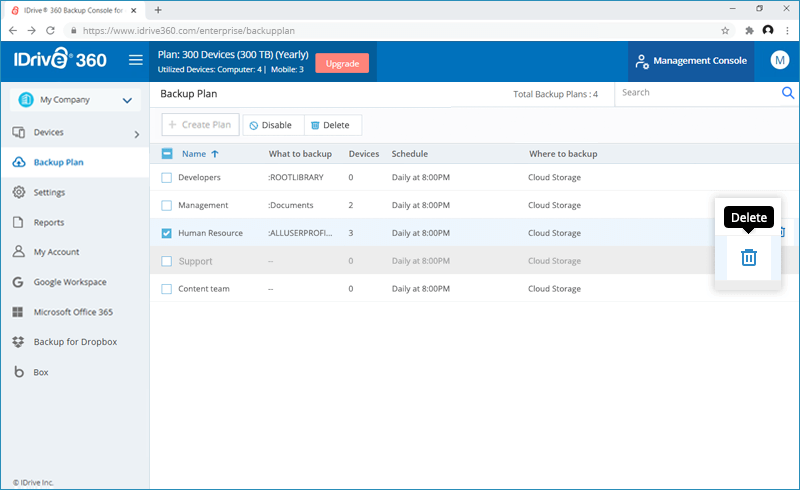
- In the popup that appears, select the confirmation checkbox and click 'Delete'.
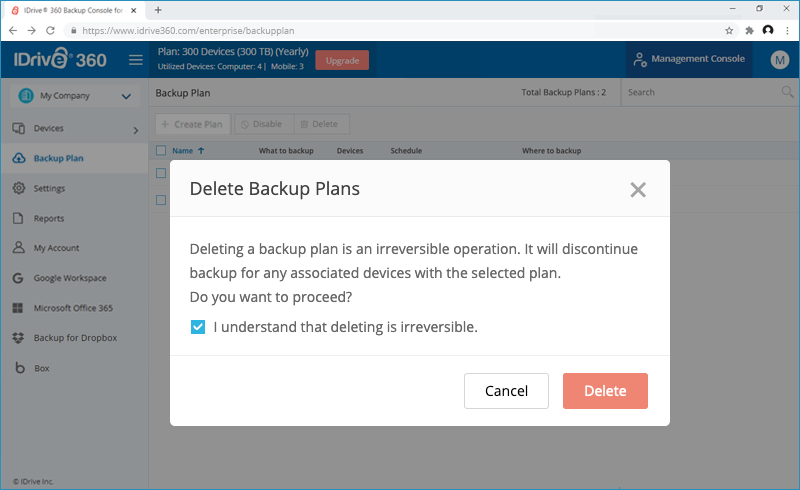
On deleting a backup plan, all the backups with the configured settings will be discontinued for the associated devices.
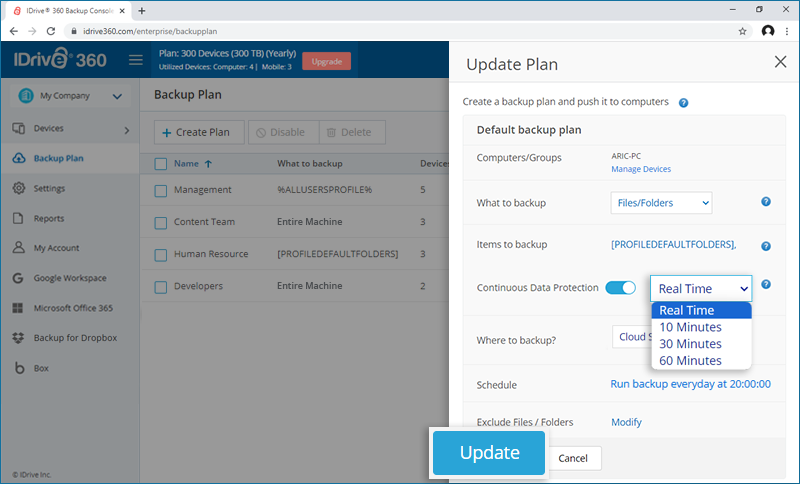
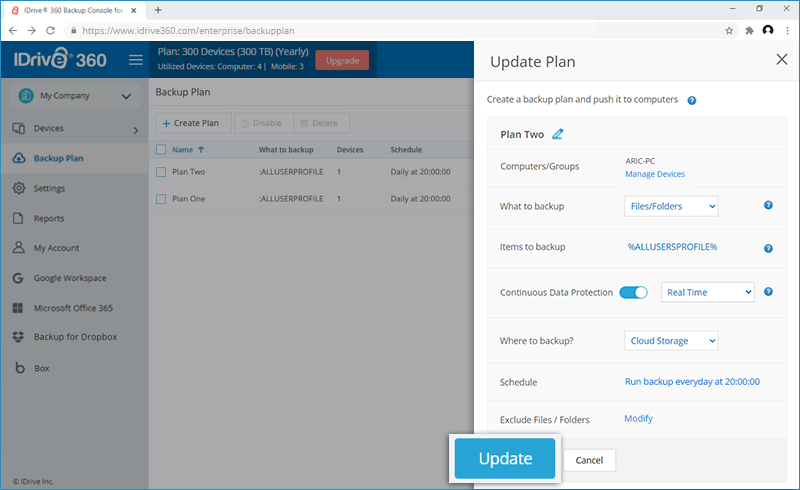
How do I modify an existing backup plan?
To modify an existing backup plan,
- Sign in to your IDrive® 360 account.
- In the 'Backup Console', go to the 'Backup Plan' tab and navigate to the backup plan you wish to modify. Hover on the backup plan name and click .
- In the 'Update Plan' screen that appears, modify your backup plan details and click 'Update'.
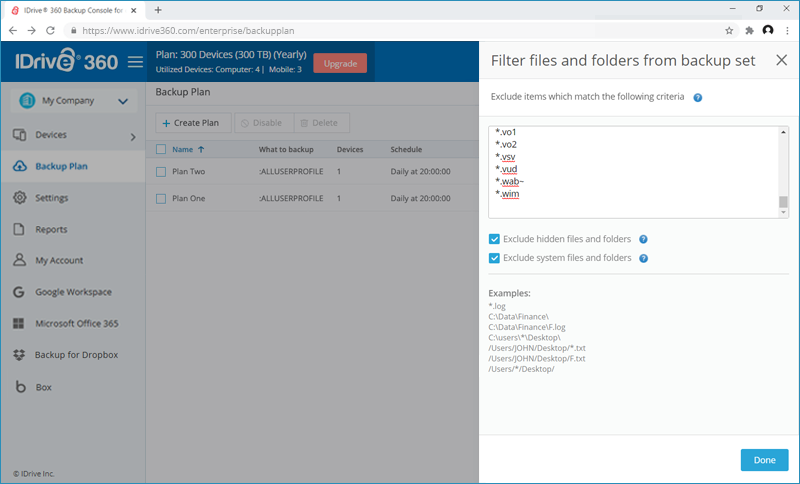
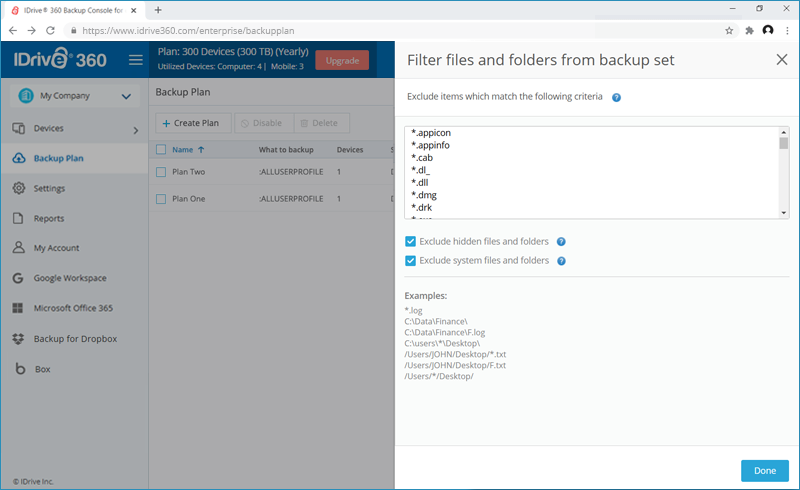
How can I exclude certain files/folders from being backed up?
To optimize bandwidth certain file types and system folders are excluded from backup by default. You can choose to include these items for backup. You can also exclude other files/folders from being backed up, based on full path names or partial names.
To modify files/folders excluded from backup,
- Sign in to your IDrive® 360 account.
- In the 'Backup Console', go to the 'Backup Plan' tab and click 'Create Plan'.
- In the 'Create Plan' screen that appears, click 'Modify' against the 'Exclude Files / Folders' field.
- Add or remove the files and folders you wish to exclude from backup, and click 'Done'.
To modify files/folders excluded from backup using the remote management console,
- In the 'Devices' tab, click on the required computer. The remote management console appears.
- Go to the 'Settings' > 'Exclude files'.
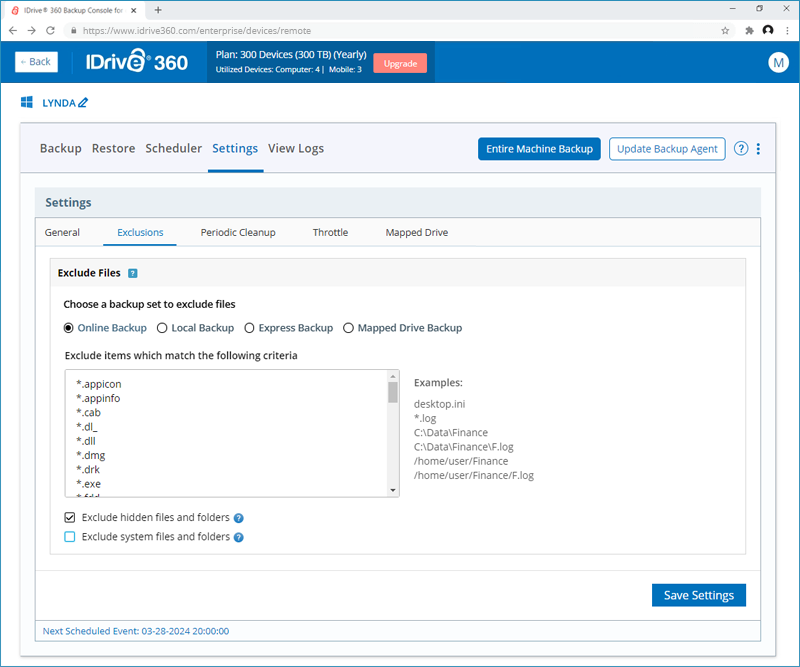
- Add or remove the files and folders you wish to exclude from backup in the 'Exclude items which match the following criteria' field.
- Configure these for online, local, and mapped drive backups using respective radio buttons.
- System files/folders and hidden files/folders are excluded by default. You can use the checkboxes to include these items for backup.
- Click 'Save Settings'.
Default Exclusion List
- Application & System Files
- Executable & Installer Files: .exe, .msi, .cab, .dl_, .dll
- System Files: .sys
- Virtual Machine & Disk Image Files
- Virtual Machine Files: .vdi, .vhd, .vhdx, .vmc, .vmdk, .vmem, .vmsd, .vmsn, .vmss, .vmx, .vmxf, .vsv, .vud, .nvram
- Disk Image & Backup Files: .iso, .sparseimage, .dmg, .hdd, .hds, .fdd, .wim
- Parallels VM Files: .pva, .pvi, .pvm, .pvs
- Log & Temporary Files
- Log Files: .log
- Temporary & Cache Files: .qtch, .menudata, .wab~
- Email & Data Storage Files
- Email Files: .ost
- Miscellaneous Files
- App & Config Files: .appicon, .appinfo
- Memory Dump & Debug Files: .mem, .drk
- iOS & Thumbnail Files: .ithmb
- Object Files
- Compiled Object Files: .o (Generated by compilers as intermediate object code before linking into an executable)
- System files and folders:
- C:\Windows\
- C:\Program Files (x86)\
- C:\Program Files\
- C:\pagefile.sys
- C:\hiberfil.sys
- Files and folders with System attribute
- /Library
- /Applications
- /Users/all users/Library/Cookies
- /Users/all users/Library/Logs
- /Users/all users/Library/Caches
- /Users/all users/Library/Saved Application State
- /Users/all users/Library/Containers/com.apple.mail/Data/DataVaults
- /Users/all users/Library/VoiceTrigger/SAT
- /dev/
- /run/
- /lost+found/
- /cdrom/
- /swapfile
- /proc/
- /sys/
These are executable files, system files, and installer-related files.
These are related to virtual machines, disk images, and snapshots.
These store logs, temporary data, and configuration.
These are used for email storage and application data.
These files are related to metadata, application configuration, and debugging.
For Windows:
For Mac:
For Linux:
Can I backup my mapped / external drives with IDrive® 360?
Yes, you can backup all your mapped / external drives with IDrive® 360.
To backup your mapped / external drives,
- Sign in to your IDrive® 360 account.
- Navigate to the 'Backup Console' > 'Devices' tab.
- Click on the computer where the mapped / external drives are connected. The remote management console appears.
- Click 'Change' and select the mapped / external drive connected to your computer, for backup.
- The selected drive appears under the 'Mapped and external drive files for online backup' section.
- Click 'Backup Now'.
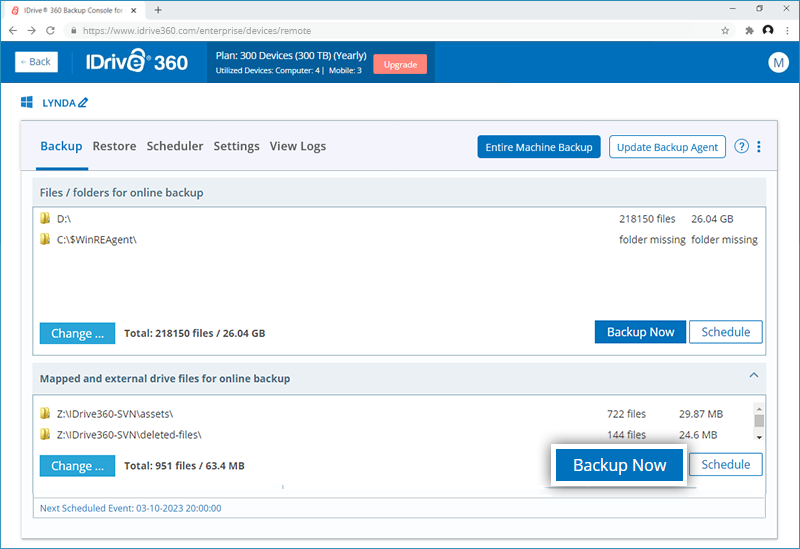
Note: The mapped / external drives must be available at the time of backup.
What are snapshots in IDrive® 360?
Snapshots provide a historical view of your data set, stored in your IDrive® 360 account, enabling point-in-time recovery. They are particularly useful if your files are corrupted by malware and you need to restore them to a previous recovery point.
A daily snapshot is automatically captured for the entire backed-up data of a computer at that specific point in time. This ensures efficient and consistent recovery points.
The daily snapshots are immutable and hence safe from any type of alteration due to human error or malware. This ensures backups are completely accurate and legal hold compatible.
Note: The snapshot-based functionality applies only to accounts created/devices added on or after 03-05-2024.
How to perform a snapshot-based restore in IDrive® 360?
To perform a snapshot-based restore,
- Sign in to your IDrive® 360 account.
- Navigate to 'Backup Console' -> 'Devices' and select the computer you want to restore.
- Go to 'Restore' and click 'View Snapshots'.
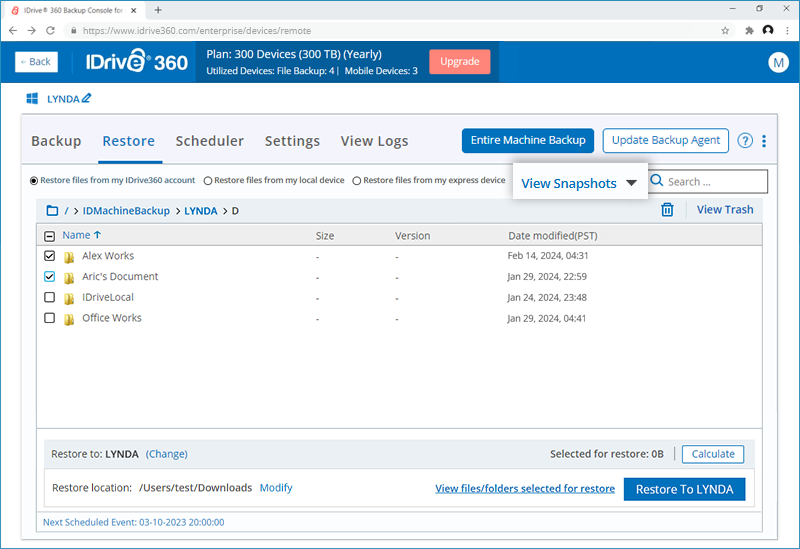
- Choose the snapshot date from the dropdown to view all data backed up on or before that date.
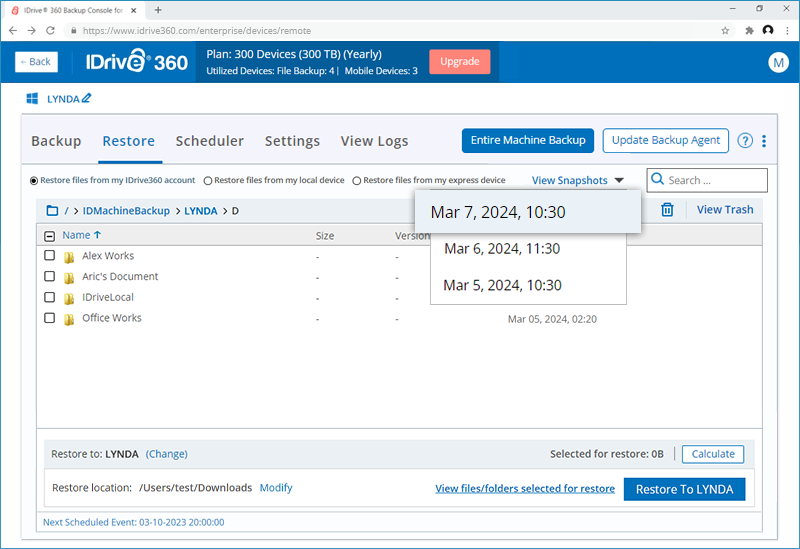
- Select the files or folders you want to restore.
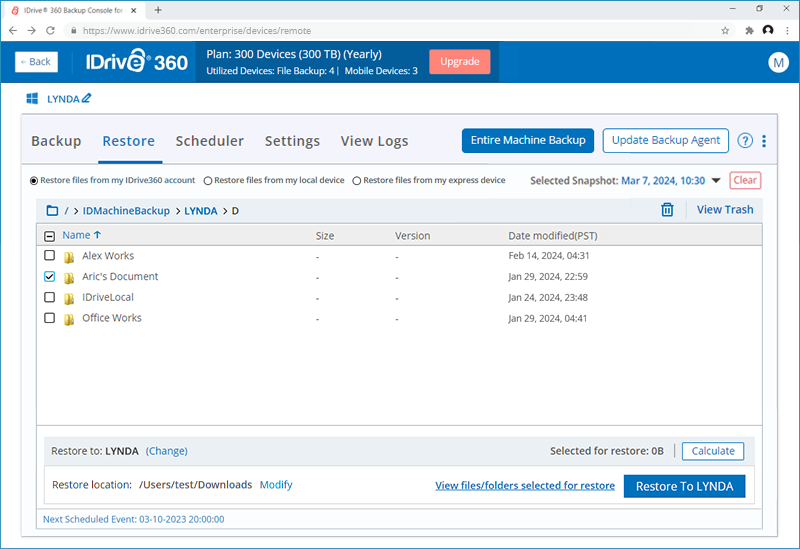
- Choose the target computer and the restore location.
- Click 'Restore to <computer name>' to initiate the restore process.
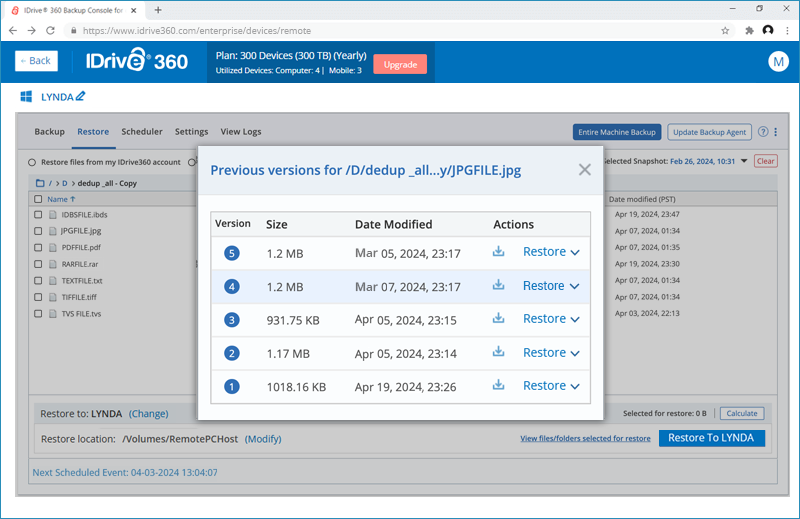
To restore a specific version of the file,
- Right-click on the file you want to restore.
- Click 'Version' to see all available versions of the file.
- Click
 next to the version you want to restore.
Note: The snapshot-based restore functionality applies only to accounts created/devices added on or after 03-05-2024.
How does versioning work in Snapshots?
In IDrive® 360, any changes made to a file in the backup set are backed up incrementally and saved as a version. Up to 30 versions of each file are stored, with only the latest version counting towards storage quota. You can choose to restore any of the 30 previous versions of a file.
With snapshot-based restore, you can even restore a version that is older than the 30th version. This is because when the daily snapshot is captured for a computer, all the files and their versions at that point in time are also captured. Therefore, you can easily select the required snapshot and choose the version you wish to restore.
What is immutable storage, and how does it work with IDrive® 360?
Immutable storage allows you to access deleted backups during a specified retention period. You can recover the content of these backups, but you cannot change the backup files or move them back to their original storage. When the retention period ends, the backups in immutable storage are permanently deleted.
IDrive® 360 automatically enables daily snapshots for your backups, and each snapshot is immutable by default and available in compliance mode. This mode prevents anyone, including the root user, from deleting or modifying the object until the retention period expires.
What is legal hold, and how is it supported by IDrive® 360?
Legal hold requires an organization to preserve data that may be relevant to a legal case. Legal hold requires not only that data be preserved but also that it be preserved in its present state until the hold is lifted. This means that changes to a database that may modify or delete data are not permitted while the litigation hold is in effect.
In IDrive® 360, admins can use the snapshots and use them for legal purposes for any given date and time.
From where can I manage the alerts and notifications for my backup settings?
You can set and manage your backup settings from the 'Backup Console' of your IDrive® 360 account.
To manage alerts and notifications settings,
- Sign in to your IDrive® 360 account.
- Click 'Settings' in the 'Backup Console' tab.
- Select the company or group where you wish to change the settings and go to the 'Alerts/Notification' tab. You can set the following options:
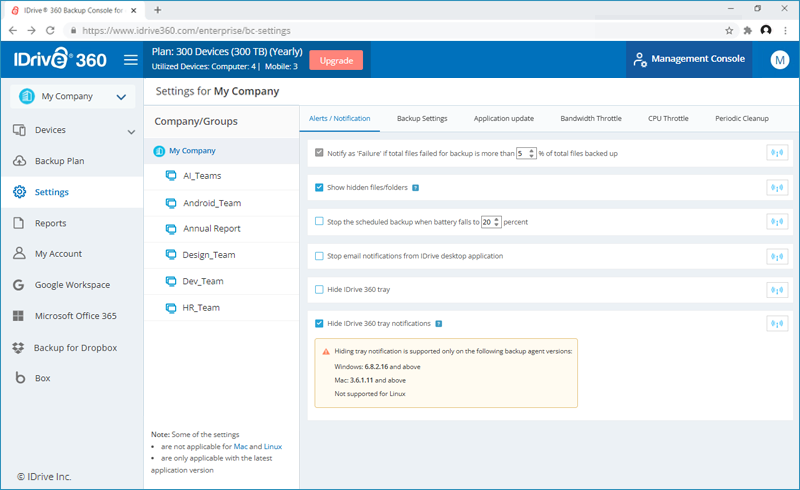
- Notify as 'Failure' if the total files failed for backup is more than '-' % of the total files backed up: The application will notify backup as 'Failure' if the number of files failed for backup is more than '-' % of the total files backed up.
- Notify as 'Failure' if the total files missing for backup is more than '-' % of the total files backed up: On selecting this option, the application will notify backup as 'Failure' if the total files missing for backup is more than '-' % of the total files backed up.
- Start IDrive Monitor on system startup: IDrive® 360 application interface will launch immediately after you startup your computer.
- Show hidden files / folders: You can choose this option to make IDrive® 360 show the hidden files and folders on your computers.
- Stop scheduled backup when battery fails to '-' percent: With this option, you can choose to stop ongoing scheduled backup whenever the laptop battery drops below a certain percent value. You can set the percentage.
- Stop the email notifications from IDrive desktop application: Select this option to stop from receiving email notifications from the IDrive® 360 desktop application.
- Hide IDrvie® 360 tray: Enable this option to hide the IDrive® 360 tray icon from the system tray on user computers.
- Hide IDrvie 360 tray notifications: Enable this option to stop displaying desktop notifications from the IDrive® 360 tray application.
To push these settings, click  against the particular settings you wish to push. The settings will be applied to the selected companies/groups. Click 'Yes' in the popup that appears.
Note: The settings to Start IDrive Monitor on system startup available for Mac only.
From where can I set the backup settings?
To set and manage the backup settings,
- Sign in to your IDrive® 360 account.
- Click 'Settings' in the 'Backup Console' tab.
- Select the company or group where you wish to change the settings and go to the 'Backup Settings' tab. You can set the following options:
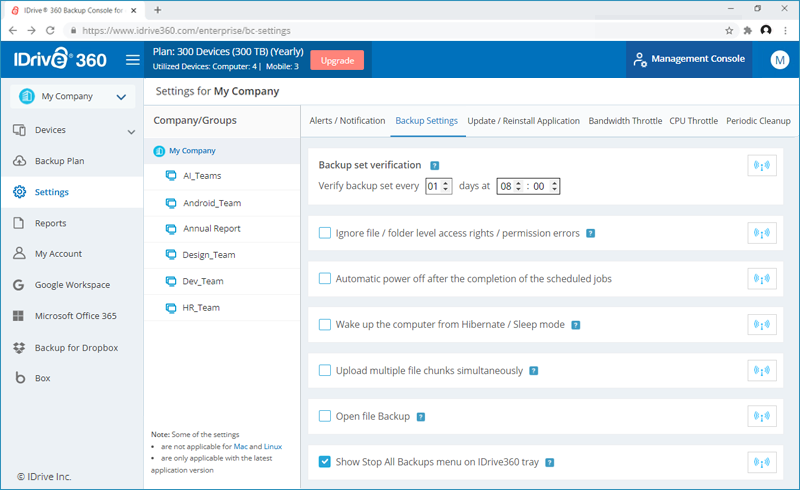
- Backup set verification: Set the interval to verify your backup set periodically.
- Ignore file /folder level access rights / permission errors: IDrive® 360 does not backup any file/folder in your backup set which has insufficient access rights/permissions. Hence in such a case, by default, your backup will be considered as Failure. You can enable this option to ignore file/folder level access rights/permission errors. IDrive® 360 will not consider this as an error and status of your backup will be displayed as Success.
- Automatic power off after the completion of the scheduled jobs: Your computer will be powered off automatically after the completion of the scheduled backup job.
- Wake up the computer from Hibernate/Sleep mode: IDrive® 360 will wake up the computer from Hibernate/Sleep mode and then perform the scheduled backup job.
- Upload multiple file chunks simultaneously: IDrive® 360 will optimize the transfer speed by uploading multiple file chunks simultaneously.
- Open file Backup: You can backup open files like Outlook files (.pst), QuickBooks, Quicken, ACT, MS Word, MS Excel, MS Money, MS Access, and MS FoxPro.
- Show Stop All Backups menu on IDrive360 tray: On selecting this, the Stop All Backups menu will be displayed on the IDrive 360 tray.
To push these settings, click against the particular settings you wish to push. The settings will be applied to the selected companies/groups. Click 'Yes' in the popup that appears.
Note: The 'Ignore file /folder level access rights / permission errors' and 'Open file Backup' options are not applicable for Mac.
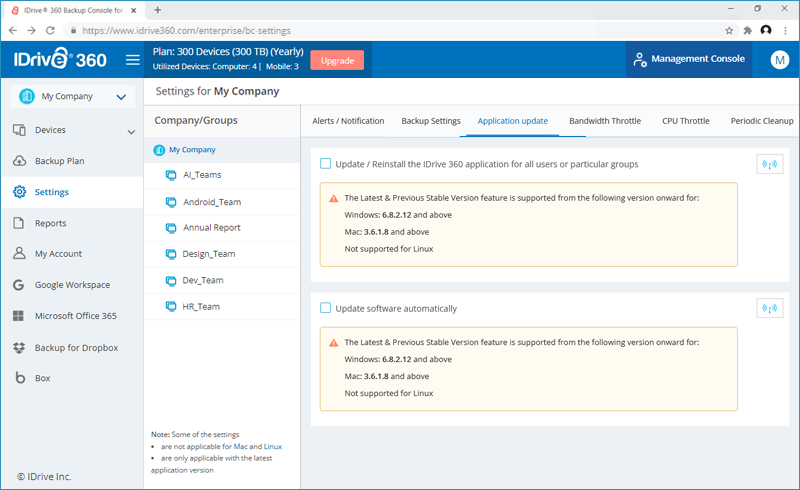
Can I update the IDrive® 360 application for all my users?
Yes. As an administrator of an IDrive® 360 account, you can automatically update or reinstall the IDrive® 360 application for all users or selected groups. You can choose to install either the latest version or the previous stable version.
To update or reinstall the application,
- Sign in to your IDrive® 360 account.
- Click 'Settings' in the 'Backup Console' tab.
- Select the company or group where you wish to change the settings and go to the 'Application update' tab.
- Choose the required update option.
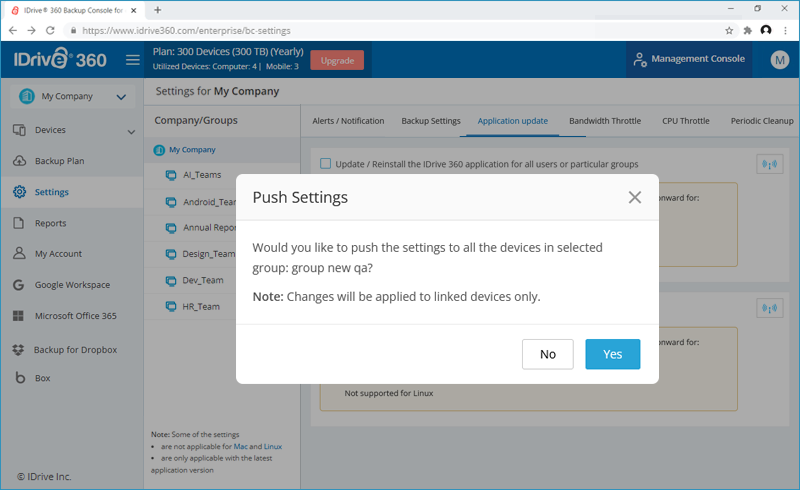
- Click to apply the settings for the company/group you have selected. Click 'Yes' in the popup that appears.
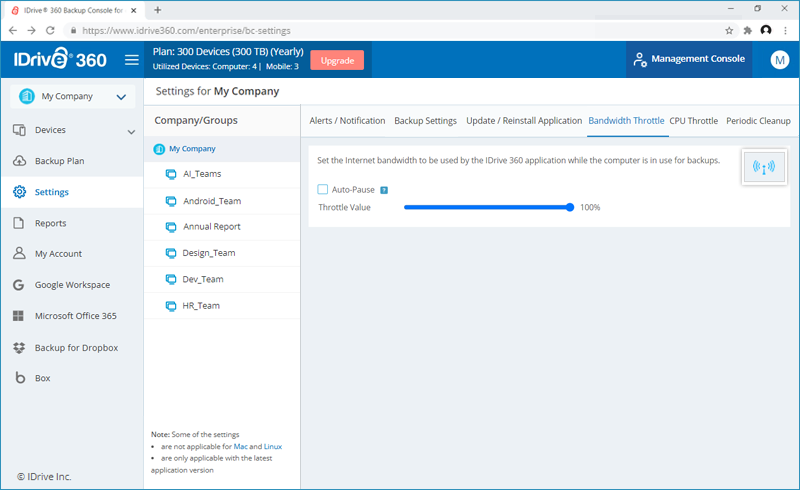
The 'Bandwidth Throttle' feature lets you set the Internet bandwidth to be used by the IDrive® 360 application for backups. By default, the bandwidth throttle value is set to 100%.
To enable Auto-Pause and change the bandwidth settings,
- Sign in to your IDrive® 360 account.
- Click 'Settings' in the 'Backup Console' tab.
- Select the company or group where you wish to change the settings and go to the 'Bandwidth Throttle' tab. You can set the following options:
- Auto-Pause: Enable 'Auto-Pause' to set the 'PC in use' and 'PC not in use' options.
- PC in use: This option lets you set the bandwidth to be used by IDrive 360 for backups, when it is in use. By default, it is set to 25%. This allows other applications to run without hindrance.
- PC not in use: This option lets you set the bandwidth to be used by IDrive 360 for backups when it is not in use. By default, it is set to 100%.
Use the sliders to set the bandwidth to be used, and click to apply the changes to the company or group selected. Click 'Yes' in the popup that appears.
The 'Periodic Cleanup' feature lets you make a one-to-one match of the local data in the backup set, with the same in your cloud account. If data is deleted from your computer that has already been backed up, the corresponding data in your IDrive® 360 account would get permanently deleted too.
To push Periodic Cleanup,
- Sign in to your IDrive® 360 account.
- Click 'Settings' in the 'Backup Console' tab.
- Select the company or group you wish to change the settings and go to the 'Periodic Cleanup' tab. You can set the following options:
- Periodic Cleanup: Enable 'Periodic Cleanup' to set up automated cleanup.
- Set the number of days and percentage of files to be considered for cleanup.
Click to apply the changes for the company or group selected. Click 'Yes' in the popup that appears.
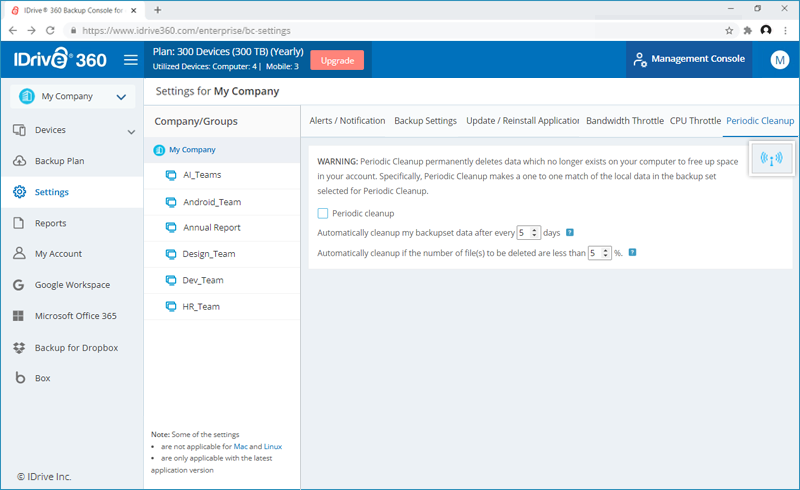
Note:
- Periodic Cleanup permanently deletes data which no longer exists on your computer to free up space in your account. Users will need to delete empty folders manually in order to remove them from the account.
- Periodic Cleanup may result in automatic deletion of data from your IDrive® 360 account. So use / set this option carefully.
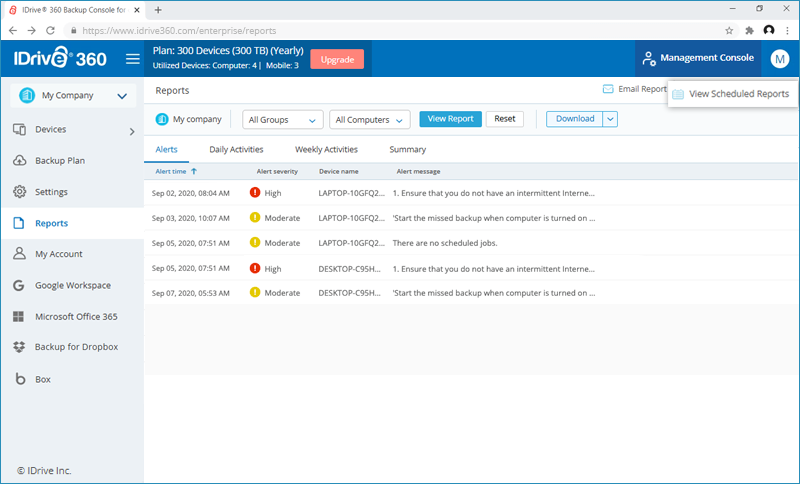
Can I view reports of my backup / restore operations?
Yes, you can view, schedule as well as download reports of your backup / restore operations.
To view reports,
- Sign in to your IDrive® 360 account.
- In the 'Backup Console', go to the 'Reports' tab.
- You can view alerts, and reports based on duration:
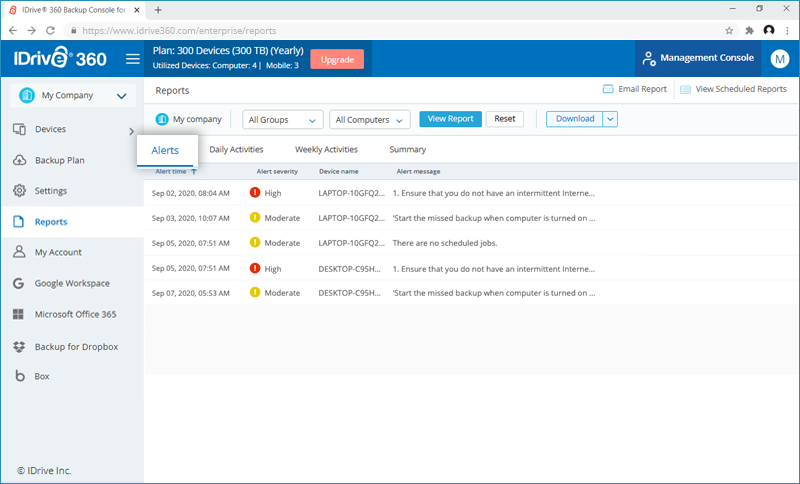
- Alerts - Choose the Alerts tab to view the active alerts details
- Daily Activities - View the daily account activities
- Weekly Activities - View the account activities, based on per week
- Summary - Choose the Summary tab to view the overall activity summary
To download reports, click 'Download' and select PDF or Excel format to save the file.
You can schedule and send the reports of your backup / restore operations on a daily or weekly basis.
To schedule and send the report through email,
- Click 'Email Report'.
- In the window that appears, enter the name and email addresses of the recipient(s) and choose the report type and the file format for the report.
- Click 'Send'.or
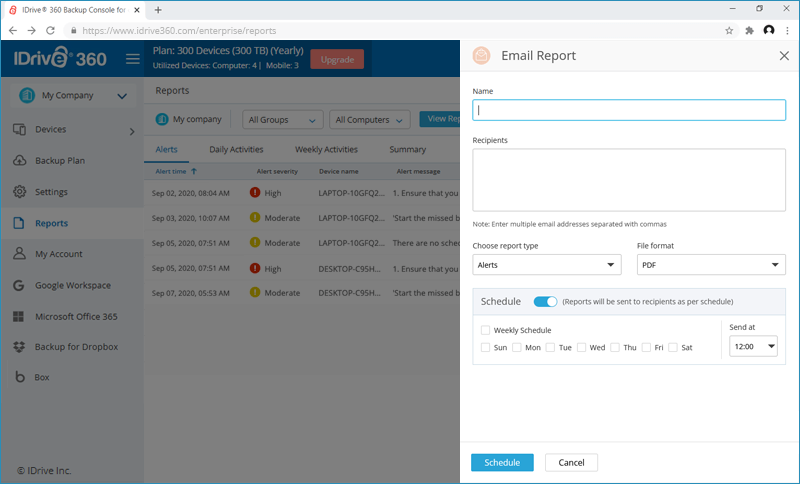
Enable the 'Schedule' button to select the day and time to schedule the reports. Click 'Schedule'.
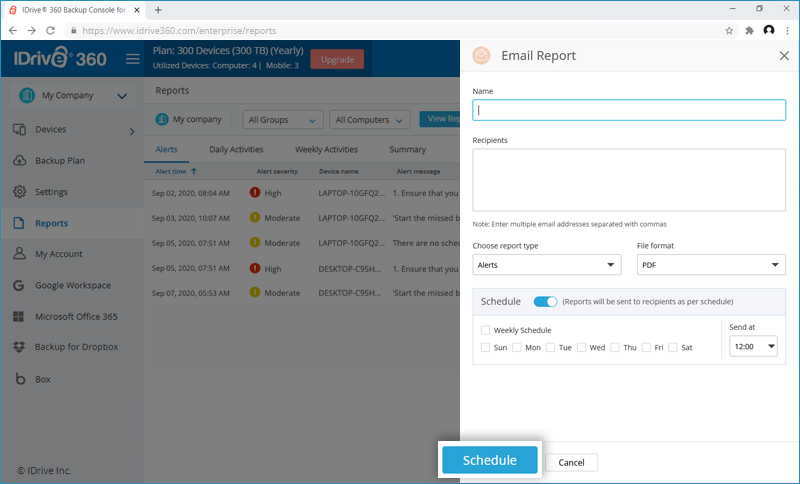
You can view all the scheduled reports under the 'View Scheduled Reports' section. You can also edit or delete the scheduled reports.
To view and modify a scheduled report,
- Click 'View Scheduled Reports'. All the scheduled reports will be listed.
- Hover on the report name you wish to edit and click . Make the required changes and click 'Save' to save the changes.
- To delete a particular report, hover on the same and click . Click 'Delete' in the confirmation pop that appears.