Microsoft Office 365 Backup
If your question is not addressed below, contact us through our support form and we will get back to you shortly.
General
- What is IDrive® 360 Microsoft Office 365 Backup?
- Why do you need to backup your Microsoft Office 365 Suite?
- Which applications are supported by IDrive® 360 Microsoft Office 365 Backup?
- Are there any limitations of IDrive® 360 Microsoft Office 365 Backup?
- How do I get started with IDrive® 360 Microsoft Office 365 Backup?
- How to add and manage new domains in IDrive® 360 Microsoft Office 365 Backup?
- Can I rename domains in IDrive® 360 Microsoft Office 365 Backup?
- Is it possible to add a user to manage backup and recovery for my Microsoft 365 domains?
- Can I access the backed-up data from anywhere?
- How many storage regions are available for my backups?
- How does IDrive® 360 Microsoft Office 365 Backup secure my data?
- How does IDrive® 360 Microsoft Office 365 Backup meet the HIPAA compliance requirements?
- Why am I asked to trust IP Address while trying to export or restore data?
Backup
- How does IDrive® 360 Microsoft Office 365 Backup work?
- Can I backup my personal Microsoft Office 365 account?
- Are there any limitations of IDrive® 360 Personal Microsoft Office 365 Backup?
- How are the IDrive® 360 Microsoft Office 365 Backups scheduled?
- Will the subsequent changes in my backed-up files be transferred incrementally to IDrive® 360 Microsoft Office 365 Backup?
- How do I backup OneDrive data for a specific user from my IDrive® 360 Microsoft Office 365 Backup account?
- How do I backup Outlook data for a specific user from my IDrive® 360 Microsoft Office 365 Backup account?
- Can I backup the In-Place-Archive and Public Folder for Outlook to my IDrive® 360 Microsoft Office 365 Backup account?
- The status for my Outlook backup is successful, however the data inside the Public Folder is not backed up. Why?
- I am unable to backup my Exchange mailbox and I get an 'ErrorQuotaExceeded' message. Why?
- How do I backup SharePoint data for a specific user from my IDrive® 360 Microsoft Office 365 Backup account?
- How do I backup Teams data for a specific user from my IDrive® 360 Microsoft Office 365 Backup account?
- How does snapshot and versioning work in IDrive® 360 Microsoft Office 365 Backup?
- What information can I view in the Overview tab of my web console?
- Is it possible to backup only SharePoint sites or Teams data?
Seat Management
- What is a Seat?
- Which user management tools can I access under seat management?
- How do I change seat status for users?
- How do I add users to the IDrive® 360 Microsoft Office 365 Backup set?
- How do I re-add users to the IDrive® 360 Microsoft Office 365 Backup set?
- How do I view the backup status of the users?
Recovery
- How do I restore the backed-up OneDrive data from my IDrive® 360 Microsoft Office 365 Backup account?
- How do I restore the backed-up Outlook emails from my IDrive® 360 Microsoft Office 365 Backup account?
- How do I restore the backed-up Outlook contacts from my IDrive® 360 Microsoft Office 365 Backup account?
- How do I restore the backed-up Outlook calendars from my IDrive® 360 Microsoft Office 365 Backup account?
- How do I restore the backed-up Outlook tasks from my IDrive® 360 Microsoft Office 365 Backup account?
- How do I restore the backed-up SharePoint data from my IDrive® 360 Microsoft Office 365 Backup account?
- How do I restore the backed-up Teams data from my IDrive® 360 Microsoft Office 365 Backup account?
- How do I cancel an ongoing restore in my IDrive® 360 Microsoft Office 365 Backup account?
- Can I search and restore a specific file or folder in IDrive® 360 Microsoft Office 365 Backup?
- How do I search for a specific item from my IDrive® 360 Microsoft Office 365 Backup account?
- How do I export the backed-up Microsoft Office Suite data from my IDrive® 360 Microsoft Office 365 Backup account ?
- What search terms are supported for export and restore in my IDrive® 360 Microsoft Office 365 Backup account?
- Can I preview the content of a backed up email?
- Can I restore corrupted files and folders from my IDrive® 360 Microsoft Office 365 Backup account?
- Why is there no restore option for Microsoft Office 365 Personal backup users?
Activity Logs
- Can I view the activity logs for my IDrive® 360 Microsoft Office 365 Backup account?
- How do I view system activity logs for my IDrive® 360 Microsoft Office 365 Backup?
- How do I view admin activity logs for my IDrive® 360 Microsoft Office 365 Backup account?
- How can I view all event activity log reports for my IDrive® 360 Microsoft Office 365 Backup?
What is IDrive® 360 Microsoft Office 365 Backup?
IDrive® 360 Microsoft Office 365 is a single backup solution that secures the entire Microsoft Office Suite of your organization including OneDrive, Outlook, Exchange, SharePoint, and Teams data by retaining multiple versions of the data in the cloud.
Why do you need to backup your Microsoft Office 365 Suite?
Due to Microsoft's limited data recovery features, Enterprises must add an extra layer of security to their Microsoft Office 365 data. The IDrive® 360 Microsoft Office 365 Backup solution with cloud backup, versioning, and point-in-time recovery acts as a robust protection for your Microsoft data against disasters, human errors, and ransomware that encrypts data and claims a ransom to regain access.
Which applications are supported by IDrive® 360 Microsoft Office 365 Backup?
IDrive® 360 Microsoft Office 365 Backup supports:
- OneDrive
- Outlook
- SharePoint
- Teams
Are there any limitations of IDrive® 360 Microsoft Office 365 Backup?
IDrive® 360 Microsoft Office 365 Backup has the following limitations in the current version. We are working on implementing these features in the upcoming releases.
Exchange
- Calendar attachments are excluded from backup.
- Litigation Hold artifacts are not included in the backup.
- Groups are excluded from backup.
- Backup of Yammer Root, Sync issues folder, Files & Conversation Action settings are excluded from backup.
Teams
- IDrive backs up the OneDrive data and files but does not backup Calendar data.
- Chat (1:1) is not included in the backup.
OneDrive: Shared Folders are excluded from backup.
Sharepoint
- Sharepoint Classic sites cannot be backed up.
- Libraries and Metadata are excluded from backup.
How do I get started with IDrive® 360 Microsoft Office 365 Backup?
The Super Administrator of the Microsoft Office 365 account needs to authorize the IDrive® 360 Microsoft Office 365 Backup application to access all the user’s data available in the account. Once done, your Microsoft Office Suite will be automatically synced with IDrive® 360 Microsoft Office 365 Backup application for backup.
To get started with backup,
- Sign in to your IDrive® 360 account.
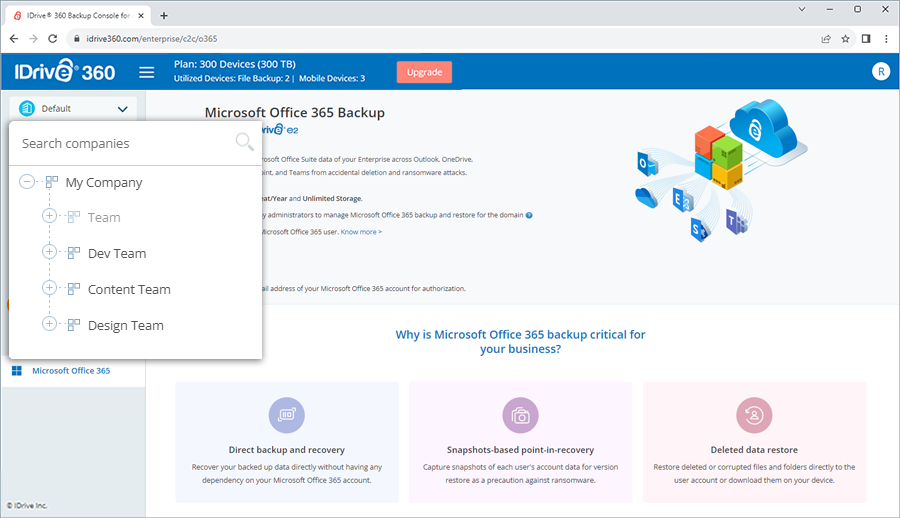
- Click Microsoft Office 365.
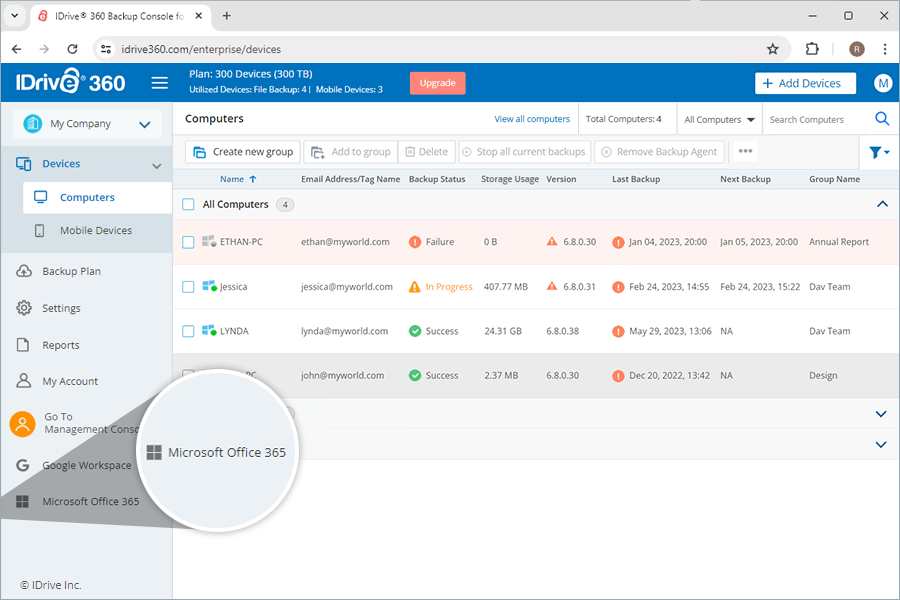
- Select the company for which you want to enable Microsoft Office 365 backup.
- Click Enable.
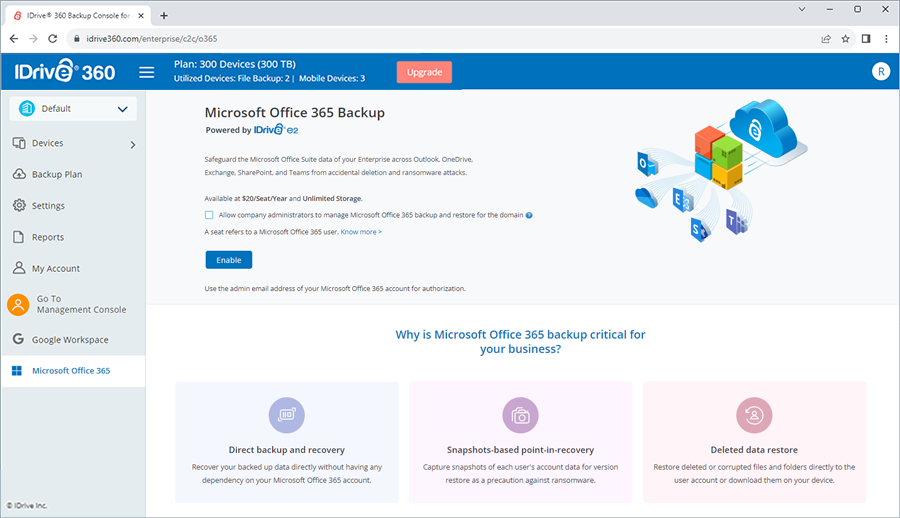
- Select a Region from the drop-down list to store your Microsoft Office 365 backups.

- Click Proceed. You will be redirected to the Microsoft Office 365 authorization page.
- Select the email address of the Super Administrator of the Microsoft account that you want to backup. The permission screen will appear.
- Click Accept. You will be redirected to the Microsoft Office 365 Backup dashboard.
Once access is allowed, all the users and their data across OneDrive, Outlook, Teams, and Sharepoint will be backed up and displayed on your IDrive® 360 Microsoft Office 365 Backup dashboard. You can now manage the backups and restores for all the users in your Microsoft account from the web console.
Note: The Company Administrator of the selected company will have access to the backup details of the IDrive® 360 Microsoft Office 365 Backup account. However, they are not allowed to cancel the subscription.
How to add and manage new domains in IDrive® 360 Microsoft Office 365 Backup?
To add a new domain, you must have enabled IDrive® 360 Microsoft Office 365 Backup.
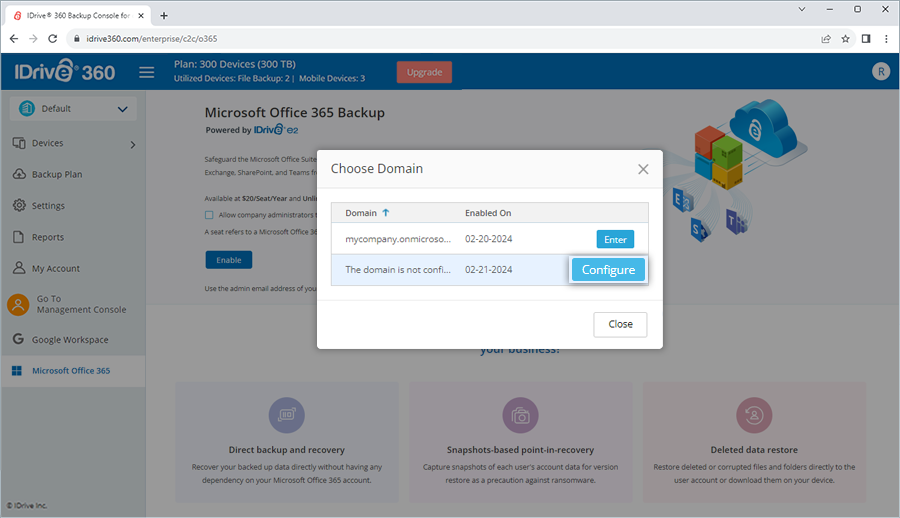
- Click Enter for Microsoft Office 365 Backup.
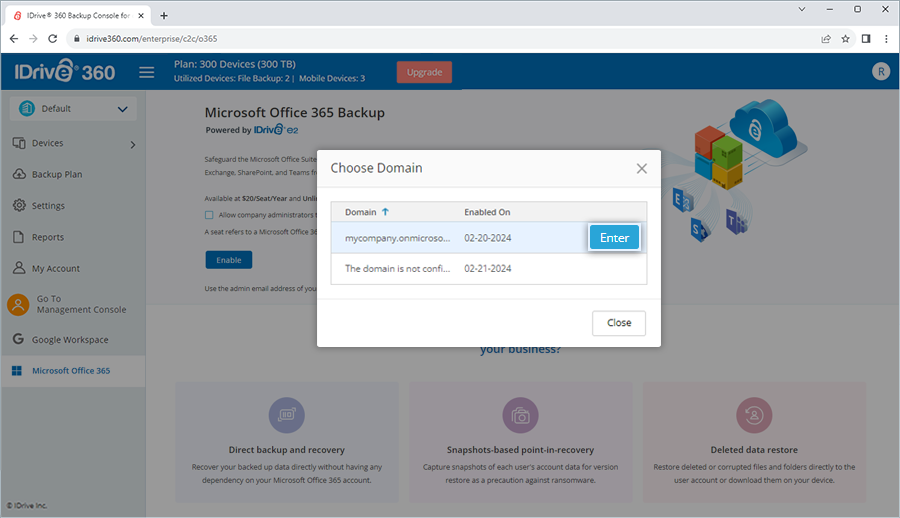
- In the Choose Domain pop-up, hover on the list and select a domain.
- a. Click Configure. You will be redirected to the Configure page.
- b. Select the email address of the Super Administrator of the Microsoft account that you want to backup. The permission screen will appear.
- c. Click Accept. You will be redirected to the Microsoft Office 365 Backup dashboard.
- a. Click Enter in the Choose Domain pop-up. You will be redirected to the Microsoft Office 365 Backup dashboard.
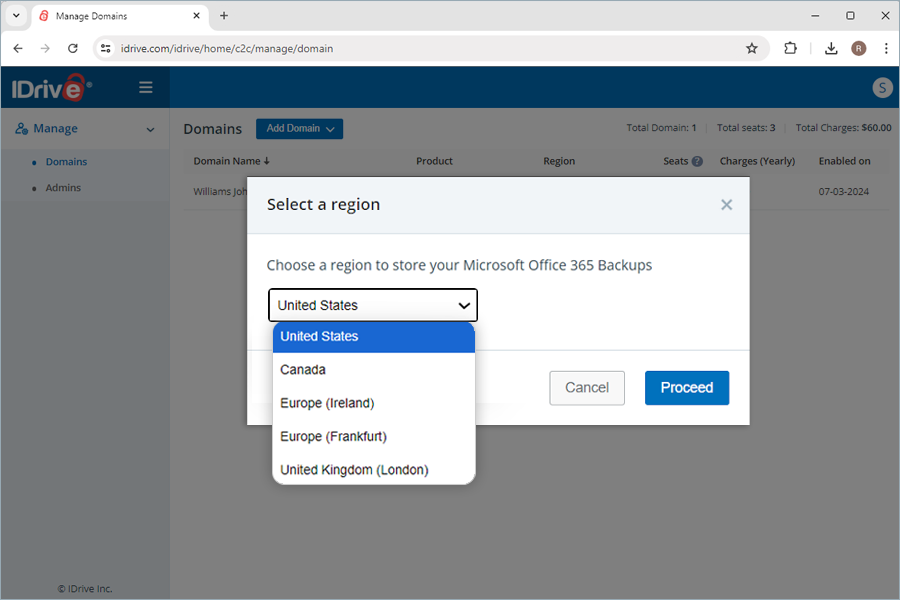
- In the Overview tab, go to Administrative Center > Manage Domains.
- On the Domains page under Manage, click Add Domain.
- Select Microsoft Office 365 Backup
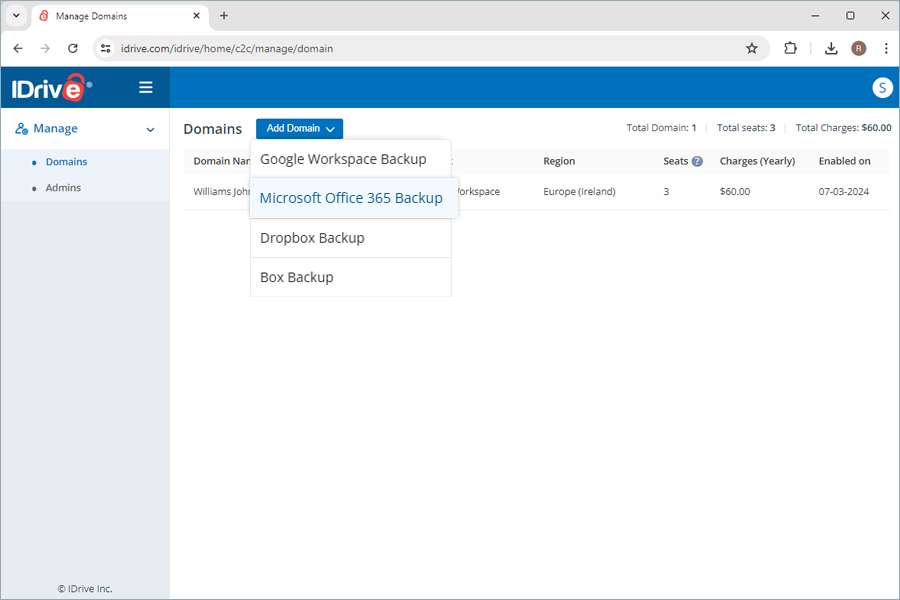
- Select a Region from the drop-down list to store your Microsoft Office 365 Backups.
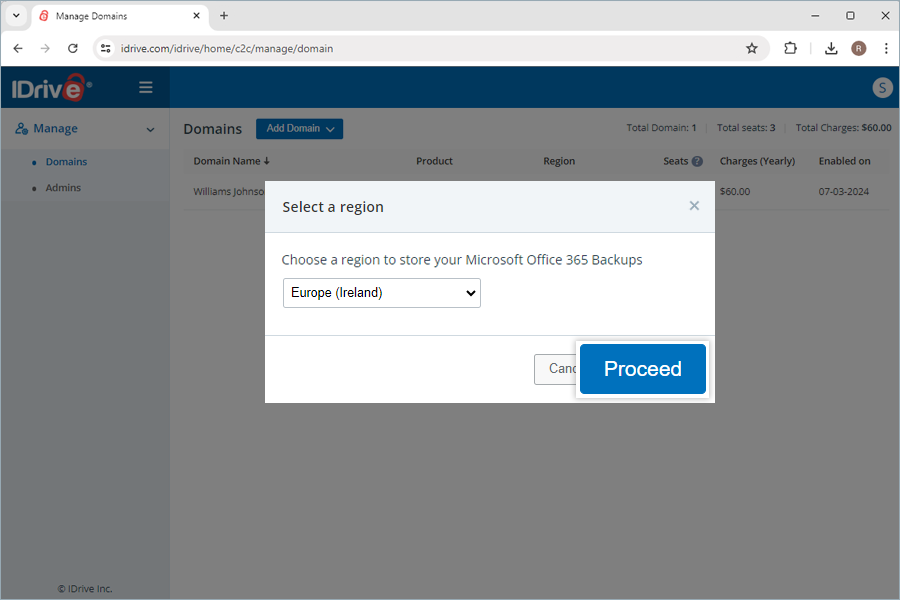
- Click Proceed and follow the above steps to enable and configure.
For domains that have been enabled but not configured:
For domains that have been enabled and configured:
To enter or remove a domain, hover on the required domain and click Enter or Remove.
Note:
- You cannot enter more domains before configuring the previously enabled domain.
- Each domain is charged as a seat.
Can I rename domains in IDrive® 360 Microsoft Office 365 Backup?
Yes, you can remain a domain in IDrive 360 Microsoft Office 365 Backup.
To rename,
- Click
 next to your IDrive 360 Microsoft Office 365 Backup domain name.
 - The Edit Details popup opens.
- Edit the name and click Save.
Alternatively, under Account Information > Provider, click Edit domain and modify the domain name.
Is it possible to add a user to manage backup and recovery for my Microsoft 365 domains?
Yes, you can add a user with administrative privileges to manage backup and recovery for your Microsoft 365 domains.
- Click Enter for Microsoft 365 Backup. You will be redirected to the Microsoft 365 Backup dashboard.
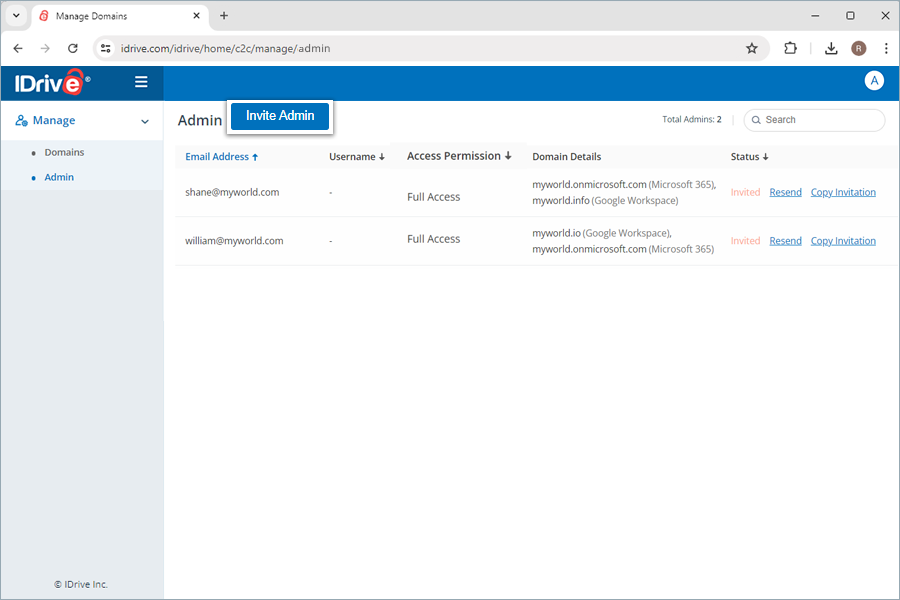
- In the Overview tab, go to Administrative Center > Manage Admins.
- On the Admins page under Manage, click Invite Admin.
- Click Invite Admin.
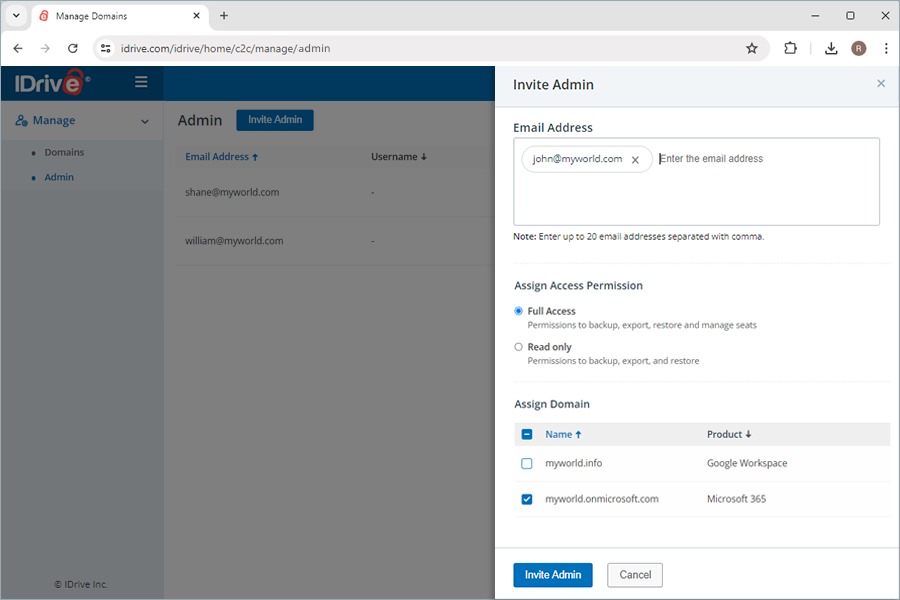
- Enter the Email Address of the user you wish to assign administrative rights.
- In the Assign Access Permission section,
- a. Select Full Access if you want to grant privileges for backup, export, restore and seat management.
- b. Select Read Only if you want to grant only for privileges for backup, export, and restore.
- In the Assign Domain section, select the required domains you want the user to manage.
- Click Invite Admin.
To invite an admin,
The user will receive an email invitation. Once they create an account using the link in the invitation, they will be able to manage operations for assigned domains according to assigned permissions.
Click ![]() and and confirm in the popup to remove an admin.
and and confirm in the popup to remove an admin.
Can I access the backed-up data from anywhere?
Yes, you can access your backed-up data from OneDrive, Outlook, SharePoint, and Teams via the web console. Similarly, you can manage backups and restore the backed-up data from any location via the web..
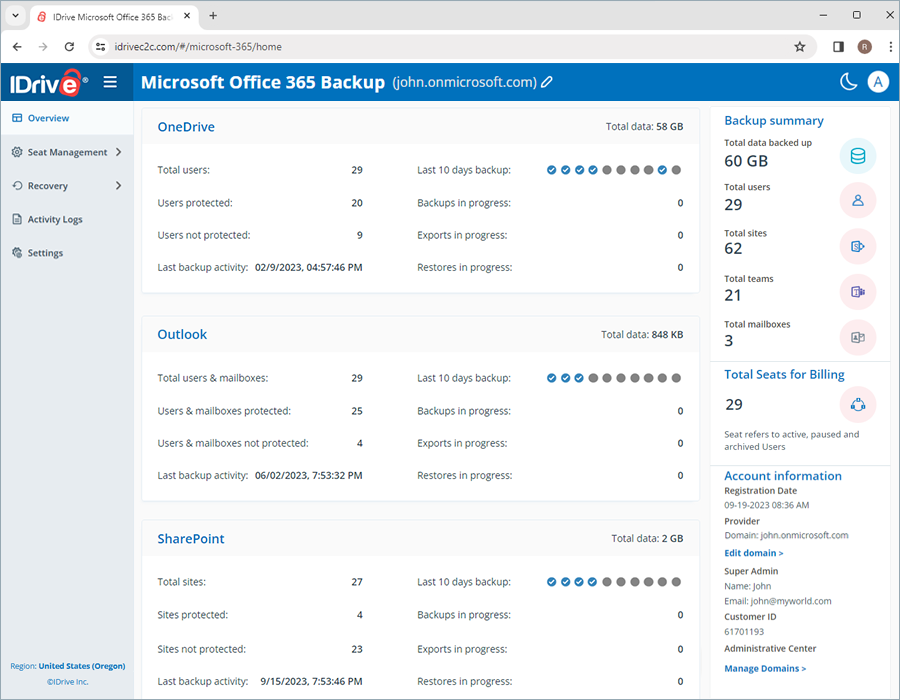
- Overview: Get an overview of the total Microsoft Office 365 user accounts, total backed-up accounts, and the last backup time across OneDrive, Outlook, SharePoint, and Teams.

- Seat Management: Add, view, and manage user accounts across the entire Microsoft Office Suite.

- Recovery: View, manage and restore point-in-time backups of all users across OneDrive, Outlook, SharePoint, and Teams. Search, download, restore and monitor specific data from specific users across Microsoft Office 365 suite.
- Activity logs: View activity logs, for all users across the account.
- Settings: Enable daily backup status notification to receive emails for completed, failed and in progress backups.

The web console has the following sections:
How many storage regions are available for my backups?
Currently, you can store your data in any of the regions - Oregon (USA), Ireland (EU), Frankfurt (EU), London (UK), and Canada. You can choose a region while enabling Microsoft Office 365 backup.
How does IDrive® 360 Microsoft Office 365 Backup secure my data?
IDrive® 360 Microsoft Office 365 Backup prioritizes data security in the following ways:
Automated data backup
Your data is automatically backed up three times a day, providing regular and reliable protection for critical business data.
- IDrive® 360 Microsoft Office 365 Backup stores your data across top-notch data centers and secures with industry-standard 256-bit AES encryption on both transfer and storage.
- Each authenticated data transmission and user interaction from Microsoft Office 365 are processed through TLS 1.2 encrypted connections.
- IDrive® 360 uses 0Auth-based authentication to verify your Microsoft Office 365 user accounts without requiring their passwords.
Multi-layered data security
Business compliance
IDrive® 360 implements data control measures across operations, software, and infrastructure to assist companies in adhering to various regulatory standards such as HIPAA, SOX, GLBA, SEC/FINRA, and PCI DSS.
How does IDrive® 360 Microsoft Office 365 Backup meet the HIPAA compliance requirements?
IDrive® 360 Microsoft Office 365 Backup uses IDrive® e2 technology. IDrive® e2 ensures the following and assists users to meet HIPAA compliance:
- Physical security of the data centers
- Strong authentication and authorization controls for cloud, storage, and networking infrastructure
- Encrypts data at rest and in transit to safeguard confidential patient information
Why am I asked to trust IP Address while trying to export or restore data?
When using a new IP address to export or restore data you must authorize the IP address by entering a verification code sent to the email address of the account administrator. This provides an additional layer of security for your data.

How does IDrive® 360 Microsoft Office 365 Backup work?
Once you configure your Microsoft Office 365 Office Suite to IDrive® 360 Microsoft Office 365 Backup, it will run a full automated backup of your entire Microsoft Office Suite including OneDrive, Outlook, Sharepoint, and Teams for all users.
IDrive® 360 Microsoft Office 365 Backup enables automated data synchronization, so that after the full initial backup, all the subsequent changes are incrementally backed up.
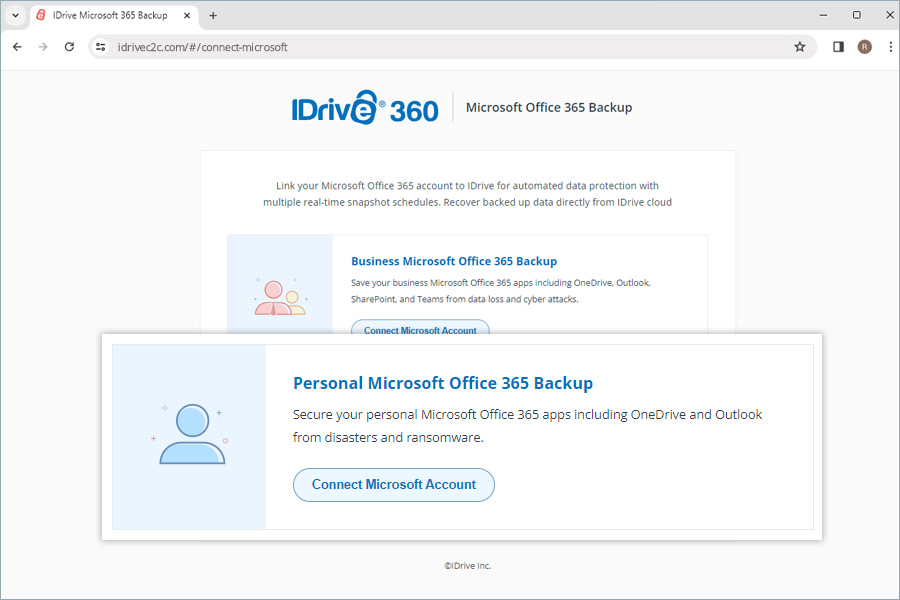
Can I backup my personal Microsoft Office 365 account?
Yes, you can configure your personal Microsoft Office 365 account for backup with IDrive® 360. Your Outlook, OneDrive, and Office Apps data will be backed up.
To backup your personal Microsoft Office 365 account,
- Sign in to your IDrive® 360 account.
- Click Microsoft Office 365.
- Click Enable.
- Select a Region from the drop-down list to store your Microsoft Office 365 backups.
- Click Proceed.
- On the Microsoft account connection page, click Connect Microsoft Account under Personal Microsoft Office 365 Backup.
- Select the Microsoft account that you want to backup. The permission screen will appear.
- Click Accept.
Your personal Microsoft account will be automatically synced with IDrive® 360 for backup.
Are there any limitations of IDrive® 360 Personal Microsoft Office 365 Backup?
IDrive® 360 Personal Microsoft Office 365 Backup has the following limitations in the current version.
OneDrive: IDrive® 360 does not backup Shared Folders and Personal Vault in OneDrive. This is due to restrictions from Microsoft. Even in case the user unlocks the Personal Vault, IDrive® 360 cannot receive the data added inside.
Exchange:
- Groups are excluded from backup.
How are the IDrive® 360 Microsoft Office 365 Backups scheduled?
IDrive® 360 Microsoft Office 365 Backup runs up to three automated backups everyday for all the users of your organization. These system backups run on a predefined schedule for the entire organization.
In the event of a failed backup, the backup is run again immediately till successful.
Will the subsequent changes in my backed-up files be transferred incrementally to IDrive® 360 Microsoft Office 365 Backup?
Yes, as IDrive® 360 Microsoft Office 365 Backup enables automated data synchronization. After the full initial backup, all subsequent changes are incrementally backed up.
How do I backup OneDrive data for a specific user from my IDrive® 360 Microsoft Office 365 Backup account?
To perform OneDrive backup for a specific user,
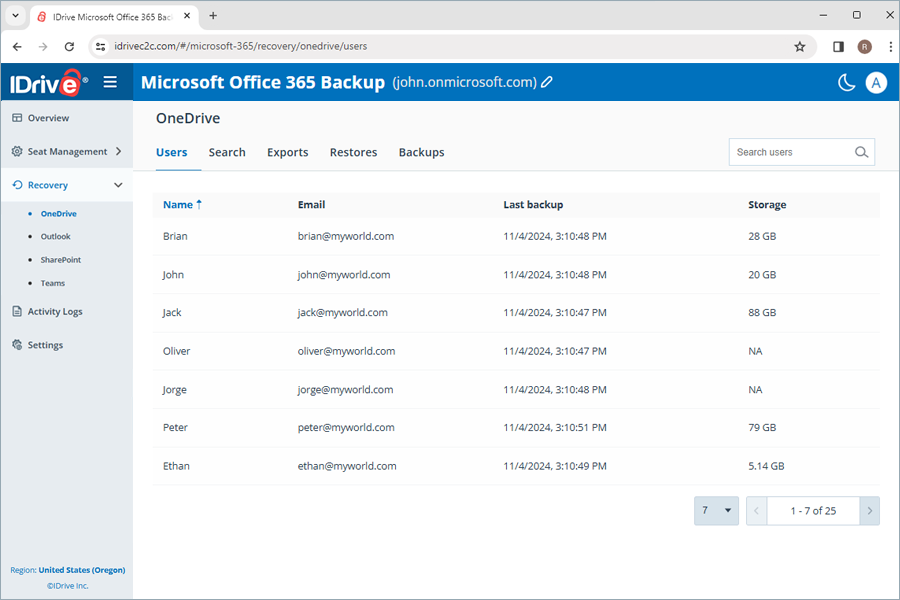
- Go to the Recovery tab.
- Select OneDrive.

- Click the user account for which you want to backup data.
- Click Backup Now.
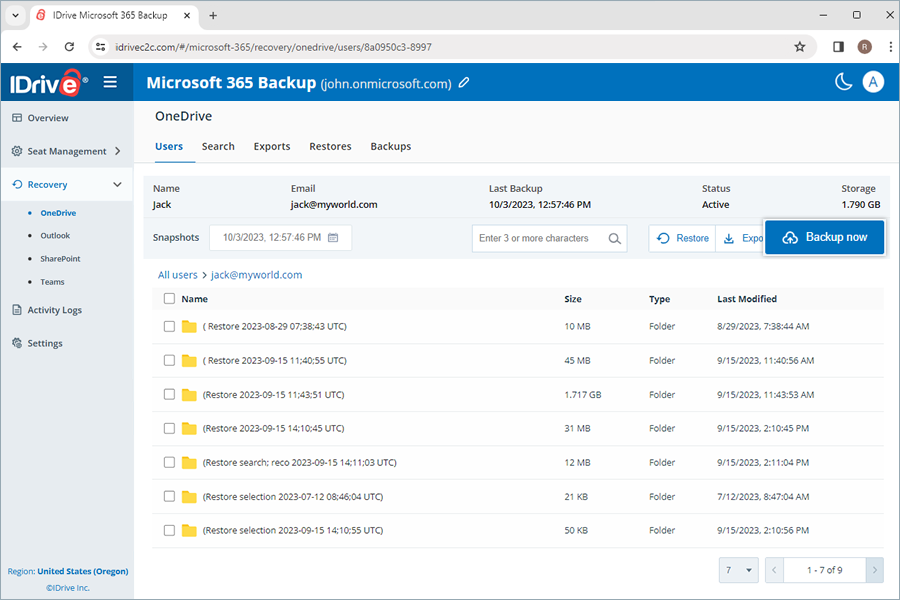
The backup progress will be displayed. You can view the backup details under Backups.
Note:
- When backing up a user for the first time, you can check the current backup size by clicking.

- Running a manual backup does not affect the auto-scheduled backups.
How do I backup Outlook data for a specific user from my IDrive® 360 Microsoft Office 365 Backup account?
To perform Outlook backup for a specific user,
- Click Recovery.
- Select Outlook.

- Click the user account for which you want to backup data.
- Click Backup Now. The Mail, Contact, Calendar, and Tasks data will be backed up.
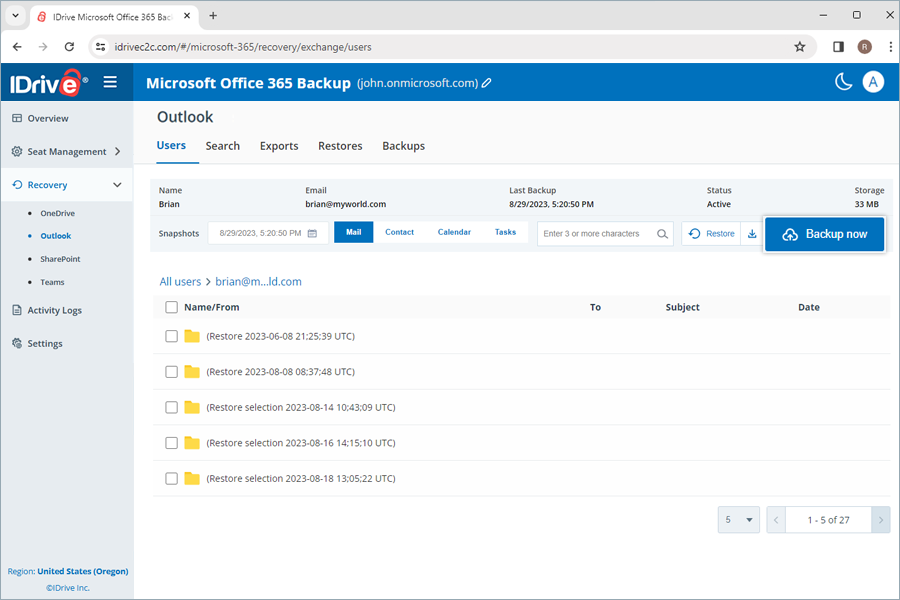
The backup progress will be displayed. You can view the backup details under Backups.
Note:
- When backing up a user for the first time, you can check the current backup size by clicking.
- Running a manual backup does not affect the auto-scheduled backups.
Can I backup the In-Place-Archive and Public Folder for Outlook to my IDrive® 360 Microsoft Office 365 Backup account?
Yes, the In-Place-Archive and Public Folder backup function is enabled by default for new users who register an account after 09/30/2024.
If your user account is registered before 09/30/2024, to backup the In-Place-Archive and Public Folder, you need to enable backup for these folders from your IDrive 360 account.
To enable backup,
- Go to the Overview tab on your IDrive® 360 Microsoft Office 365 Backup dashboard.
- Click the Enable Backup button on the popup window.
In-Place-Archive and Public Folder in your Outlook will be automatically synced with IDrive 360 for backup, and the data will be displayed on the screen.
The status for my Outlook backup is successful, however the data inside the Public Folder is not backed up. Why?
If your Outlook backup is successful but Public Folder data is not backed up, it may be due to lack of permission to the Public Folder for the user. You must provide appropriate user permissions to backup the Public Folder.
To assign permissions,
- Sign in to your Microsoft 365 admin account.
- In the upper-left corner, click the grid icon and select Admin.
- On the left pane, navigate to Admin and click the arrow next to it.
- Click Exchange.
- Click Public Folders.
- Click the Public Folders tab and then click Root permissions.
- Check whether your account is in the list.
- If your account is not listed, click (+) to add it to the list.
- In the Public Folder Permissions window click Browse and select your account.
- Click OK.
- In the Permission level drop-down menu, select Owner.
- Click Save.
- Select Apply changes to this public folder and all its subfolders checkbox.
- Click Save.
I am unable to backup my Exchange mailbox and I get an 'ErrorQuotaExceeded' message. Why?
When the mailbox size exceeds the specified limit, Microsoft Exchange may prevent a data backup from that mailbox.
The users will not be able to backup the Exchange data to their IDrive 360 Microsoft Office 365 account until the mailbox is freed up to the allowed quota. Any backup attempt will fail and an 'ErrorQuotaExceeded' message will be displayed.
How do I backup SharePoint data for a specific user from my IDrive® 360 Microsoft Office 365 Backup account?
To perform SharePoint backup for a specific user,
- Click Recovery.
- Select SharePoint.
- Click the user account for which you want to backup data.
- Click Backup Now. The Drive and List data will be backed up.
The backup progress will be displayed. You can view the backup details under Backups.
Note:
- When backing up a user for the first time, you can check the current backup size by clicking .
- Running a manual backup does not affect the auto-scheduled backups.
How do I backup Teams data for a specific user from my IDrive® 360 Microsoft Office 365 Backup account?
To perform Teams backup for a specific user,
- Click Recovery.
- Select Teams.
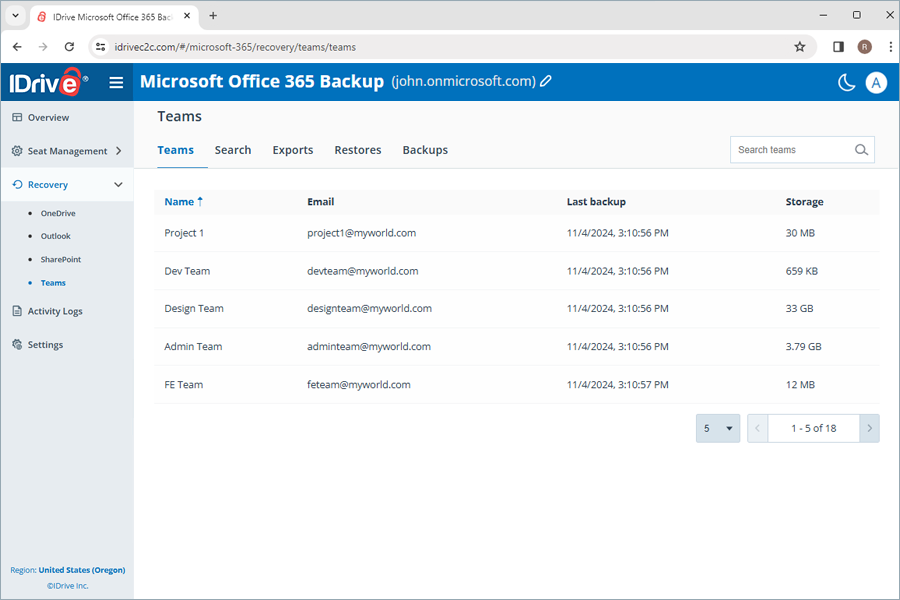
- Click the team for which you want to backup the data.
- Click Backup Now.
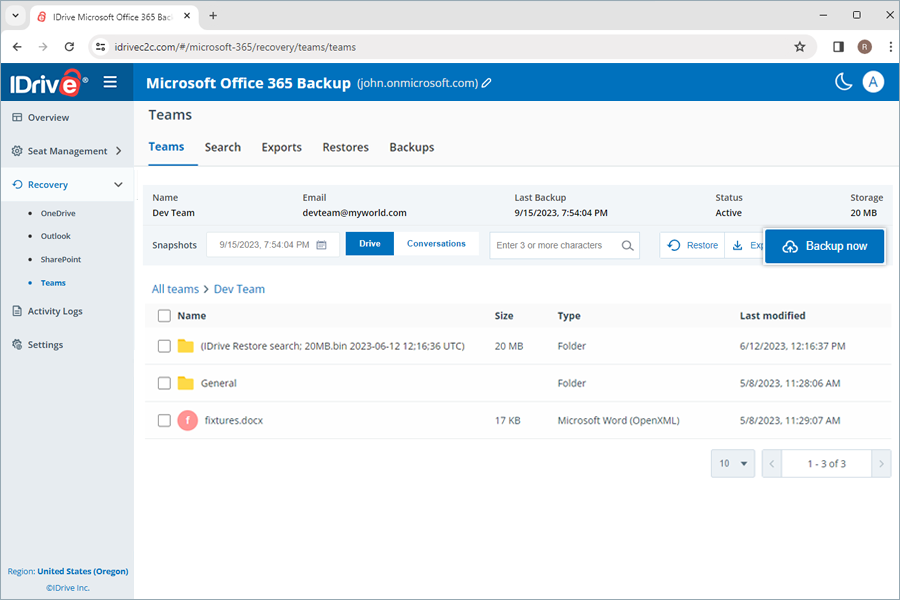
The Drive and Conversations data for the team will be backed up and the progress will be displayed. You can view the backup details under Backups.
Note:
- When backing up a user for the first time, you can check the current backup size by clicking
- Running a manual backup does not affect the auto-scheduled backups.
How does snapshot and versioning work in IDrive® 360 Microsoft Office 365 Backup?
IDrive® 360 Microsoft Office 365 Backup retains previous versions of the backed-up data as point-in-time snapshots, enabling you to run point-in-time restores of your data to the exact state it was in at the time of your backup.
The snapshots are retained and consolidated in the following manner:
- IDrive® 360 runs automated backups daily 3 times, that are retained for 30 days
- After 30 days, IDrive® 360 saves one of the 3 daily backups per user
- After 90 days, IDrive® 360 saves one weekly backup per user
- After 365 days, IDrive® 360 saves one monthly backup per user
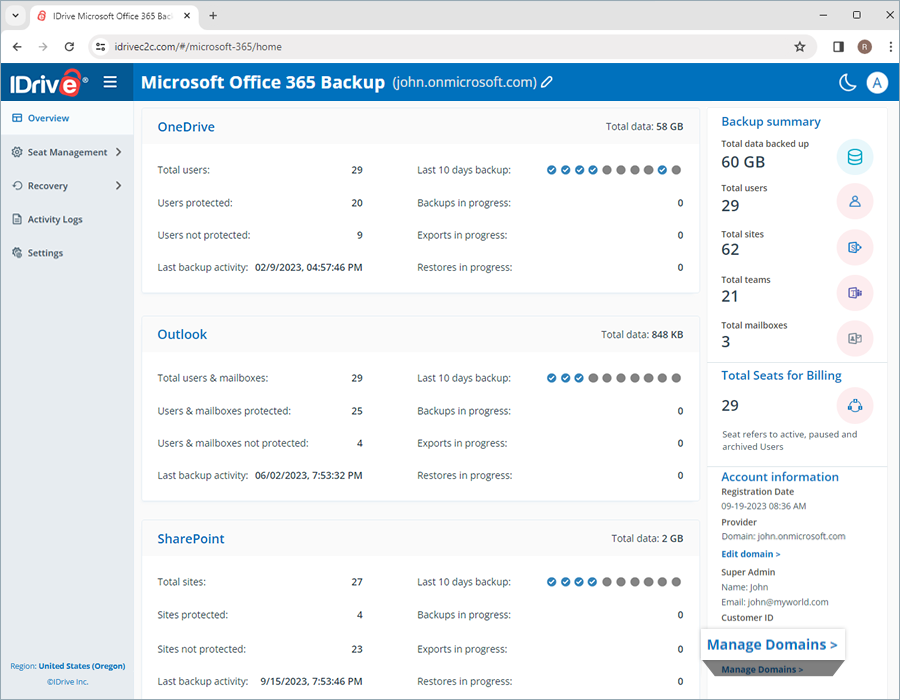
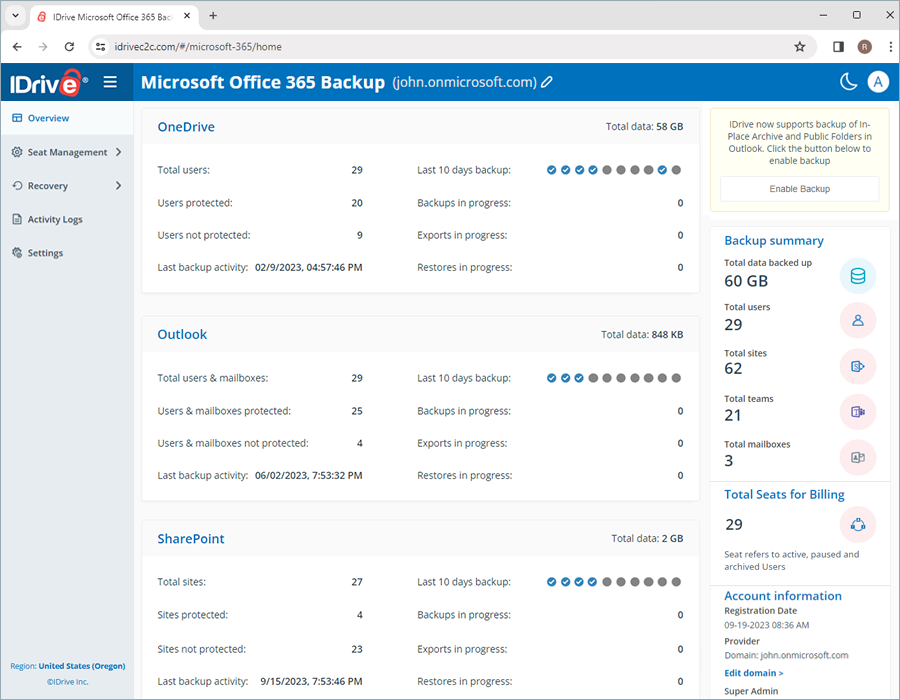
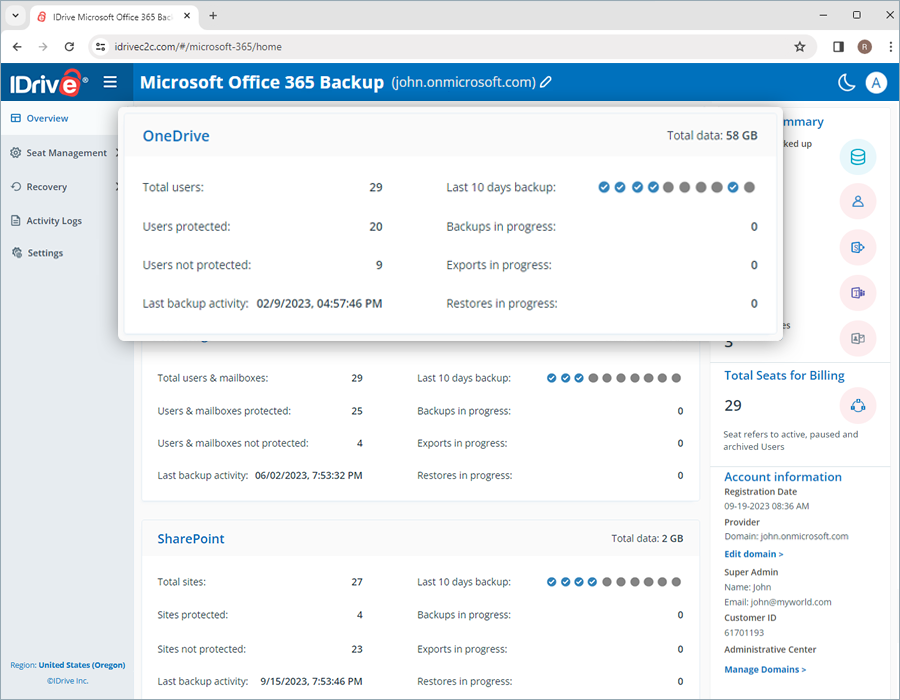
What information can I view in the Overview tab of my web console?
The Overview tab gives you a quick glance of the backups, exports, and restores of your users. You can view the summary of the following information across all the Microsoft Office 365 Suite applications:
- Total users: The total number of active users in your Microsoft Office 365 account.
- Users protected: The number of active users added to the backup list and who have completed backup within the last 24 hours.
- Users not protected: Number of active users not included in the backup list.
- Last backup activity: This displays the last date when every module in the application successfully completed a backup within a 24-hour period.
- Last 10 days backup: This displays the status of the last 10 days, represented by the following icons,
 - backup failure
 - backup was 100% successful
 - backup has not yet commenced
 - backup was partially successful
- Backup in progress: Total number of ongoing backup operations.
- Exports in progress: Total number of ongoing export operations.
- Restore in progress: Total number of ongoing restore operations.
Is it possible to backup only SharePoint sites or Teams data?
Yes, you can backup only Sharepoint sites and Teams data during the free trial. After the free trial, you must have at least one active seat (Microsoft user) to backup only SharePoint sites and Teams data.
A seat refers to a Microsoft Office 365 user. Each seat added to the account is billed as per the subscribed plan.
Which user management tools can I access under seat management?
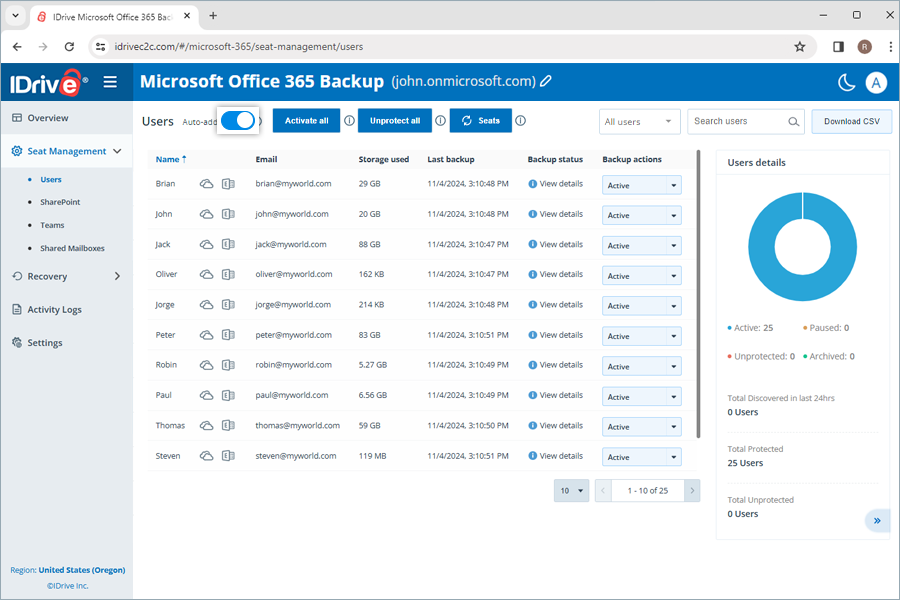
You can access the records of all the users under the Seat Management tab in your IDrive® 360 Microsoft Office 365 Backup web console regardless of their backup status.
Navigate to the Users tab under Seat Management to access the following management tools:
- Auto-add: Automatically syncs all new users added to your Microsoft Office 365 account.
- Activate all users: Activate backup for all unprotected users.
- Filter all users: Filter records of users according to their backup status- active, paused, and unprotected.
- Search: Lookup specific users among the records.
- Download CSV: Download list of all users in CSV format.
- Manage OneDrive or Outlook data: Manage specific OneDrive and Outlook data for a user by clicking on the respective icons -
 or
or 
- Backup status: Hover over View Details to view summary of backup status, or click View Details to view detailed backup status summary.
- Backup actions: Pause, add or remove users from backup set. For details, refer FAQ.
- Refresh seats: You can refresh the seats by clicking this button. Depending on the Auto-add status, new seats will be added with the corresponding backup status. If auto-add is enabled, the newly discovered seats are automatically protected, if not, they remain unprotected until the user manually changes it.
- Unprotect all: You can unprotect all the seats using this option. The unprotected seats will be excluded from the daily backups and will not be accessible in the Recovery module.
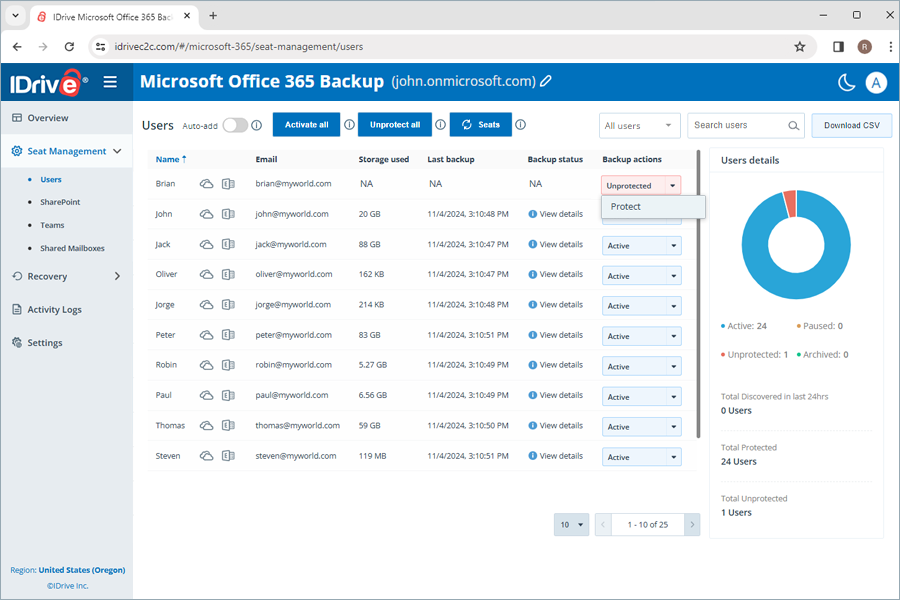
How do I change seat status for users?
You can add and remove the users from the backup set, or pause backups by changing their seat status.
To change the seat status for users,
- Go to the Seat Management tab on your IDrive® 360 Microsoft Office 365 Backup dashboard.
- Go to the Users tab.
- Under the Backup actions column corresponding to the user, set the seat status as required.
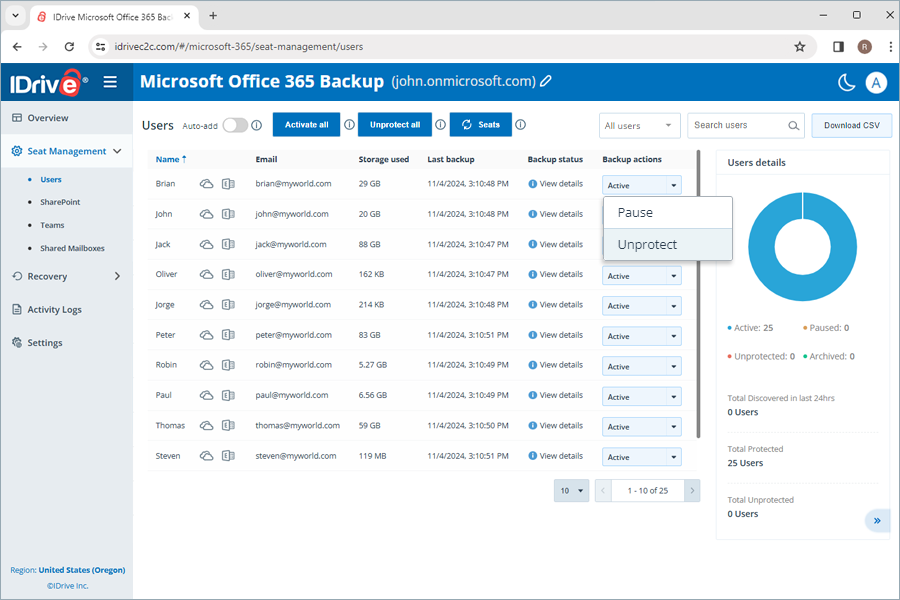
- Pause: Pause the backup for the user.
- Unprotect: Remove the user from the IDrive® 360 Microsoft Office 365 Backup set
- Protect: Resume/start backup for unprotected/paused users
The status of a user added to the backup set will be displayed as Active.
Note: On changing the seat status to Unprotect for a user, all backups associated with the user will be deleted.
How do I add users to the IDrive® 360 Microsoft Office 365 Backup set?
Users in your Microsoft Office Suite are automatically detected and added to the backup set during the first automatic backup. Auto-add will be enabled by default to protect new users in your Microsoft Office 365 account.
Depending on the Auto-add status, new seats will be added with the corresponding backup status. If auto-add is enabled, the newly discovered seats are automatically protected, if not, they remain unprotected until the user manually changes it.
To manually add new seats, you can click  to refresh the data.
To enable auto-add,
- Go to the Seat Management tab.
- Navigate to the Users tab.
- Enable the toggle switch next to Auto-add.
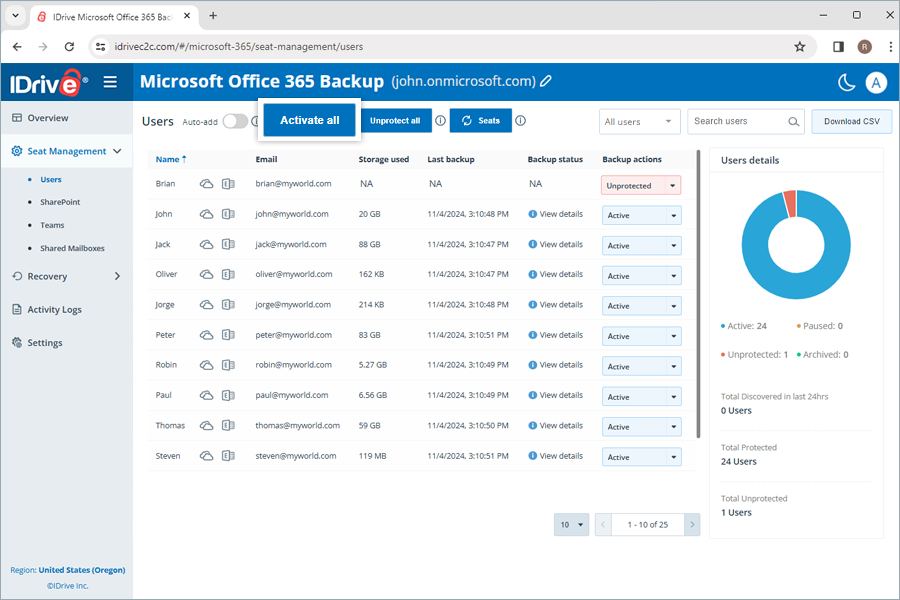
How do I re-add users to the IDrive® 360 Microsoft Office 365 Backup set?
You can re-add unprotected users to the active backup set by changing their seat status to active.
To activate backup for users who are not included in the backup set,
- Go to the Seat Management tab on your IDrive® 360 Microsoft Office 365 Backup dashboard.
- Navigate to the Users tab.
- Under the Backup actions column next to the paused/unprotected user, select Protect in the dropdown menu.
To activate all the unprotected users, click Activate all.
How do I view the backup status of the users?
The Backup Status next to each user gives you an overview of the user’s backup results for the last backup of each service past 24 hours. Click View Details to view the following backup status parameters for each backup module:
- Backup status: Success/failure status of the backup in the past 24 hours last, denoted by Completed / Failed
- Storage used: Total space occupied by the backup
- Last backup: Timestamp of the last backup
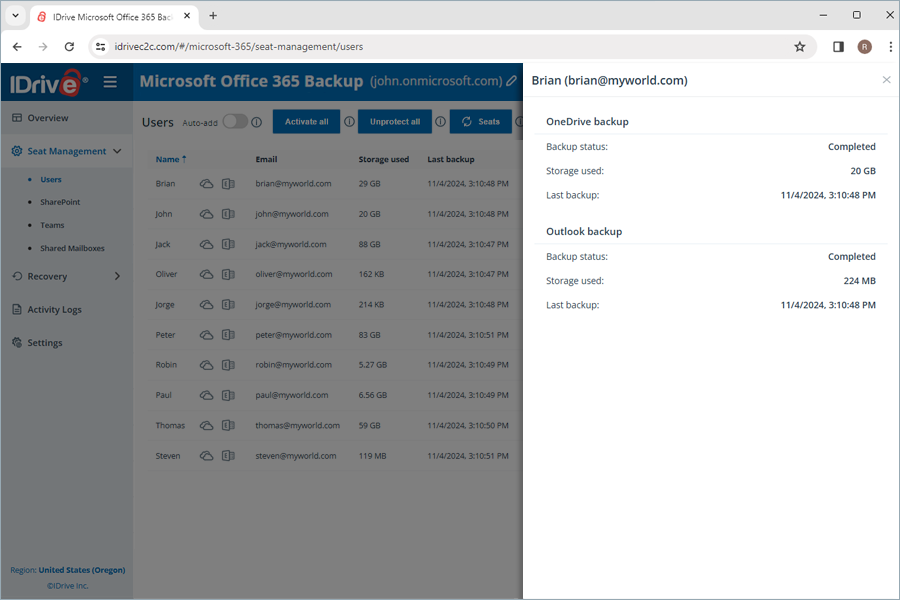
To view the summarized backup status for each module, hover on View Details.
How do I restore the backed-up OneDrive data from my IDrive® 360 Microsoft Office 365 Backup account?
To restore the backed-up OneDrive data,
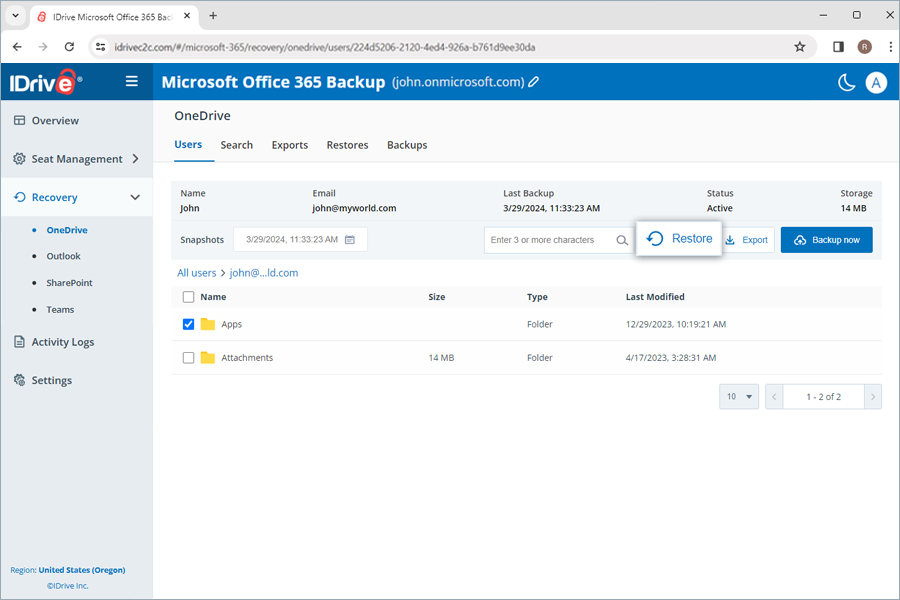
- Go to the Recovery tab on your IDrive® 360 Microsoft Office 365 Backup dashboard.
- Select OneDrive.
- Click the user account from which you want to restore data.
- Select the appropriate recovery point under Snapshots if you want to perform a point-in-time restore. To restore a specific file or folder, select the item from the list of backed-up items. You can also search for a specific file or folder.
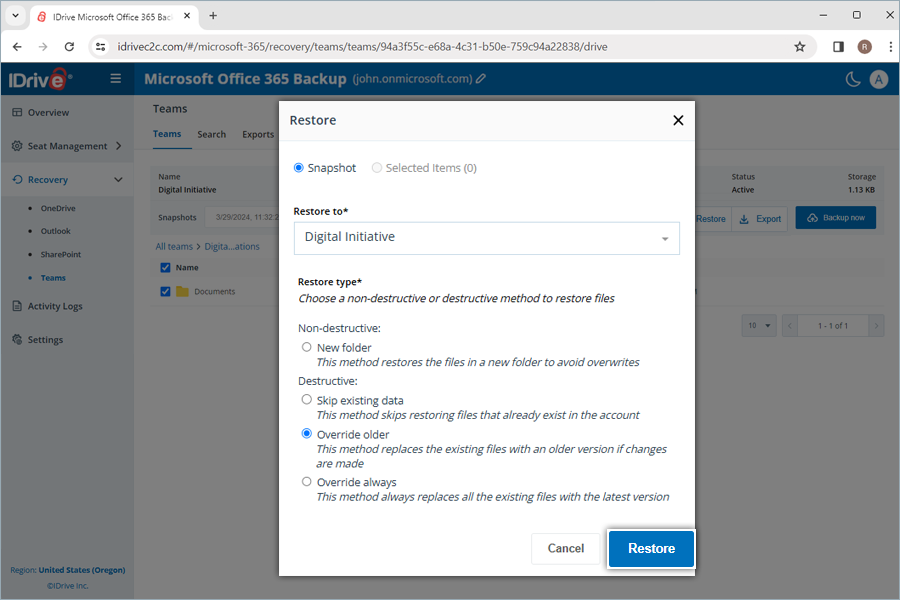
- Click Restore. A popup window will appear.
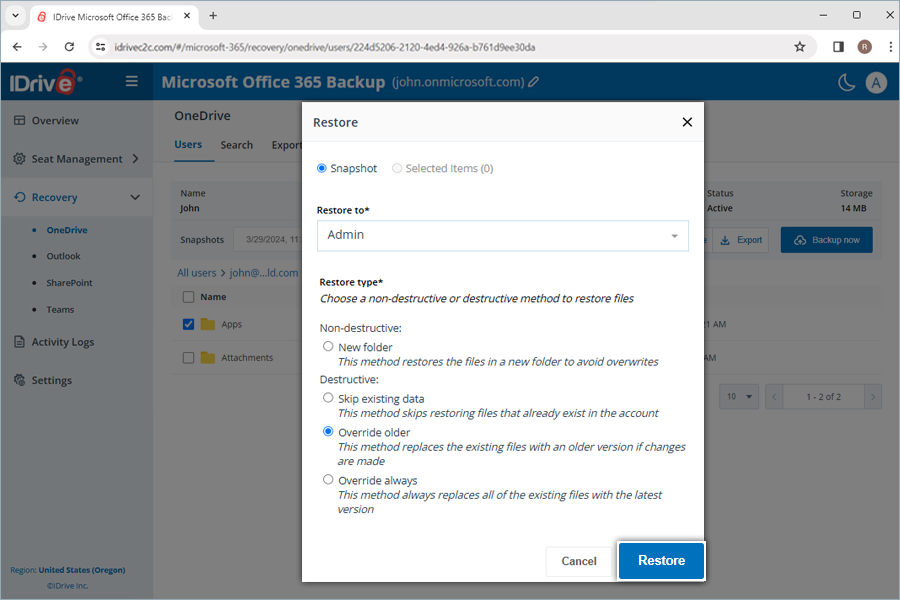
- Select Snapshot or Selected Item as required.
Note:Note: The Selected Item option will be enabled only if you have selected items for restore. If nothing is selected, Snapshot is selected by default. - Select the user account from the Restore to drop-down menu to which you want to restore the snapshot or the selected item. You can restore the data to the same user account or a different user account.
- Choose a non-destructive or destructive restore method to manage existing files:
- New folder (Non-destructive): This method restores the files in a new folder to avoid overwrites.
- Skip existing data (Destructive): This method skips restoring files that already exist in the account.
- Override older (Destructive): This method replaces the existing files with an older version if changes are made.
- Override always (Destructive): This method always replaces all of the existing files with the latest version.
- Click Restore.
- Click Proceed in the confirmation popup, if you have selected Override older or Override always.
On selecting the non-destructive restore method to create a new folder, a label named after the restore mode and date will be auto-created at the restore location. A folder (IDrive Restore selection <TimeStamp in UTC>) will be created when restoring selected items. Similarly, a folder (IDrive Restore <TimeStamp in UTC>) will be created for snapshot restore, and (IDrive Restore search:Search_Term <TimeStamp in UTC>) folder will be created for search-based restore.
How do I restore the backed-up Outlook emails from my IDrive® 360 Microsoft Office 365 Backup account?
To restore the backed-up emails,
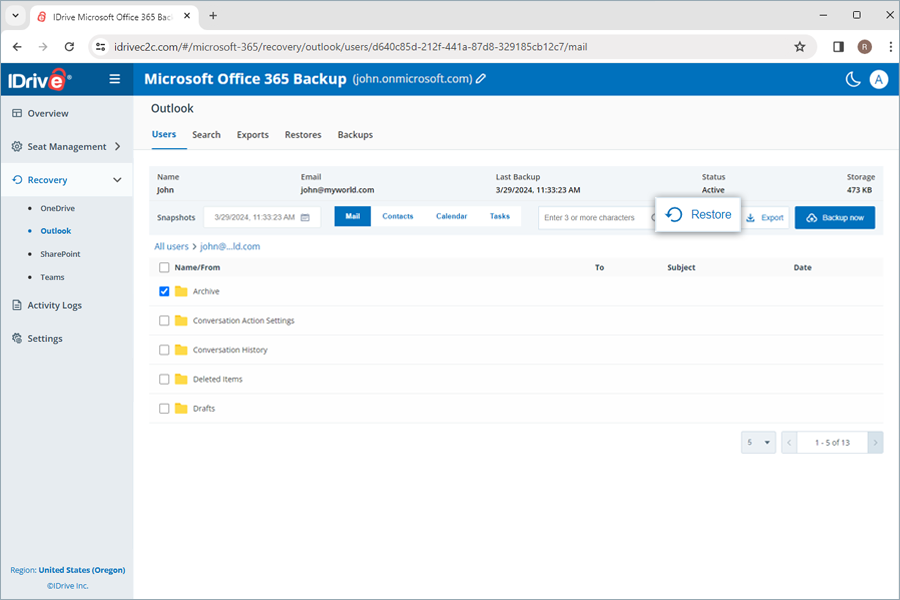
- Go to the Recovery tab on your IDrive® 360 Microsoft Office 365 Backup dashboard.
- Select Outlook.
- Click the user account from which you want to restore data.
- Click Mail.
- Select the appropriate recovery point under Snapshots if you want to perform a point-in-time restore. To restore a specific mail or folder, select the item from the list of backed-up items. You can also search for a specific mail or label.
- Click Restore. A popup window will appear.
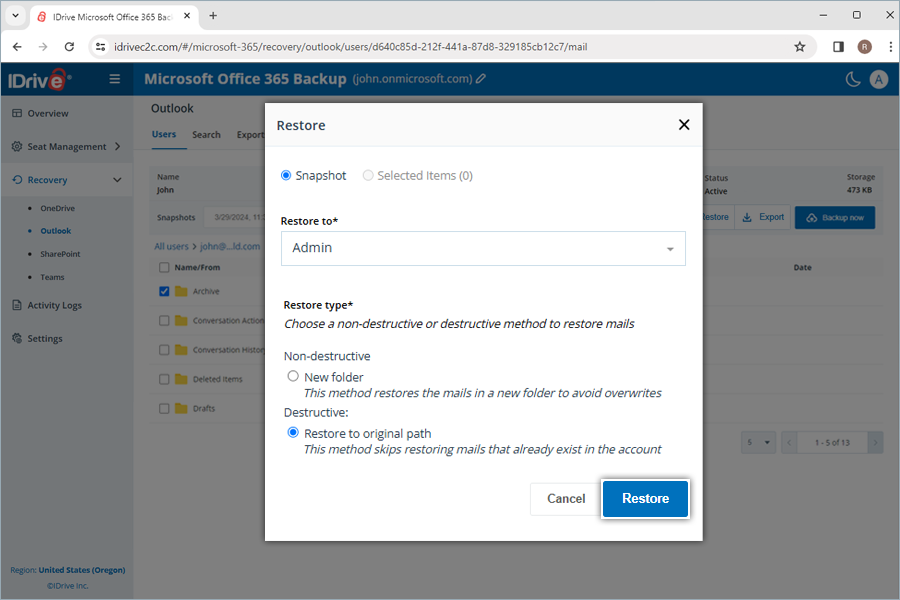
- Select Snapshot or Selected Item as required.
Note: The Selected Item option will be enabled only if you have selected items for restore. If nothing is selected, Snapshot is selected by default. - Select the user account from the Restore to drop-down menu to which you want to restore the snapshot or the selected item. You can restore the data to the same user account or a different user account.
- Choose a non-destructive or destructive restore method to manage existing files:
- New folder (Non-destructive): This method restores the mails in a new folder to avoid overwrites.
- Restore to original path (Destructive): This method skips restoring mails that already exist in the account.
- Click Restore.
On selecting the non-destructive restore method to create a new folder, a label named after the restore mode and date will be auto-created at the restore location. A label (IDrive Restore selection <TimeStamp in UTC>) will be created when restoring selected items. Similarly, a label (IDrive Restore <TimeStamp in UTC>) will be created for snapshot restore, and (IDrive Restore search:Search_Term <TimeStamp in UTC>) folder will be created for search-based restore.
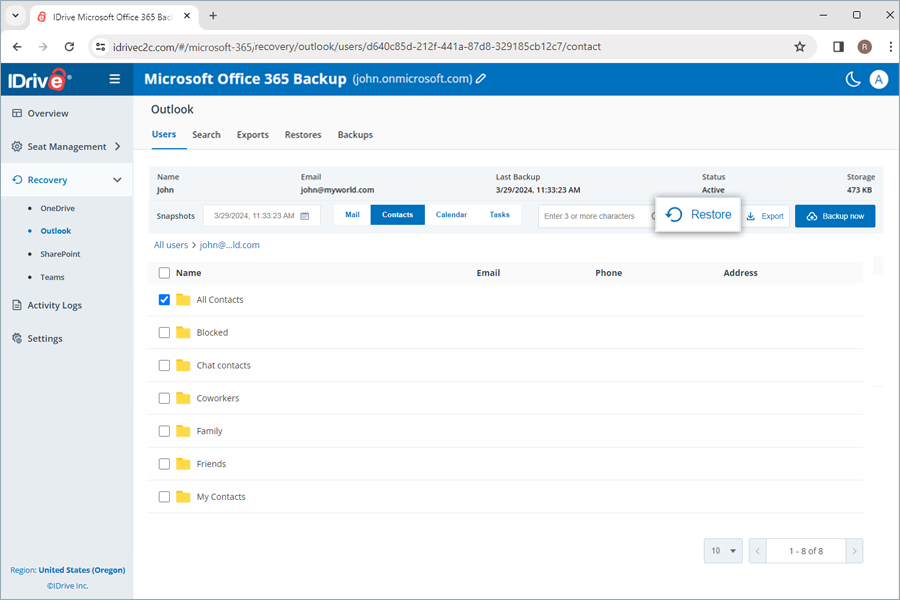
How do I restore the backed-up Outlook contacts from my IDrive® 360 Microsoft Office 365 Backup account?
To restore the backed-up contacts,
- Go to the Recovery tab on your IDrive® 360 Microsoft Office 365 Backup dashboard.
- Select Outlook.
- Click the user account from which you want to restore data.
- Click Contacts.
- Select the appropriate recovery point under Snapshots if you want to perform a point-in-time restore. To restore a specific contact or folder, select the item from the list of backed-up items. You can also search for a specific contact or label.
- Click Restore. A popup window will appear.
- Select Snapshot or Selected Item as required.
Note: The Selected Item option will be enabled only if you have selected items for restore. If nothing is selected, Snapshot is selected by default. - Select the user account from the Restore to drop-down menu to which you want to restore the snapshot or the selected item. You can restore the data to the same user account or a different user account.
- Choose a non-destructive or destructive restore method to manage existing files:
- New folder (Non-destructive): This method restores the contacts in a new folder to avoid overwrites.
- Skip existing data (Destructive): This method skips restoring contacts that already exist in the account.
- Override older (Destructive): This method replaces the existing contacts with an older version if changes are made.
- Override always (Destructive): This method always replaces all of the existing contacts with the latest version.
- Click Restore.
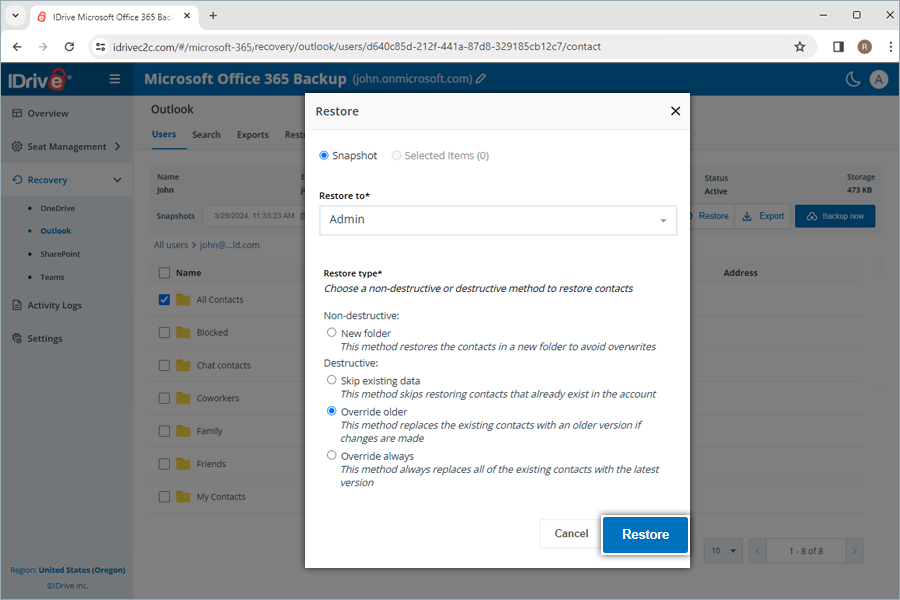
- Click Proceed in the confirmation popup, if you have selected Override older or Override always.
On selecting the non-destructive restore method to create a new folder, a label named after the restore mode and date will be auto-created at the restore location. A label (IDrive Restore selection <TimeStamp in UTC>) will be created when restoring selected items. Similarly, a label (IDrive Restore <TimeStamp in UTC>) will be created for snapshot restore, and (IDrive Restore search:Search_Term <TimeStamp in UTC>) folder will be created for search-based restore.
How do I restore the backed-up Outlook calendars from my IDrive® 360 Microsoft Office 365 Backup account?
To restore the backed-up calendars,
- Go to the Recovery tab on your IDrive® 360 Microsoft Office 365 Backup dashboard.
- Select Outlook.
- Click the user account from which you want to restore data.
- Click Calendar.
- Select the appropriate recovery point under Snapshots if you want to perform a point-in-time restore. To restore a specific event or folder, select the item from the list of backed-up items. You can also search for a specific event or label.
- Click Restore. A popup window will appear.
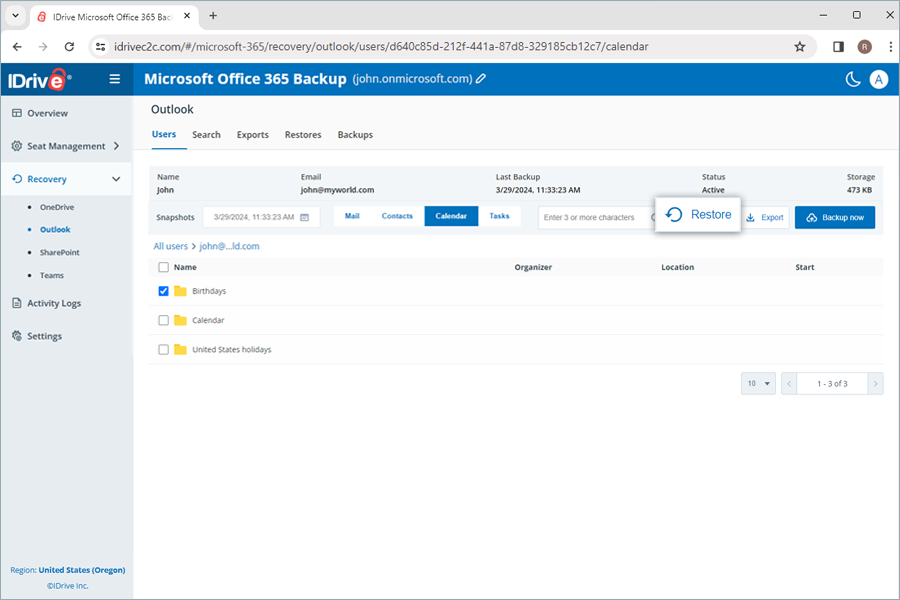
- Select Snapshot or Selected Item as required.
Note: The Selected Item option will be enabled only if you have selected items for restore. If nothing is selected, Snapshot is selected by default. - Select the user account from the Restore to drop-down menu to which you want to restore the snapshot or the selected item. You can restore the data to the same user account or a different user account.
- Choose a non-destructive or destructive restore method to manage existing files:
- New folder (Non-destructive): This method restores the events in a new folder to avoid overwrites.
- Skip existing data (Destructive): This method skips restoring events that already exist in the account.
- Override older (Destructive): This method replaces the existing events with an older version if changes are made.
- Override always (Destructive): This method always replaces all of the existing events with the latest version.
- Click Restore.
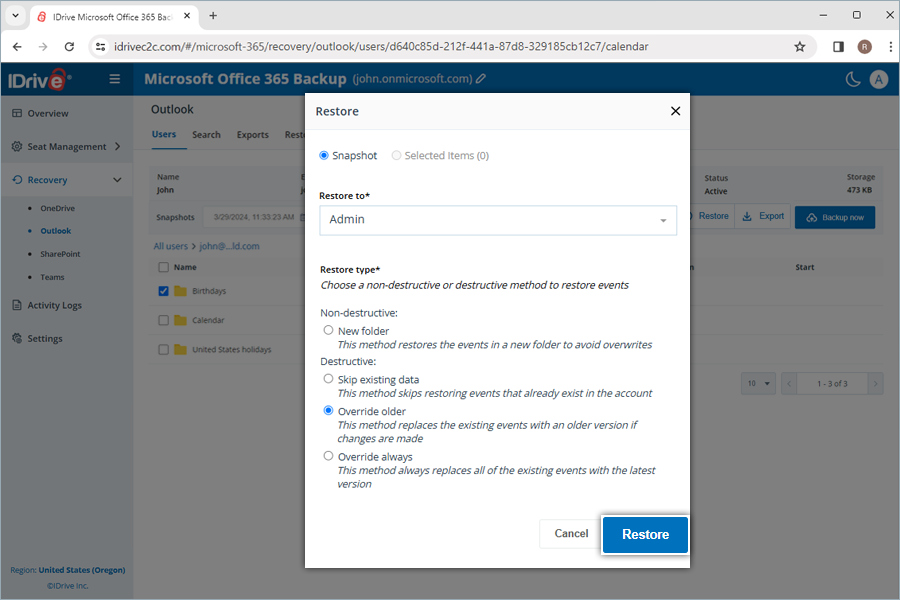
- Click Proceed in the confirmation popup, if you have selected Override older or Override always.
On selecting the non-destructive restore method to create a new folder, a calendar named after the restore mode and date will be auto-created at the restore location. A calendar (IDrive Restore selection <TimeStamp in UTC>) will be created when restoring selected items. Similarly, a calendar (IDrive Restore <TimeStamp in UTC>) will be created for snapshot restore, and (IDrive Restore search:Search_Term <TimeStamp in UTC>) folder will be created for search-based restore.
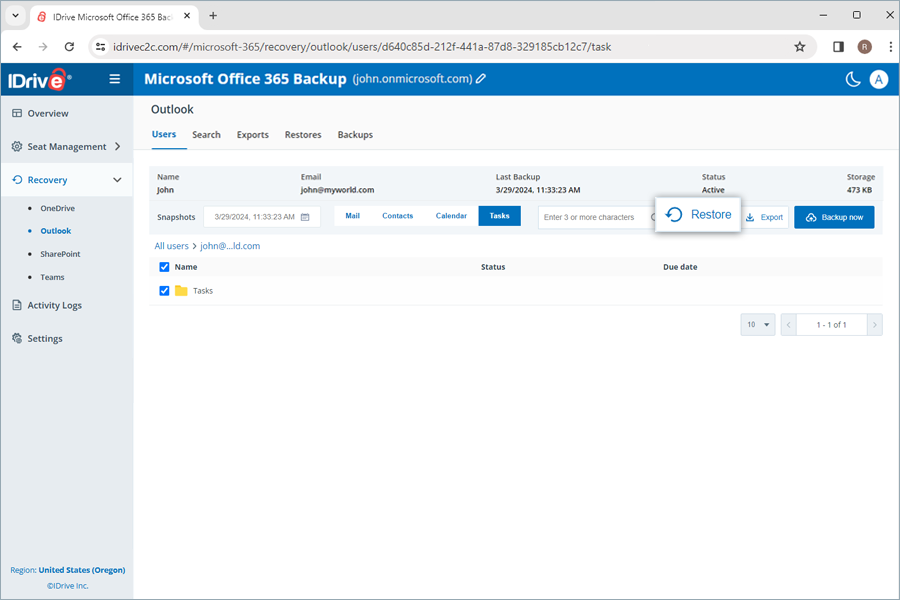
How do I restore the backed-up Outlook tasks from my IDrive® 360 Microsoft Office 365 Backup account?
To restore the backed-up tasks,
- Go to the Recovery tab on your IDrive® 360 Microsoft Office 365 Backup dashboard.
- Select Outlook.
- Click the user account from which you want to restore data.
- Click Tasks.
- Select the appropriate recovery point under Snapshots if you want to perform a point-in-time restore. To restore a specific task or folder, select the item from the list of backed-up items. You can also search for a specific task or label.
- Click Restore. A popup window will appear.
- Select Snapshot or Selected Item as required.
Note: The Selected Item option will be enabled only if you have selected items for restore. If nothing is selected, Snapshot is selected by default. - Select the user account from the Restore to drop-down menu to which you want to restore the snapshot or the selected item. You can restore the data to the same user account or a different user account.
- Choose a non-destructive or destructive restore method to manage existing files:
- New folder (Non-destructive): This method restores the tasks in a new folder to avoid overwrites.
- Skip existing data (Destructive): This method skips restoring tasks that already exist in the account.
- Override older (Destructive): This method replaces the existing tasks with an older version if changes are made.
- Override always (Destructive): This method always replaces all of the existing tasks with the latest version.
- Click Restore.
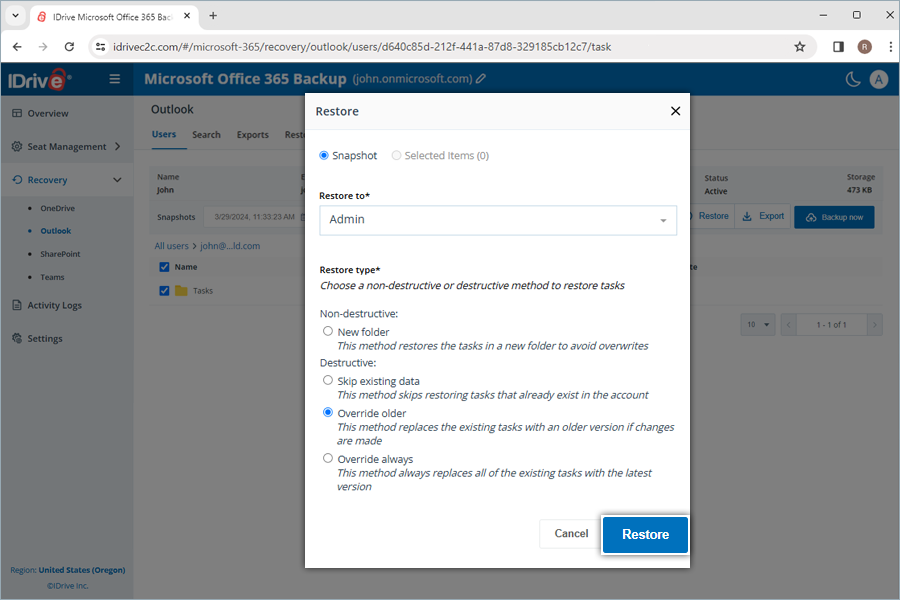
- Click Proceed in the confirmation popup, if you have selected Override older or Override always.
On selecting the non-destructive restore method to create a new folder, a label named after the restore mode and date will be auto-created at the restore location. A label (IDrive Restore selection <TimeStamp in UTC>) will be created when restoring selected items. Similarly, a label (IDrive Restore <TimeStamp in UTC>) will be created for snapshot restore, and (IDrive Restore search:Search_Term <TimeStamp in UTC>) folder will be created for search-based restore.
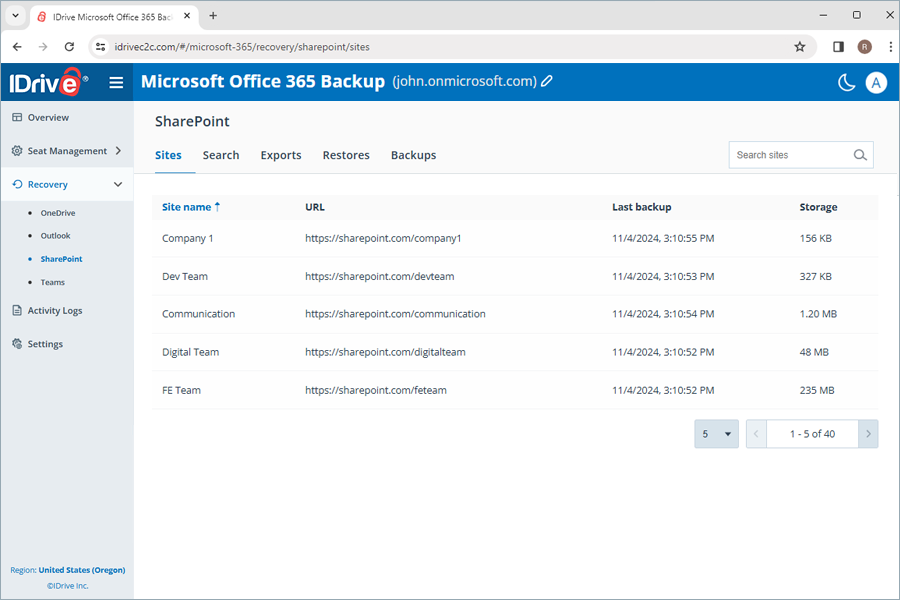
How do I restore the backed-up SharePoint data from my IDrive® 360 Microsoft Office 365 Backup account?
To restore the backed-up SharePoint data,
- Go to the Recovery tab on your IDrive® 360 Microsoft Office 365 Backup dashboard.
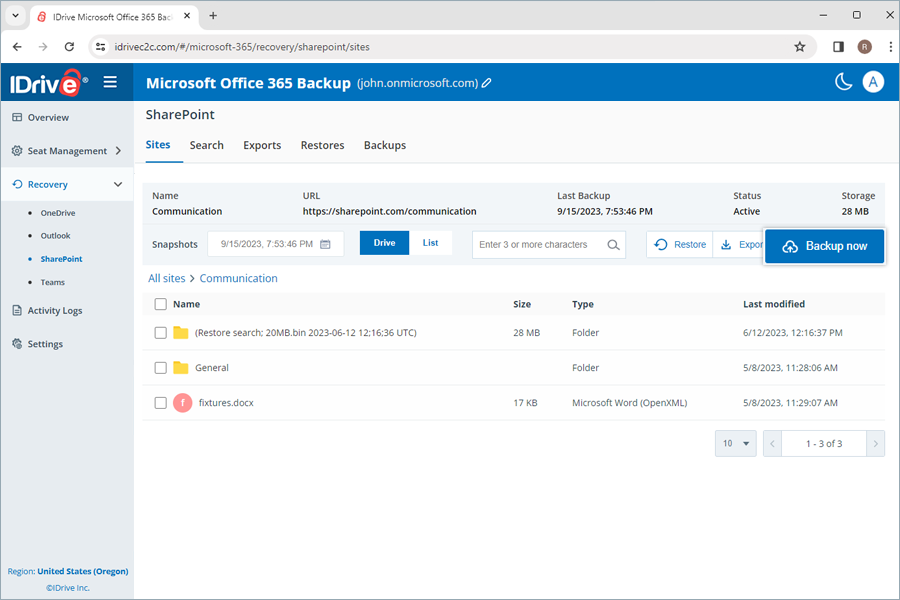
- Select SharePoint.
- Click the user account from which you want to restore data.
- Select Drive to restore SharePoint drives or List to restore SharePoint lists.
- Select the appropriate recovery point under Snapshots if you want to perform a point-in-time restore. To restore a specific file or folder, select the item from the list of backed-up items. You can also search for a specific file or folder.
- Click Restore. A popup window will appear.
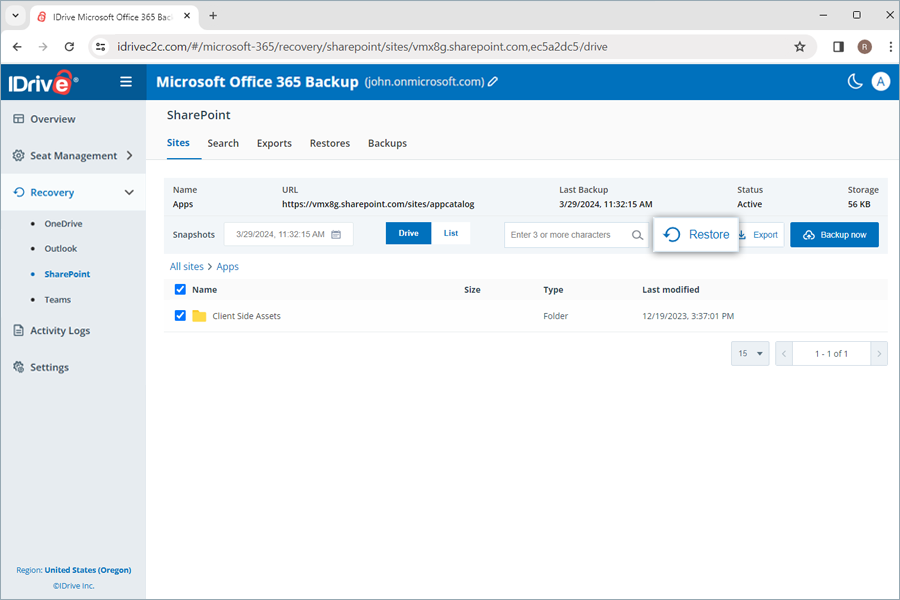
- Select Snapshot or Selected Item as required.
Note: The Selected Item option will be enabled only if you have selected items for restore. If nothing is selected, Snapshot is selected by default. - Select the user account from the Restore to drop-down menu to which you want to restore the snapshot or the selected item. You can restore the data to the same user account or a different user account.
- Choose a non-destructive or destructive restore method to manage existing files:
- New folder (Non-destructive): This method restores the files in a new folder to avoid overwrites.
- Skip existing data (Destructive): This method skips restoring files that already exist in the account.
- Override older (Destructive): This method replaces the existing files with an older version if changes are made.
- Override always (Destructive): This method always replaces all the existing files with the latest version.
- Click Restore.

- Click Proceed in the confirmation popup, if you have selected Override older or Override always.
On selecting the non-destructive restore method to create a new folder, a folder named after the restore mode and date will be auto-created at the restore location. A folder (IDrive Restore selection <TimeStamp in UTC>) will be created when restoring selected items. Similarly, a folder (IDrive Restore <TimeStamp in UTC>) will be created for snapshot restore, and (IDrive Restore search:Search_Term <TimeStamp in UTC>) folder will be created for search-based restore.
How do I restore the backed-up Teams data from my IDrive® 360 Microsoft Office 365 Backup account?
To restore the backed-up Teams data,
- Go to the Recovery tab on your IDrive® 360 Microsoft Office 365 Backup dashboard.
- Select Teams.
- Click the user account from which you want to restore data.
- Select Drive to restore attachments.
Note: Team channels conversations cannot be restored. - Select the appropriate recovery point under Snapshots if you want to perform a point-in-time restore. To restore a specific file or folder, select the item from the list of backed-up items. You can also search for a specific file or folder.
- Click Restore. A popup window will appear.
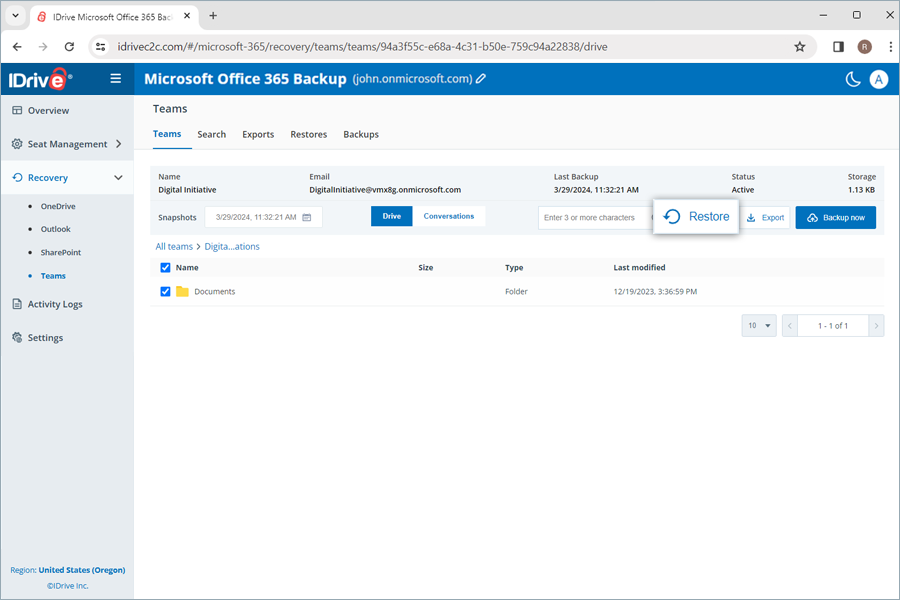
- Select Snapshot or Selected Item as required.
Note: The Selected Item option will be enabled only if you have selected items for restore. If nothing is selected, Snapshot is selected by default. - Select the user account from the Restore to drop-down menu to which you want to restore the snapshot or the selected item. You can restore the data to the same user account or a different user account.
- Choose a non-destructive or destructive restore method to manage existing files:
- New folder (Non-destructive): This method restores the files in a new folder to avoid overwrites.
- Skip existing data (Destructive): This method skips restoring files that already exist in the account.
- Override older (Destructive): This method replaces the existing files with an older version if changes are made.
- Override always (Destructive): This method always replaces all the existing files with the latest version.
- Click Restore.
- Click Proceed in the confirmation popup, if you have selected Override older or Override always.
On selecting the non-destructive restore method to create a new folder, a folder named after the restore mode and date will be auto-created at the restore location. A folder (IDrive Restore selection <TimeStamp in UTC>) will be created when restoring selected items. Similarly, a folder (IDrive Restore <TimeStamp in UTC>) will be created for snapshot restore, and (IDrive Restore search:Search_Term <TimeStamp in UTC>) folder will be created for search-based restore.
How do I cancel an ongoing restore in my IDrive® 360 Microsoft Office 365 Backup account?
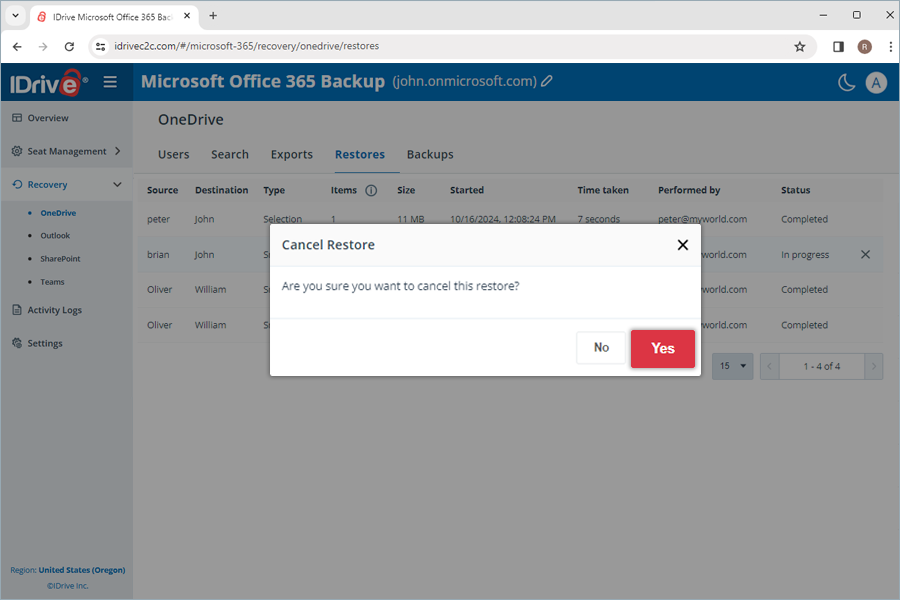
To cancel an ongoing data restore,
- Go to Recovery and select the required module from the drop-down list.
- Click Restores.
- Click
 to stop the ongoing restore operation.
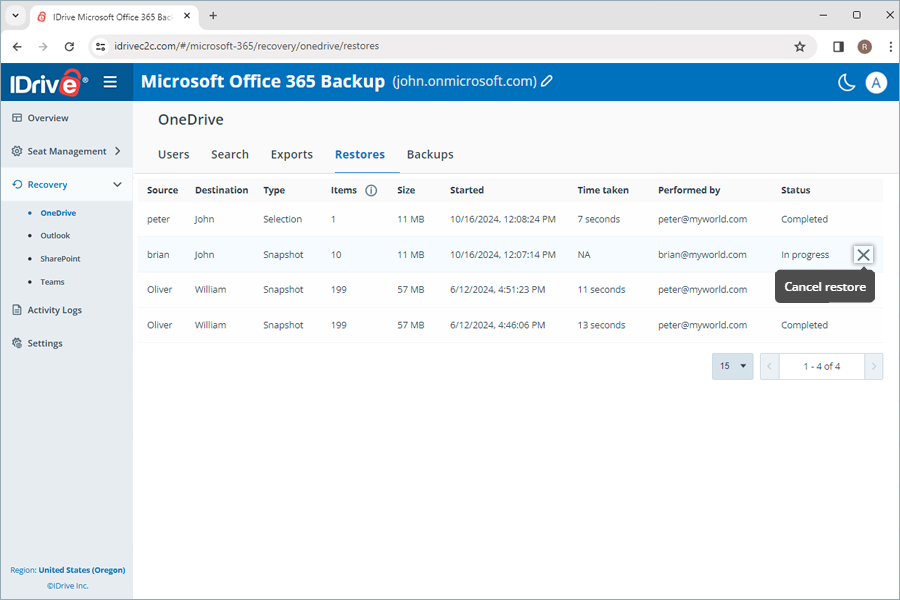
- Click Yes in the confirmation popup.
Can I search and restore a specific file or folder in IDrive® 360 Microsoft Office 365 Backup?
Yes. IDrive® 360 Microsoft Office 365 Backup allows you to search and recover specific files, entire folders, images, videos, emails, and even contacts and calendars at a granular level.
Note: Global search only supports new folder restore.
How do I search for a specific item from my IDrive® 360 Microsoft Office 365 Backup account?
You can perform both point-in-time and file-level searches across multiple search parameters to perform granular restore.
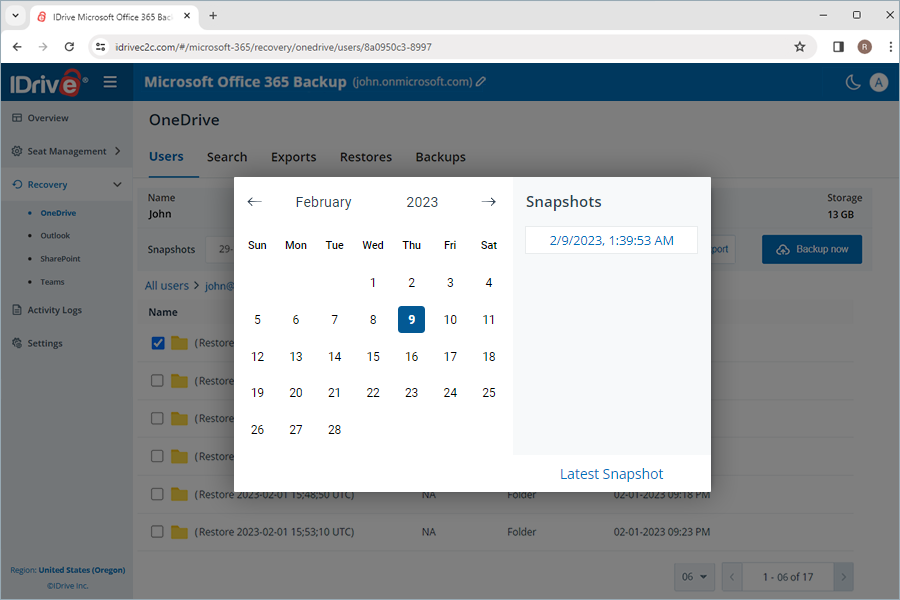
To perform a point-in-time search for restoring a specific version of the backed-up data from a user account,
- Go to the Recovery tab on your IDrive® 360 Microsoft Office 365 Backup dashboard.
- Select the required application from which you want to restore data.
- Click the user account for which you want to perform the search.
- To search for all the snapshots for a specific data, select the date on the calendar. A list of all the recent snapshots will be displayed on screen. Select the required snapshot. Click Latest Snapshot to find the latest snapshot.
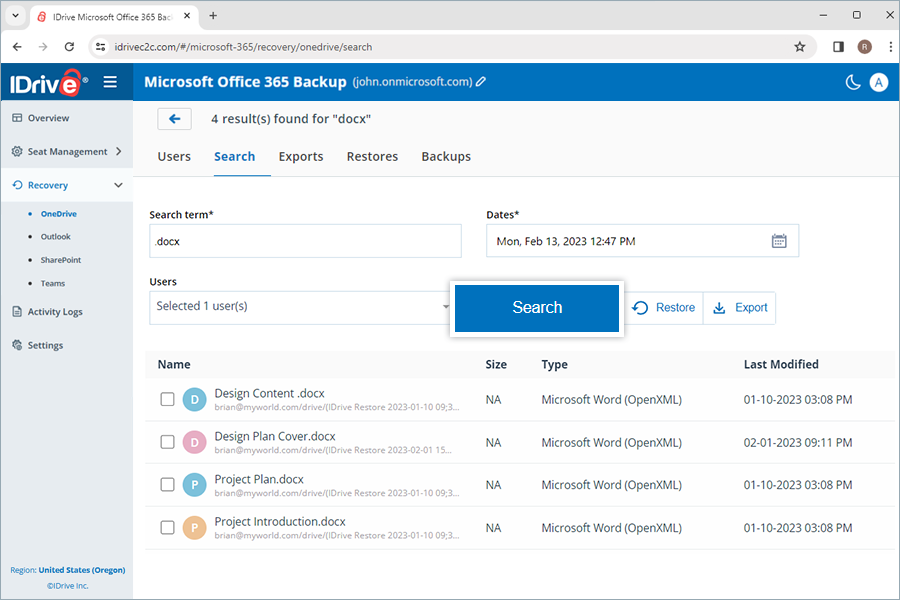
A file-level search enables you to locate specific backed-up files and folders from a user account.
To perform file-level restore,
- Go to the Recovery tab on your IDrive® 360 Microsoft Office 365 Backup dashboard.
- Select the required application for which you want to restore data.
- Go to the Search tab.
- Enter a valid search term, set the required date and time for snapshots, select single or multiple users from the dropdown menu. Refer to this FAQ for search terms.
Note: The closest snapshot to the selected timestamp will be displayed.
- Click Search.
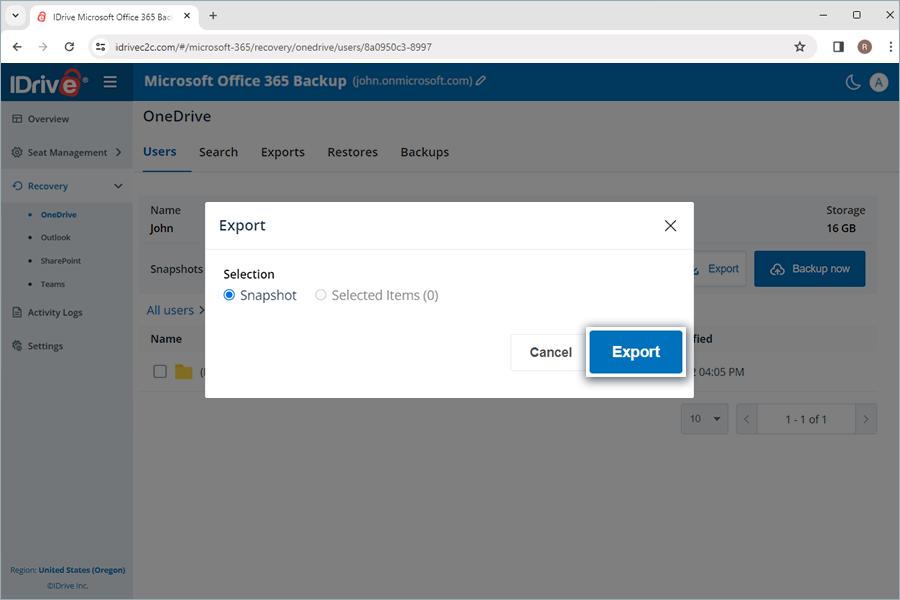
How do I export the backed-up Microsoft Office Suite data from my IDrive® 360 Microsoft Office 365 Backup account ?
To export the backed-up data,
- Go to the Recovery tab on your IDrive® 360 Microsoft Office 365 Backup dashboard.
- Select the required application for which you want to export data.
- Select the appropriate snapshot under Snapshots if you want to perform a point-in-time export. To export a specific file or folder, select the item from the list of backed-up items. You can also search for a specific file or folder.
- Click Export. A popup window will appear.
- Select Snapshot or Selected Item as required.
Note: The Selected Item option will be enabled only if you have selected items for restore. If nothing is selected, Snapshot is selected by default. - Click Export.
You can download the generated export files in the Exports tab by clicking ![]() next to successful exports. Alternatively, click
next to successful exports. Alternatively, click ![]() to delete the exported data.
to delete the exported data.
Note: Exported data will be downloaded as zip files.
To cancel an ongoing data export, click ![]() and click Yes in the confirmation popup.
and click Yes in the confirmation popup.
What search terms are supported for export and restore in my IDrive® 360 Microsoft Office 365 Backup account?
IDrive 360 Microsoft 365 Backup supports specific search terms for each module, as listed below:
| Module | Search Term |
|---|---|
| OneDrive | Folder Name/File Name |
| Outlook - Mail | Folder Name/Subject |
| Outlook - Contacts | Folder Name/Contact Name |
| Outlook - Calendar | Folder Name/Event Name |
| Outlook - Tasks | Folder Name/Task Name |
| SharePoints | Folder Name/File Name |
| Team - Drive | Folder Name/File Name |
| Team Conversations | Name/Message |
Note: Restore of Teams conversations is not supported.
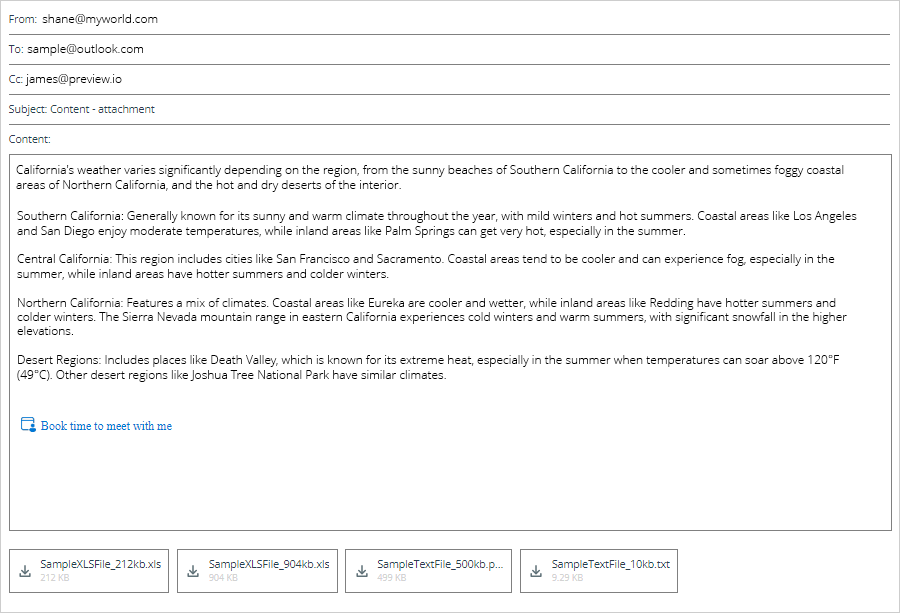
Can I preview the content of a backed up email?
Yes, you can preview the content of any backed up email. Go to Recovery > Outlook and click on the required email. The content of the email will be displayed in a preview pane. You can download any attachments to your computer.
Can I restore corrupted files and folders from my IDrive® 360 Microsoft Office 365 Backup account?
Yes, you can restore deleted or corrupted files and folders directly to the user account or download them on a device while retaining their exact folder structure.
Why is there no restore option for Microsoft Office 365 Personal backup users?
Microsoft Office 365 Personal Backup has API limitations in the current version to enable the restore option to the users. We are working on implementing a different API approach and it will be available in the upcoming releases.
Can I view the activity logs for my IDrive® 360 Microsoft Office 365 Backup account?
Yes, you can view the logs or generate summary of the scheduled System Events and Admin Actions like backup, restore, search, and web operations performed manually, across IDrive® 360 Microsoft Office 365 Backup under the Activity Logs tab.
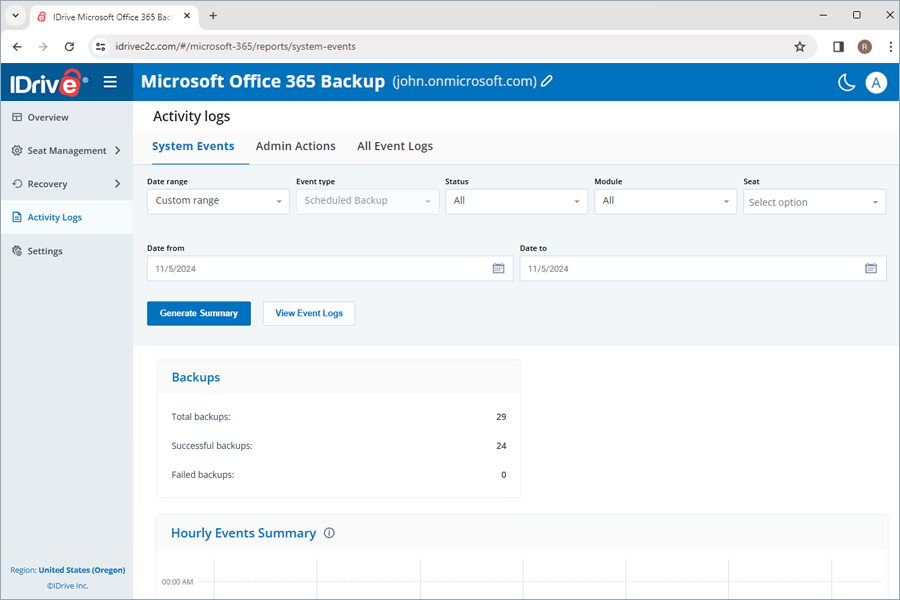
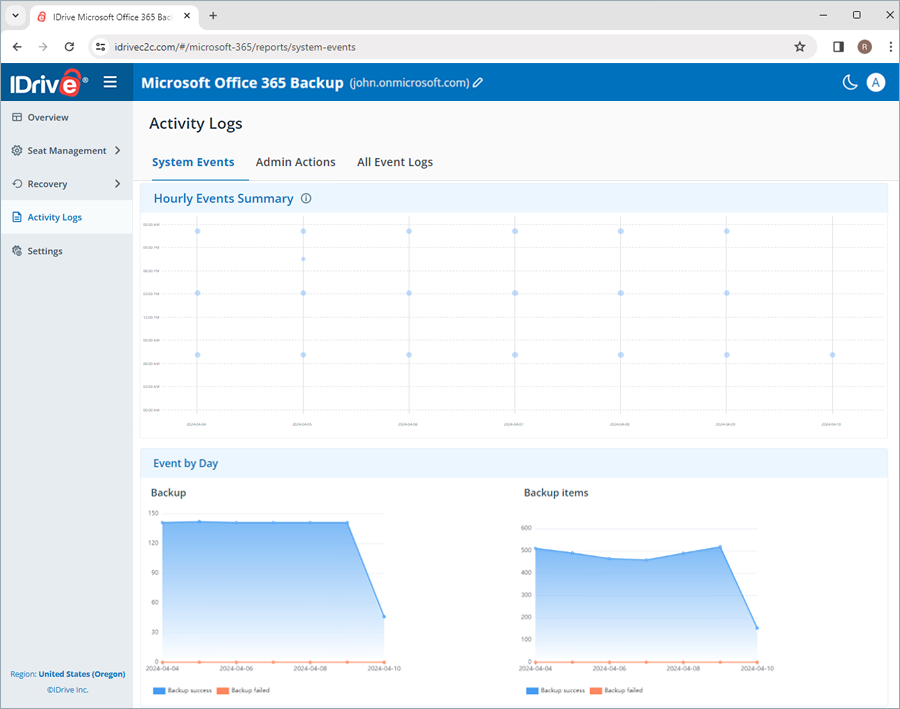
How do I view system activity logs for my IDrive® 360 Microsoft Office 365 Backup?
To view activity logs for system-generated automatic backups,
- Navigate to the Activity Logs tab.
- Click System Events.
- Select Date range. To set a custom start and end date, select Custom range.
- Next, specify the following parameters:
- Event Type: By default, it will be set as Scheduled.
- Status: Generate log for all activities or completed, pending, in progress and failed events.
- Module: Choose the backed-up service (OneDrive, Outlook, SharePoint, and Teams).
- Seat: Generate log for specific user(s), or all users.
- Click View Event Logs.
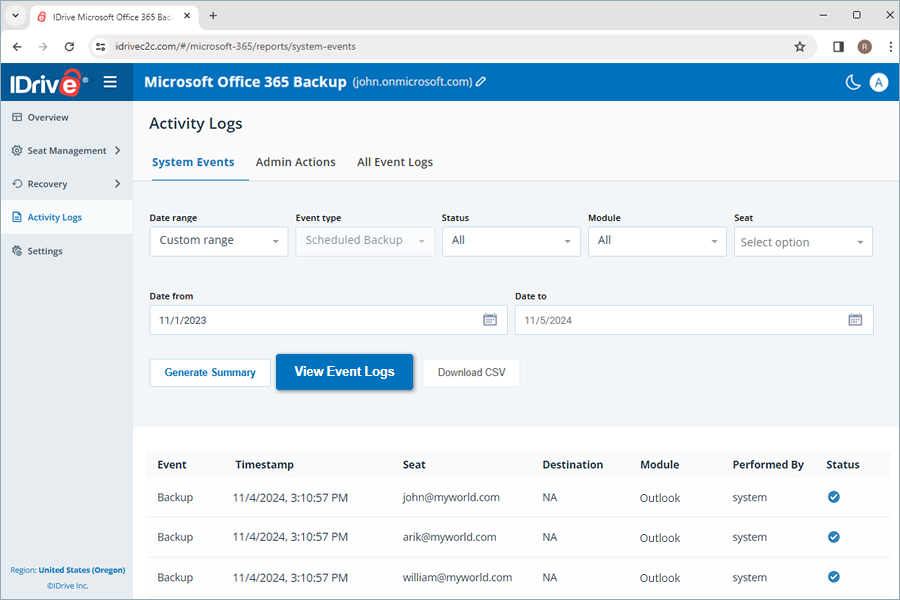
A list of all the scheduled backup activities including timestamp, seat, module, backup status, event (backup), destination (for restore), performed by, will be displayed on the screen. You can also view the summary of the hourly and daily events (backup).
To generate a detailed summary report of the activities, click Generate Summary.
You can also download the activity log reports on your system in CSV format by clicking Download CSV.
How do I view admin activity logs for my IDrive® 360 Microsoft Office 365 Backup account?
To view activity logs for admin-initiated actions,
- Navigate to the Activity Logs tab.
- Click Admin Actions.
- Select Date range. To set a custom start and end date, select Custom range.
- Next, specify the following parameters:
- Event Type: Select the type of operation (All, backup, export, restore, and search)
- Status: Generate log for all activities or completed, pending, in progress and failed events.
- Module: Choose the backed-up service (OneDrive, Outlook, SharePoint, and Teams).
- Seat: Generate log for specific user(s), or all users.
- Click View Event Logs.
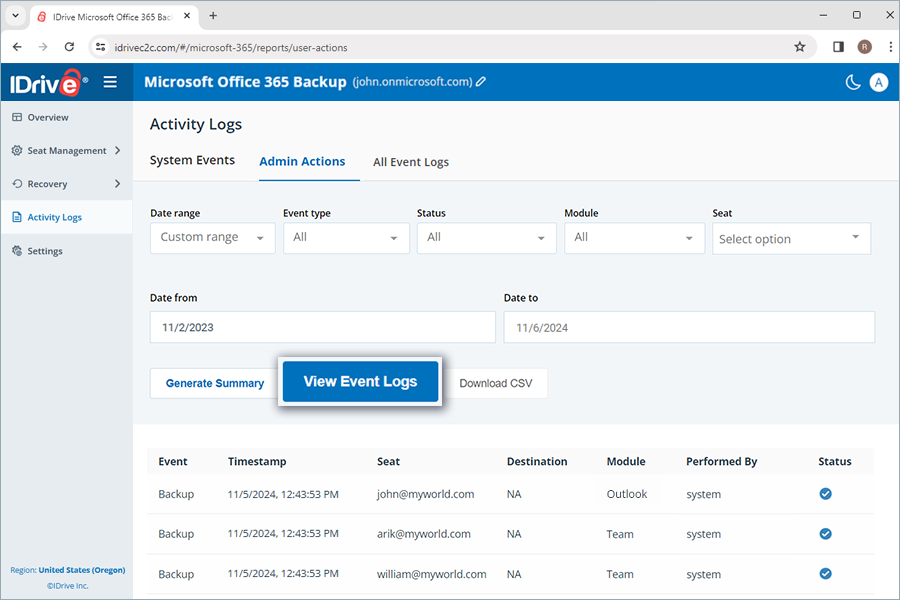
A list of all the scheduled backup activities including timestamp, seat, module, backup status, event (backup), destination (for restore), performed by, will be displayed on the screen.
To generate a detailed summary report of the activities, click Generate Summary.
You can also download the activity log reports on your system in CSV format by clicking Download CSV.
How can I view all event activity log reports for my IDrive® 360 Microsoft Office 365 Backup?
To view activity log reports for all events,
- Navigate to the Activity Logs tab.
- Click All Event Logs.
- Select Date range. To set a custom start and end date, select Custom range.
- Next, specify the following parameters:
- Event Type: Select the type of operation (All, backup, export, restore, and search)
- Status: Generate log for all activities or completed, pending, in progress and failed events.
- Module: Choose the backed-up service (OneDrive, Outlook, SharePoint, and Teams).
- Seat:Generate log for specific user(s), or all users.
- Click View Event Logs.
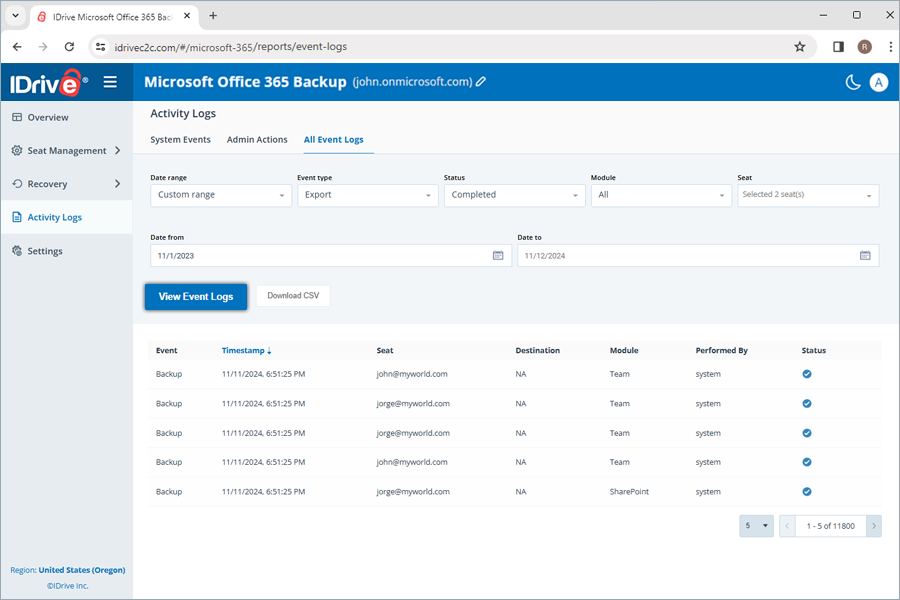
A list of all the scheduled and manual system as well as admin backup activities including timestamp, seat, module, backup status, event (backup), destination (for restore), performed by, will be displayed on the screen.
To generate a detailed summary report of the activities, click Generate Summary. You can also download the activity log reports on your system in CSV format by clicking Download CSV.