General
To get started, create an IDrive® CRM account and sign in to your account using the credentials. Once you have signed in, set up your sales process for creating stronger customer relations. Explore the FAQs below to effectively use your IDrive® CRM account.
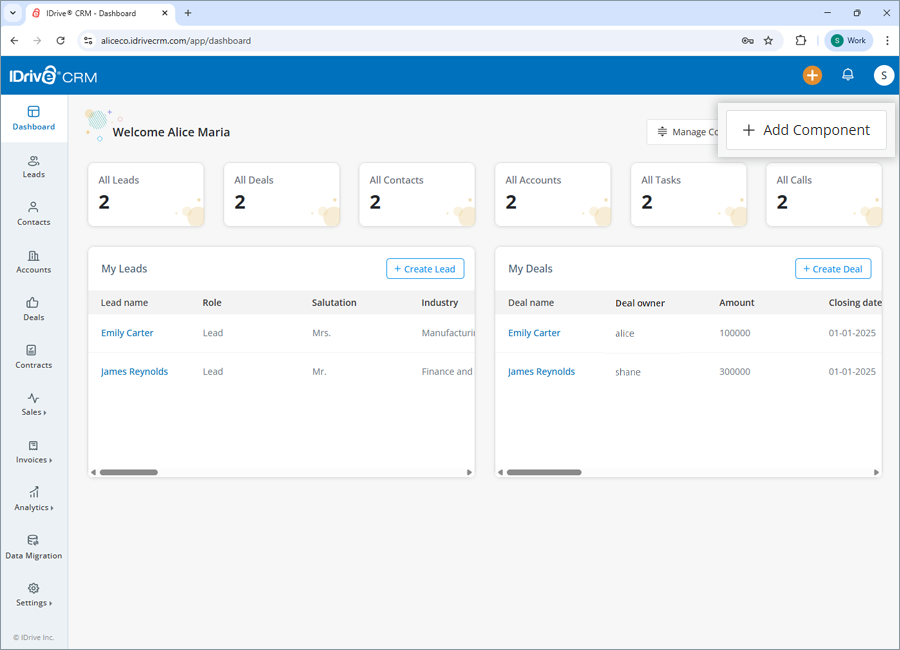
The Dashboard gives an overview of the tasks and meetings, along with their POC (point of contact) name, status, and priority. It also displays your sales data, KPI’s, and other CRM metrics in one place.
IDrive® CRM is a tool designed to streamline sales processes for businesses by providing insights into customer preferences so you can optimize your operations and build stronger, lasting customer relationships.
Yes, you can securely access and manage your IDrive® CRM account from anywhere via the web. Using our easy-to-use web console you can easily create, access, and manage your leads/deals from wherever you are.
Yes, you can customize the dashboard to create a personalized view with quick access to key information.
To add new components to the dashboard,
- Sign in to your IDrive® CRM account.
- On the Dashboard page, click Add Component.
- Select a module from the dropdown list.
- Select a filter from the dropdown list.
- Enter a name for the component.
- Choose a type of widget - Count or Table.
- Click Create.
Once created, the component will be displayed on the Dashboard.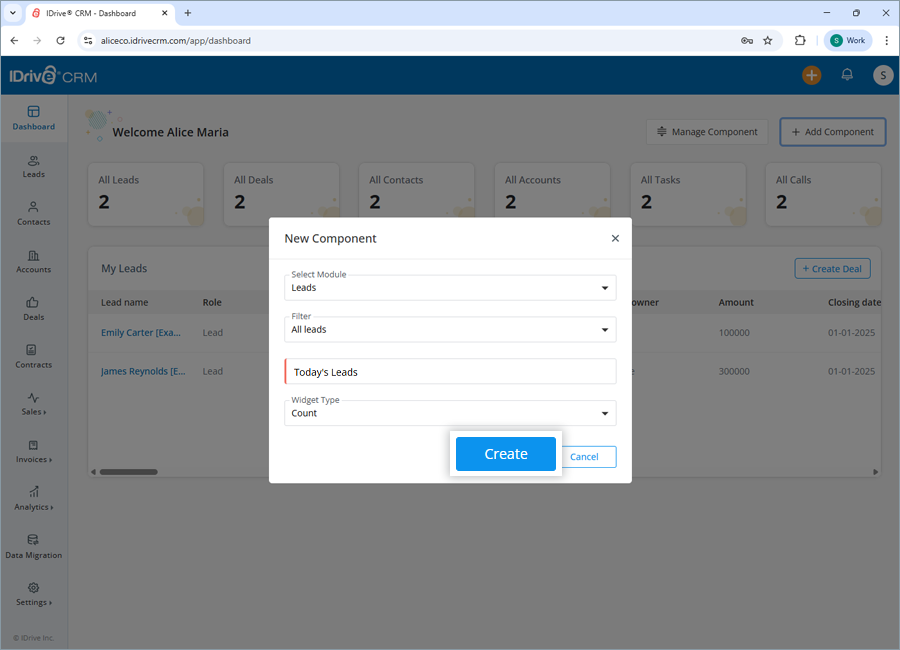
To organize and modify dashboard components,
- On the Dashboard page, click Manage Component.
- Hover on the component you want to modify.
- Edit: Click
 and select Edit. Modify the component details as required and click Update to save changes.
 - Delete: Click and select Edit. Confirm Delete in the popup and then click Save Changes on the dashboard to finalize the deletion.
- Reorder: Drag and drop components to reorganize their order.
- Resize: Drag a component's corners using the slider to adjust its size.
- Edit: Click
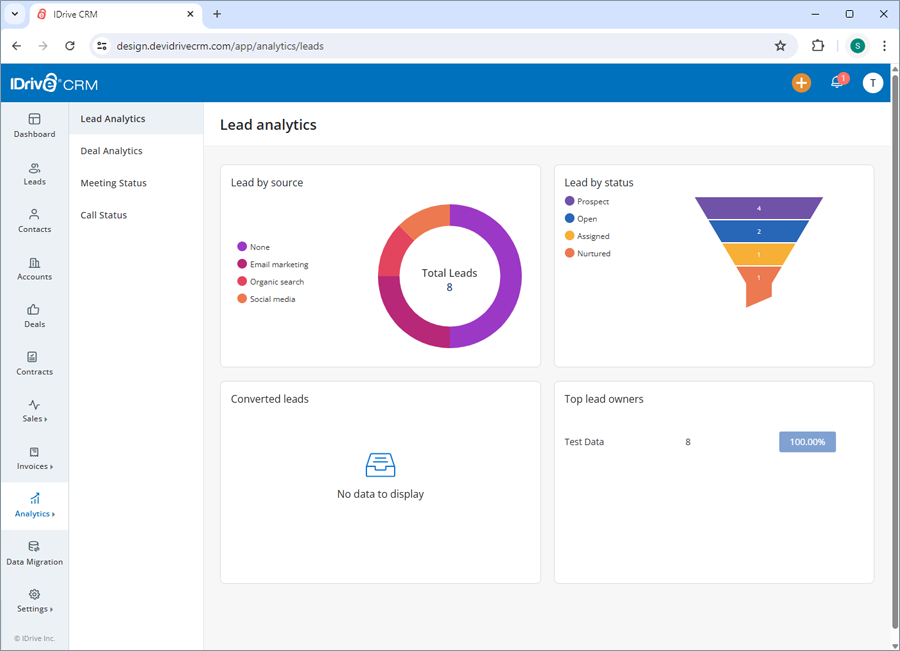
The Analytics page displays a graphical representation of the statistical information as well as the status of all the leads, deals, meetings, and calls in your account with the help of easy-to-understand charts and graphs.
Sign in to your IDrive® CRM account and navigate to Analytics to view the following information:
- Lead analytics - Displays the statistics of leads by source, status, converted leads, and the top lead owners.
- Deal insights - Displays the statistics of deals by source, stage, ongoing deals for the current month, and the top deal owners.
- Meeting status - Displays the statistics of meetings by status, meetings created and scheduled for the current week and month, and the top meeting owners.
- Call status - Displays the statistics of calls by purpose, calls created and scheduled for the current week and month, and the top call owners.
- Custom Analytics - Displays the statistics of desired modules as per your preferred style and time range via the IDrive Analytics extension.
To access custom metrics, you will need to enable the Custom Analytics feature by installing the IDrive Analytics extension.
To enable custom analytics,
- Sign in to your IDrive® CRM account.
- Navigate to Analytics and click Custom Analytics.
- Click Go to Extensions. The Extensions page will appear.

- Click IDrive Analytics and click Install.


- On the activation page, click Activate.

Once installed, return to the Custom Analytics page to start generating metrics.
To generate and view metrics,
- Choose the module for which you want to generate metrics.
- Choose the required columns.
- Select a graphical layout - Bar, Line, Scatter, Pie, Donut.
- Select From Date and End Date and click Generate.

The generated analytics will be displayed in the selected chart format along with the JSON data. To download the chart, click Download.
IDrive® CRM uses industry-standard robust AES-256-encryption that is ideal for higher security needs of Financial, Healthcare, and Government organizations to secure your sensitive data in storage from any loss.
Data is stored at our world-class data centers equipped with state-of-the-art security and surveillance systems to prevent unauthorized access.
We are currently blocking access from the following countries for security and compliance reasons:
- Russia
- China
- Ukraine
Paid users from these countries can send request for allowing IPs but each request is subject to review and may not be approved. If your IP address changes frequently, you will need to provide updated information for consideration.
For more assistance, contact our support team.
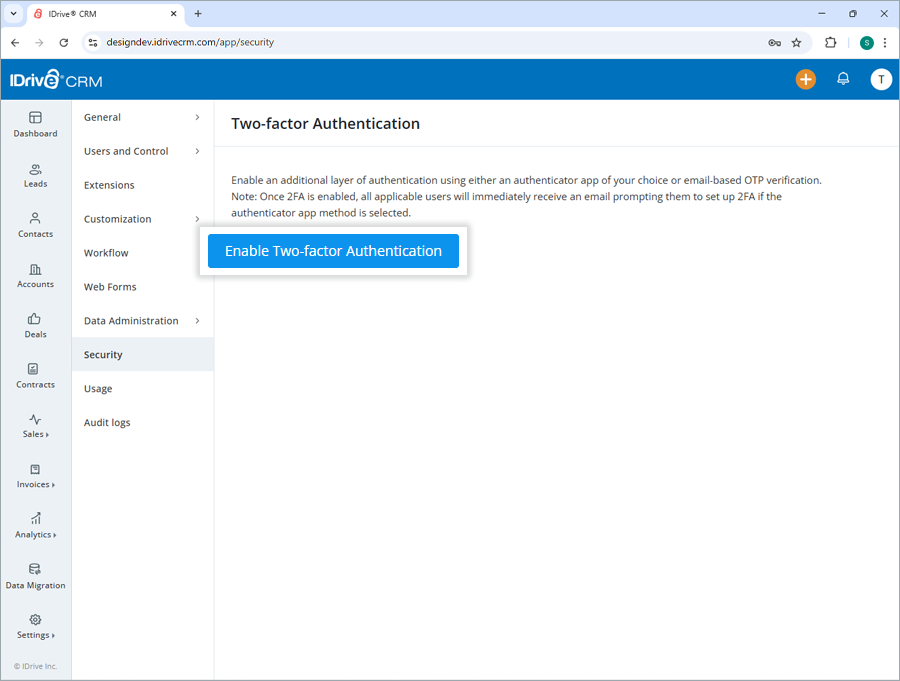
The two-factor authentication process enhances the security of your account and prevents access by unauthorized parties. Once two-factor authentication is enabled, in addition to your password, you will need to enter a verification code sent to your registered email address while signing in to IDrive® CRM.
To enable two-factor authentication,
- Sign in to your IDrive® CRM account.
- Navigate to Settings and click Security.
- In the Two-factor authentication screen, click Enable Two-Factor Authentication.
- Select Email Address or Time-based OTP authentication as your preferred method of receiving the one-time verification code and click Confirm.
Click here to know how to set up via Time-based OTP Authenticator app.
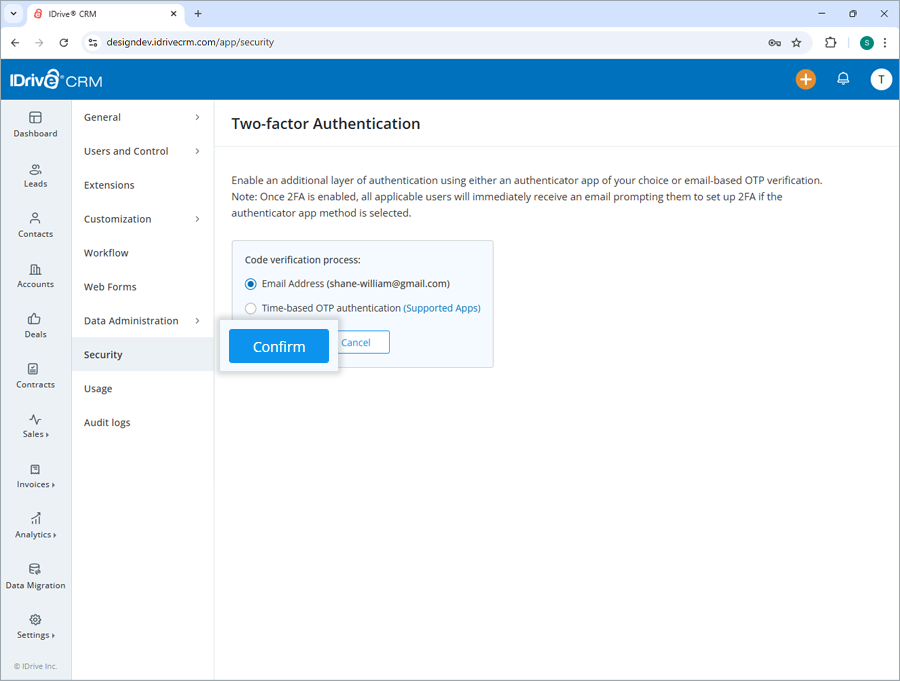
- Enter the verification code sent to your registered email address and click Verify & Enable.
Once enabled, you can apply the verification to all users or select specific users.
To sign in after two-factor authentication is enabled,
- On the sign in screen, enter your username and password and click Sign In.
- You will be prompted to enter a verification code sent to your email address.
- Enter the code and click Verify.
The two-factor authentication process enhances the security of your account and prevents access by unauthorized parties. Once two-factor authentication is enabled, in addition to your password, you will need to enter a verification code generated by the Time-based OTP authenticator app, installed on your mobile device, while signing in to IDrive® CRM.
To enable two-factor authentication,
- Sign in to your IDrive® CRM account.
- Navigate to Settings and click Security.
- In the Two-factor authentication screen, click Enable Two-Factor Authentication.
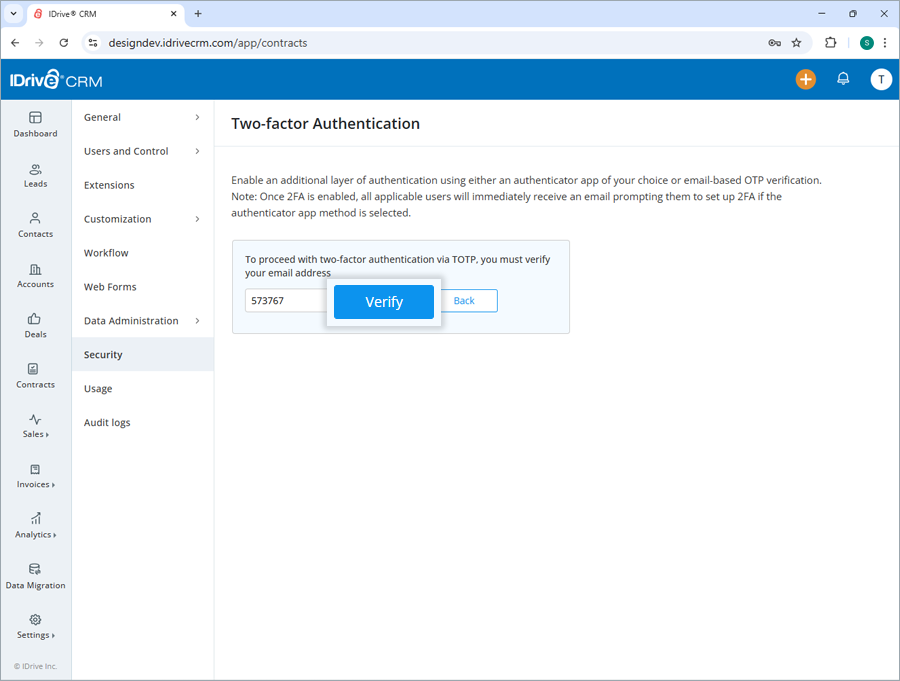
- Select Time-based OTP authentication as your preferred method of receiving the one-time verification code and click Confirm.
See supported TOTP apps

- Launch the Time-based OTP authenticator app on your mobile device and scan the QR code displayed on your computer screen. Alternatively, you can view the key by clicking enter key manually. Type it manually on your mobile device, and click Next.
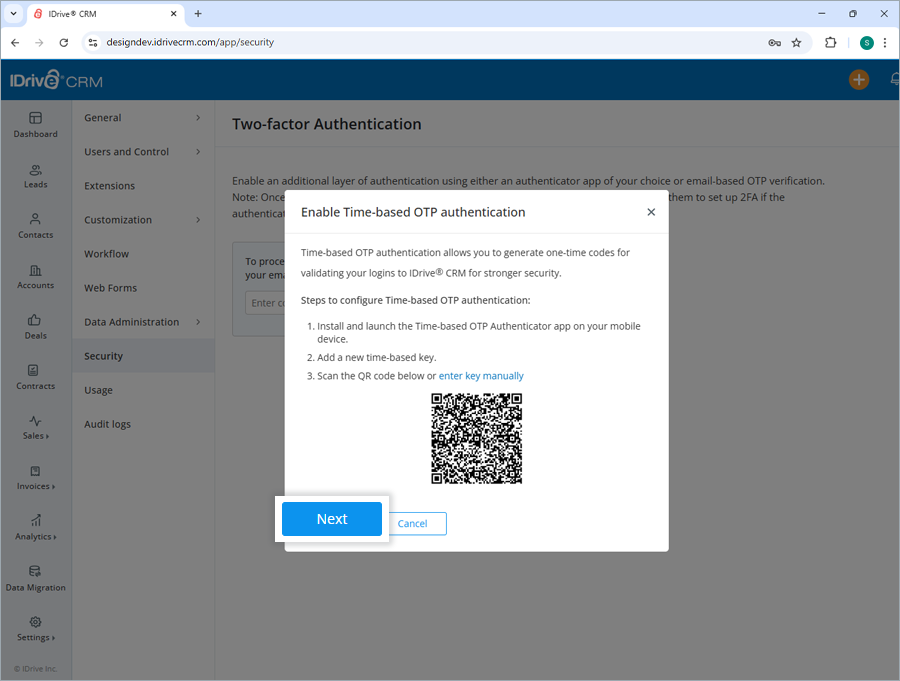
- Copy and save the recovery code displayed on your computer screen securely or click Download to download and save it as a
.txtfile. Click Continue.
Note: You will require the recovery code to deactivate two-factor authentication for your account in case you lose access to the mobile device where the Time-based OTP Authenticator app is installed.
- Enter the one-time code generated by the Time-based OTP Authenticator app on your mobile device and click Activate.
- On the sign in screen, enter your username and password and click Sign In.
- You will be prompted to enter the one-time code generated by the Time-based OTP Authenticator app on your mobile device.
- Enter the code and click Submit Code.
To sign in after two-factor authentication is enabled with Time-based OTP Authenticator,
To disable two-factor authentication,
- Sign in to your IDrive® CRM account.
- Navigate to Settings and click Security.
- In the Two-factor authentication screen, click Disable.
- In the Disable two-factor authentication popup screen, enter the OTP.
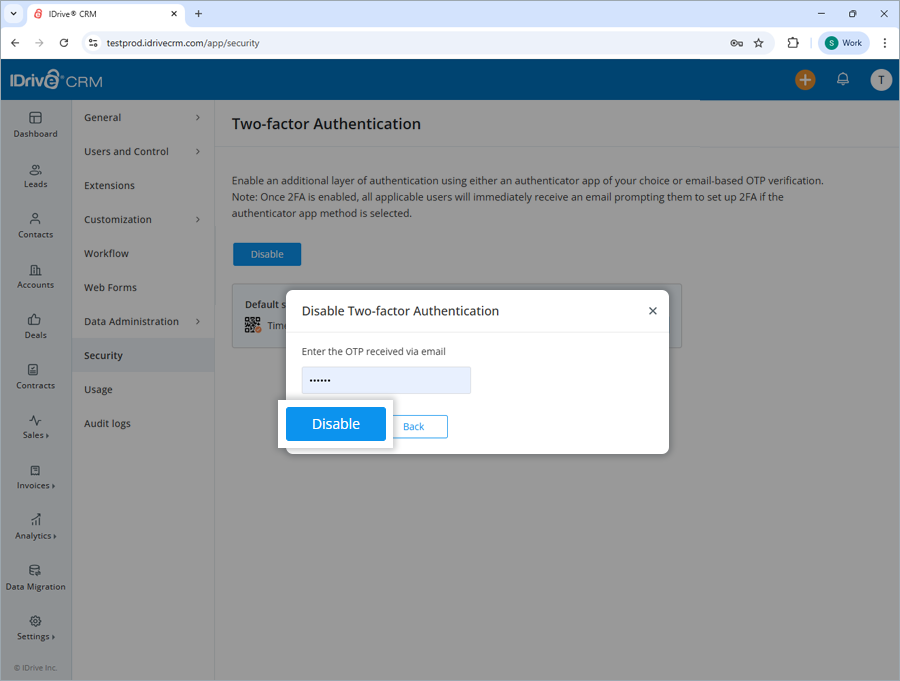
- Click Disable.
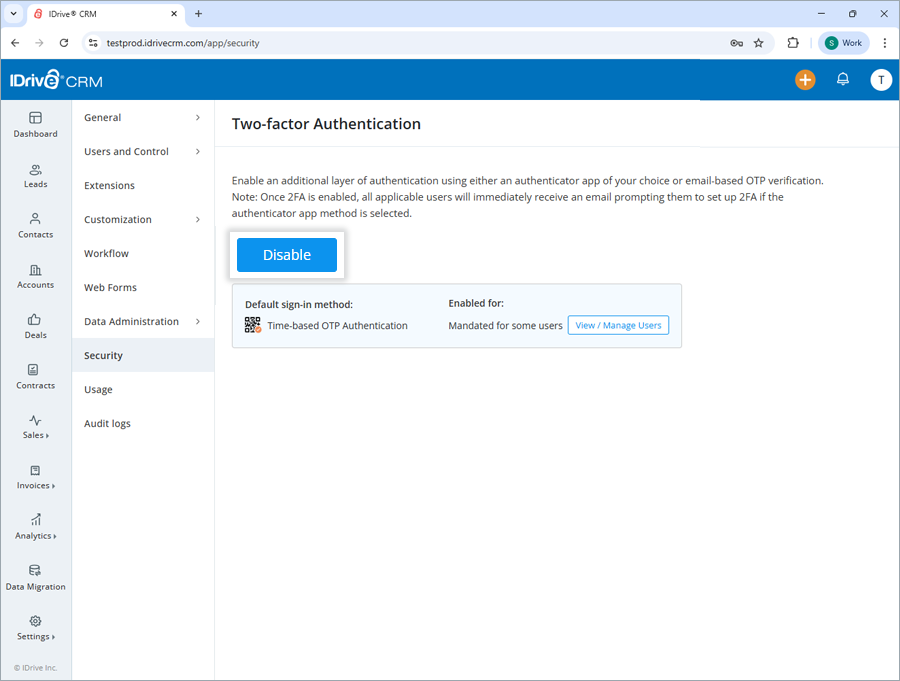
Two-factor authentication will be disabled for users who have it enabled.
IDrive® CRM supports the following Time-based OTP authenticator apps:
- Google Authenticator (Android/iPhone/BlackBerry)
- Duo Mobile (Android/iPhone)
- Microsoft Authenticator (Android/iPhone/Windows Phone 7)
- Okta Verify (Android/iPhone)
- Any other authentication app that supports time-based one-time protocol, or is compatible with Google Authenticator