Computers
Computers
Manage your data backups, restore files/folders to the corresponding computers, modify application settings, view logs, and do much more on your connected computers.
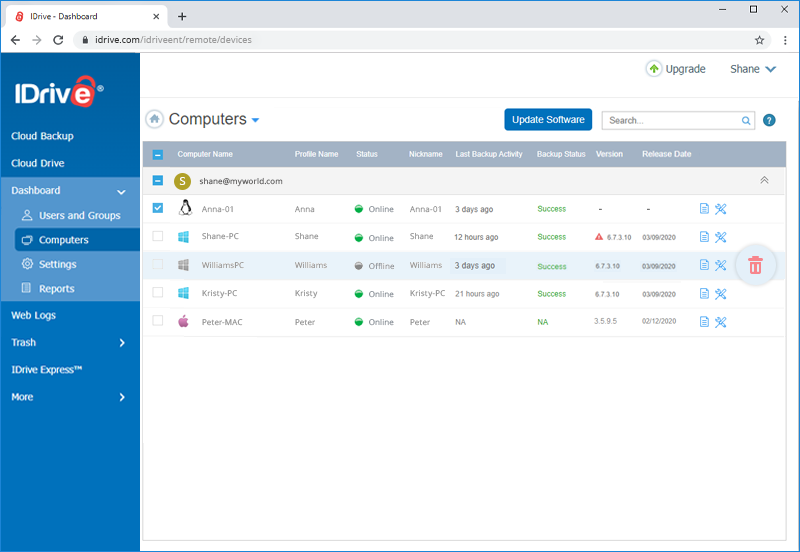
Computer List
Computer list displays the list of all the backed up computers. You can also view backup details like last backup time and the status of each backup.
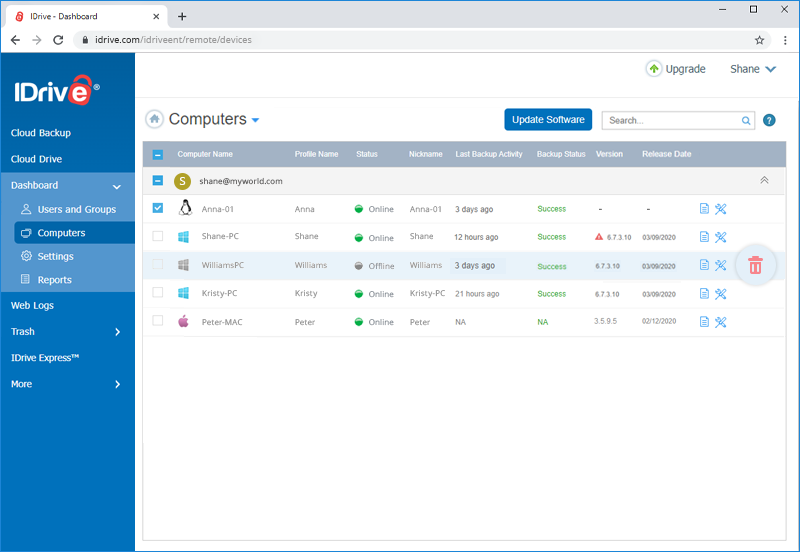
All the connected computers appear in the 'Computers' tab. Click the computer name to view the IDrive® application interface on the web.
The following status indicates that the connected computer is online or offline:
 The computer is online and the web access is enabled
 The computer is offline and the web access is disabled
Backup
Backup your data to your IDrive® account via the web. IDrive® creates a unique folder in your account with your computer name to backup data.
To instantly backup your files/folders,
- In the 'Backup' tab, files already selected for backup appear in the backup set.
- By default, the 'Backup files to my account' option is selected. Alternatively, to perform a local backup, select 'Backup files to a local destination'.
- To remove or add files to the backup set, click Modify.
- Click 'Backup Now'.
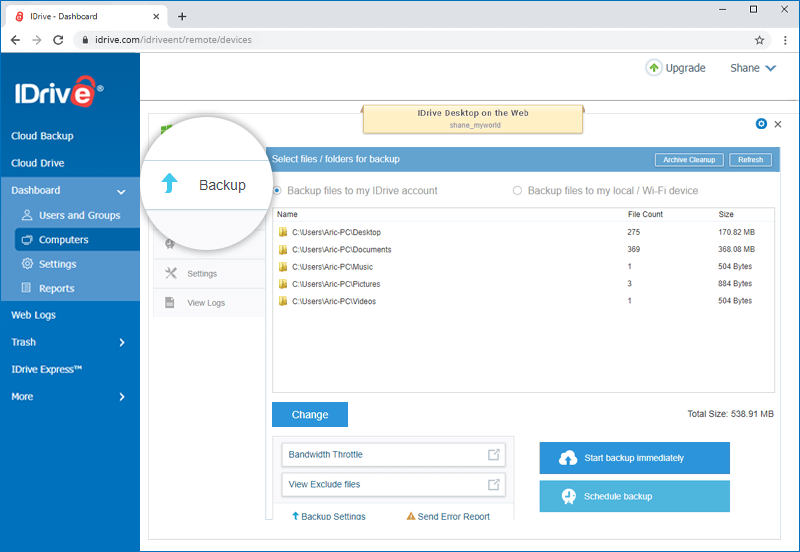
You can also schedule your backups to automate data protection. On the 'Backup' screen, click 'Backup' and configure the scheduling parameters like backup date, time, frequency, and notification type, and click 'Save Changes'. During backup, you can view the detailed backup progress status. Once the backup operation is complete, a popup will display the backup summary.
Send Error Report
The 'Send Error Report' option automatically captures all the essential information to help us resolve the problems you may be facing with the application.
To send an error report,
- Click icon then click 'Send Error Report' in the 'Backup' screen. The 'Send Error Report' window appears.
- Enter your IDrive Username, Email Address, Trouble Ticket Number, and Contact Number. Enter details of your problem, type of error or query in the 'Message' text box.
- Click 'Send' to send your feedback or query to the IDrive® technical support team.
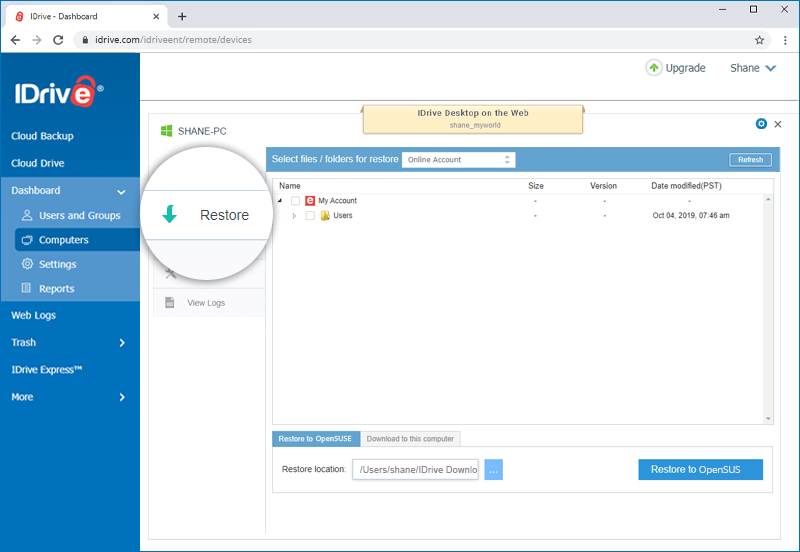
Restore
Restore files/folders from your IDrive® online account instantly to your computer or any other computer.
To restore your data,
- In the 'Restore' tab, select the desired files/folders.
- Click 'Restore to (your computer name)' to restore the files/folders to your computer.
- Click 'Restore'.
Note: You can choose the restore location on your computer using the 'Restore location' field.
During restore, the restore progress status appears on the screen. Once the restore operation is complete, a popup will display the summary.
Download
You can also download the selected files/folders from your IDrive account instantly to your computer or any other computer.
To download your files/folders,
- In the 'Restore' tab, select 'Download to this computer'.
- Click 'Download to this computer'.
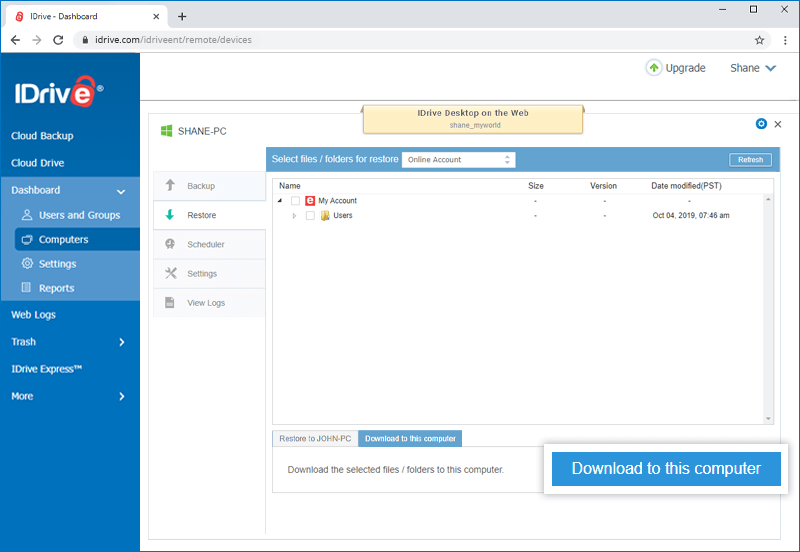
The downloaded file will be saved in the default download location of your computer.
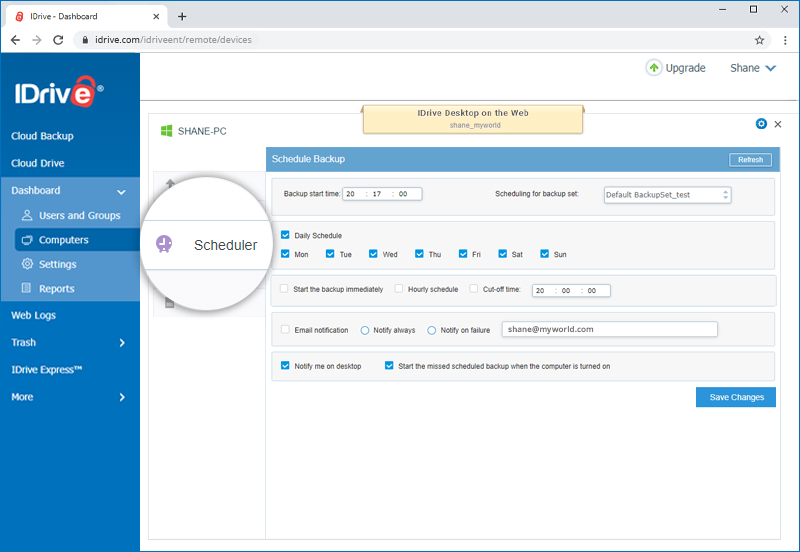
Scheduler
Schedule automated backups; set the day, time and notification options for your backup operations using the Scheduler option.
To schedule automated backups, set the following options under the 'Scheduler' tab:
- Backup start time - Set the time at which your scheduled backup should start.
- Backup set name - Select the backup set you want to schedule for backup.
- Daily - Select this option to run your backup jobs every day.
- Custom - Select the days of the week on which you want to run your backup jobs.
- Start the backup immediately - Select this option to run a backup job immediately.
- Hourly schedule - Select this option to configure hourly backup operations.
- Cut-off time - Set the time at which your scheduled backup should stop. This is helpful if you want to hard stop the backup progress at a specific time.
- Email notification - Enter your email address to receive backup status notifications. 'Notify always' and 'Notify on failure' are the two notification options that you can select.
- Notify me on desktop - Select this option to receive backup notifications on your desktop.
- Start the missed scheduled backup when the computer is turned on - Your missed scheduled backups will start automatically once you turn on your computer.
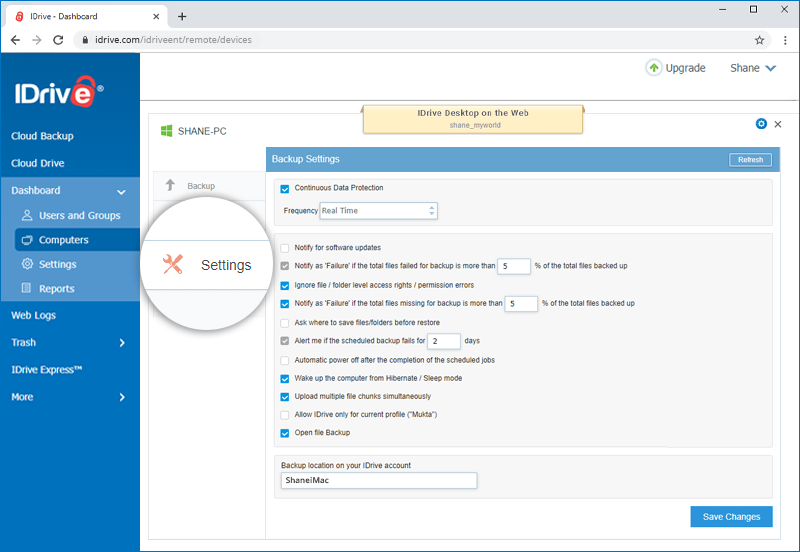
Settings
You can configure your IDrive® account settings with ease using the 'Settings' option.
Set the following options under the 'Settings' tab:
- Continuous Data Protection: IDrive® automatically recognizes the changes made to the files (up to 500 MB) present in your backup set and backs them up in real-time. To enable, turn on the 'Continuous data protection' toggle button, and set the frequency of your choice from the drop-down list.
- Optimize network resources: Select this option to disable the Large Send Offload V2 (IPv4) option and resolve any connectivity issue.
- Update software automatically: Select this option to auto-update software whenever a newer version is available.
- Notify for software updates: Select this option to get notified whenever a newer version of the application is available.
- Notify as 'Failure' if the total files failed for backup is more than 5% of the total files backed up: You can select this option to receive notifications of the same from IDrive®. You can set the file percentage using the drop-down list. By default, it is set to 5 percent.
- Ignore file/folder level access rights/permission errors: IDrive® does not backup any file/folder in your backup set which has insufficient access rights/permissions. Hence in such a case, by default, your backup will be considered as 'Failure'. You can enable this option to ignore file/folder level access rights/permission errors. IDrive® will not consider this as an error and status of your backup will be displayed as 'Success'.
- Notify as 'Failure' if the total files missing for backup is more than '-' % of the total files backed up: You can select this option to receive notifications of the same from IDrive®. You can set the number of days using the drop-down list. By default, it is set to 5 percent.
- Ask where to save files/folders before restore: IDrive® will prompt you for a restore location on your computer, while restoring your files and folders.
- Alert me if the scheduled backup fails for 2 days: IDrive® will notify you if the scheduled backup fails for a given number of days. You can set the number of days using the drop-down list. By default, it is set to 2 days.
- Power off after the completion of scheduled jobs: Your computer will be powered off automatically after the completion of the scheduled backup job.
- Wake up computer from hibernate/sleep mode for scheduled backup: IDrive® will wake up computer from hibernate/sleep mode and then perform the scheduled backup job.
- Upload multiple file chunks simultaneously: You can enable this option to upload large number of file chunks to your account at a time.
- Allow IDrive® only for current profile: This option enables you to restrict IDrive® to run only under the system profile on which the application has been installed.
- Open file backup: You can backup open files like Outlook files (.pst), QuickBooks, Quicken, ACT, MS Word, MS Excel, MS Money, MS Access, and MS FoxPro.
- Backup location in account: You can choose the backup location for your IDrive® account.
You can also perform the following operations from the 'Settings' tab:
Bandwidth Throttle
Bandwidth Throttle lets you set the Internet bandwidth to be used by the IDrive® application for backups. By default, the bandwidth throttle value is set at 100%.
You can set the Auto-Pause option during backup operations to enable optimum desktop experience with the following options:
- PC in use: This option lets you set the bandwidth to be used by IDrive® for backups, when the computer is in use. By default, it is set to 25%. This allows other applications to run without hindrance.
- PC not in use: This option lets you set the bandwidth to be used by IDrive® for backups, when the computer is not in use. By default, it is set to 100%.
To enable Auto-Pause and change the bandwidth settings,
- On the 'Backup' screen, click 'Bandwidth Throttle'.
- On the pop up window, enable 'Auto-Pause' to set the 'PC in use' and 'PC not in use' options.
- Use the sliders to set the bandwidth.
- Click 'Save Changes'.
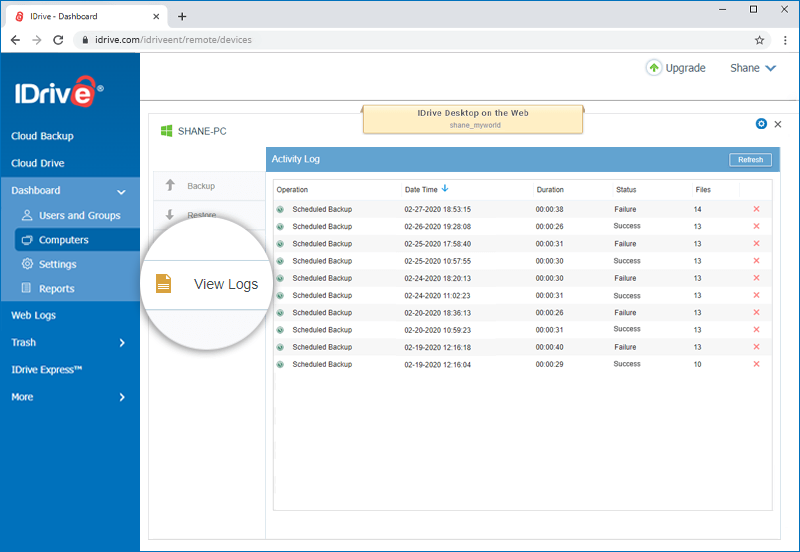
View Logs
IDrive® maintains detailed logs of operations like backup, restore, archive cleanup, delete, etc. performed in your account.
The 'View Logs' tab displays a list of all the activity logs. Click the specific session log that you wish to view. To delete logs, select the specific log and click .
.
Update Software
Upgrade to the latest version of IDrive® on any connected computer remotely via the Dashboard.
To install the latest updates on a computer,
- Sign in to IDrive® and click the 'Dashboard' tab.
- Click 'Computers'. From the computer list, click the computer on which you want to update the IDrive® application.
- On the top right corner, click 'Update Software'.
Note: Make sure that the computer is 'Online' (green) and web access is enabled.

The IDrive® application installed on that particular computer will get updated to the latest version.
Delete Computer
You can delete a connected computer from the 'Computers' tab on the dashboard.
Deleting a computer will remove it from the computer list in the dashboard and you will not be able to manage it remotely.
If you are logged in to the IDrive® application on the deleted computer, you will be logged out and backups for the computer will stop. All data, including any previous backups, from the computer will be stored in your cloud account.
To delete a computer,
- Sign in to IDrive® and click the 'Dashboard' tab.
- Click the 'Computers' tab. The list of all the backed up computers appear here.
- Hover on the computer name you wish to delete and click (delete icon). The 'Delete Computer' screen appears.
- Click 'Delete' in the confirmation pop up.
- Click 'Yes' to delete the computer.
Remove Computer
A connected computer can be removed from the list of computers on the dashboard.
Removing a computer will only remove it from the ‘Computers’ tab on the dashboard. However, it might re-appear in the list if the user is logged in to the IDrive desktop application on the removed computer. To delete data and stop backups, uninstall the application.
To remove a computer,
- Sign in to IDrive® and click the 'Dashboard' tab.
- Click the 'Computers' tab. The list of all the backed up computers appears.
- Hover on the computer you wish to remove and click . The 'Remove Computer' screen appears.
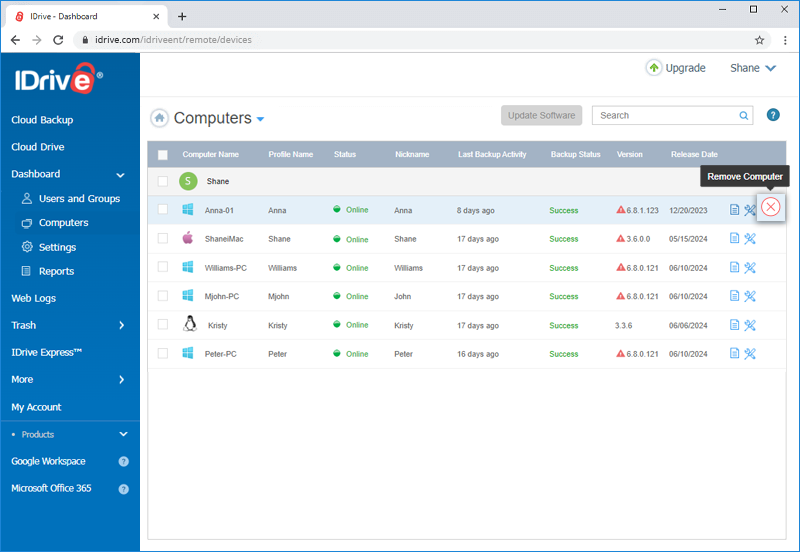
- Click 'Remove' in the confirmation popup.
- Click 'Yes' to remove the computer from the dashboard computer list.