How do I perform system restore from IDrive BMR server?
You can perform system restore from the BMR server by creating an IDrive BMR Restore CD or a bootable USB thumb drive to boot your computer. For steps, refer the instructions included with the shipped BMR device.
You need to also ensure that your computer is connected to the same network as the IDrive BMR server.
To perform system restore,
- Boot your computer using IDrive BMR Restore CD or a USB thumb drive, which has the restore environment.
- After booting your system, click 'Next' in the welcome page.
- Select 'BMR Server' and click 'Next'.
- Enter the BMR server password and click 'Login'.
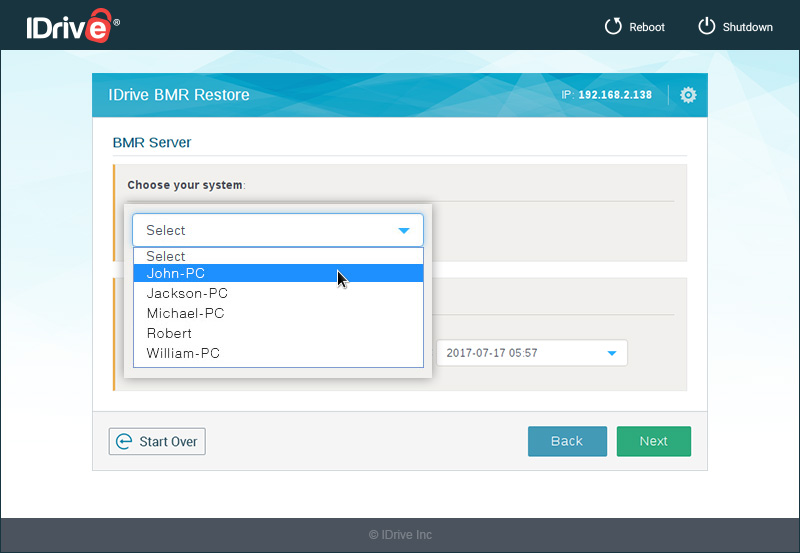
- Select the system from which you want to restore data, from the 'Choose your system' drop-down menu.
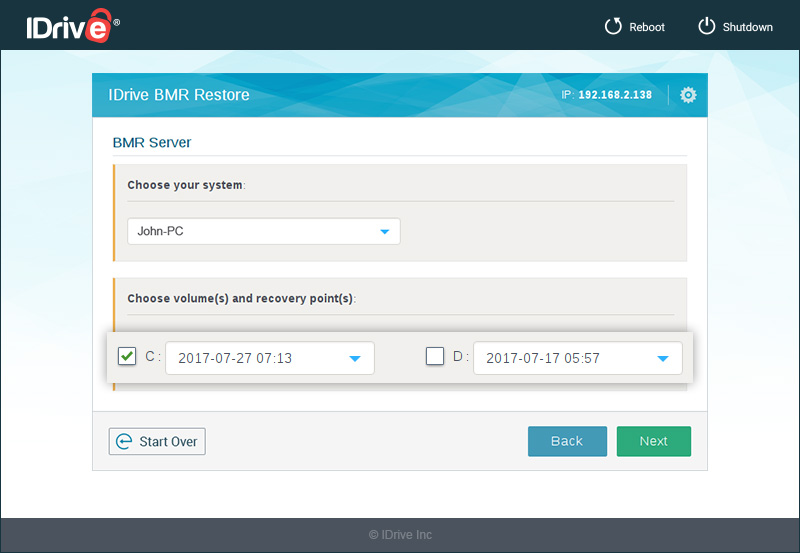
- Select the required volumes and their recovery points to restore, from the 'Choose volume(s) and recovery point(s)' section and click 'Next'.
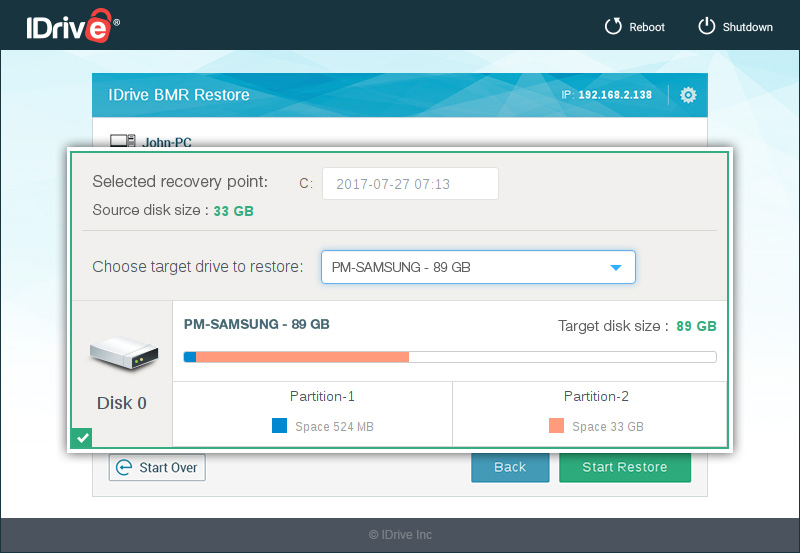
- Select the drive to which you want to restore data, from the 'Choose target drive to restore' drop-down menu.
- Click 'Start Restore' and click 'Yes' in the confirmation window to start the restore process.
Note:
- The computer to which you are restoring data should have the same hard drive space as the computer being backed up. Also, if the backup computer has multiple drives, ensure that the restore computer also has the same number of drives.
- It is recommended that the 'restore computer' has the same hardware configuration as the 'backup computer'. However, you may have to install the required additional drivers if there is any change in the hardware configuration of the 'restore computer'.
|
|
How many recovery points can I create?
You can create a maximum of 5 recovery points. Each recovery point will have a username and password, and the details will be displayed in the 'Mount Path Summary' table. |
|
Can I perform snapshot restore?
Yes, you can perform snapshot-based image restore for point-in-time recovery. During the restore process, you need to select the particular drive along with the required date on which the data was backed up, to perform bare-metal restore. |
|
How can I perform system restore to multiple computers?
You can perform system restore to multiple computers in one go. All you have to do is boot the computers with the restore CDs/USBs and perform the restore operation. Data can be accessed directly from the IDrive BMR server during restore. |
|
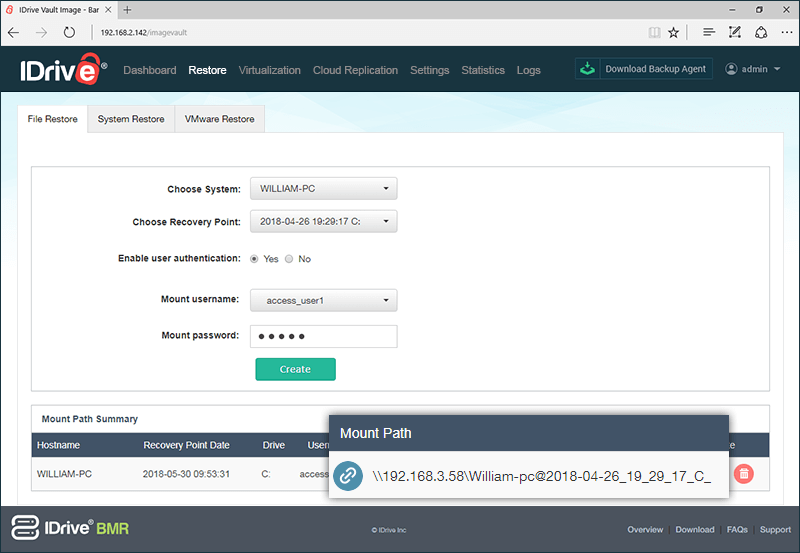
Can I perform file-level restore to a client?
Yes, you can perform file-level restore to a client by creating recovery point.
To create file-level recovery point access,
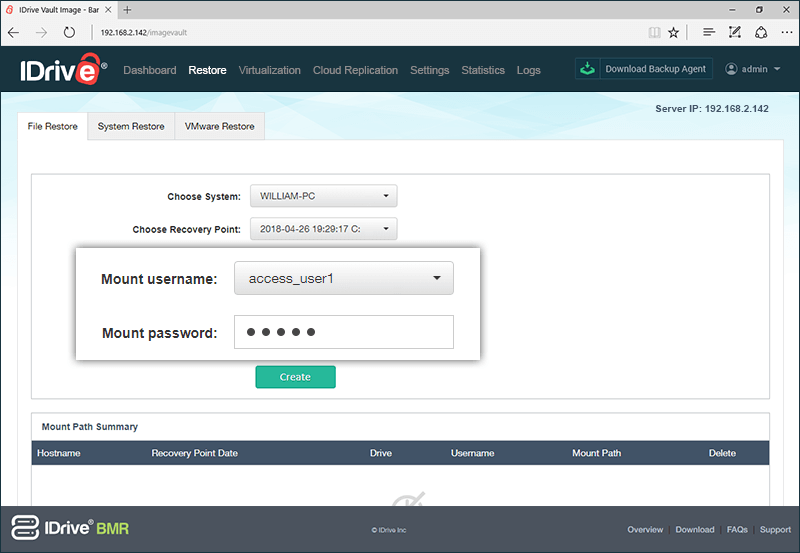
- On the 'File Restore' tab, select a client from the 'Choose a System' drop-down menu.
- Select recovery point from the 'Choose a Recovery Point' drop-down menu.
- By default 'Enable user authentication' will be selected as 'No'. This will create an open share that is accessible on the network. To create a secure share,
- Select 'Yes'.
- Select the username from the 'Mount username' drop-down menu.
- Enter the mount password.
- Click 'Create'.
A summary for the selected computer will be created in the 'Mount Path Summary' table. You can use the path displayed under 'Mount Path' to access your backed up data.
|
|
How can I access my backed up data if bare-metal restore fails or the computer does not boot up after performing the restore?
The bare-metal restore operation may fail or the computer may not boot up if the restored computer does not have the same hardware configuration as the backup computer. There may be new hardware devices present on the restore computer and the necessary drivers may not be installed. We recommend you to have identical hardware configurations on both computers.
However, you still can access all the backed up data by creating a recovery point. For steps to create recovery points, refer FAQ. |
|
How many network share can I create for a recovery point?
You can create a maximum of 5 simultaneous network shares for a recovery point, irrespective of the authentication type selected. The details of recovery point will be displayed in the 'Mount Path Summary' table. |
|
Can I perform bare-metal restore with IDrive BMR to any computer with a different hardware configuration?
We do not recommend performing bare-metal restore to a computer with a different hardware configuration, as the restored computer may not boot after restore due to hardware dissimilarity. For the bare-metal restore to be successful, a computer with same or similar hardware configuration as the backup computer is preferred.
Ensure the following conditions are met, if the restore computer has different hardware configuration:
- The restore issue due to hardware dissimilarity is lesser in modern Windows operating systems such as Windows 8.1 and Windows 10.
- The motherboard chipset type (AMD / Intel) should be same in both the backup and restore computer.
- The hard drive storage controller (IDE / SATA) should be same in both the backup and restore computer.
|
|
I have backed up my client machine with RAID-based storage to the BMR server. However, I am not able to perform bare-metal restore. Why?
Bare-metal restore for the client machine with RAID-based storage (Hardware or Software RAID) is not supported by IDrive BMR. However, you can still perform file-level restore of the backed up data to the client machine.
Note: Virtualization of the client machine with RAID-based storage may work depending on the RAID type and driver compatibility. |
|
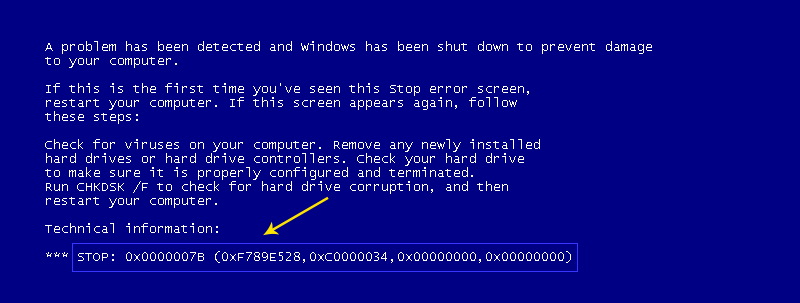
Why do I get a blue screen error with the error code 'Stop x0000007B INACCESSABLE_BOOT_DEVICE' when I try to perform bare-metal restore to a computer with different hardware configuration?
You may get a blue screen with an error code “Stop 0x0000007B INACCESSABLE_BOOT_DEVICE” as shown in the image below.
This is because, when the OS restarts after a bare-metal restore, it automatically disables unused storage drivers to speed up the Windows startup process.
To fix this issue temporarily, you can reset the SATA mode from AHCI or RAID to IDE in BIOS. However, you will get the same error when you reboot the computer.
To fix this issue permanently,
- Log in to Windows and go to the following path in 'Registry Editor':
- HKEY_LOCAL_MACHINE\SYSTEM\CurrentControlSet\services\msahci
- HKEY_LOCAL_MACHINE\SYSTEM\CurrentControlSet\services\pciide
- Double-click 'Start', set 'Value data' to zero and click 'OK'.
- Close 'Registry Editor' and restart the system.
- Go to BIOS settings and change the SATA configuration settings as per your requirements.
After Windows starts booting up, it will automatically detect the change and install the appropriate drivers. Once the drivers are installed, Windows will boot without any problem. |
|
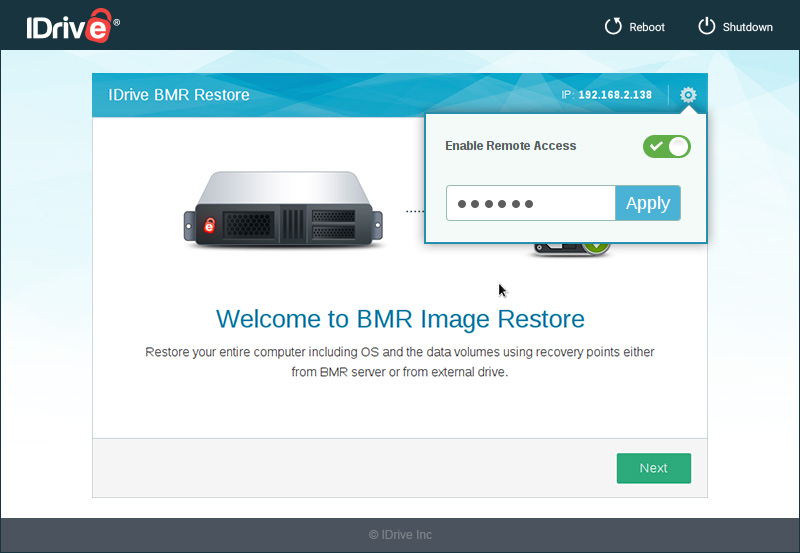
I am unable to connect to the BMR server when trying to perform restore operation. What should I do?
You are unable to connect to the BMR server due to a network connectivity issue and your machine has not availed the IP address from the router. The connection status will be displayed as 'Connection failure' in the 'IP' field on the top-right corner of the page.
Ensure the following requirements are met and reboot your machine:
- Ethernet cable is properly connected to the primary NIC in your machine.
- DHCP is enabled in the router to which the machine is connected.
Contact support if you are still unable to connect to the BMR server. We recommend you to enable remote access so that our support team can connect to your machine remotely and resolve the issue.
To enable remote access,
- Click
 displayed on the top-right corner of the page. displayed on the top-right corner of the page.
- Click on the slider.
- Provide the password and click 'Apply' to enable remote access.
Note: If there is any connection failure between the BMR server and the machine when the restore operation is in progress, you should reboot the system and restart the restore operation. |
|
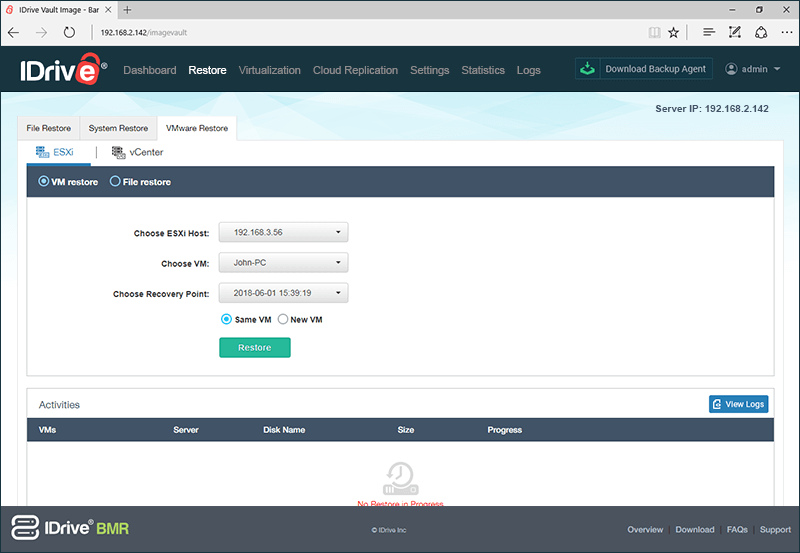
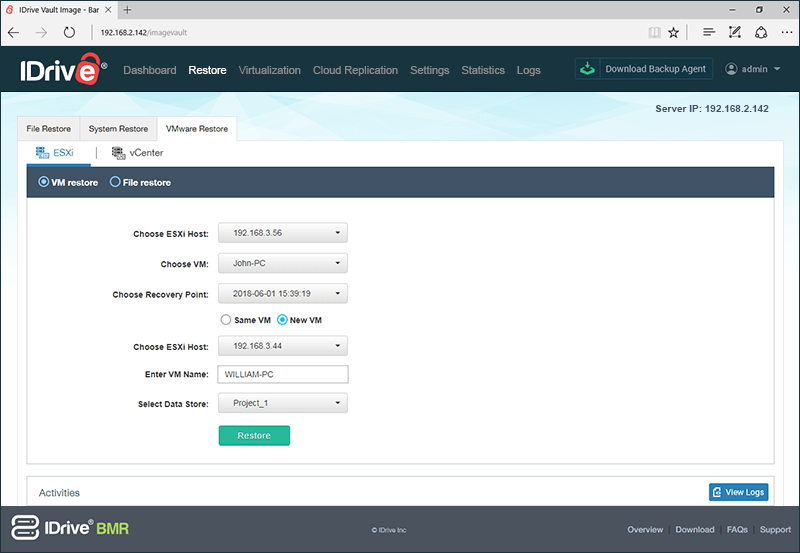
How do I restore VMware ESXi host and vCenter server backed up on the BMR device?
To restore a VM,
- Log in to the IDrive BMR server web interface and go to the 'Restore' tab.
- Go to 'VMware'–>'ESXi'/vCenter.
- Select 'VM restore'.
- Select the required ESXi host you want to restore.
- Select a VM and the required recovery point.
- Select 'Same VM' if you wish to restore data to the same VM.
- To restore data to another VM, select 'New VM'.
- Select an ESXi host for the new VM.
- Enter a name for the VM and select a data store.
- Click 'Restore' to initiate the restore process.
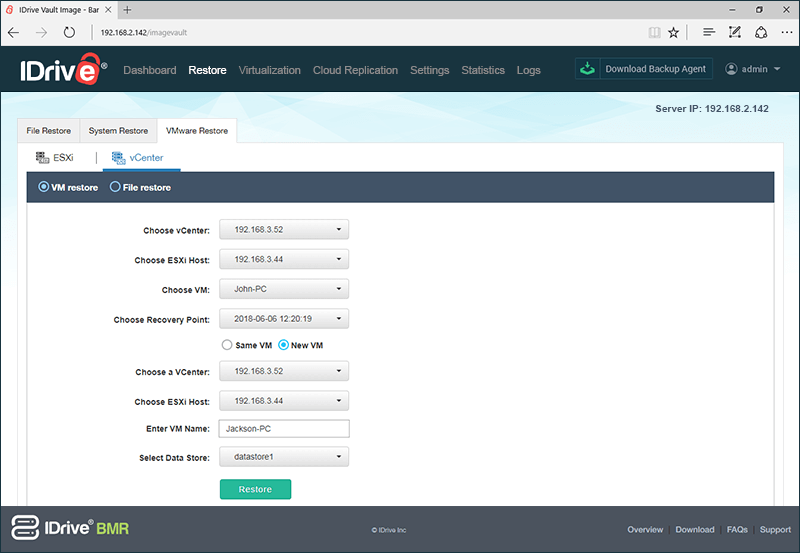
To restore a VM running on vCenter server,
- Log in to the IDrive BMR server web interface and go to the 'Restore' tab.
- Go to 'VMware Restore'–>'vCenter'.
- Select 'VM restore'.
- Select the required vCenter server you want to restore.
- Select an ESXi host.
- Select a VM and the required recovery point.
- Select 'Same VM' if you wish to restore data to the same VM.
- To restore data to another VM, select 'New VM'.
- Select a vCenter and the required ESXi host for the new VM.
- Enter a name for the VM and select a data store.
- Click 'Restore' to initiate the restore process.
You can view detailed restore progress in the 'Activities' section. |
|
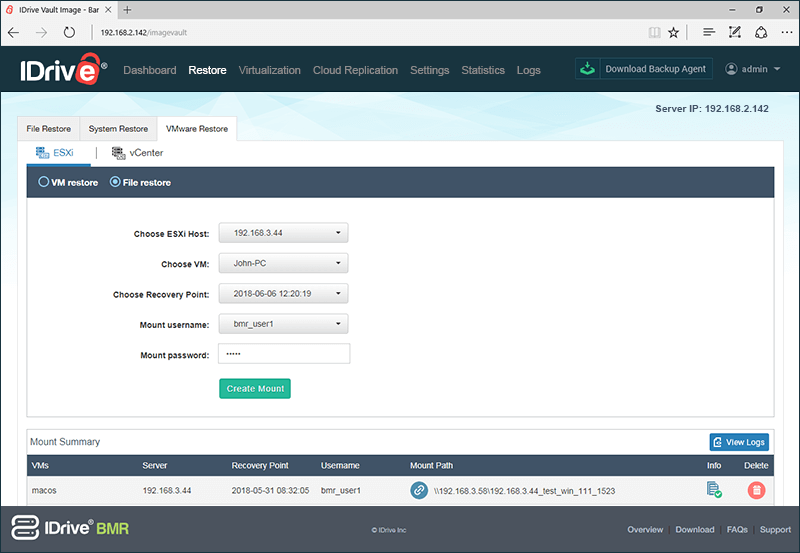
Is it possible to restore individual files/folders from VMware ESXi host and vCenter server backed up on BMR device?
Yes, you can restore individual files/folders, irrespective of the operating system used on the VM. All major file systems on the VM are also supported.
To restore individual files/folders from a backed up ESXi host,
- Log in to the IDrive BMR server web interface and go to the 'Restore' tab.
- Go to 'VMware Restore'–>'ESXi'.
- Select 'File restore'.
- Select the required ESXi host you want to restore.
- Select a VM and the required recovery point.
- Click 'Create Mount' to initiate the restore process.
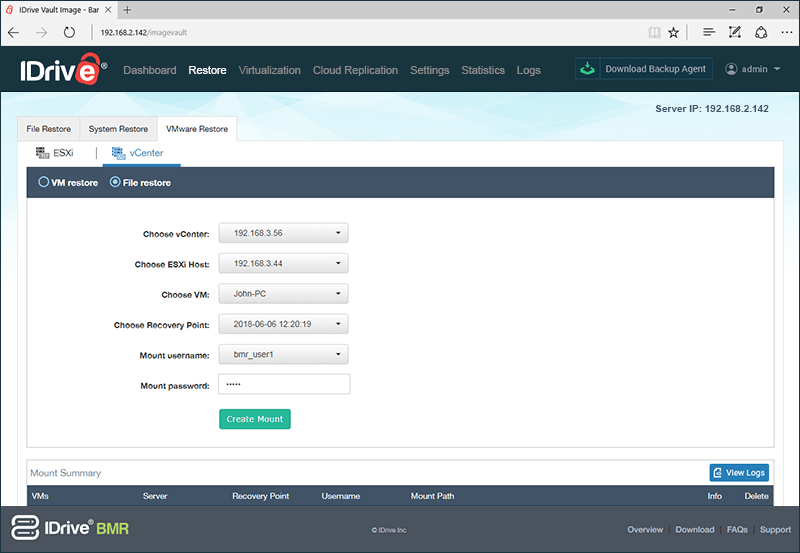
To restore individual files/folders from a backed up vCenter ,
- Log in to the IDrive BMR server web interface and go to the 'Restore' tab.
- Go to 'VMware Restore'–> 'vCenter'.
- Select 'File restore'.
- Select the required vCenter server you want to restore.
- Select an ESXi host.
- Select a VM and the required recovery point.
- Click 'Create Mount' to initiate the restore process.
You can view detailed restore progress in the 'Activities' section. |
|
|