Restore your entire computer including the OS or just restore individual files as required. Also, you can restore data to multiple computers at the same time.
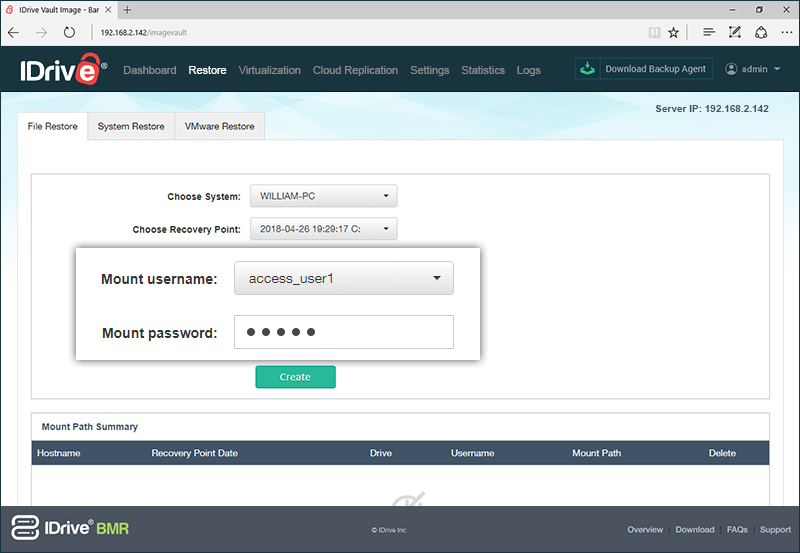
With IDrive BMR, you can restore individual files and folders to the client by creating mount path for the recovery points.
To create a mount path for the recovery points,
- Navigate to the 'File Restore' tab and from the 'Choose a System' drop-down select the required client.
- From 'Choose a Recovery Point' drop-down, select the required recovery point
- By default 'Enable user authentication' will be selected as 'No' and it'll create an open share that is accessible on the network. However, you can secure the share with username and password. To create a secure share, select 'yes' and perform the following steps:
- a. Select a username from 'Mount username' drop-down.
- b. Enter the mount password.
- Click 'Create'.
A summary for the selected computer will be created in the 'Mount Path Summary' table. To access your backed up data, copy and paste the path displayed under 'Mount Path' on the network path.
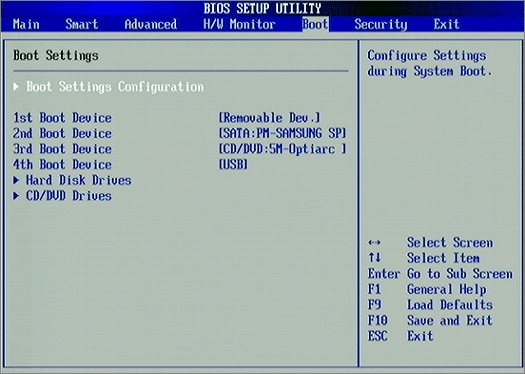
Before proceeding with system restore, you need to create a bootable CD or a bootable USB thumb drive using an ISO file and boot your computer.
The required ISO file and related information for creating bootable CD or a bootable USB thumb drive is available on the shipped device.
Perform the following steps to boot your computer:
Note:
- Screenshots used in the following scenario is just an example. Depending on the BIOS manufacturer you would get a different menu options.
- Switch on the computer and press ESC, F1, F2, F8 or F10 during the initial startup screen. Depending on the BIOS manufacturer, a menu would appear.
- Go to BIOS setup and select 'BOOT' tab.
- To set a boot sequence priority, perform the following steps:
- If you are using a restore CD/DVD, then move the 'CD/DVD..' to the first position in the list.
- If you are using a USB drive instead, then move the 'USB' to the first position in the list.
- Save and exit the BIOS setup.
You can now proceed with the restore process.
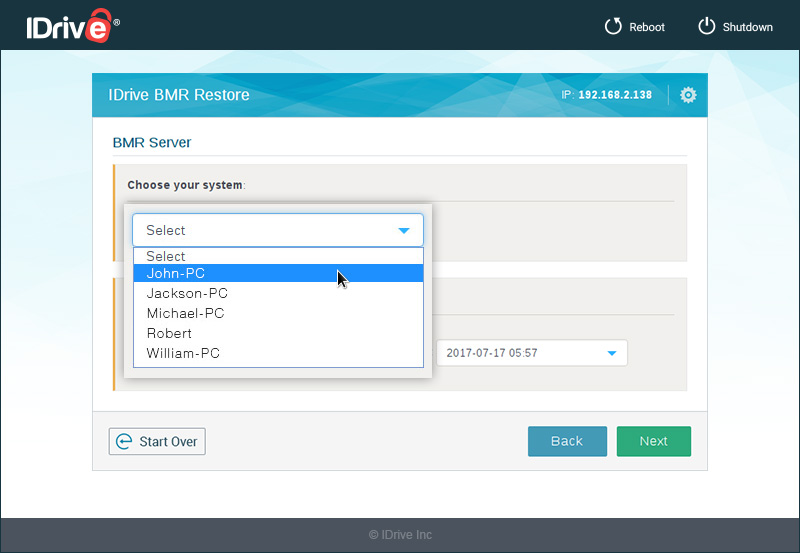
- Boot your computer using IDrive BMR Restore CD or a USB thumb drive which has restore environment.
- After booting your system, click 'Next' in the welcome page.
- Select 'BMR Server' and click 'Next'.
- Enter the BMR server password and click 'Login'.
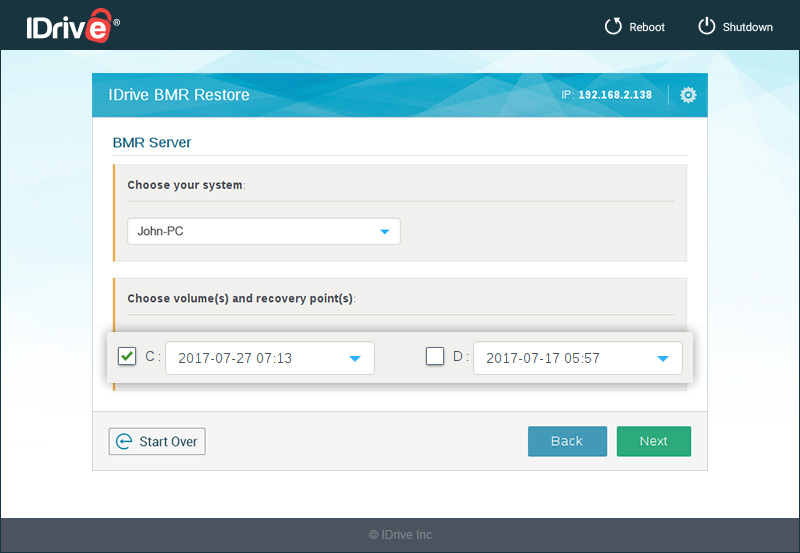
- Select the system from which you want to restore the data, from 'Choose your system' drop-down menu.
- Select the required volumes and their recovery points to restore, from 'Choose Volume(s) and recovery point(s)' section and click 'Next'.
- Select the drive to which you want to restore data, from 'Choose target drive to restore' drop-down menu.
- Click 'Start Restore' and click 'Yes' in the confirmation window to start the restore process.
- After exiting from BIOS setup, click 'OK' in the confirmation window.
- Provide your username and password.
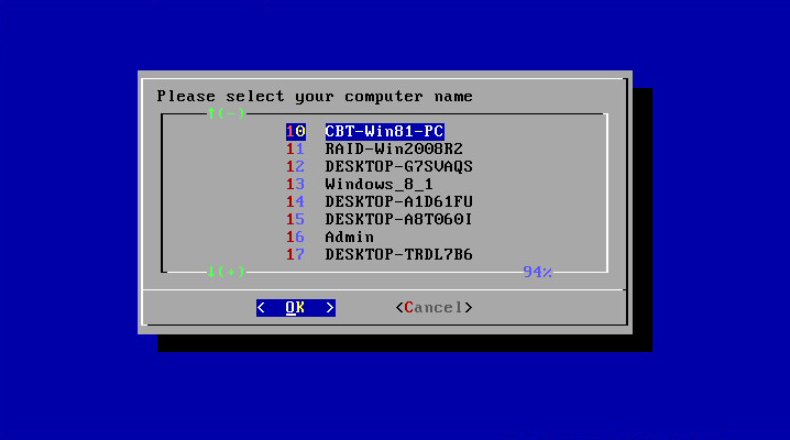
- Select the particular computer from the list of computers and click 'OK'.
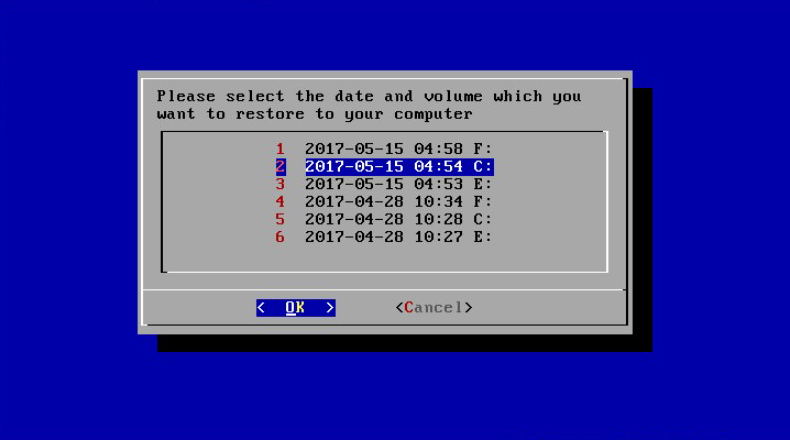
The list of drives with date and time of the last backup is displayed.
- Select the particular drive you want to restore.
- Select the target drive to which you want to restore data.
- Click 'OK' in the confirmation window.
Note:
- The 'restore computer' should at least have same hard drive space as 'backup computer'. Also, if the 'backup computer' has multiple drives, ensure that the 'restore computer' also has same number of drives.
- It is recommended that 'restore computer' have same hardware configuration as 'backup computer'. However, you may have to install the required additional drivers if there is any change in the hardware configuration of the 'restore computer'.
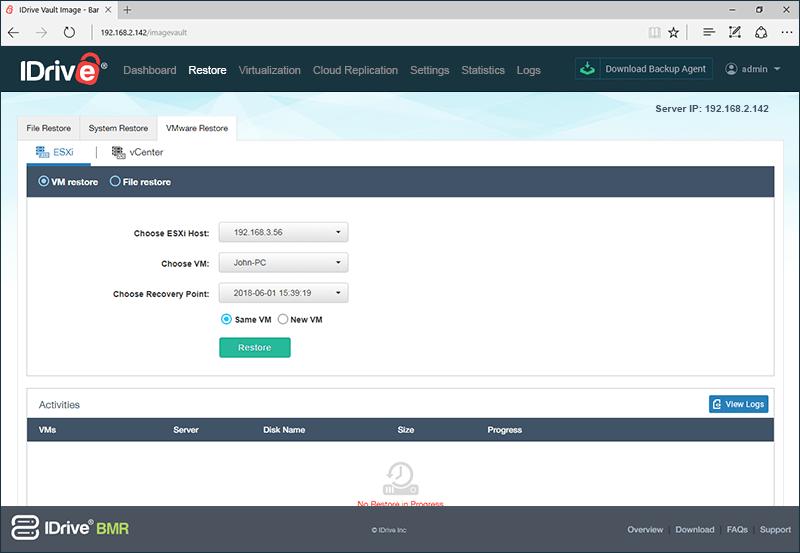
To perform VM restore of virtual machines running on ESXi host,
- Log in to the IDrive BMR server web interface.
- Click 'Restore' on the menu bar and then go to 'VMware Restore' tab.
- Choose the ESXi Host, VM and Recovery Point from the respective drop-down menus.
- By default data will be restored to same VM.
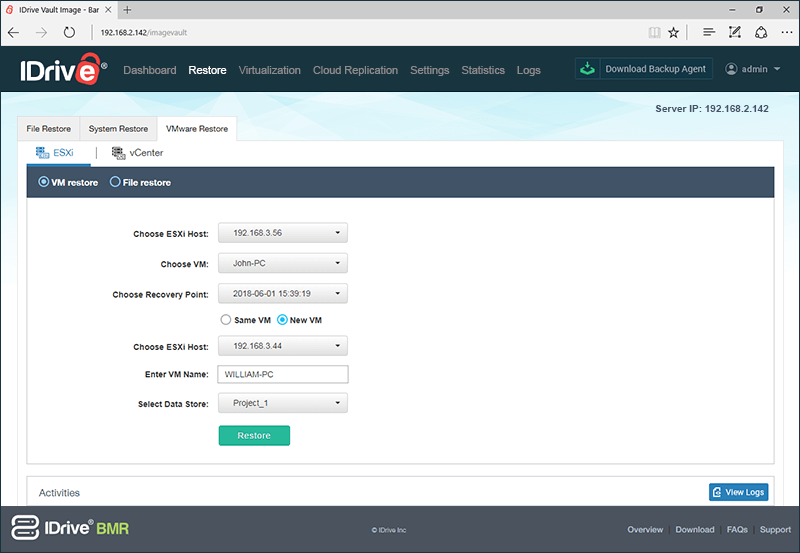
- To create new VM and restore the data, select 'New VM' then choose the ESXi Host, add the VM name and select Datastore Store.
- Click 'Restore'.
- Click 'Continue'.
Once the restore starts, you can see the progress of the restore in the 'Activities' section displayed on the bottom-right corner.
Note: We support only 4 VMs to be restored at a time.
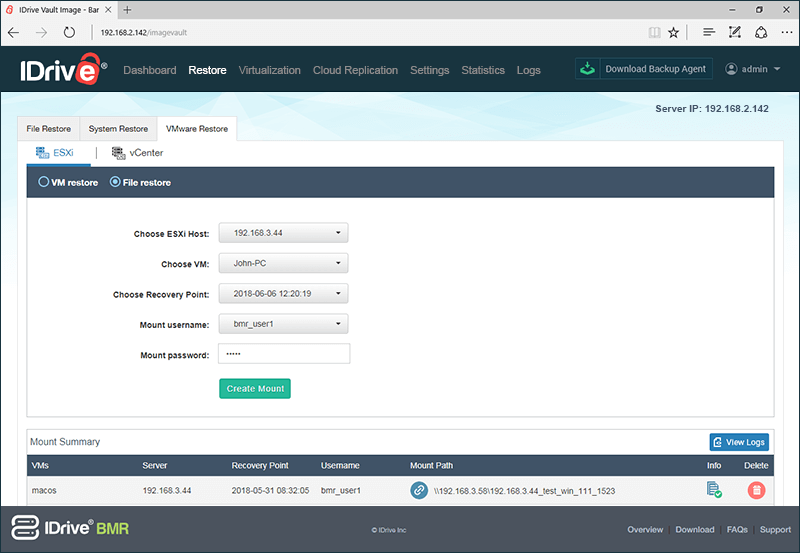
To perform file-level restore of virtual machines running on ESXi host,
- Log in to the IDrive BMR server web interface.
- Click 'Restore' on the menu bar and then go to 'VMware Restore' tab.
- Go to 'File restore'.
- Choose the ESXi Host, VM and Recovery Point from the respective drop-down menus.
- Select the mount username and enter the password.
- Click 'Create Mount'.
A summary for the selected VM will be created in the 'Mount Path Summary' table. You can use the path displayed under 'Mount Path' to access your backed up data.
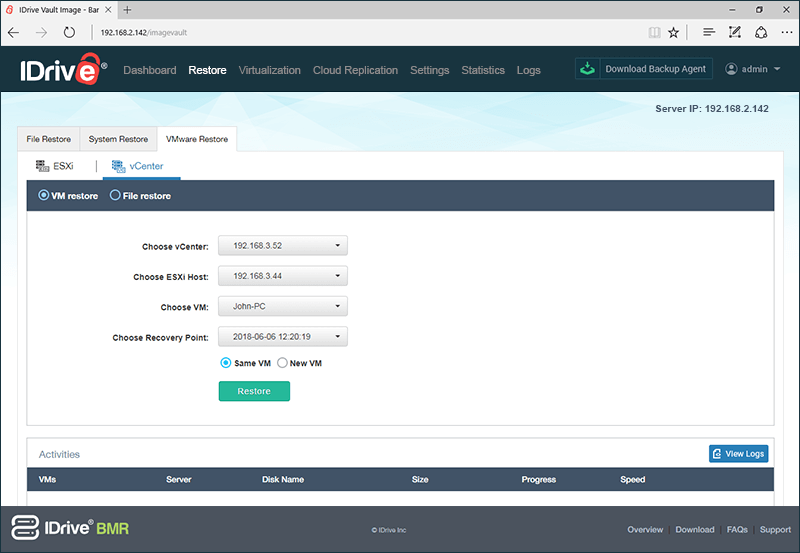
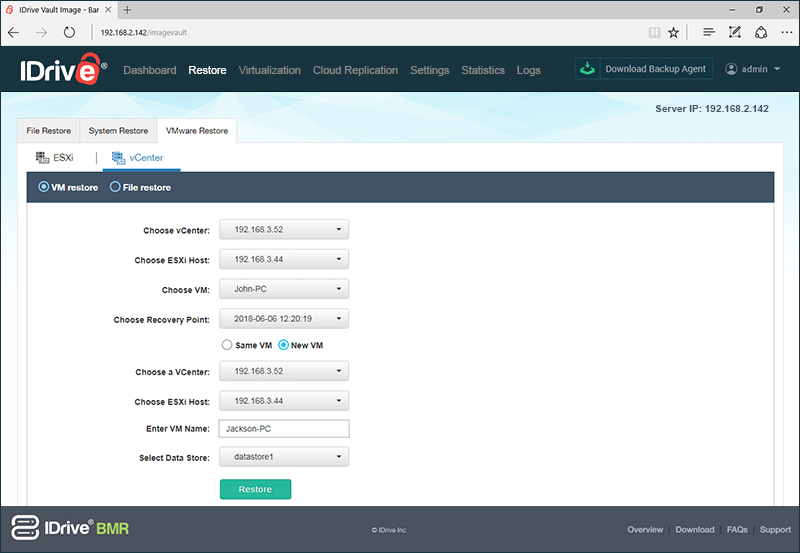
To perform VM restore of virtual machines running on vCenter server,
- Log in to the IDrive BMR server web interface.
- Click 'Restore' on the menu bar and then go to the 'VMware Restore' tab.
- Go to the 'vCenter' tab.
- Choose the vCenter, ESXi Host, VM and Recovery Point from the respective drop-down menus.
- By default data will be restored to the same VM.
- To create a new VM and restore the data, select 'New VM' then choose the ESXi Host, add the VM name and select Data Store.
- Click 'Restore'.
- Click 'Continue'.
Once the restore starts you can see the progress of the restore in the 'Activities' section.
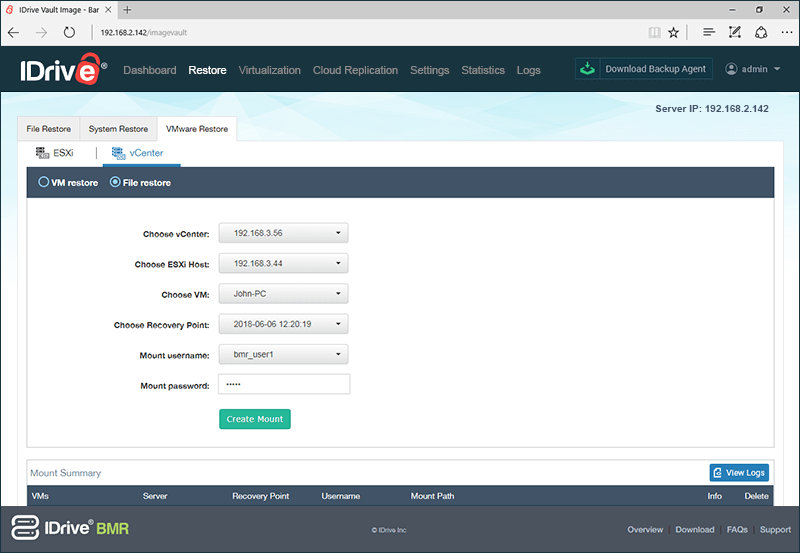
To perform file-level restore of virtual machines running on vCenter server,
- Log in to the IDrive BMR server web interface.
- Click 'Restore' on the menu bar and then go to 'VMware Restore' tab.
- Go to 'vCenter' and click 'File restore'.
- Choose the vCenter, ESXi Host, VM and Recovery Point from the respective drop-down menus.
- Select the mount username and enter the password.
- Click 'Create Mount'.
A summary for the selected VM will be created in the 'Mount Path Summary' table. You can use the path displayed under 'Mount Path' to access your backed up data.
Note: We allow only 4 file restore mount at a time.