Web Console
Remotely monitor the backup status and activities via the BMR Web Console. You can view comprehensive statistics and logging options to monitor the backup status.
The web console allows you to access IDrive BMR server, add computers and VMware machines to the server and manage their data backups and restores.
Besides, you can:
To access, log in to IDrive BMR web interface, using the admin credentials. You can view the comprehensive statistics and logging options to monitor backup status and check the health status of your IDrive BMR server.
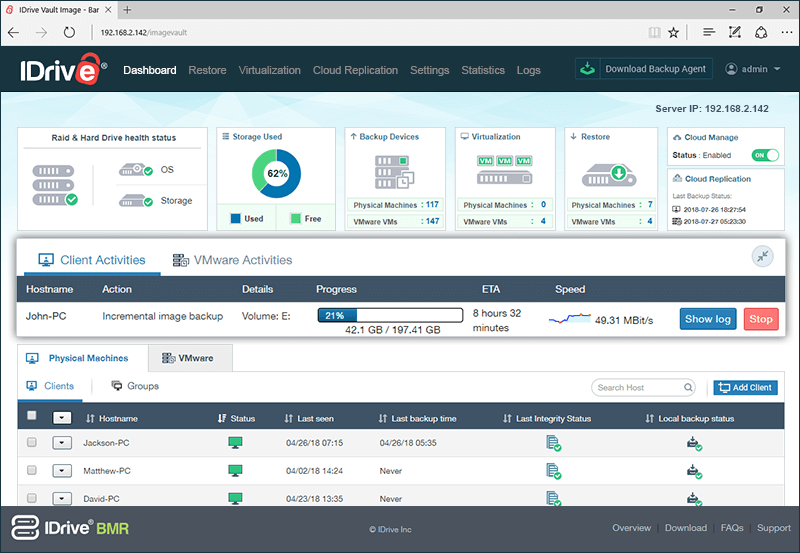
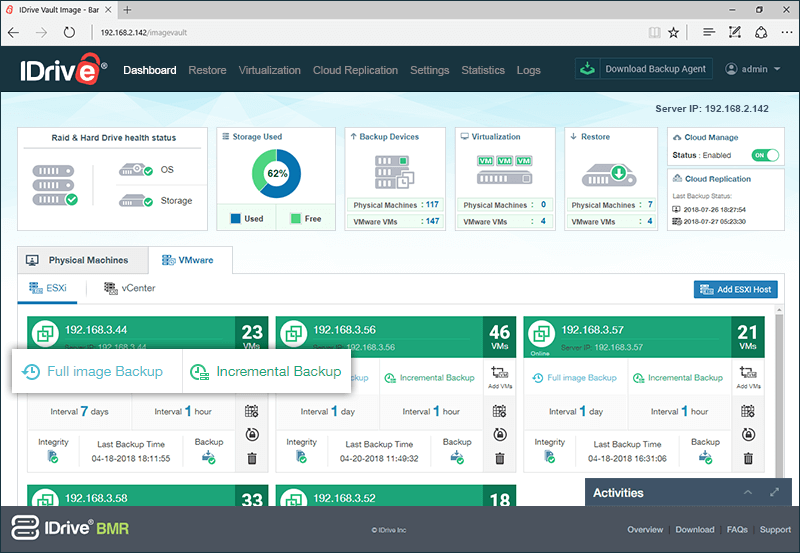
The dashboard displays critical information about backup status and activities of the registered clients. You can manually add clients, organize them into groups, initiate and monitor their backup operation, get the overview of the storage space and download the backup agent software. Also, you can check the health status of the devices.
By using the web console, you can perform full and incremental backup of the registered clients and VMware machines. The backup can be scheduled or run manually. You can backup the entire computer with multiple hard drives and partitions. The backup routine runs in the background and consumes very little resources on the client computer.
Steps to perform backup:
- Download the agent and install it on the computer you want to backup.
- IDrive BMR server detects the agent and starts full image backup automatically for the first time.
- For subsequent backups perform any of the following:
-
Manual Backup
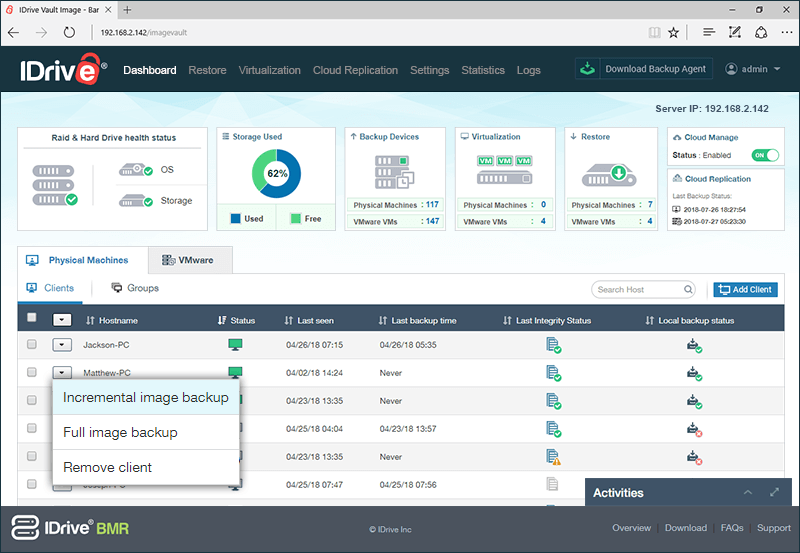
Steps to perform manual backup,
- Log in to IDrive BMR web interface. The list of computers appears under 'Clients' tab.
- Click
 and select 'Incremental image backup' or 'Full image backup' from the drop-down menu to start the backup.
Note:
- If you perform incremental backup, IDrive BMR server will backup the updated files and folders.
- If you perform full backup, IDrive BMR server will backup the entire system including the operating system.
You can see backup status in the 'Activities' section.
-
Scheduled Backup
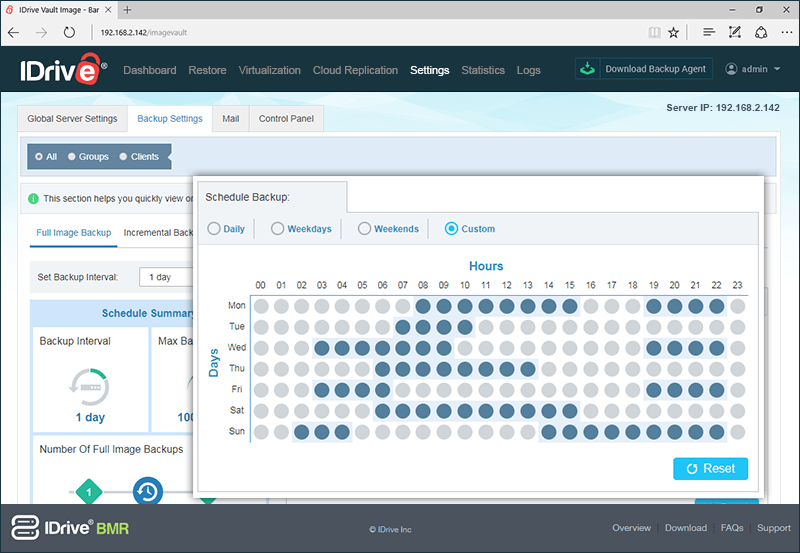
Log in to IDrive BMR and schedule local backup from the 'Schedule Backup' section under 'Backup Settings' from 'Settings' tab. You can Schedule the backup on daily/weekdays/weekends or even customize the schedule by selecting the required days and hours as required from this section .
By creating a recovery point, perform file level restore from your backups.
Steps to create a file level recovery point access:
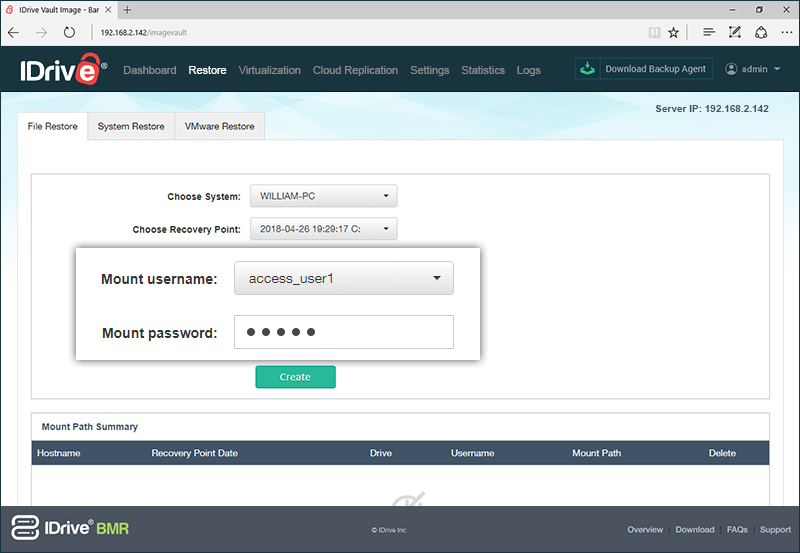
- Log in to IDrive BMR web interface and go to the 'Restore' tab.
- On the 'File Restore' tab, select the client from 'Choose a System' drop-down menu.
- Select the recovery point from 'Choose a Recovery Point' drop-down menu.
- By default 'Enable user authentication' will be selected as 'No'. This will create an open share that is accessible on the network. However, if you want the share to be secured, we recommend you to create with username and password. To create a secure share, select 'yes' and perform the following steps:
- Select the username from 'Mount username' drop-down.
- Enter the mount password.
- Click 'Create'.
A summary for the selected computer will be created in the 'Mount Path Summary' table. You can use the path displayed under 'Mount Path' to access your backed up data.
Replicate backups stored on your IDrive BMR server to the Cloud. To do so, you need to enable the cloud replication feature by providing IDrive account credentials in the 'Cloud Replication' page. Once enabled, you are provided with necessary interface to schedule cloud replication and monitor the backup status through the web console.
You can transfer the local backup to your cloud account instantly or schedule the cloud replication as per your requirement.
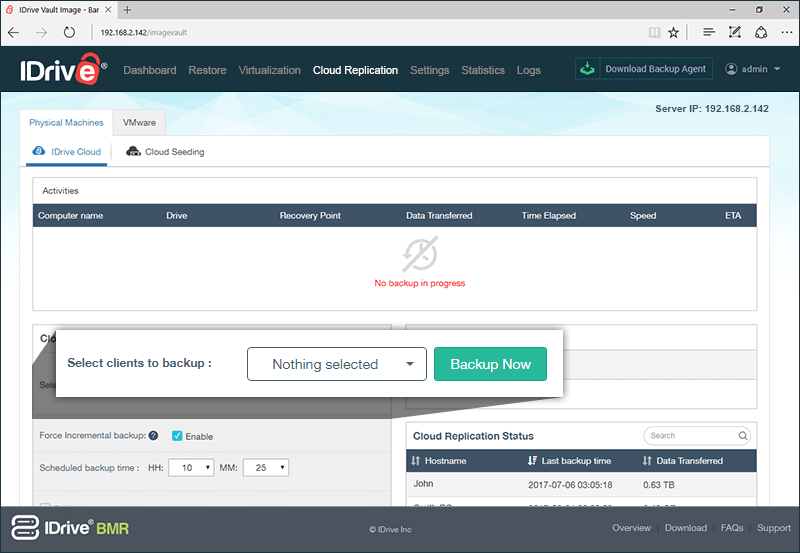
To perform manual cloud replication,
- Log in to IDrive BMR web interface and go to 'Cloud Replication'.
- In the 'Cloud Replication Settings' section, select the required computer from 'Select clients to backup' drop-down and click 'Backup Now'.
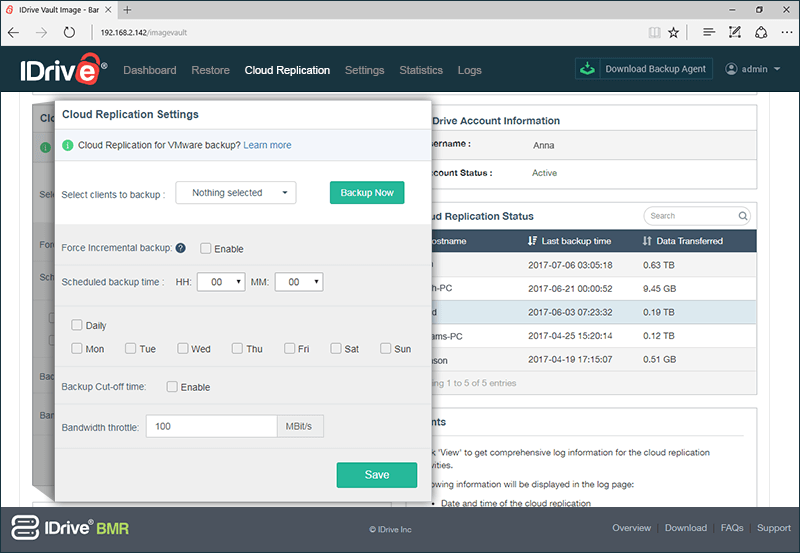
Schedule cloud replication
To schedule cloud replication, log in to IDrive BMR and go to the 'Cloud Replication' tab. You can schedule the backups for desired day(s) on a weekly or daily basis.
You can set the following parameters:
- Select clients to backup: You can select the required clients to schedule the backup. Click 'Select All' to select all the computers.
- Scheduled backup time: Set the time at which your scheduled backup should start.
- Select 'Daily' to perform the backup everyday or you can even select the days for the backup to run.
- Backup Cut-off time: Enable and set the time to stop the scheduled backup. The scheduled backup will not stop exactly at the cut-off time, if there is a recovery point backup in progress. It will stop after the recovery point backup, and before the next scheduled backup.
- Bandwidth throttle: Enter the bandwidth throttle value to set the internet usage for your backups. By default this value will be set to 100. Bandwidth throttle value should be between 1-1000.
- Email Notification: Add email address to receive notifications on cloud replication status.
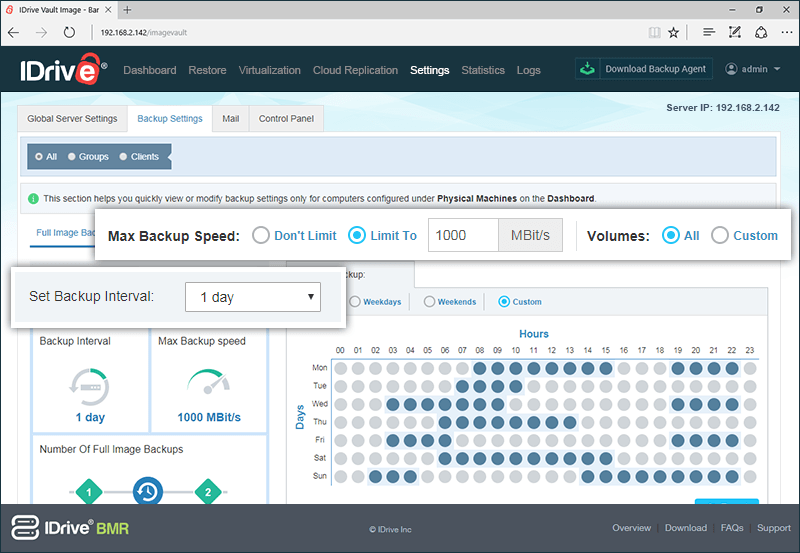
You can change the local backup settings for your client machines from 'Backup Settings' in the 'Settings' tab.
Following are the available options:
- Max backup speed: Specify bandwidth throttle to set the local network usage during backup.
- Volumes: Specify volumes to backup. Select 'All' to include all volumes or select 'Custom' and enter the required volumes separated by comma (,).
- Set the interval backup: Specify the interval between last and the next image backup from the drop-down.
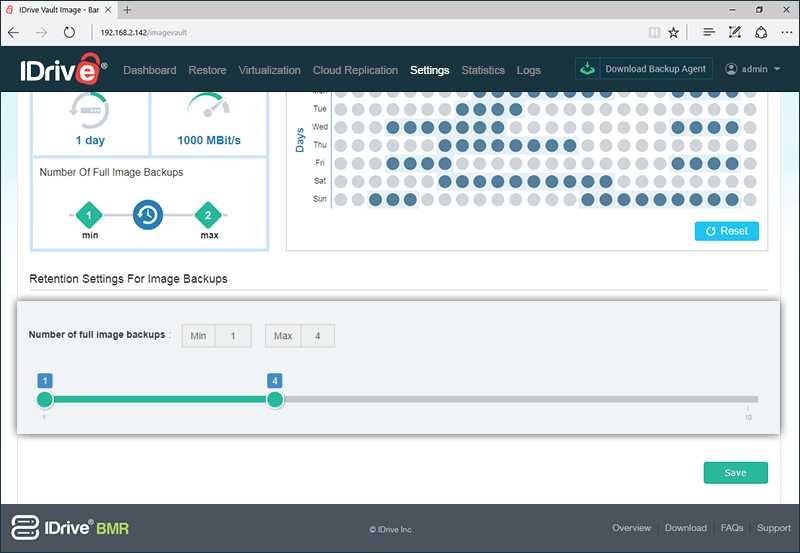
- Number of full/incremental image backups: Use the slider to set the minimum and maximum number of full/incremental image backups server should retain for a client.
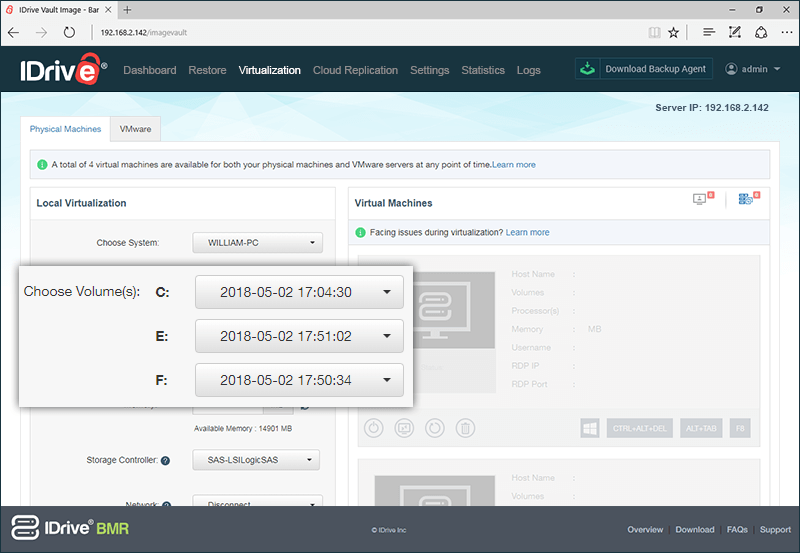
Create up to four virtual instances of your client machines on the BMR server instantly. Access these instances without losing data and resume your business, in case of any disaster.
To create a virtual instance of your client machine,
- Log in to IDrive BMR server web interface and go to the 'Restore' tab.
- Click 'Virtualization' in the menu bar.
- Select the required client from 'Choose a System' drop-down menu.
- Choose the recovery points for the given volumes.
- Select the number of processors for the virtual machine from the 'Processor(s)' drop-down list.
- Enter the memory value in the 'Memory' field.
Note: Memory value should be greater than 1024 MB. You can decide the memory value depending on the available memory displayed below the 'Memory' field. Click to recalculate the available memory.
- Select the required storage controller. By default 'SATA' will be selected.
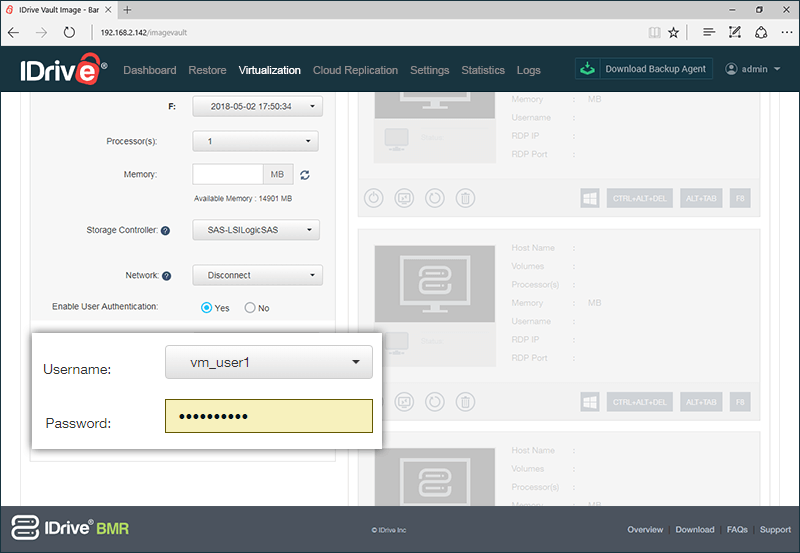
- Select 'Yes' to enable user authentication for the virtual machine.
Note: By default 'Enable user authentication' will be selected as 'No'.
- Select username from the 'Username' drop-down list, and enter the password.
- Click 'Build Virtual Machine'.
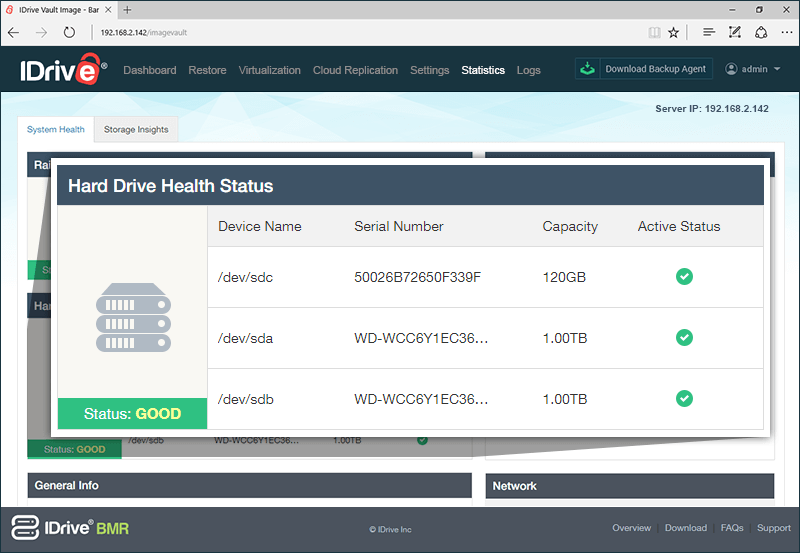
You can check the individual health status of hard drive (OS and storage) under 'Hard drive health status' section in 'System Health' tab.
Health status can be any of the following:
- GOOD: Working fine
- BAD: Contact support team immediately
- Predicted to Fail: Contact support team immediately
A unique serial number will be provided to each storage device to identify and replace them if the health status is bad.
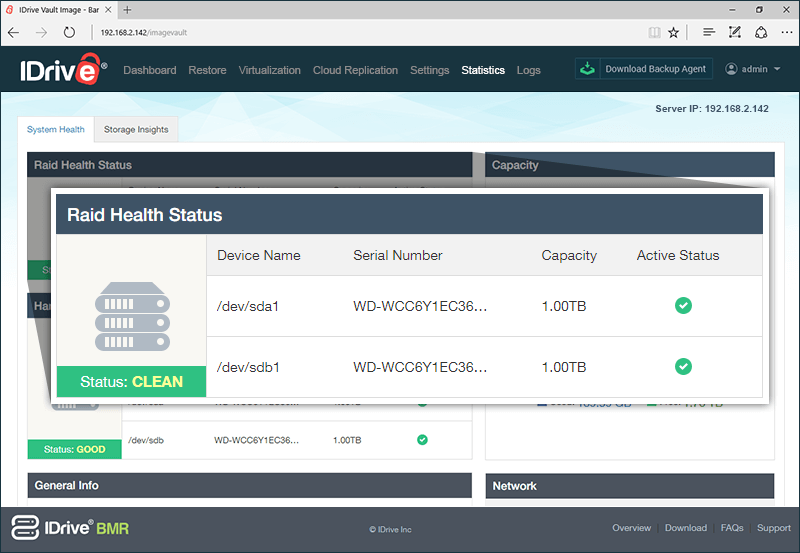
IDrive BMR server is equipped with the mirrored storage array for data redundancy. The 'Raid health status' section displays the health of raid devices. If one storage drive stops working the other will serve as backup.
Status can be any of the following:
- Clean: Devices are working fine
- Warning: Contact support team immediately
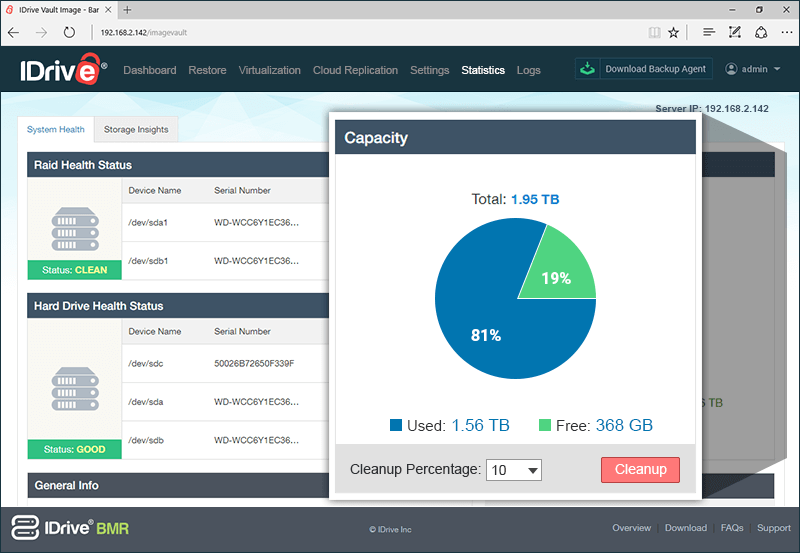
Perform manual cleanup only when you have utilized 80% of storage space. An option to perform manual cleanup with a drop-down to select the percentage of storage space to cleanup will be enabled.
Steps to perform manual cleanup:
- Log in to IDrive BMR web interface and click 'System Health' displayed on the menu bar.
- Select the percentage of storage space to cleanup from 'CleanUp Percentage' drop-down list.
- Click 'Cleanup'.
- Click 'Confirm' in the confirmation window.
Note: During manual cleanup, the server will restart couple of times and the web interface will be unavailable.
Perform local backup and restore of virtual machines running on VMware ESXi Host and vCenter server
You need to add VMware ESXi host and vCenter server to the BMR server to back them up. For steps to add ESXi host and vCenter server to the BMR server, refer BMR FAQs
To perform immediate backup of virtual machines after adding them to BMR server,
- Log in to the IDrive BMR server web interface.
- Go to 'VMware'->'ESXi'/'vCenter'.
- Click 'Full Image Backup'/'Incremental Backup' on the required ESXi/vCenter to perform full or incremental image backup.
Once data backup starts, you can see the progress of the backup in the 'Activities' section.
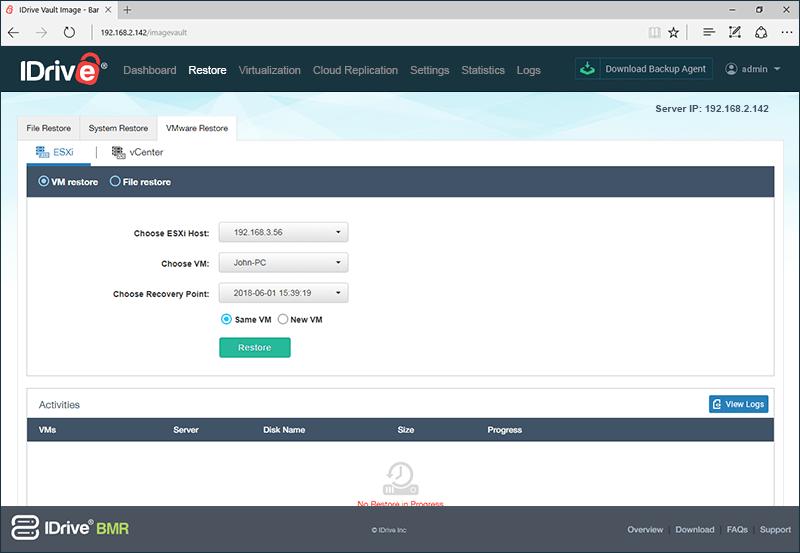
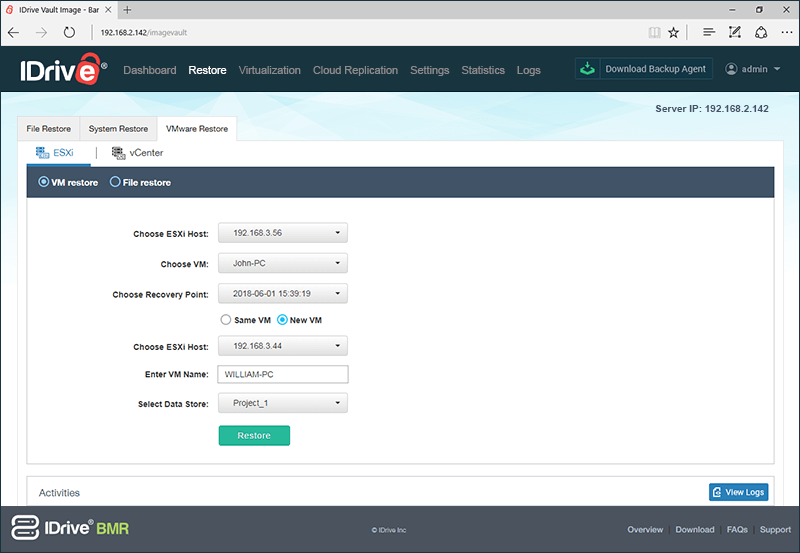
To restore your virtual machines,
- Log in to the IDrive BMR server web interface.
- Click 'Restore' on the menu bar and then go to 'VMware Restore' tab.
- Choose the ESXi Host, VM and Recovery Point.
- If you select 'New VM' then choose the ESXi Host, add the VM name and Select Data Store.
- Click Restore.
- Click 'Continue'.
Once the restore starts you can see the progress of the restore in the 'Activities' section.