Integrate Microlite BackupEDGE with IDrive® e2
Microlite BackupEDGE is a comprehensive backup and disaster recovery software solution for Linux and UNIX systems, supporting storage across tape, disk, NAS, and cloud environments. It delivers advanced features, including encryption, compression, scheduling, bare-metal recovery, and automated unattended backups with notifications. Integrating Microlite BackupEDGE with IDrive® e2 adds a capable and scalable cloud object storage solution that facilitates systematic integration for secure and efficient data protection.
Prerequisites
Before you begin, ensure the following:
- An active IDrive® e2 account. Sign up here if you do not have one.
- A bucket in IDrive® e2. See how to create a bucket.
- Valid Access Key ID and Secret Access Key. Learn how to create an access key.
- A valid Microlite BackupEDGE account.
The following steps can help you successfully integrate Microlite BackupEDGE with IDrive® e2 cloud object storage.
Configure Microlite BackupEDGE with IDrive® e2
- Install and Launch BackupEdge on a Linux Server.
- In S3 Configure Graphical mode, enter the details as mentioned below.
- Amazon S3 and Compatible S3 Cloud Resource is selected as the Resource Type by default.
- Enter a Resource name.
- Enter the directory path of the folder in the bucket as Directory.
- Enter your IDrive® e2 bucket as Bucket.
- Enter your IDrive® e2 Access Key as Access Key.
- Enter your IDrive® e2 Secret Key as Secret Key.
- Enter your IDrive® e2 S3 endpoint as the S3 Cloud Endpoint.
- Click Test URL.
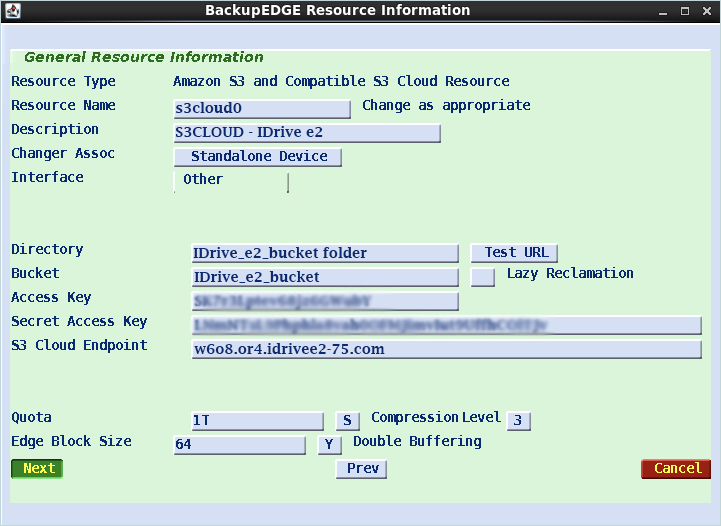
- Select Next using the Tab key.
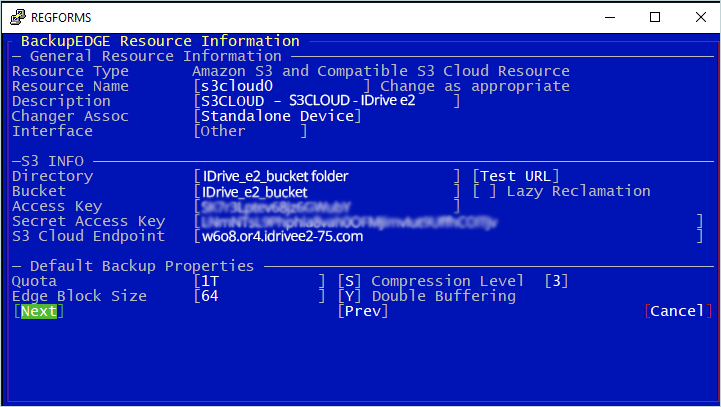
For the S3 Configure in character mode, enter details as mentioned below.
-
- Amazon S3 and Compatible S3 Cloud Resource selected as the Resource Type by default.
- Enter the Resource Name.
- Enter the directory path of the folder in the bucket as Directory.
- Enter your IDrive® e2 bucket as Bucket.
- Enter your IDrive® e2 Access Key as Access Key.
- Enter your IDrive® e2 Secret Key as Secret Key.
- Enter your IDrive® e2 S3 endpoint as the S3 Cloud Endpoint.
- Click Test URL.
- Select Next using the Tab key.
Note
If you have enabled MFA, please provide the following in the Password field: (in addition to the password)
/mfa=nnnnnn
Where nnnnnn = The 6-digit code from your Authenticator App.
For instance, if your password is "Password1" and the 6-digit code from your MFA Authenticator App is 123456, enter the following in the password field: "Password1/mfa=123456".
Note: Data restoration is handled by your specific backup solution provider and is affected by multiple variables that are unique to your environment. For application-related enquiries/support, it is strongly recommended you seek guidance from the technical team of your backup solution provider.