Related Links
Integrate Commvault with IDrive® e2
Use this guide to configure IDrive® e2 as a destination for your Commvault backups.
Learn more about Commvault.
Prerequisites
Before uploading files using Commvault, you require:
- An active IDrive® e2 account. Sign up here if you do not have one.
- A bucket in IDrive® e2. See how to create a bucket.
- A valid Commvault account and access to Commvault Command Center
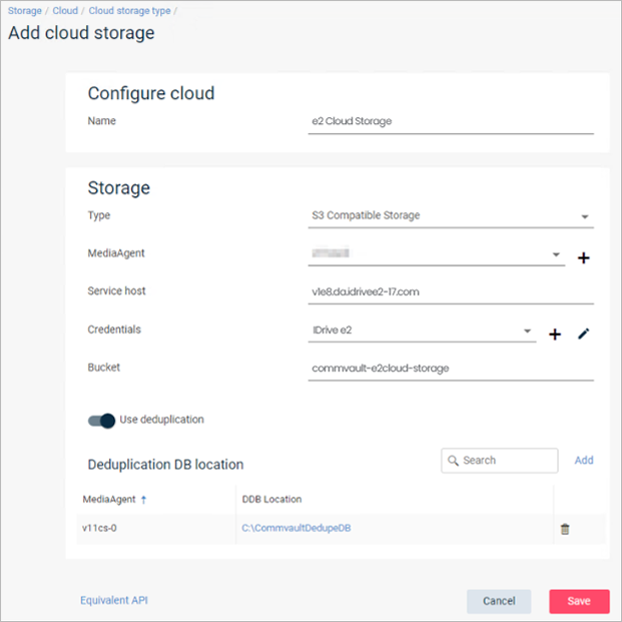
Set Up IDrive® e2 in the Commvault Web Interface
After you set up IDrive® e2 as a cloud storage target, you can create backup jobs in the Commvault Command Center and select IDrive® e2 as your backup target.
- Sign in to the Commvault Command Center.
- Navigate to Storage and select Cloud.
- Click ADD, and select Cloud storage.
- Configure the cloud storage fields.
- Enter a name for the cloud storage target.
- Select S3 Compatible Storage as the cloud storage type.
- Select the Media Agent that you want to use.
- In the Service host field, enter the endpoint URL for the IDrive® e2 bucket where you want to store Commvault backups.
- Enter your credentials.
- In the Credentials field, click + (add).
- Enter your IDrive® e2 credential name.
- Enter your IDrive® e2 access key as the Access key ID.
- Enter your IDrive® e2 secret key as the Secret access key.
- Enter the name of your IDrive® e2 bucket.
- Click Save.
Set Up IDrive® e2 in the Commvault Console
After you set up IDrive® e2 as a cloud storage target, you can create a Storage Policy, edit or create a backup set, and select IDrive® e2 as your backup target.
Note: You must install the Commvault console on your computer and sign in.
- In the CommCell Browser, expand Storage Resources.
- Right-click Libraries, and select Add > Cloud Storage Library > Cloud Storage.
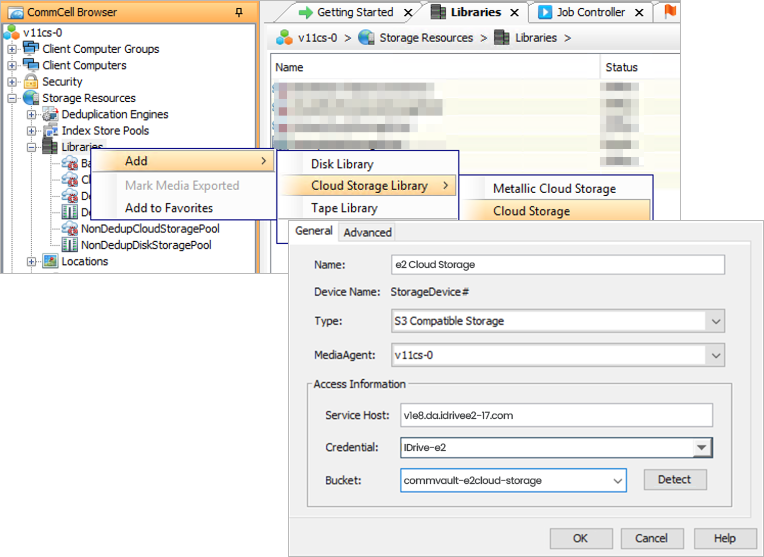
- In the General tab, enter a name for the cloud storage target.
- Select S3 Compatible Storage as the cloud storage type.
- Select the Media Agent that you want to use.
- In the Service Host field, enter the endpoint URL for the IDrive® e2 bucket where you want to store Commvault backups.
- Enter your credentials.
- In the Credentials field, click Create New.
- Enter your IDrive® e2 credential name.
- Enter your IDrive® e2 access key as the Access key ID.
- Enter your IDrive® e2 secret key as the Secret access key.
- Click OK.
- Enter the name of your IDrive® e2 bucket, and click Detect.
- Click OK.