The IDrive web client helps you upload, view, search, and restore files directly from the web. Use your username and password to sign in at www.idrive.com. You can share data with friends, view backup status reports, manage your account subscription, etc.
View backed up files and folders
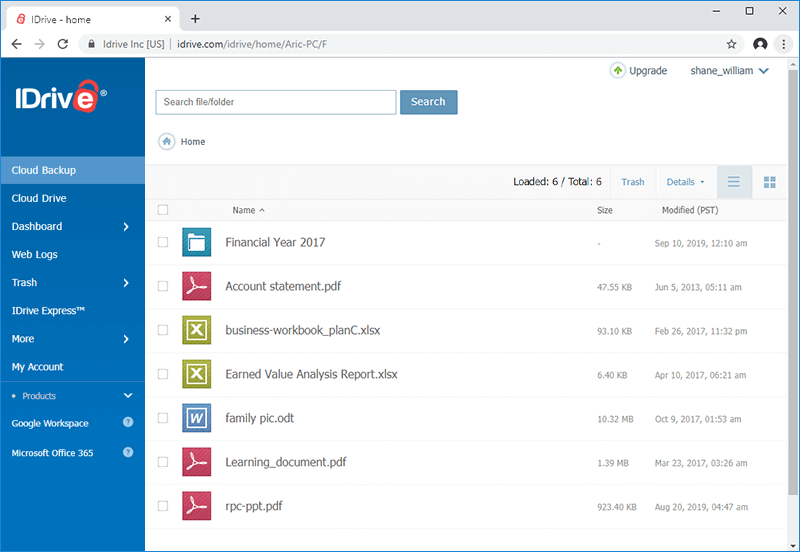
Once signed in, computers from where your data is backed up are displayed. Click on the computer/drive name to view all your backed up files and folders. The same folder structure, as on your local computer is maintained.
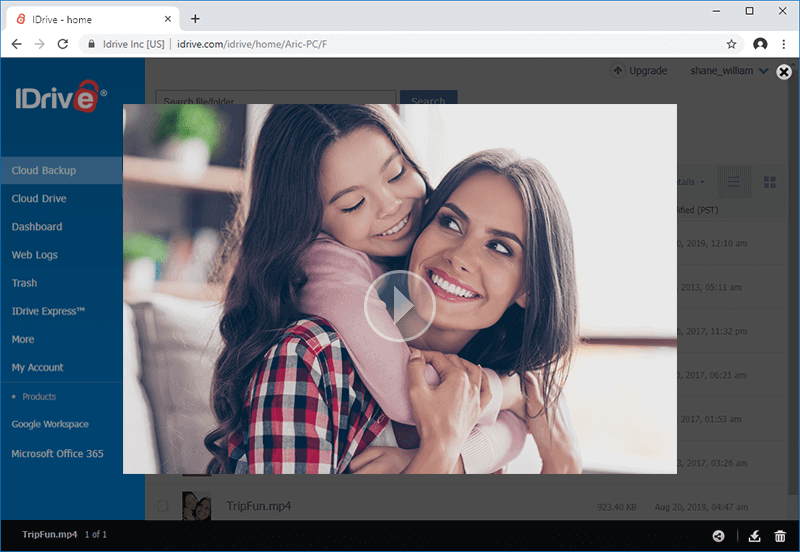
Yes, you can stream video files directly from your IDrive account using any web browser. You can play MP4, WebM, FLV, MOV, .3gp, .3gpp, .3g2, .asf, .avi, .dv, .m2t, .m4v, .mkv, .mpeg, .mpg, mts, .ogv, rm, .ts, .vob, .wmv media file formats.
Note: You can stream videos that are shorter than 30 minutes or have a file size less than 2 GB.
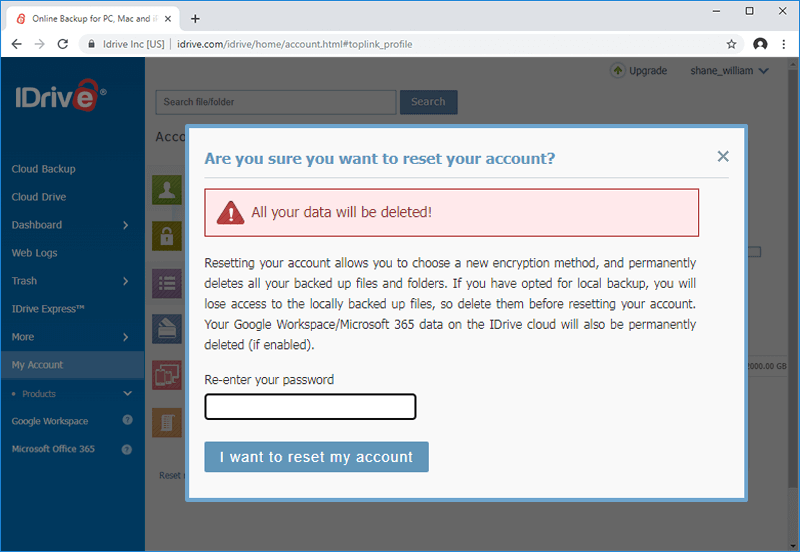
You should reset your IDrive account only if you must modify its encryption type or the encryption key.
Note: Resetting your account permanently deletes all your backed up files and folders. If you have opted for local backup, you will lose access to the locally backed up files, so delete them before resetting your account.
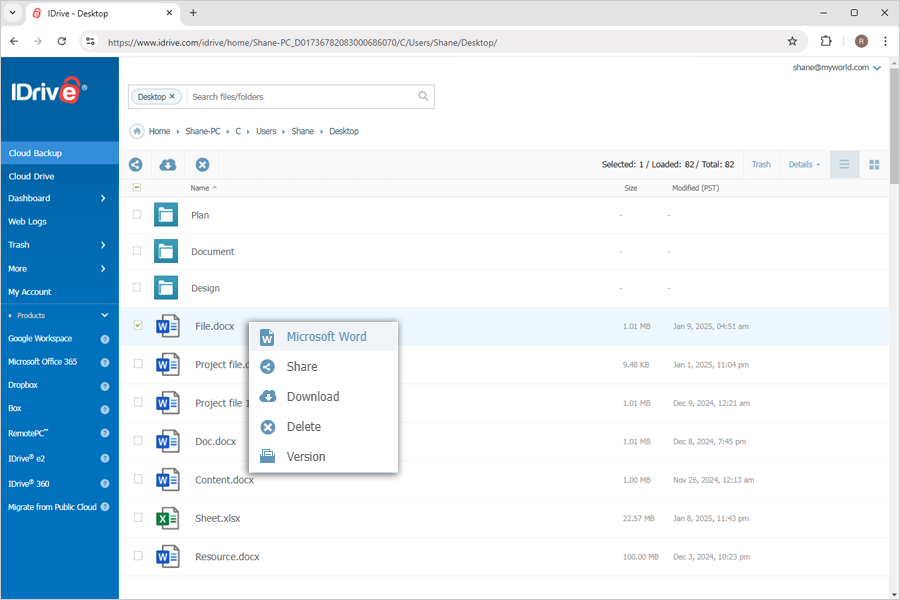
Can I preview backed up Word, Excel, PowerPoint, and PDF files in my IDrive cloud backup account?
Yes, you can preview your backed up Word, Excel, PowerPoint, and PDF files in your IDrive cloud backup account. The following file formats are supported:
Go to the Cloud Backup tab and click on the required file to directly open it in your browser.
Alternatively, right-click on the file you want to preview and select 'Microsoft Word', or 'Microsoft Excel' or 'Microsoft PowerPoint' from the drop-down list to open it in the browser.
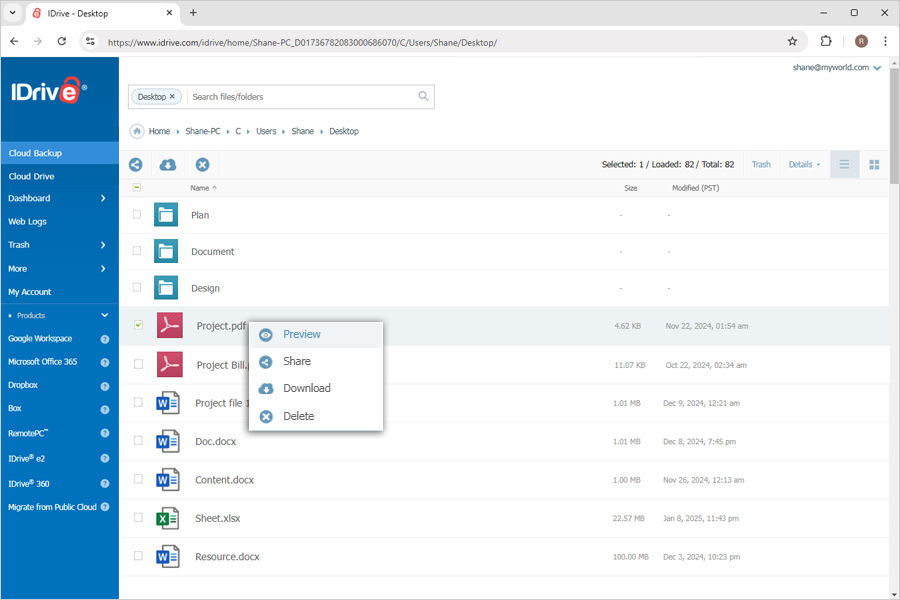
View PDF files
To preview a PDF file, click the PDF file to view it in your browser.
Alternatively, right-click on the file you want to preview and select Preview from the drop-down list to open it in the browser.
However, Cloud Backup section has only preview support. IDrive does not support editing to ensure integrity of the backed up files.
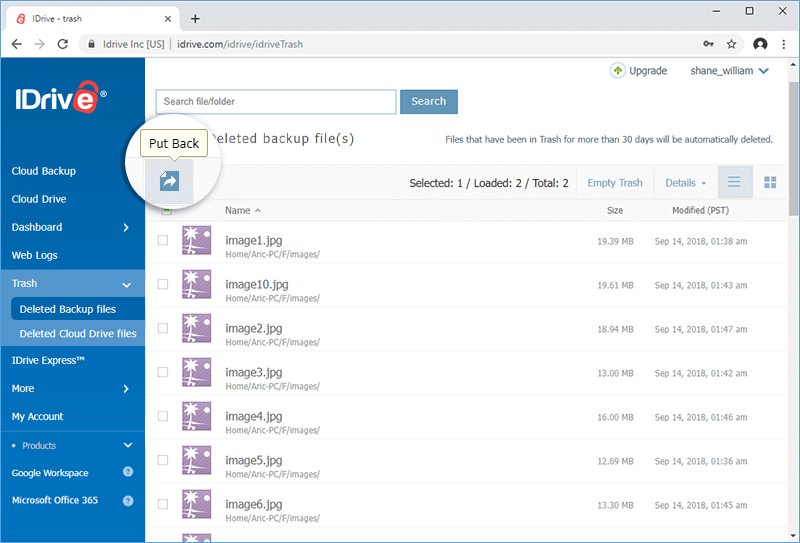
Is it possible to restore the files that are accidentally deleted from my IDrive account via the web?
Yes. All files deleted from your account will be moved to Trash. You can either move your files to the original location in your IDrive account or restore them to your local computer. The files present in Trash will automatically get deleted after a 30 day period.
Can Admin schedule the reports for each user account?
Yes, the admin of IDrive Business and IDrive Enterprise accounts can schedule the generation of Device Status and Backup Activity for each user account. The reports can be scheduled on a daily or weekly basis.
To schedule reports,
Sign in to IDrive account and go to Reports tab.
Click the Email Reports button.
In the Email Reports window:
Enter the report name
Choose the report type and file format
Specify the intended recipients
Set a time range i.e, the frequency at which the report will be generated
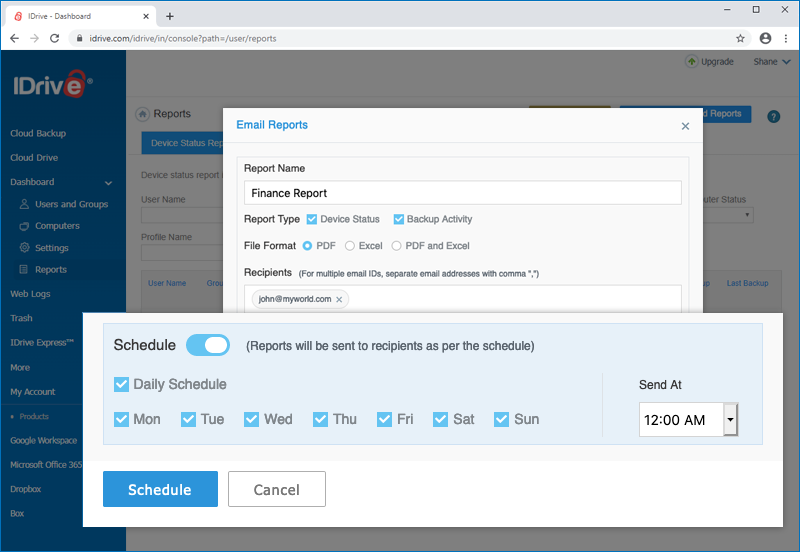
Enable the Schedule button
Select a day and time to schedule the reports
Click Schedule.
The report is sent based on the selected day and time.
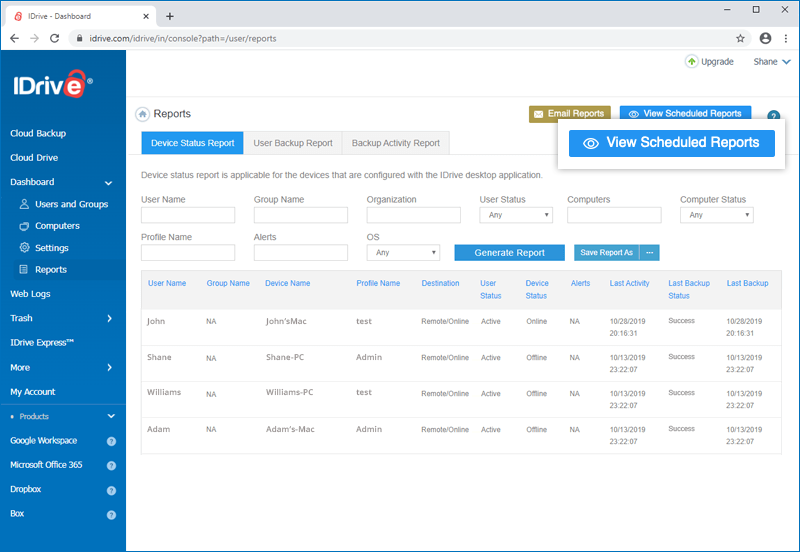
All the scheduled reports can be viewed under View Scheduled Reports.
Can Admin send the reports for each user account to other recipients?
Yes, the admin of IDrive Business and IDrive Enterprise accounts can directly send Device Status Report and Backup Activity Report for each user account in PDF, Excel, and PDF and Excel formats to multiple recipients, at a time.
To send reports,
Sign in to IDrive account and go to Reports tab.
Click the Email Reports button.
In the Email Reports window:
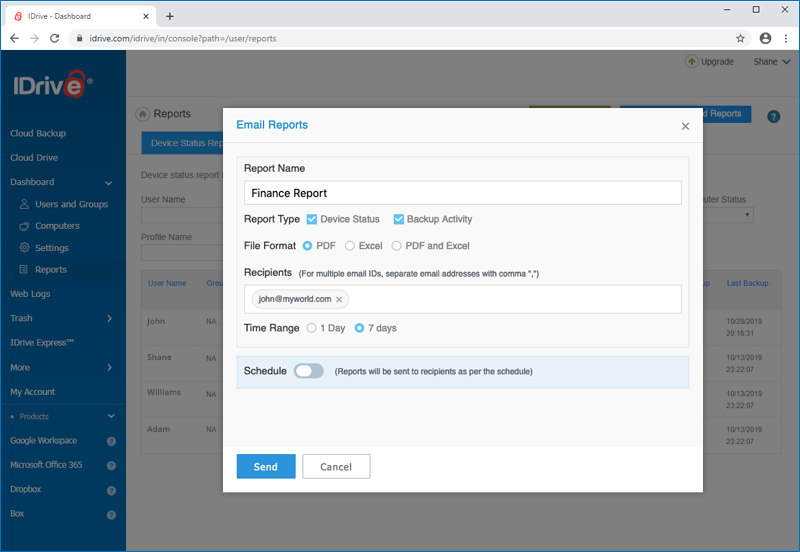
Enter the report name
Choose the report type and file format
Specify the intended recipients
Set a time range i.e, the frequency at which the report will be generated
Click Send.
The reports are immediately sent to the recipients by email.
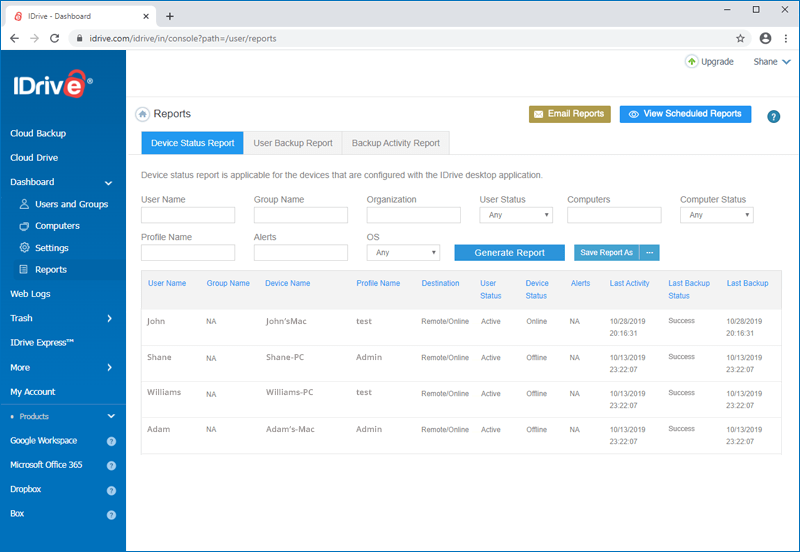
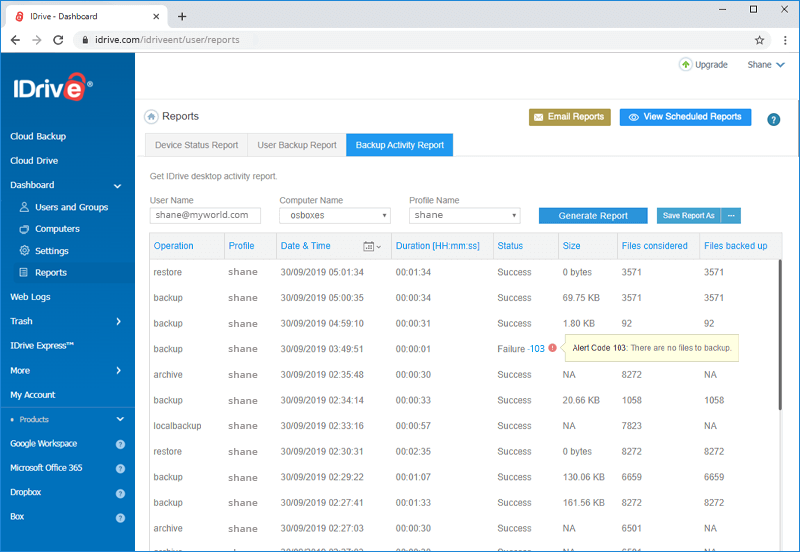
Can Admin view the total number of backed up files, their status, etc. in the Backup Activity Report?
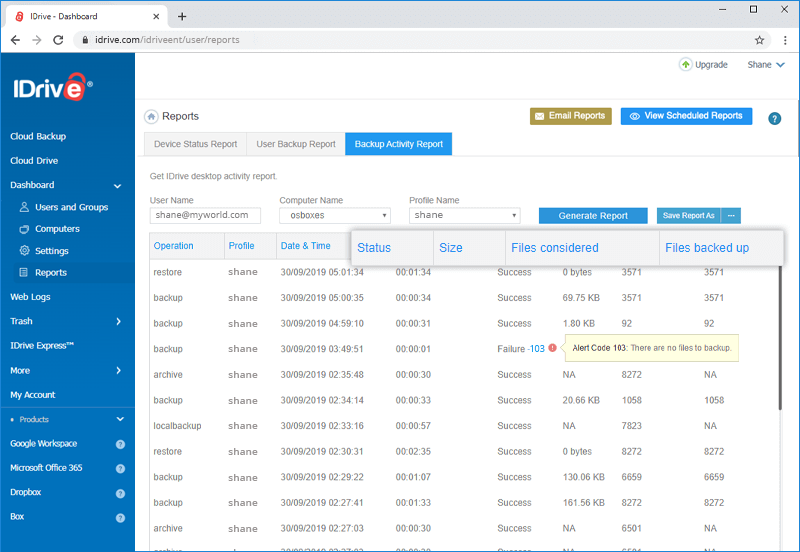
Yes, the admin of an IDrive Business and IDrive Enterprise account can view various details like the number of backed up files, their size, status, etc. in the Backup Activity Report.
To view,
Sign in to IDrive account and go to Reports tab.
In the Backup Activity tab, fill details in the fields to filter your search.
The Admin of IDrive Business and Enterprise accounts can add users to the account and manage backups at one place.
There are three different ways to add users to your account. To add multiple users at once, you can either enter information manually for each user or upload a text file with the list of users.
You can add users in the following ways:
Entering information manually for each user
Uploading a text file with a list of users
Sending email invitations
To add users manually,
Sign in to your IDrive account.
Go to Admin tab and select Add Users.
Enter the user's First name, Last name, Email address and Password.
Confirm password and select encryption type for the user account.
Click Add User.
Download and install the IDrive application on the user's device and sign in with the newly created account.
To add users by uploading a text file,
Sign in to your IDrive account.
Go to Admin tab.
Click Add Users under User Management.
Select Add Multiple Users and click Download Template File.
Modify the sample file.
Delete the sample entry for Alexandra.
Add the information for your users in the following format (one line per user): "FirstName,LastName,EmailAddress,Password"
Save the modified file.
Drag and drop your saved users .txt file onto the Upload or Drop your file here! area. Alternatively, click the area to browse for your user .txt file. A confirmation message appears after adding the users.
Download and install the IDrive application on the users' device and sign in with the newly created account.
Note: You can add up to 5000 users at a time using the text file.
To add users by inviting them via email,
Sign in to your IDrive account.
Go to Admin tab.
Click Invite Users under User Management.
Enter the user's email address. Note: You can enter multiple email addresses separated by commas.
Click Send Invite.
Select a group from the existing list or create a new group for the invited users.
Your users will receive an email with instructions for getting started.
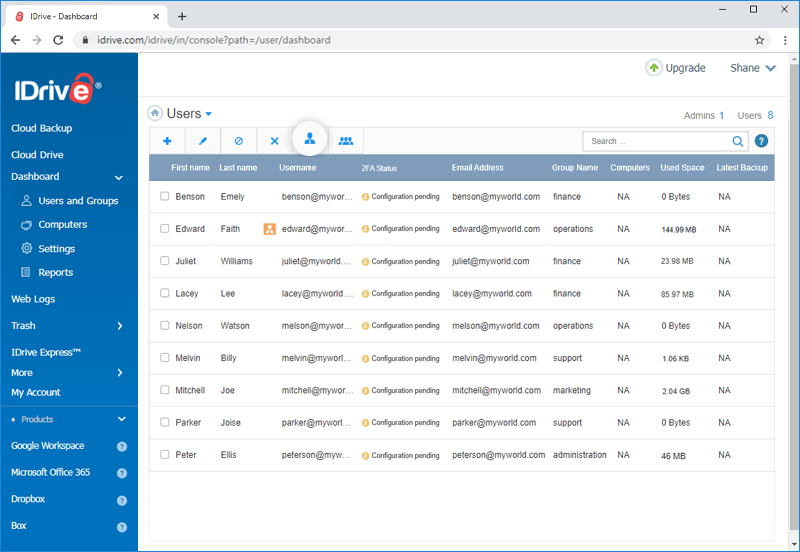
What user-oriented operations can be performed by an admin?
The admin of IDrive Business and Enterprise accounts can add or invite users, edit, block, and delete users from the account. Admins can also make the users as admin.
To edit users,
Sign in to your IDrive account.
Go to Admin tab.
Under User Management, hover on the user you want to edit.
Click edit icon. The Edit screen appears.
Update the required details and click Save.
To block users,
Sign in to your IDrive account.
Go to Admin tab.
Under User Management, hover on the user you want to block.
Click block icon. The Block Selected Users popup screen appears.
Click Block.
To delete users,
Sign in to your IDrive account.
Go to Admin tab.
Under User Management, hover on the user you want to delete.
Click delete icon. The Delete Selected Users popup screen appears.
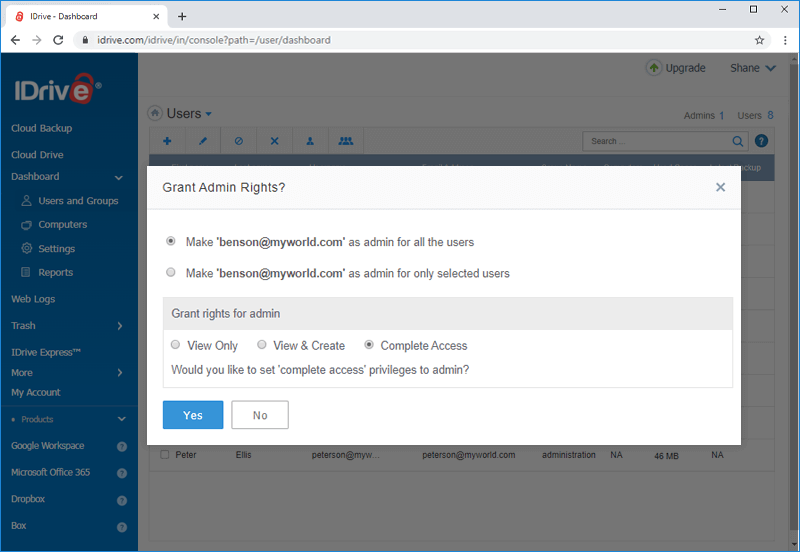
Yes, the admin of IDrive Business and Enterprise accounts can make other users as admin and assign them admin controls. Users who are assigned with admin control can add or invite, edit, block, and delete users from your account.
While assigning admin controls, you can grant the following rights to the users:
Full Admin: An admin created with Full Admin privileges will have the right to add, edit, block and delete user among other operations
View-Only Admin: An admin created with View-Only privileges will have the right to view, but not modify anything
User-Level Admin: An admin created with User-Level Admin privileges will be able to manage all users assigned to them
To make the user as an admin,
Sign in to your IDrive account.
Go to Admin tab.
Under User Management, hover on the user you want to give admin rights.
Click . The Edit screen appears.
Under Advanced Settings, select the checkbox Make as Admin.
All the options appear. Select one and click Save.
The selected user will become an admin with assigned rights.
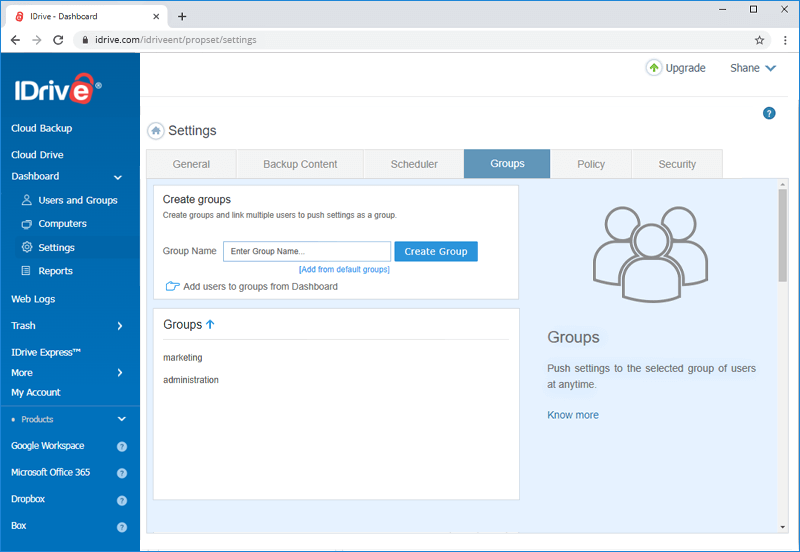
A group is a list of users whom you can organize for a variety of purposes. You can push many settings to a group of users at the same time, monitor their backups, and do much more. Up to 200 groups can be created with any number of users and a user can be a part of multiple groups.
Note: User-management function like 'Group' is a feature of IDrive Business and Enterprise account.
To create a group,
Sign in to your IDrive account.
Go to Admin tab.
Click Create Group under User Management.
Enter a group name. You can add users to the group from the list of users that appear.
Click Create Group.
A success message will appear on the screen. You can see the newly created group under Groups from the dropdown in User Management.
As an admin, can I assign encryption key type to the user accounts?
Yes, you as an admin can assign encryption key type to the user accounts. When adding users, there is an option to secure users with Default Encryption/Private Key Encryption. The admin can select either of the two options, to assign an encryption key type to the user account.
If the encryption key type is not assigned by the admin, the user would be prompted to choose Default Encryption/Private Key Encryption the next time he signs in to his account.
Is there any limit on the number of computers a user can add?
While there is no limit on the number of computers each user can add to their account, we highly recommend that a maximum count of five computers per user must be maintained for best performance and reliability.
Yes, Free 10 GB users can add up to 3 sub-users. Each sub-user will be allocated 1 GB of storage and the backups will fail once the allocated storage is utilized.
What is legal hold? Can Admin block or put a legal hold on a user account?
Legal hold is a process which allows the admin to block a user account. The user will not be able to access his account, but Admin can actively access his account and download data.
To block/legally hold a user account,
Sign in to your IDrive account.
Go to Admin tab.
Under User Management, select the users you want to block.
Click . The Block Selected Users screen appears.
Click Yes.
To unblock a user account,
Sign in to your IDrive account.
Go to Admin tab.
Under User Management go to Block Users from the dropdown.
Select the users you want to unblock.
Click . The Unblock Selected Users screen appears.
I am unable to manage my machines running on Windows XP and Windows Server 2003 operating systems remotely. Why?
Due to security reasons, machines running on Windows XP and Windows Server 2003 operating systems cannot be managed remotely. However, backups will continue to run as per the schedule for these computers and servers through the IDrive desktop application.
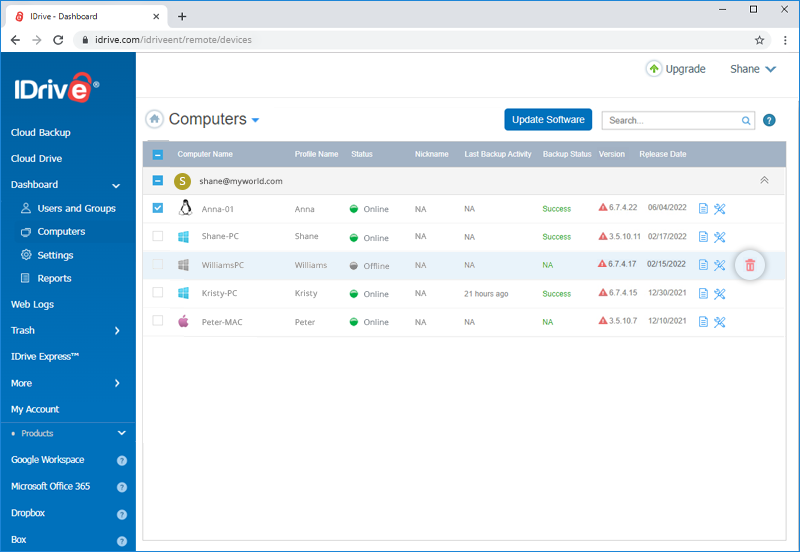
You can manage all the connected computers under Remote Manage on the More tab. You can also view backup details like last backup time and the status of each backup.
To manage computers,
Sign in to your IDrive account.
Go to More tab and click Remote Manage. The list of all the backed up computers appear here.
Click the computer name to view the IDrive application interface on the web.
Perform data backups, restore files to the respective computers, configure application settings, and view logs of your connected computers.
The following status indicates that the connected computer is online or offline:
online icon Indicates that the computer is online and the web access is enabled
offline icon Indicates that the computer is offline and the web access is disabled
Can I enable two-factor authentication for my users?
Yes, you can enable two-factor authentication for your users from the Admin tab.
To enable,
Sign in to IDrive and click your username.
Under Admin tab, select Settings.
In the Enable two-factor authentication for users section, click Enable.
Click Enable in the confirmation popup that appears.
Note:
Once enabled, all users as well as the admin must configure two-factor authentication in order to sign in.
On sign in, your users will be asked to choose a method (SMS or Time-based OTP authentication) for receiving the one-time code. Once they verify the credentials via OTP, the configuration process will be complete.
During all subsequent sign-ins, users will need to enter the code sent to their, phone number or the code displayed in their Time-based OTP Authenticator app.
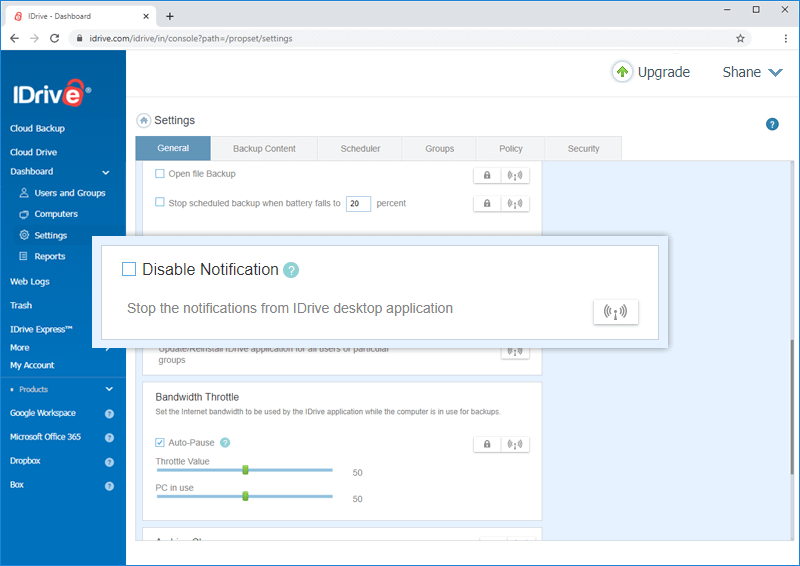
As an Admin, can I disable the notifications from the desktop application for user accounts?
Yes, you can disable the notifications from the desktop application for the user accounts. All you need to do is enable and push Disable Notifications under Settings to stop the notifications.
To disable notifications,
Sign in to your IDrive account.
Go to Remote Manage under More tab and click Settings button.
Select Disable Notification and click .
Select All Users or required groups to push this setting.
Admin can view the notifications under the Reports tab.
A policy is a group of settings. You can push these policies to a group of users to push the settings to them. Also, you can edit and delete the policies as required.
To create a policy,
Sign in to your IDrive account.
Go to Remote Manage under More tab and click Policy button.
Click Create Policy and enter the Policy name.
Select the required settings and click Create to create a policy. A confirmation message will appear.
Go to Remote Manage under More tab and click Policy button.
Hover over the policy and choose Delete from the dropdown.
Click Delete in the confirmation popup.
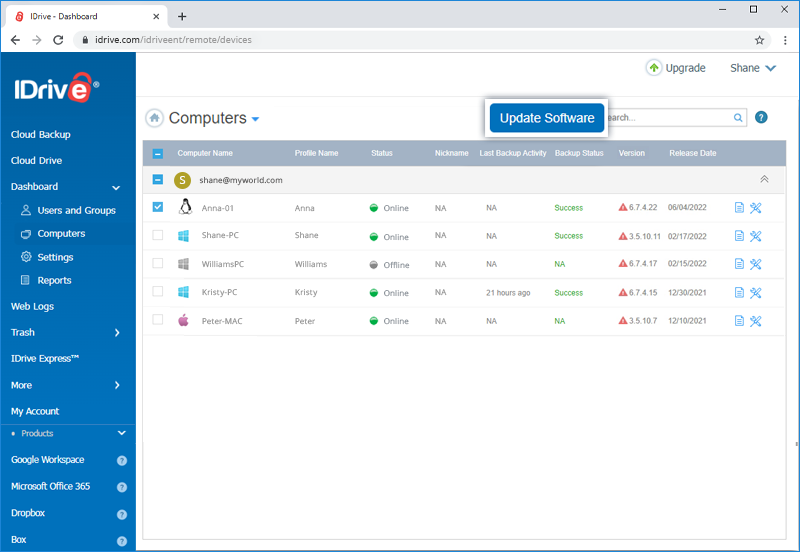
Can I remotely update to the latest version of IDrive on any connected computer?
Yes, you can remotely update to the latest version of IDrive on any connected computer via Remote Manage.
To remotely install updates,
Sign in to your IDrive account.
Go to More tab and click Remote Manage.
Select the particular computer on which you want to update the IDrive application.
Note: Make sure that the computer is Online (green) and web access is enabled.
Click Update Software.
The latest version of the IDrive application will get installed on that particular computer.
Yes, you can delete a connected computer under Remote Manage from More tab.
Deleting a computer will stop any ongoing and scheduled backups and remove all backed up data. You will not be able to manage it anymore from the computers list.
If you are logged in to the desktop application on the deleted computer, you will be logged out and backups for the computer will stop. All data, including any previous backups, from the computer will be deleted from your cloud account.
To delete a computer,
Sign in to your IDrive account.
Go to More tab and click Remote Manage.
Hover on the computer name you wish to delete and click delete icon
Is it possible to remove a computer from Remote Manage?
Yes, you can remove a computer from the list of computers on the Remote Manage tab. However, it might re-appear in the list if the user is logged in to the IDrive desktop application on the removed computer. To delete data and stop backups, uninstall the application.
How can I manage computers via the IDrive® web interface?
IDrive® helps you remotely manage all of your connected computers via the web – anytime, anywhere!
All your connected computers automatically reflect on your IDrive® web interface. To manage these computers, go to More tab and click Remote Manage. Click on any computer name and perform data backups, restore files to the respective computers, configure application settings, view logs and much more on each of your connected computers.
Can I add files to the backup set and perform an immediate backup of my connected computer?
You can easily backup files/folders of any connected computers via the web.
To perform a backup,
Sign in to your IDrive account.
Go to More tab and click Remote Manage. The list of all connected computers appear here.
Click any computer. The Backup screen appears.
By default, the Backup files to my IDrive account option is selected. Alternatively, to perform a local backup, select Backup files to a local destination.
Files already selected for backup appear on the backup set.
To add or remove files from the backup set, click Modify.
Yes, you can delete any file or folder from your IDrive® cloud account.
To delete a single file, hover over it, click the dropdown icon and select the delete option.
If you wish to delete multiple files, select the same and click the delete icon.
A popup confirming the deletion will appear. Enter your password and click Yes to proceed. The files/folders that are deleted from your IDrive® account are moved to Trash.
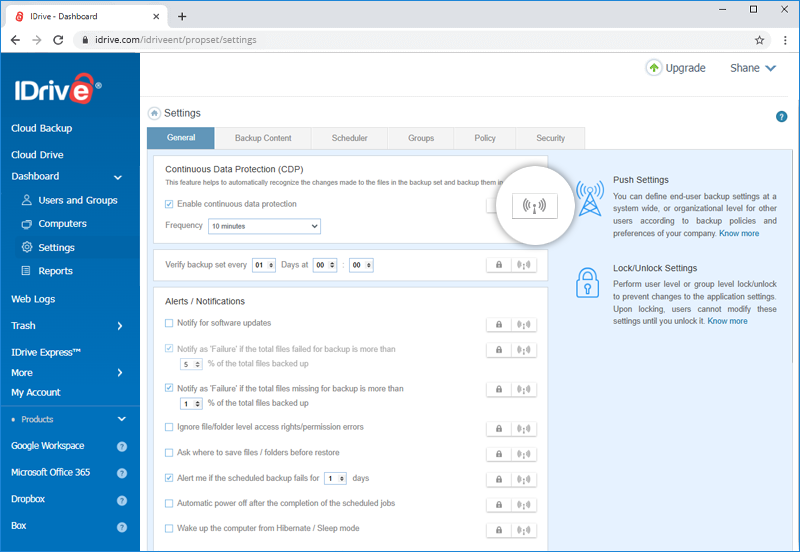
Can I manage my backup settings via IDrive® web interface?
Yes, you can manage your IDrive® account settings for your desktop application via the web interface easily. Click on the required computer from the Remote Manage tab. The Backup screen appears. Click the Settings tab displayed in the left navigation bar.
Set the following options from the Settings section.
Continuous Data Protection: IDrive® automatically recognizes the changes made to files present in your backup set and backs them up. To enable, select Continuous Data Protection, and set the frequency of your choice from the drop-down list.
Optimize CPU resources: Select this checkbox to optimize the CPU resources utilized for backup. This option is available only for certain accounts.
Update software automatically: Select this option to auto-update software whenever a newer version is available.
Notify as 'Failure' if the total files failed for backup is more than % of the total files backed up: You can select this option to receive notifications from IDrive® of the same.
Ignore file/folder level access rights/permission errors: IDrive® does not backup any file/folder in your backup set which has insufficient access rights/permissions. Hence in such a case, by default, your backup will be considered as 'Failure'. You can enable this option to ignore file/folder level access rights/permission errors. IDrive® will not consider this as an error and status of your backup will be displayed as 'Success'.
Ask where to save files/folders before restore: IDrive® will prompt you for a restore location on your computer, while restoring your files and folders.
Alert me if the scheduled backup fails for 2 days: IDrive® will notify you on the desktop if the scheduled backup fails for 2 days. You can set the number of days using the drop-down list. By default, it is set to 2 days.
Power off after the completion of the scheduled jobs: Your computer will be powered off automatically after the completion of the scheduled backup job.
Retain x versions for local backup: Select the number of versions to be retained. By default the number is set to 30.
Wake up the computer from hibernate/sleep mode: IDrive® will wake up the computer from hibernate/sleep mode and then perform the scheduled backup job.
Upload multiple file chunks simultaneously: IDrive® will optimize the transfer speed by uploading multiple file chunks simultaneously.
Allow IDrive only for current profile: This option enables you to restrict IDrive® to run only under the system profile on which the application has been installed.
Open file backup: You can backup open files like Outlook files (.pst), QuickBooks, Quicken, ACT, MS Word, MS Excel, MS Money, MS Access, and MS FoxPro.
Backup location in account: You can choose the backup location for your IDrive® account.
Show hidden files/folders: View/select the hidden files for backup.
Start IDrive® monitor on system startup: Launch the IDrive Status Item when the system is powered on.
Stop scheduled backup when battery falls to x percent: You can select this option to receive notifications of the same from IDrive. You can set the percentage using the drop-down list. By default, it is set to 20 percent.
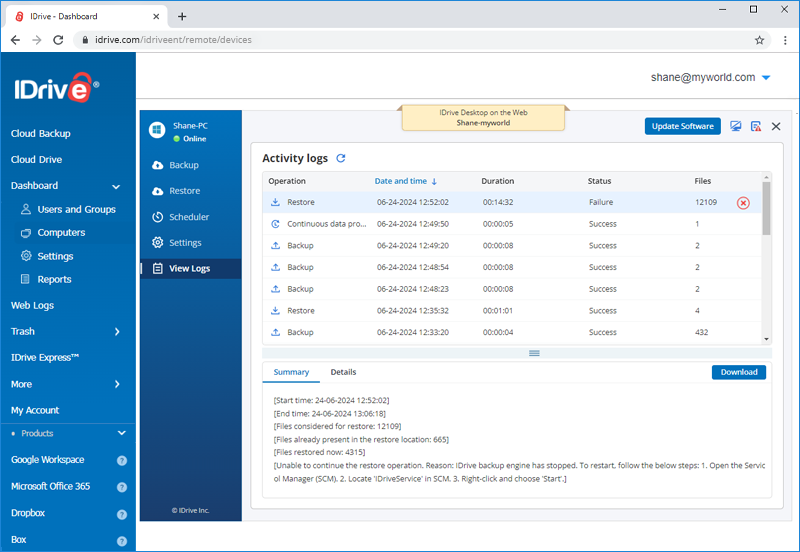
Yes, you can view detailed logs via the IDrive® web interface.
To view logs,
Sign in to your IDrive account.
Go to More tab and click Remote Manage. The list of all connected computers appear here.
Click any computer name.
Go to View Logs. A list of all the activity logs is displayed.
Click the specific log entry you want to view.
Note: For versions 6.5.0.0 or earlier, 'Desktop Backup Report' summarizes the status of the scheduled backups for your IDrive® account. By default, a report for the last seven days is displayed.
 .
.
 .
.