IDrive® e2 Express™를 사용해 대용량 데이터를 안전하게 전송하세요
IDrive® e2 Express™를 사용하면 네트워크 대역폭에 과부하를 주지 않고 테라바이트 규모의 데이터를 클라우드 스토리지로 전송할 수 있습니다. 전체 과정에서 NAS 자격 증명 기반 인증으로 데이터가 보호되므로, 물리적 드라이브를 분실하거나 도난당하더라도 승인된 사용자만 접근할 수 있습니다.
목차
다음 섹션을 통해 IDrive® e2 Express™ 백업을 시작할 수 있습니다:
- 1단계: IDrive® e2 Express™ 장치 주문하기
- 2단계: 배송 추적 및 장치 수령 확인
- 3단계: IDrive® e2 버킷 준비
- 4단계: 버킷 이름 및 설정 검증
- 5단계: 로컬에서 IDrive® e2 Express™ 장치로 데이터 복사
- 6단계: 데이터 업로드 후 장치 반송
- 7단계: IDrive® e2로의 데이터 적재 확인
- 8단계: 데이터 전송 검증 및 완료
IDrive® e2 Express™는 어떻게 사용하나요?
다음 단계를 따라 IDrive® e2 Express™ 데이터 전송을 효율적으로 완료하세요:
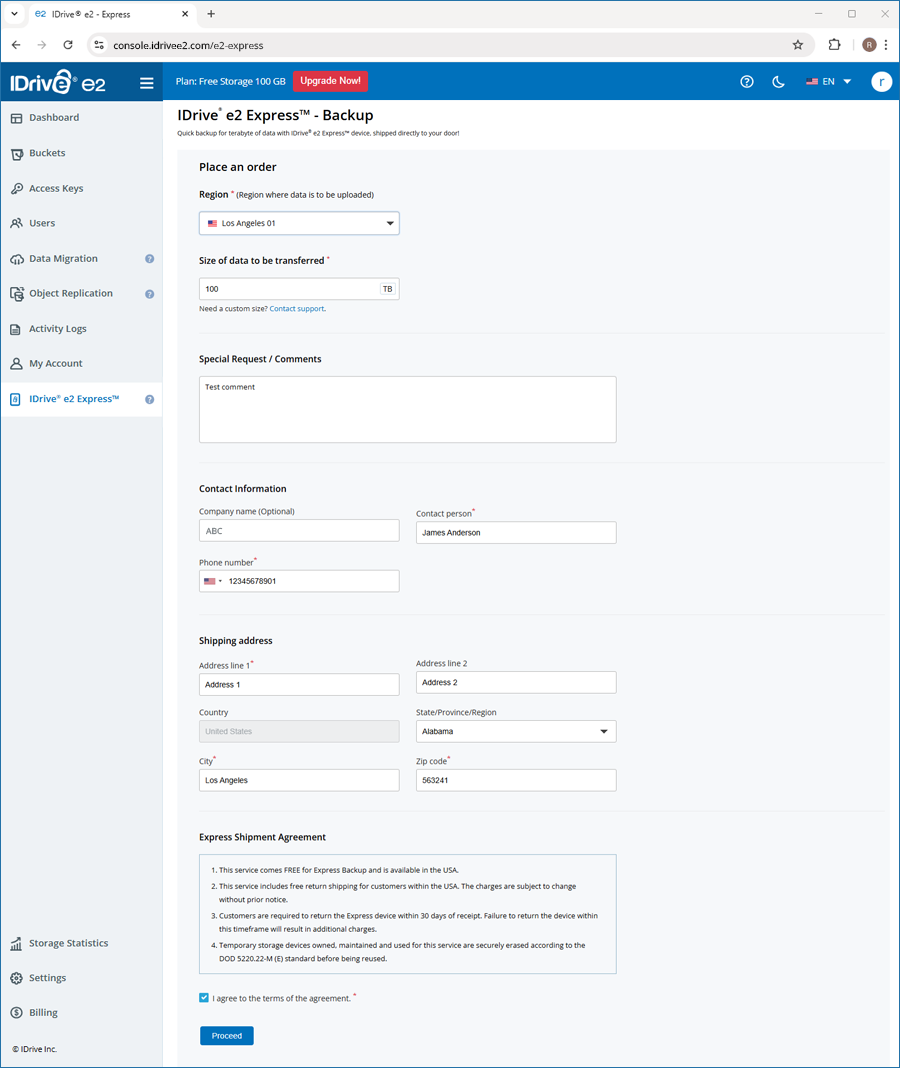
1단계: IDrive® e2 Express™ 장치 주문하기
- IDrive® e2 웹 콘솔에 로그인하세요.
- IDrive® e2 Express™ 탭으로 이동하여 양식을 작성하세요.
- 리전(Region)을 선택하고 전송할 데이터 크기를 입력하세요.
- 특별 요청 사항 또는 코멘트를 추가하세요.
- 연락처 정보와 배송 정보를 입력하세요.
- Express 배송 동의서를 검토하고 동의한 뒤 Proceed를 클릭하세요.
- Express 배송 동의서를 다시 확인하고 약관 동의 체크박스를 선택하세요.
- Place an order를 클릭하여 주문을 확정하세요.
- 주문 ID, 작업 상태, 리전, 용량, 연락처 정보가 포함된 확인 이메일이 발송됩니다. 주문 상태는 Initiated로 표시됩니다.
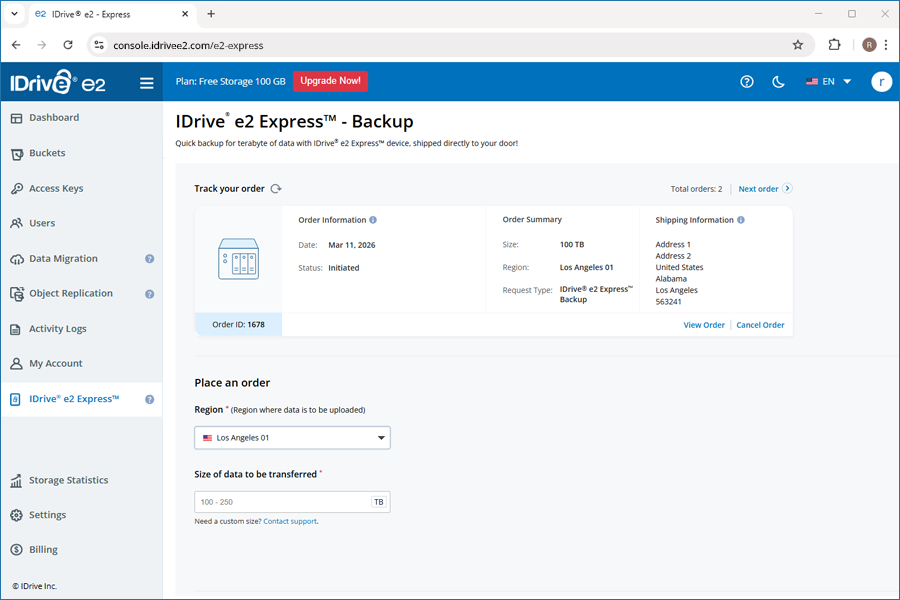
- Express 백업 주문 세부 정보를 확인하세요.
- 리전, 스토리지 또는 배송 정보를 수정하려면 Order Information을 클릭하세요.
참고:- 주문 상세 정보는 주문 상태가 Initiated일 때까지만 수정할 수 있습니다.
- 상태가 In Progress인 동안에는 청구 주소를 수정할 수 있습니다.
참고:
상태가 Initiated 또는 In Progress일 때 Cancel Order를 클릭하여 주문을 취소할 수 있습니다.
2단계: 배송 추적 및 장치 수령 확인
NAS 장치가 할당되면 주문 상태가 In Progress로 변경됩니다. 장치가 발송되면 배송 세부 정보와 추적 ID가 포함된 이메일을 받게 됩니다.
Express 장치를 수령한 후,
- 계정에 로그인한 후 대시보드 안내에서 Update status를 클릭하세요.
- Update status 아래 체크박스를 선택하여 장치 수령을 확인하세요.
- Confirm를 클릭하세요.
확인 후 주문 상태는 Arrived at User로 변경됩니다.
NAS 자격 증명을 확인하려면 View Credentials를 클릭하고, 버킷 검증 스크립트에 접근하려면 View Script를 클릭하세요.
3단계: IDrive® e2 버킷 준비
Object Lock, Versioning, Encryption 같은 기능을 사용하려면 데이터 전송 전에 IDrive® e2에서 먼저 버킷을 생성해야 합니다.
- 필요에 따라 버킷을 생성하세요.
- 각 버킷에 대해 Object Lock, Versioning, Encryption 등 필요한 설정을 구성하세요.
- 각 버킷 이름이 다음을 충족하는지 확인하세요:
- 해당 NAS 장치 폴더 이름과 정확히 일치해야 합니다. 이름은 대소문자를 구분합니다.
- AWS S3 네이밍 규칙을 따라야 하며, 소문자만 사용하고 공백/특수문자는 사용할 수 없습니다.
버킷을 미리 생성하지 않은 경우,
- 전송 중 NAS 폴더 이름을 기준으로 자동 생성됩니다.
- 기본 버킷 구성만 적용됩니다.
- Object Lock, Versioning 또는 사용자 지정 Encryption 기능은 활성화되지 않습니다.
4단계: 버킷 이름 및 설정 검증
- IDrive® e2 대시보드에서 validate_bucketname.sh 스크립트를 다운로드하세요.
- 제공된 자격 증명으로 NAS 장치에 연결하세요.
- NAS 장치에 폴더를 생성하세요. 이 폴더들은 버킷에 매핑됩니다.
참고: 폴더 이름은 AWS S3 네이밍 규칙을 따라야 하며, 소문자만 사용하고 공백/특수문자는 사용할 수 없습니다. - 검증 스크립트를 실행하여 모든 버킷 이름이 유효한지 확인하세요.
중요:
마이그레이션 실패를 방지하려면 버킷 이름이 AWS S3 네이밍 규칙을 엄격히 준수해야 합니다. 모든 버킷 이름이 검증을 통과한 후에만 데이터 전송을 진행하세요.
5단계: 로컬에서 IDrive® e2 Express™ 장치로 데이터 복사
Express 장치를 수령하면 네트워크에 연결한 후 데이터를 업로드하세요.
- Rclone을 설치하세요.
- Linux에서는 다음 명령어를 실행하세요:
curl https://rclone.org/install.sh | sudo bash - macOS에서는 다음 명령어를 실행하세요:
brew install rclone - Windows에서는 다음에서 다운로드하세요:
https://rclone.org/downloads/
- Linux에서는 다음 명령어를 실행하세요:
- NAS(S3 호환 스토리지)를 구성하세요.
- 다음 명령어를 실행하세요:
rclone config -
안내에 따라 새 remote를 생성하세요.
- S3를 선택하세요.
- Other (S3 Compatible)를 선택하세요.
- Access Key, Secret Key, Endpoint를 입력하세요.
예: http://your-nas-endpoint:8010
- 다음 명령어를 실행하세요:
- 버킷을 생성하세요.
다음 명령어를 실행하세요:
rclone mkdir nas:mybucket참고:
- 버킷 이름은 S3 네이밍 규칙을 따라야 하며, 3~63자의 소문자만 사용하고 밑줄(_)은 사용할 수 없습니다.
- 전역 고유성은 AWS S3에만 필요하며 대부분의 사설 NAS 배포에는 필요하지 않습니다.
- 아래와 같이 기본 복사 명령어를 실행하세요:
rclone copy <source_path> nas:mybucket -P - 성능 최적화 명령어를 실행하세요(권장 시작값).
nohup rclone copy <source_path> nas:mybucket \ --transfers 16 --checkers 16 --fast-list --progress --no-traverse --stats=1s \ --no-check-certificate --stats-log-level=INFO --log-level=INFO --log-file=transfer.log \ --ignore-size --check-first --local-no-check-updated --local-no-set-modtime --inplace \ --s3-chunk-size 64M --s3-upload-concurrency 4 --multi-thread-streams 4 -P > transfer.out 2>&1 &참고:
- nohup은 세션이 끊겨도 전송이 계속되도록 합니다.
- 로그는 combined_transfer.log 및 combined_transfer.out에 저장됩니다.
- 해당 플래그는 대용량 데이터셋 전송을 위해 동시성, 청크 크기, 스트림 처리를 최적화합니다.
- 높은 동시성은 리소스 사용량을 크게 늘릴 수 있으므로 CPU, 메모리, 디스크, 네트워크 용량을 기준으로 점진적으로 조정하세요.
-
전송 상태를 모니터링하세요.
tail -f transfer.out tail -f transfer.log -
전송 완료 후 검증하세요.
rclone check <source_path> nas:mybucket - 중단된 전송을 재개하세요.
참고: 전송이 중단되면 동일한 명령어를 다시 실행하세요. Rclone은 이미 전송된 파일을 자동으로 건너뛰고 미완료 전송을 이어서 수행합니다.
6단계: 데이터 업로드 후 장치 반송
- NAS 장치와 모든 케이블을 원래 포장재에 안전하게 넣으세요.
- 제공된 반송 배송 라벨을 박스에 부착하세요.
- 장치를 IDrive® e2로 반송하세요.
장치를 반송한 후 IDrive® e2 계정에 로그인하여 대시보드 알림의 Update status를 클릭하세요. 확인 팝업에서 장치를 당사로 반송했음을 확인하고 Confirm를 클릭하세요.
또는 Track Your Order 섹션으로 이동해 목록에서 해당 주문을 찾은 뒤, Order Information 아래 상태 옆의 ![]() 아이콘을 클릭하여 장치 반송 사실을 확인할 수 있습니다. 상태는 이에 따라 업데이트됩니다.
아이콘을 클릭하여 장치 반송 사실을 확인할 수 있습니다. 상태는 이에 따라 업데이트됩니다.
당사에서 장치를 수령하면 Express 드라이브의 데이터가 고객님의 버킷으로 업로드됩니다. 데이터 업로드 진행 상황을 추적할 수 있습니다.
버킷 업로드가 완료되면 데이터 검증 알림을 받게 됩니다.
7단계: IDrive® e2로의 데이터 적재 확인
장치를 당사에서 수령하면 고객님의 IDrive® e2 Express™ 드라이브가 데이터 센터에 도착했음을 알리는 이메일을 받게 됩니다.
이후 Express 장치의 데이터가 IDrive® e2 버킷으로 전송됩니다.
8단계: 데이터 전송 검증 및 완료
데이터 복사가 성공적으로 완료되면 이메일 알림을 받게 됩니다. 또한 대시보드에 데이터 전송 정확성 검증을 요청하는 알림이 표시됩니다.
진행 전에 다음 단계를 완료하세요.
- IDrive® e2 계정에 업로드된 데이터의 무결성과 완전성을 검증하세요.
- 검증이 완료되면 대시보드 알림의 Update Status 버튼을 클릭하거나, Track Your Order 섹션에서 주문을 찾아 Order Information 아래 상태 옆
 아이콘을 클릭하여 상태를 Verified by User로 업데이트하세요.
고객 확인 후 NAS 장치에 대한 보안 정리 절차가 진행됩니다. 본 서비스에 사용된 모든 임시 저장 장치는 재사용 전에 DOD 5220.22-M (E) 표준에 따라 안전하게 삭제됩니다.