VMware
Wenn Ihre Frage unten nicht beantwortet wird, kontaktieren Sie uns über unser Support-Formular und wir werden uns in Kürze bei Ihnen melden.
- Unterstützt IDrive® 360 inkrementelle Backups für VMware-VMs?
- Wie deaktiviere ich Change Block Tracking (CBT) für VMware-Backups?
- Welche Ports benötigt die IDrive® 360-Desktop-Anwendung für Backup- und Wiederherstellungsvorgänge?
- Wie teste ich die VMware-Konnektivität zu Port 902?
- Wie kann ich meine VMware-VMs sichern?
- Wie zeige ich VMs von vCenter an und sichere sie?
- Kann ich VMware-VMs auf einem Netzlaufwerk oder NAS sichern?
- Wie sichere ich VMware-VMs auf einem Netzwerkcomputer?
- Wie führe ich ein Backup von VMware-VMs zu einem Netzwerkspeicherort oder NAS durch?
- Was sind die Systemanforderungen für das IDrive® 360 VMware-Backup?
- Muss ich die VMs im VMware Manager ausschalten, um ein Backup durchzuführen?
- Wie sicher ist die Datenübertragung beim Backup/Wiederherstellen mit IDrive® 360 VMware-Backup?
- Wie stelle ich eine VM auf dem VMware-Server wieder her?
- Wie stelle ich VMs von einem vCenter-Server wieder her?
- Wie kann ich VMware-VMs von einem Netzwerkspeicherort wiederherstellen?
- Kann ich VMware-VMs von einem Netzlaufwerk oder NAS wiederherstellen?
- Ist für das VMware-Backup ein zusätzliches oder externes Speichervolume erforderlich?
- Kann ich eine VMDK-Datei aus dem IDrive® 360 VMware-Backup an einen anderen VMware-Server anhängen?
- Kann ich die gesicherte VMDK-Datei über den Sphere Client oder das Web Interface hochladen und an VMware ESXi anhängen?
- Erfordert VMware ESXi eine lizenzierte Version für die Durchführung von Backups?
- Was ist die maximale Festplattengröße einer VM, die ich sichern kann?
Unterstützt IDrive® 360 inkrementelle Backups für VMware-VMs?
Ja. Nach dem ersten vollständigen Backup sind alle nachfolgenden Backups mit IDrive 360 inkrementell. Um inkrementelle Backups zu aktivieren, muss Change Block Tracking (CBT) für die virtuelle Maschine aktiviert sein.
So aktivieren Sie CBT:
- Schalten Sie die virtuelle Maschine aus.
- Klicken Sie mit der rechten Maustaste auf die VM und wählen Sie 'Einstellungen bearbeiten'.
- Klicken Sie auf 'Optionen'.
- Klicken Sie im Abschnitt 'Erweitert' auf 'Allgemein' und dann auf 'Konfigurationsparameter'. Das Dialogfeld 'Konfigurationsparameter' wird angezeigt.
- Klicken Sie auf 'Zeile hinzufügen'.
- Fügen Sie den Parameter ctkEnabled hinzu und setzen Sie dessen Wert auf true.
- Klicken Sie erneut auf 'Zeile hinzufügen', fügen Sie scsi0:0.ctkEnabled hinzu und setzen Sie dessen Wert auf true.
Hinweis:
- scsi0:0 in scsi0:0.ctkEnabled bezieht sich auf das SCSI-Gerät, das der virtuellen Festplatte zugewiesen ist. Jede der VM hinzugefügte Festplatte erhält ein eindeutiges SCSI-Gerät, z.B. scsi0:0, scsi0:1 oder scsi1:1.
- CBT muss für jede virtuelle Festplatte einzeln aktiviert werden; es kann nicht global für die VM angewendet werden.
Wie deaktiviere ich Change Block Tracking (CBT) für VMware-Backups?
So deaktivieren Sie CBT für VMware-Backups:
- Schalten Sie die virtuelle Maschine aus.
- Klicken Sie mit der rechten Maustaste auf die VM und wählen Sie 'Einstellungen bearbeiten'.
- Klicken Sie auf 'Optionen'.
- Klicken Sie im Abschnitt 'Erweitert' auf 'Allgemein' und dann auf 'Konfigurationsparameter'. Das Dialogfeld 'Konfigurationsparameter' öffnet sich.
- Setzen Sie den Parameter 'ctkEnabled' für die gewünschten SCSI-Festplatten auf false.
- Schalten Sie die virtuelle Maschine ein.
Welche Ports benötigt die IDrive® 360-Desktop-Anwendung für Backup- und Wiederherstellungsvorgänge?
Die Ports 443 und 902 müssen auf dem Quellhost geöffnet und zugänglich sein, um Backup- und Wiederherstellungsvorgänge zu ermöglichen.
Wie teste ich die VMware-Konnektivität zu Port 902?
Um die Konnektivität zu Port 902 auf einem ESXi-Host zu testen, führen Sie den folgenden Befehl in einer Eingabeaufforderung aus:
C:\>telnet server 902
How can I back up my VMware virtual machines?
To back up your VMware virtual machines,
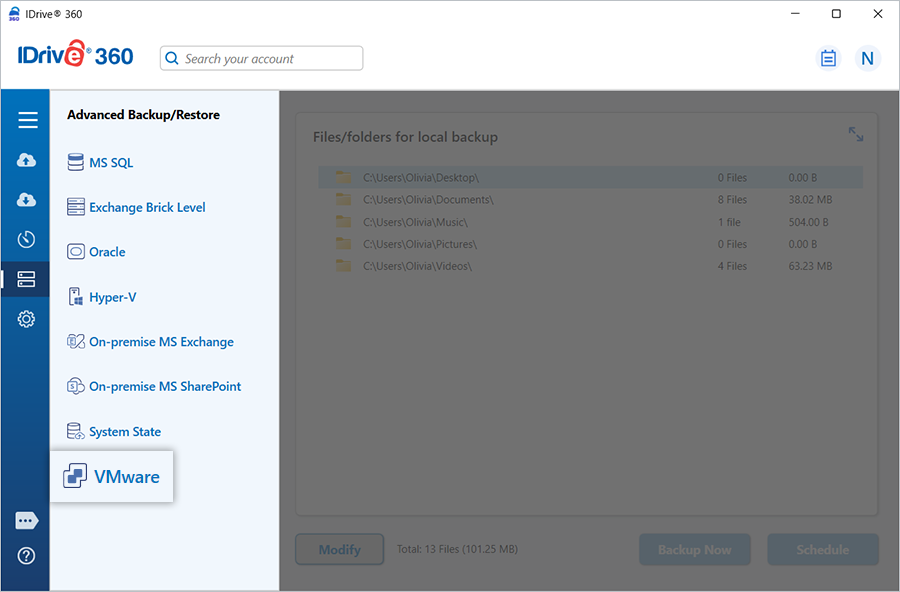
- Sign in to the IDrive 360 desktop application and click 'Server Backup'. A slider menu will appear.
- Click 'VMware'. The VMware connection screen appears, with 'VMware backup' selected by default.
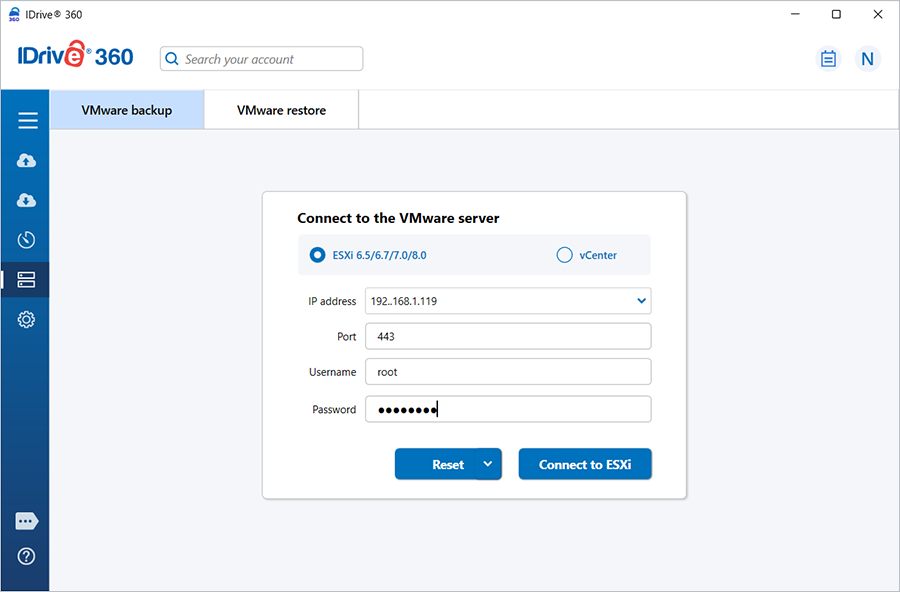
- Select 'ESXi 6.5/6.7/7.0/8.0'.
- Enter valid credentials and click 'Connect to ESXi'.
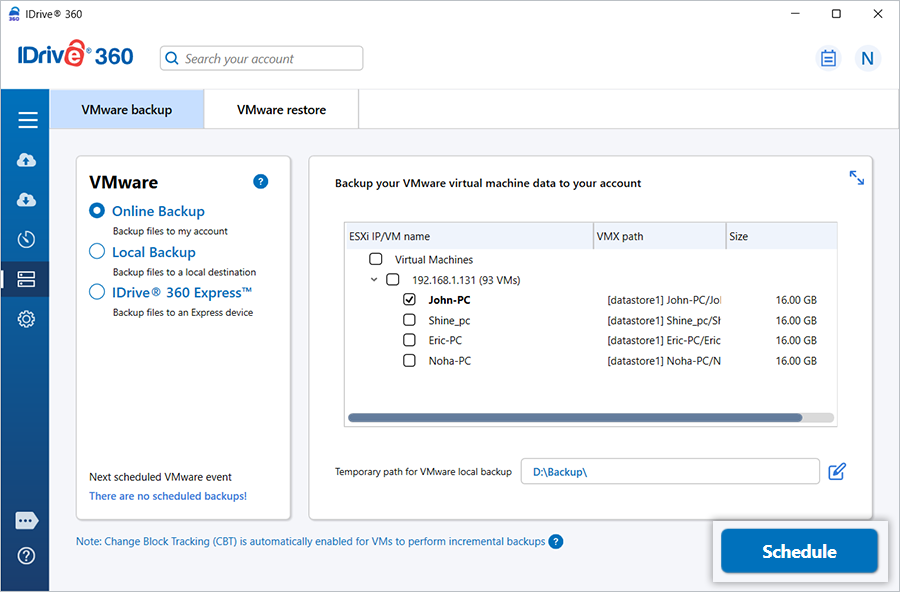
- Select 'Online Backup', 'Local Backup', or 'IDrive® 360 Express�'.
Note: 'Online Backup' stores data on the IDrive 360 cloud. 'Local Backup' and 'IDrive® 360 Express� Backup' store data on the local drive.
- Select the virtual machines from the list and specify a temporary path for the local backup.
- Click 'Schedule Now'.
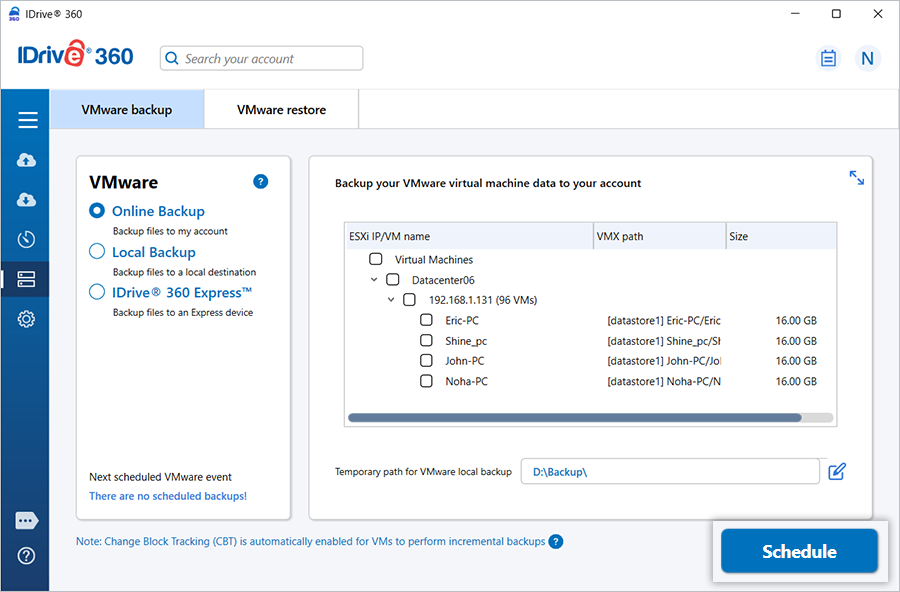
- The 'Scheduler' appears, where you can schedule the backup for a future date and time or perform an immediate backup of the selected virtual machines.
How do I view and back up virtual machines from vCenter?
To back up multiple ESXi virtual machines via vCenter,
- Sign in to the IDrive 360 desktop application and click 'Server Backup'. A slider menu will appear.
- Click 'VMware'. The VMware connection screen appears, with 'VMware backup' selected by default.
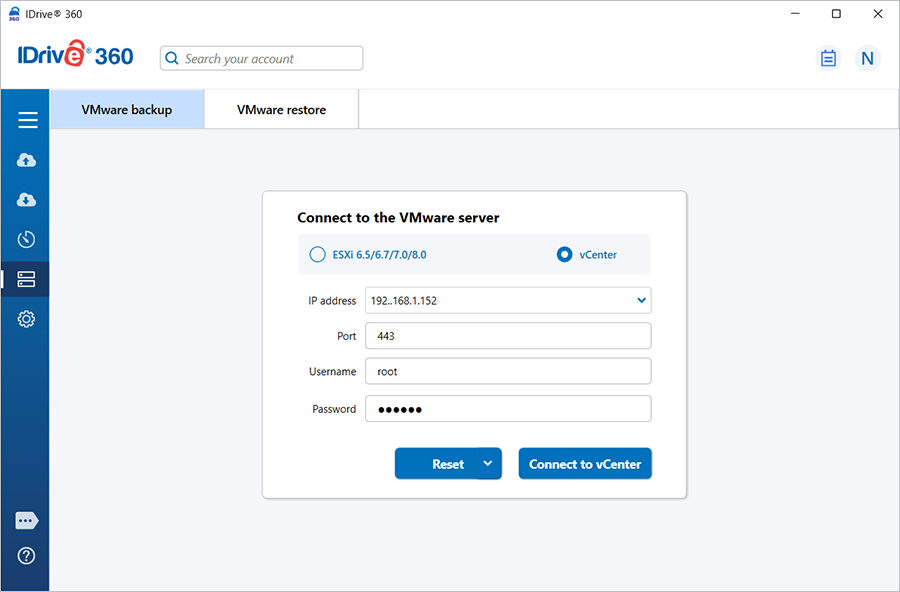
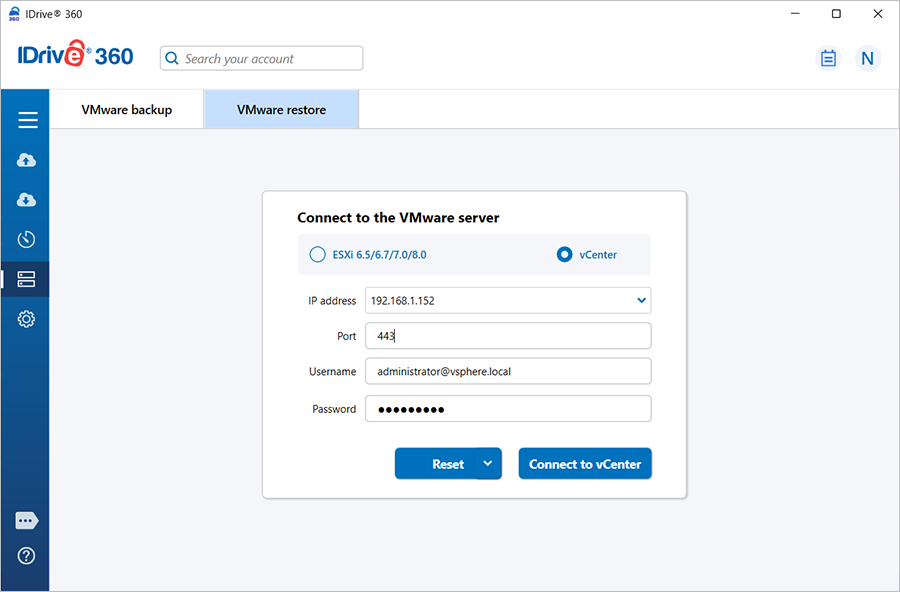
- Select 'vCenter'.
- Enter the IP address, Port, Username, Password, then click 'Connect to vCenter'.
- Select 'Online Backup', 'Local Backup', or 'IDrive® Express� Backup'.
- Select the virtual machine(s) from the list and specify a temporary path for the local backup.
- Click 'Schedule Now'.
- The 'Scheduler' appears, allowing you to schedule the backup for a future date and time or perform an immediate backup of the selected virtual machines.
Can I back up VMware virtual machines to a network-mapped or NAS drive?
Yes, you can back up VMware virtual machines to a network-mapped drive or NAS drive. While selecting the local backup path, choose the network-mapped or NAS drive and provide the necessary authentication.
To back up VMware virtual machines to a network-mapped or NAS drive,
- Sign in to the IDrive 360 desktop application and click 'Server Backup'. A slider menu will appear.
- Click 'VMware'. The VMware connection screen appears, with 'VMware backup' selected by default.
- Select 'ESXi 6.5/6.7/7.0/8.0' or 'vCenter'.
- Enter valid credentials and click 'Connect to ESXi'/'Connect to vCenter'.
- Select 'Online Backup', 'Local Backup', or 'IDrive® 360 Express�'.
- Select the virtual machines from the list.
- Select the network-mapped or NAS drive as the backup location.
- Click 'Schedule Now'.
- Enter your username and password to authenticate the network-mapped or NAS drive, then click 'Authenticate'.
- The 'Scheduler' appears, allowing you to schedule the backup for a future date and time or perform an immediate backup of the selected virtual machines.
How do I back up VMware virtual machines to a network computer?
To back up VMware virtual machines to a computer on the local network,
- Go to 'Server Backup'. A slider menu will appear.
- Click 'VMware'. The VMware connection screen appears, with 'VMware backup' selected by default.
- Select 'ESXi 6.5/6.7/7.0/8.0' or 'vCenter', as required.
- Enter the server IP address, Port, Username, and Password, then click 'Connect to ESXi' or 'Connect to vCenter'.
- Select 'Online Backup', 'Local Backup', or 'IDrive® 360 Express� Backup'.
- Select the virtual machines for backup from the list.
- Click against 'Temporary path for VMware local backup'.
- In the popup window, click 'Network', then double-click and select the required computer from the list of network computers.
- If prompted, enter the username and password to authorize access.
- Click 'Schedule Now'.
- The 'Scheduler' appears, allowing you to schedule the backup for a future date and time or perform an immediate backup of the selected virtual machines.
How do I perform a backup of VMware virtual machines to a network location or network-attached storage (NAS)?
To back up VMware virtual machines to a network location or NAS,
- Go to 'Server Backup'. A slider menu will appear.
- Click 'VMware'. The VMware connection screen appears, with 'VMware backup' selected by default.
- Select 'ESXi 6.5/6.7/7.0/8.0' or 'vCenter', as required.
- Enter the IP address, Port, Username, and Password of the server, then click 'Connect to ESXi' or 'Connect to vCenter'.
- Select 'Online Backup', 'Local Backup', or 'IDrive® 360 Express� Backup'.
- Select the virtual machines to back up from the list.
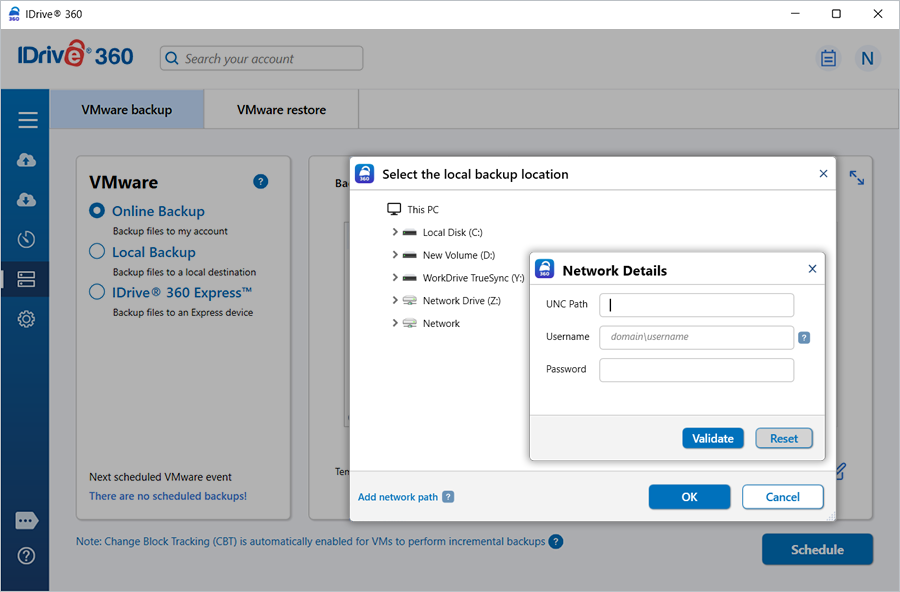
- Click 'Verify access to network location for backup'. This 'Network Details' popup will appear.
- Enter the NAS or Network UNC path (\\IP Address or Computer name\dir), along with the username and password, then validate the connection.
- Click 'Schedule Now'.
- The 'Scheduler' appears, allowing you to schedule the backup for a future date and time or perform an immediate backup of the selected virtual machines.
Was sind die Systemanforderungen für das IDrive® 360 VMware-Backup?
Die Systemanforderungen für das IDrive 360 VMware-Backup sind:
- ESXi: 6.5, 6.7, 7.0, 8.0
- vCenter: 6.5, 6.7, 7.0, 8.0
- Betriebssystem: Windows 64-Bit
- RAM: 2 GB
- Speicher: Ausreichend Festplattenspeicher zum Speichern von VM-Dateien für temporäres Backup und Wiederherstellung
Muss ich die VMs im VMware Manager ausschalten, um ein Backup durchzuführen?
Nein. Sie müssen Ihre aktiven VMs nicht herunterfahren, um ein Backup durchzuführen. IDrive 360 ermöglicht es Ihnen, VMs zu sichern, während sie laufen.
Wie sicher ist die Datenübertragung beim Backup/Wiederherstellen mit IDrive® 360 VMware-Backup?
IDrive 360 verwendet militärtaugliche 256-Bit-AES-Verschlüsselung, um alle bei Backup- und Wiederherstellungsvorgängen übertragenen Daten zu schützen.
How do I restore a virtual machine to the VMware server?
To restore virtual machines to an ESXi host,
- Sign in to the IDrive 360 desktop application and click 'Restore'.
- Select 'Online Restore', 'Local Restore', or 'IDrive® 360 Express� Restore'.
- Locate and select the 'IDVMwareBackup' folder in your IDrive 360 account or local drive.
Note: If 'Local Restore' is selected, you can choose the required version from the 'Version' list.
- Click 'Restore Now' to restore the 'IDVMwareBackup' folder to the local computer.
- Once restored, click 'Server Backup'. A slider menu will appear.
- Click 'VMware'. The VMware connection screen appears.
- Click 'VMware restore', enter valid credentials, and click 'Connect to ESXi'.
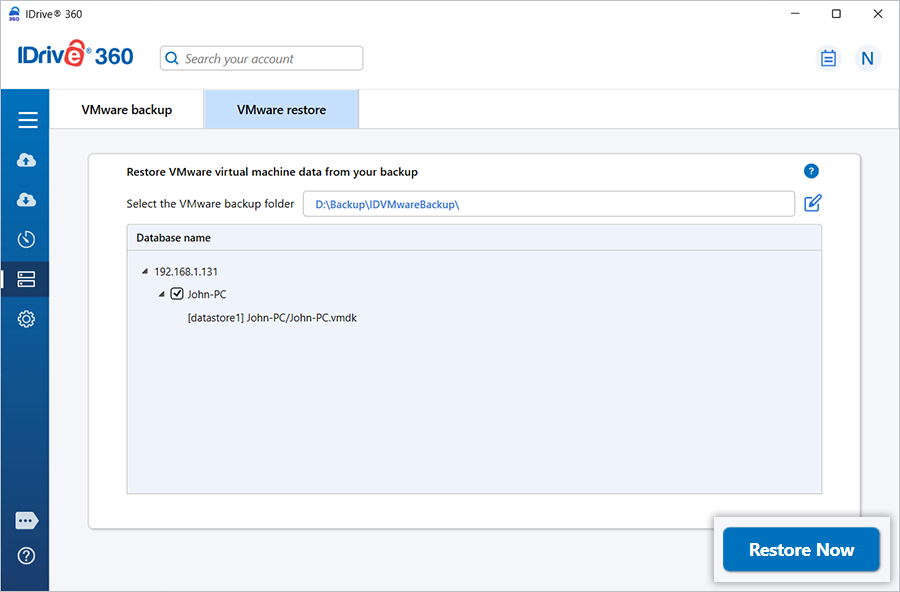
- Browse and select the 'IDVMwareBackup' folder restored earlier.
- Select the virtual machines to restore.
- Click 'Restore Now'. The restore settings popup will appear.
- By default, the 'Existing machine' is selected as the restore location.
-To create a new virtual machine in the same location, select 'New machine' and enter a name.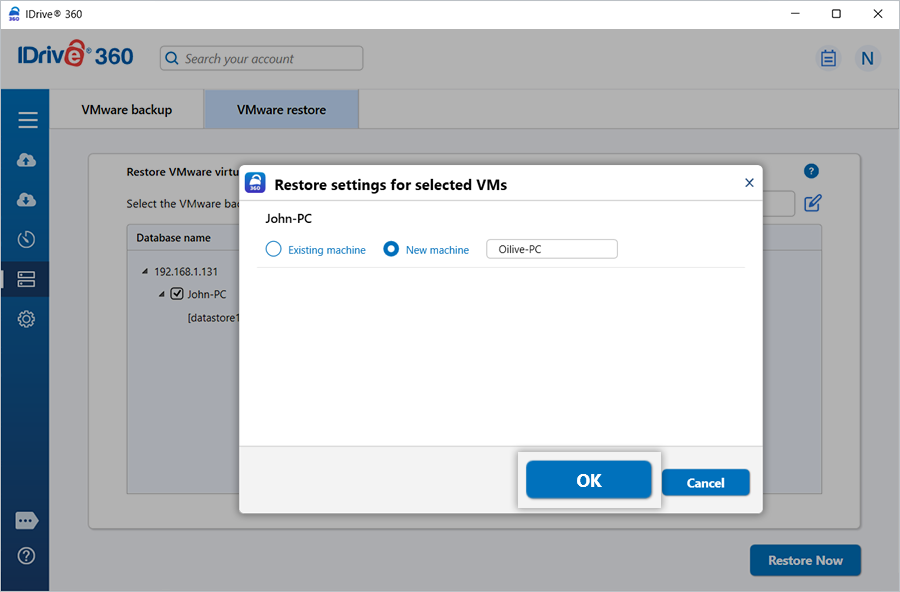
- A confirmation popup appears informing that the VMDK file will be overwritten and the virtual machine will remain powered off. Click 'Yes' to proceed.
On successful completion, a restore summary will be displayed.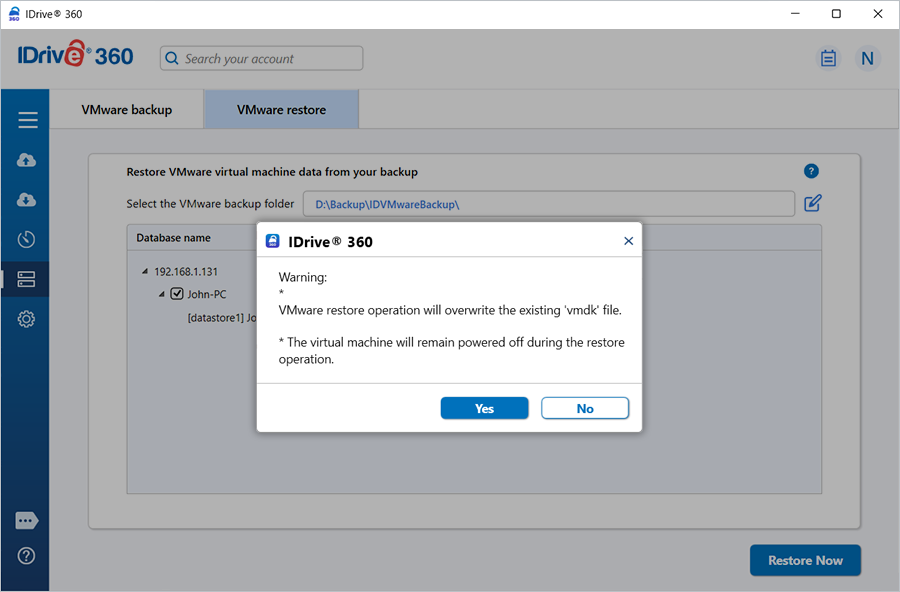
To restore virtual machines from vCenter,
- Sign in to the IDrive 360 desktop application and click 'Restore'.
- Select 'Online Restore', 'Local Restore', or 'IDrive® 360 Express� Restore'.
- Locate and select the 'IDVMwareBackup' folder in your IDrive 360 account or local drive.
Note: If 'Local Restore' is selected, you can choose the required version from the 'Version' list.
- Click 'Restore Now' to restore the folder to your local computer.
- Once restored, click 'Server Backup'. A slider menu will appear.
- Click 'VMware', then 'VMware restore'.
- Select 'vCenter' as the connection type.
- Enter the vCenter IP address, port, username, and password.
- Click 'Connect to vCenter'.
- Locate and select the 'IDVMwareBackup' folder restored.
- Choose the virtual machines to restore.
- From the 'Select the ESXi host for restore' dropdown, select the required ESXi host.
- This dropdown lists all the ESXi hosts connected to the selected vCenter server at the time of restore.
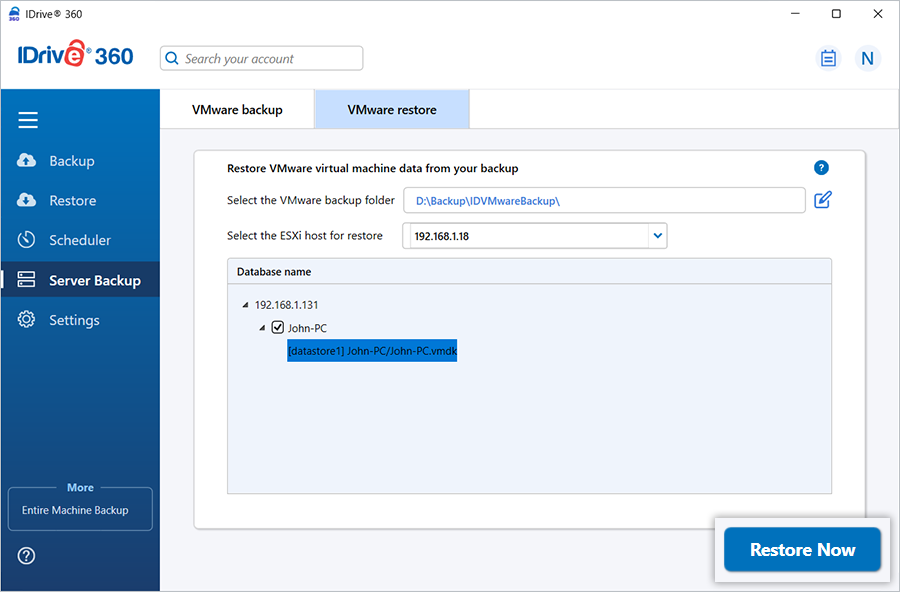
- By default, 'Existing machine' is selected as the restore location. To create a new VM, select 'New machine' and enter a name.
- A confirmation popup appears informing that the VMDK file will be overwritten and the VM will remain powered off.
- Click 'Yes' to proceed.
On successful completion, a restore summary will be displayed.
How do I restore virtual machines from a vCenter server?
IDrive 360 supports restoring virtual machines from a vCenter server.
To restore virtual machines from vCenter,
- Sign in to the IDrive 360 desktop application and click 'Restore'.
- Select 'Online Restore', 'Local Restore' or 'IDrive® 360 Express� Restore'.
- Locate and select the 'IDVMwareBackup' folder from your IDrive 360 account or local drive.
Note: If 'Local Restore' is selected, you can choose the required version from the 'Version' list.
- Click 'Restore Now' to restore the 'IDVMwareBackup' folder to the local computer.
- After the folder is restored, click 'Server Backup'. A slider menu will appear.
- Click 'VMware'. The VMware connection screen appears.
- Click 'VMware restore'.
- Select 'vCenter' as the connection type.
- Enter the vCenter IP address, port number, username, and password.
- Click 'Connect to vCenter'.
- Locate and select the 'IDVMwareBackup' folder restored earlier.
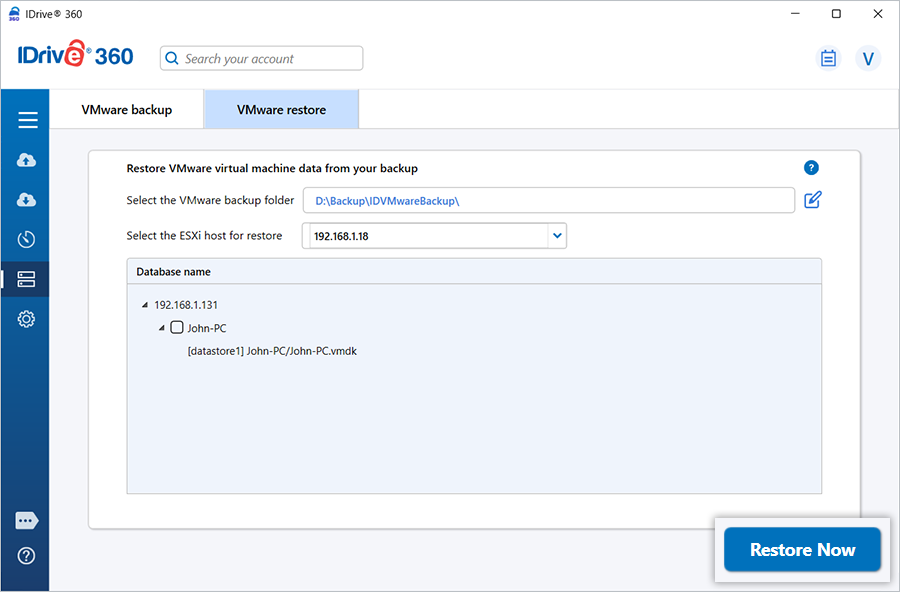
- Choose the virtual machines you want to restore to the vCenter server.
- From the 'Select the ESXi host for restore' dropdown, choose the required ESXi host.
Note: This dropdown lists all the ESXi hosts connected to the selected vCenter server at the time of restore.
- Click 'Restore Now' to initiate the restore process.
The restore settings popup will appear. - By default, the 'Existing machine' is selected as the restore location. To create a new VM in the same location with the restored data, choose 'New machine' and provide a name.
- Click 'OK' to proceed.
- A confirmation popup will appear informing that the VMDK file will be overwritten and the virtual machine will remain powered off during the restore operation. Click 'Yes' to proceed.On successful completion, a restore summary will be displayed.
Wie kann ich VMware-VMs von einem Netzwerkspeicherort wiederherstellen?
IDrive 360 unterstützt die Wiederherstellung von VMware-VMs von vCenter, ESXi-Hosts und Netzwerk-/NAS-Standorten. Befolgen Sie die Schritte basierend auf Ihrem Wiederherstellungsszenario.
So stellen Sie eine VM von einem Netzwerkcomputer auf einem ESXi-Host wieder her:
- Melden Sie sich bei der IDrive 360-Desktop-Anwendung an.
- Gehen Sie zu 'Server-Backup' > 'VMware' > 'VMware wiederherstellen'.
- Geben Sie gültige Anmeldedaten ein und klicken Sie auf 'Mit ESXi verbinden'.

- Navigieren Sie zum Ordner 'IDVMwareBackup' vom Netzwerkcomputer (laden Sie den Ordner 'IDVMwareBackup' von Ihrem IDrive 360-Konto oder lokalem Laufwerk auf einen Netzwerkcomputer herunter).
Hinweis: Wenn 'Lokale Wiederherstellung' ausgewählt ist, können Sie die erforderliche Version aus der 'Version'-Liste wählen.
- Klicken Sie auf . Das Popup 'Meinen Computer durchsuchen' wird angezeigt.
- Klicken Sie auf 'Netzwerk' und doppelklicken Sie auf den gewünschten Computer.
- Geben Sie Ihren Benutzernamen und das Passwort für die Netzwerkauthentifizierung ein.
- Wählen Sie den Ordner 'IDVMwareBackup' vom Netzwerkspeicherort aus.
- Wählen Sie die wiederherzustellenden VMs aus und klicken Sie auf 'Jetzt wiederherstellen'.
Das Popup mit den Wiederherstellungseinstellungen wird angezeigt. - Standardmäßig ist 'Vorhandene Maschine' als Wiederherstellungsort ausgewählt. Um eine neue VM zu erstellen, wählen Sie 'Neue Maschine' und geben Sie einen Namen ein.
- Bestätigen Sie das Überschreiben der VMDK-Dateien (VMs bleiben ausgeschaltet). Klicken Sie auf 'Ja'.
Nach Abschluss wird eine Wiederherstellungszusammenfassung angezeigt.
To restore virtual machines from vCenter,
- Sign in to the IDrive 360 desktop application and click 'Restore'.
- Select 'Online Restore', 'Local Restore', or 'IDrive® 360 Express� Restore'.
- Locate and select the 'IDVMwareBackup' folder from your IDrive 360 account or local drive.
Note: If 'Local Restore' is selected, you can choose the required version from the 'Version' list.
- Click 'Restore Now' to restore the IDVMwareBackup folder to your local computer.
- Once the 'IDVMwareBackup' folder is restored, click 'Server Backup'. A slider menu appears.
- Click 'VMware' > 'VMware restore'.
- Select 'vCenter' as the connection type.
- Enter the vCenter IP address, port, username, and password.
- Click 'Connect to vCenter'.
- Locate and select the restored 'IDVMwareBackup' folder.
- Choose the virtual machines to restore.
- From the 'Select the ESXi host for restore' dropdown, choose the required ESXi host.
Note: This dropdown lists all the ESXi hosts connected to the selected vCenter server at the time of restore.
- By default, the 'Existing machine' is selected as the restore location. To create a new VM, select 'New machine' and enter a name.
- Confirm overwrite of VMDK files (VMs remain powered off) and click 'Yes'.
On completion, a restore summary is displayed.
To restore a virtual machine from a network/NAS location to an ESXi host,
- Go to 'Server Backup'. A slider menu will appear.
- Click 'VMware' > 'VMware restore'.
- Enter 'IP address', 'Port', 'Username', 'Password', and click 'Connect to ESXi'.
- Select 'Online Backup', 'Local Backup' or 'IDrive® 360 Express� Backup'.
- Browse the 'IDVMwareBackup'' folder from the network computer (download the 'IDVMwareBackup' folder from your IDrive 360 account or local drive to a network/NAS location.
Note: If 'Local Restore' is selected, you can choose the required version from the latest 30 versions using the 'Version' list.
- Click 'Verify access to network location for restore'. The 'Network Details' popup will appear.
- Enter the UNC path ("\\IP Address or Computer name\dir") of network/NAS location, your username and password for network authentication.
- Select the 'IDVMwareBackup' folder from the network location.
- Select the virtual machines you want to restore and click 'Restore Now'.
The restore settings popup will appear. - By default, the 'Existing machine' is selected as the restore location. To create a new VM in the same location with the selected data, choose 'New machine' and enter a name.
- Click 'OK' to proceed.
- A confirmation popup will appear informing that the VMDK file will be overwritten and the virtual machine will remain powered off during the restore operation. Click 'Yes' to proceed.
On successful completion, a restore summary will be displayed
To restore virtual machines from vCenter,
- Sign in to the IDrive 360 desktop application and click 'Restore'.
- Select 'Online Restore', 'Local Restore', or 'IDrive® 360 Express� Restore'.
- Locate and select the 'IDVMwareBackup' folder from your IDrive 360 account or local drive.
Note: If 'Local Restore' is selected, you can choose the required version from the 'Version' list.
- Click 'Restore Now' to restore the IDVMwareBackup folder to your local computer.
- Once the 'IDVMwareBackup' folder is restored, click 'Server Backup'. A slider menu will appear.
- Click 'VMware' > 'VMware restore'.
- Select 'vCenter' as the connection type.
- Enter the vCenter IP address, port, username, and password.
- Click 'Connect to vCenter'.
- Locate and select the restored 'IDVMwareBackup' folder.
- Choose the virtual machines you want to restore to the vCenter server.
- From the 'Select the ESXi host for restore' dropdown, choose the required ESXi host.
Note: This dropdown lists all the ESXi hosts connected to the selected vCenter server at the time of restore.
- By default, the 'Existing machine' is selected as the restore location. To create a new VM in the same location with the selected data, choose 'New machine' and enter a name for the virtual machine.
- Click 'OK' to proceed.
A confirmation popup will appear informing that the VMDK file will be overwritten and the virtual machine will remain powered off during the restore operation. - Click 'Yes' to proceed.
On successful completion, a restore summary will be displayed.
Kann ich VMware-VMs von einem Netzlaufwerk oder NAS wiederherstellen?
Ja. IDrive 360 ermöglicht die Wiederherstellung von VMware-VMs von einem lokalen Pfad, einschließlich Netzlaufwerken und NAS-Geräten.
So stellen Sie auf dem VMware-Server oder ESXi-Host von einem Netzlaufwerk oder NAS wieder her:
- Gehen Sie in der IDrive 360-Desktop-Anwendung zu 'Server-Backup'. Ein Schiebemenü wird angezeigt.
- Klicken Sie auf 'VMware' > 'VMware wiederherstellen'.
- Geben Sie gültige Anmeldedaten ein und klicken Sie auf 'Mit ESXi verbinden'.
- Navigieren Sie zum Ordner 'IDVMwareBackup' auf Ihrem Netzlaufwerk oder NAS.
- Wählen Sie die wiederherzustellenden VMs aus.
- Klicken Sie auf 'Jetzt wiederherstellen'.
- Im Popup mit den Wiederherstellungseinstellungen:
- Standardmäßig ist 'Vorhandene Maschine' ausgewählt.
- Um eine neue VM zu erstellen, wählen Sie 'Neue Maschine'. - Klicken Sie auf 'OK'.
- Bestätigen Sie die Meldung, dass die VMDK-Datei überschrieben wird und die VM während der Wiederherstellung ausgeschaltet bleibt. Klicken Sie auf Ja.
Nach Abschluss der Wiederherstellung wird eine Zusammenfassung angezeigt.
So stellen Sie VMs von vCenter wieder her:
- Sign in to the IDrive 360 desktop application and click 'Restore'.
- Select 'Online Restore', 'Local Restore', or 'IDrive® 360 Express� Restore'.
- Locate and select the 'IDVMwareBackup' folder from your IDrive 360 account or local drive.
Note: If using 'Local Restore', choose the required version from the 'Version' list.
- Click 'Restore Now' to restore the IDVMwareBackup folder to your local computer.
- Once the 'IDVMwareBackup' folder is restored, click 'Server Backup'. A slider menu will appear.
- Click 'VMware'. The VMware connection screen appears.
- Click 'VMware restore'.
- Select 'vCenter' as the connection type.
- Enter the vCenter IP address, port, username, and password.
- Click 'Connect to vCenter'.
- Locate and select the restored 'IDVMwareBackup' folder.
- Choose the virtual machines to restore.
- From the 'Select the ESXi host for restore' dropdown, choose the required ESXi host.
Note: This dropdown lists all the ESXi hosts connected to the selected vCenter server at the time of restore.
- By default, the 'Existing machine' is selected as the restore location. To create a new VM, choose 'New machine' and enter a name for the virtual machine.
- Click 'OK'.
- A confirmation popup appears, stating that the VMDK file will be overwritten and the virtual machine will remain powered off during the restore process.
- Click 'Yes' to proceed.
On successful completion, a restore summary will be displayed.
Ist für das VMware-Backup ein zusätzliches oder externes Speichervolume erforderlich?
Nein. Ein zusätzliches oder externes Speichervolume ist nicht erforderlich. Stellen Sie jedoch sicher, dass der beim Planen des VMware-Backups ausgewählte temporäre Speicherort über ausreichend Speicherplatz verfügt, um die ausgewählten Daten während des Backup-Vorgangs zu speichern.
Kann ich eine VMDK-Datei aus dem IDrive® 360 VMware-Backup an einen anderen VMware-Server anhängen?
Ja, Sie können eine VMDK-Datei aus dem IDrive 360 VMware-Backup an einen anderen VMware-Server anhängen.
Kann ich die gesicherte VMDK-Datei über den Sphere Client oder das Web Interface hochladen und an VMware ESXi anhängen?
Ja. Sie können die gesicherte VMDK-Datei über den vSphere Client oder das Web Interface in einen ESXi-Datenspeicher hochladen. VMDK-Dateien aus dem IDrive 360 VMware-Backup liegen jedoch üblicherweise im monolithischen Sparse-Format vor, das nicht direkt an eine VM auf ESXi anhängbar ist.
Um sie anhängbar zu machen, müssen Sie die hochgeladene VMDK-Datei mit dem Befehl vmkfstools in ein thin-provisioned oder ESXi-kompatibles Format konvertieren.
Führen Sie folgenden Befehl aus, um die monolithische Sparse-VMDK-Datei zu konvertieren:
vmkfstools - i "Quell-VMDK-Pfad" "Ziel-VMDK-Pfad nach Konvertierung"
Zum Beispiel: vmkfstools -i /vmfs/volumes/datastore1/centos/centos.vmdk" "/vmfs/volumes/datastore1/centos/centosafterconvert.vmdk"
Nach der Konvertierung können Sie die konvertierte VMDK-Datei vom ESXi-Host an eine neue oder vorhandene VM anhängen.